That Number 2 In 3D for Prisoner106

"Number 2 in 3D" Anaglyph-a-GIF by @aforgrave

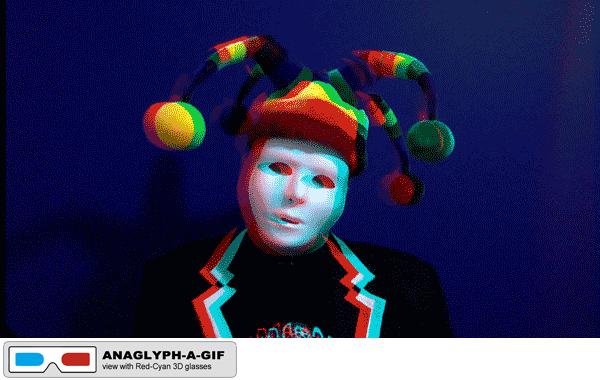
“Number 2 in 3D” Anaglyph-a-GIF by @aforgrave

I was quite taken aback with the introductory video for the #Prisoner106 Week One: Assimilation Week. That getup of that Number 2 (@ds106Number2, on Twitter) was wearing and the odd behaviour Number 2 was displaying jumped right out of the screen and and gave me an immediate dose of that old #ds106 affliction of mine, GIF-eye-tis. Throw in a long absence from making 3D Anaglyphs (something I really got into last summer) and it was time to dust off the old 3D glasses and see if I could remember how I made things happen last year.

As it turns out, I started a series of Tutorials last summer for making Anaglyphs and Anaglyph-a-GIFs (I’m having to refer back to my terms from last summer — the badges are down a ways now in my sidebar)  but it seems I only got as far as the 2nd tutorial of 5. Something called end-of-summer (or August, judging by the date of the last Tutorial) must have gotten in the way. Fortunately, a short bit of experimentation had me back in the saddle and crafting a 3D Anaglyph-a-GIF in no time. The result is up above!

I’ve checked back and see that I was about to embark next on Part 3, which is the real key, the colour separation step.

  • Next: Step 3: Colour Filtering (link to follow)
  • Then: Step 4: Positioning the Layers to Simulate Depth (link to follow)
  • Then: Step 5: Extending the Technique to make an Anaglyph-a-GIF (link to follow)

Since Tutorial posts link separately into the Assignment Bank, I will leave off here and pick up with Part 3  in a subsequent post. I’ve already got some static frames captured from Number 2 to explain the process. Onward with the Learning!

I think this one qualifies for multiple assignments, which is good, as I understand from Number 2 that the electricity to my bungalow in The Village gets shut off if I don’t earn enough Credit Units throughout the week.

I’m tagging it for the following:

Ewww Brain!!! Now in 3D

My DS106 maxim of Reuse, Riff & Recycle has once again resulted in a fun, creative morning project.  Ewww Brain! Now in 3D.

3DGIF_SharkBoy_Lines-fb

Last August,  DS106′s Talky Tina created daily GIF challenges to keep our creative juices flowing while we were waiting for the DS106 Headless ’13 course to begin.

Talky Tina’s DS106 animated GIF challenge August 2013 GIF Challenge #10: Monster Chiller Horror Theatre 3D Style GIF  was to:

…look for a part of a scene in a 3D type movie where the thing comes right out of the screen at you.  Find a way to emphasize the moving of the thing out of the screen and into your face in a GIF.

 Ewww…Brain! was my answer to the challenge taken from a  Sharkboy & Lava Girl- May The Best Dream Win movie clip on YouTube. (Link to original blog post for the ‘how it was made.’) Today while trolling my Twitter home stream a DS106 exchange about how to make a 3D GIF with the use of white lines caught my eye. (See twitter feed below.) The illusion reminded me of John Johnston’s GIFaChrome Layercake technology  that I hadn’t tried yet. I decided to give it a go andd watched the video tutorial recommended by Mariana Funes.

Using the original Photoshop CS5 file from the Talky Tina challenge I created one white (two seemed excessive) mask line.  I’ll be honest.  I’m not sure how I managed to create a layer mask instead of the intended solid white line demonstrated in the video tutorial.  But who’s going to complain? It made things much easier in the Studio B production department this morning.  Lucky me!

Next, all I had to do was erase the portion of the line where the brain was popping out of the screen. Hmmm…. What to do with the brain goo as the brain slides down the screen?  That presented a creative challenge all its own. It looked way cooler if I adjusted the erasing opacity to 50% instead of 100% to enhance the illusion of sliding down a glass surface.  One final visual feature was to use the lasso tool to cut out a brain and have it slide down over the black border of the movie trailer clip.

Looking forward to using this technique in the future.  Below is the Twitter conversation that sparked this project.

Ahhhhhh! The hand! The hand! This is for August Animated GIF…


Ahhhhhh! The hand! The hand!

This is for August Animated GIF challenge #10: Monster Chiller Horror Theatre 3D style GIF. It is also a new animated GIF assignment on ds106. The idea is to find a 3D style movie scene and somehow

find your own way to emphasize the moving of a thing out of the screen and into your face in a GIF.

I found this scene from a 3D Dracula movie trailer on YouTube.

I wanted to try to emphasize the hand moving out of the screen somehow, and came up with the idea of selectively colourizing it. I discovered that if I selected the hand with the lasso, or free select tool, and then inverted the selection (so everything but the hand was selected), then I could go to Colors -> Desaturate, and it would make what was selected b/w (everything but the hand) but not what was unselected (the hand).

I did a few layers that way, but then realized that what would be really cool is if it started off in full colour and gradually went to b/w except for the hand…like the hand was really coming out at you while the background was fading into, well, the background.

So for the layers that would be first in the gif, I kept the first two full colour, and then gradually desaturated the next few: 20%, 40%, 60%, 80%, then one at 90% b/c I wanted another step there. How I did this was to free select around the hand, invert the selection, then use Colors -> Hue-Saturation, and chose the amount of desaturation for each layer. Then the last layers of the gif were full desaturation.

What took the longest, of course, was doing the lasso/free select tool around the hand on each layer. There were a couple of layers where the hand didn’t move very much, so I could keep the selection from one layer and use that for the next layer too, for desaturation purposes. But for most of the layers (12 total, 10 desaturated to some degree) I had to do a new free select around the hand each time.

I actually started off with twice as many layers as I ended up with, and deleted every other layer to end up with half as many. That saved a lot of time, and made the gif file smaller. Desaturating most of the image made the gif file smaller too.

I realized too late that I wanted to have more of the full colour and gradual desaturation layers, so the desaturation was more gradual. But I’d have to re-do all the free selecting to change the saturation level on any of the layers. So instead I just slowed down the first few layers by putting the time in milliseconds I wanted them to last after the layer name (e.g., “full colour (300 ms)”). Then when I exported as a GIF, I chose something like 200 ms for all the layers that weren’t otherwise specified for length. The first few layers go a bit slower than the last ones that way. It’s not quite the effect I wanted, but it’s close. If I were to do it over again I’d have more full colour layers, and do the desaturation more gradually, over more layers, with just a couple at the end fully desaturated.

Finally, I used a new trick I learned from Alan Levine’s comment on my last post, as well as Talky Tina’s reply on Twitter: dithering. When I was done with the layers, I went to Image -> Mode -> Indexed (because GIFs get indexed when exported anyway), and chose the fullest number of possible colours (256 for a GIF) and clicked the check box for dithering. I played around with several dithering options, and just used the first, which is called “Floyd-Steinberg (normal).” And I didn’t get the colour banding I’ve been getting on my other GIFs! Sure, the quality isn’t perfect, but it’s an animated GIF, after all.

I had a lot of fun with this one, even if it took me awhile to finish because of the hand lassoing of most of the layers!

And I think my favourite part is that—ha ha!—Dracula never gets to grab the woman. He keeps trying and trying and he never does it. A nice twist on the fact that these horror creatures continually attack women. Not this time. In your FACE Dracula!

Monster Chiller Horror Theatre 3D GIF

Scary stuff, kids! Find a great little snippet from a 3D-style film where something comes out of the screen and towards your in the audience, and make it into a GIF. Consider looking at the fine work of Dr. Tongue and Bruno in their ground-breaking 3D films on SCTV‘s Count Floyd‘s Monster Chiller Horror Theatre (find their classic releases on YouTube), but don’t restrict yourself to their body of work!

Make sure, Friends, that you don’t put your eye out, and don’t put out the eyes of your GIF viewers, either! That would NOT be fun. But DO make a GIF, bub!