Making a Cinema Mosaic…Frozen Themed

For one of my weekly assignments, I decided that I would challenge myself by completing a five-star assignment that took more time and energy. I decided to go with making a cinema mosaic so that I could learn how to layer and add more aspects to my GIFs. I started by making my nine GIFs on GIPHY. Then I transported them into KAPWING. I searched on Google sites to make grided and layered GIFs and this was one of the options that came up. I uploaded all of the GIFs into this site and then went to work lining them up. The only downside is that it would only let me make this much content into one minute for free. My mosaic was based on Frozen, which is one of my favorite movies ever. I enjoy both frozen 1 and 2, so I used some of the highlights from Frozen 2 to share a bit of the story. Hope you enjoy it!

And… come to find out I could not embed my mosaic into WordPress, so I placed it on YouTube. I have also attached a link to the actual GIF!

(5 stars)

https://kapwi.ng/c/EkCfxXa3-O

GIF Mosaic

via GIPHY

GIF of me throwing: Shot Put, Discus, Hammer, Javelin, & Weight Throw

This design assignment was supposed to be about a movie poster but I wanted to make it more personal so I changed it a tad. Since I am Mr. UMW, I used videos of me throwing for the UMW Track Team rather than a movie.

I initially uploaded nine videos to GIPHY and then edited them down to 4 seconds long to transform them into a GIF. Once I had the GIFs I downloaded them to my phone and used an app called Cinepic. But I wasn’t done yet. The app only makes everything into a video so I had to upload my GIF Mosaic to GIPHY again and transform it into a GIF. This one took me all day to try and find the right tools. Now that I know what to do I can easily make another one in no time.

Photoshop Gone Rogue

For this assignment the task was to create an animated mosaic about a movie using a single image that then splits up into a grid of 9 different animated GIF images of various scenes in the movie.

My inspiration for this was from the Jaws example on the assignment page and from my last mashup assignment which was Star Wars Rogue One related. Differing to the Jaws example I had thought that the mosaic would be more easily created if it was using a landscape still image for the start as the GIF animations would be landscape orientated shots from the movie. During the thought process for this I also took inspiration from the Jaws example in that the GIF animations would appear momentarily one after another rather than at the same time.

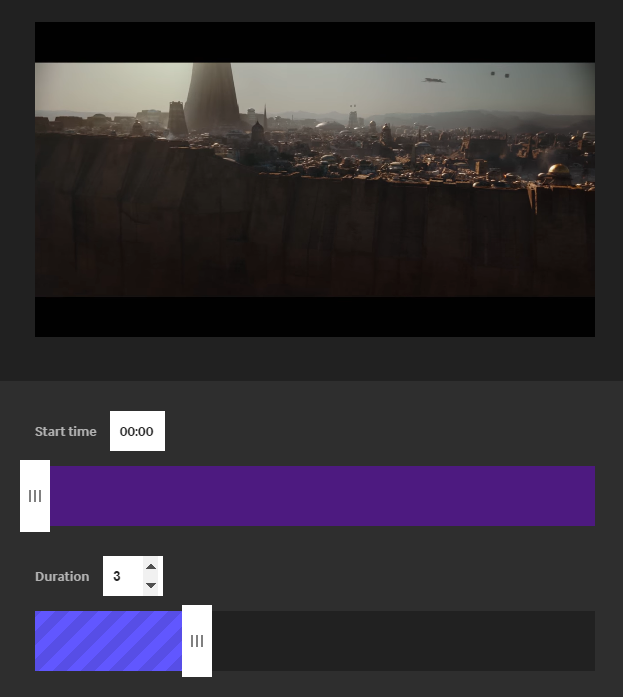
To make this Star Wars Rogue One GIF mosaic I first sourced the starting still image of from this website. I then set about souring the 9  GIF images using the Rogue One Trailer 1 and Trailer 2. I copied this links to these videos and then using GIPHY as seen below specified the start points and duration of the animation which would make the selected part of the video as a GIF image which I could then download.

capture

After I then had all of the images I then set about compiling them together to create the final product. I first attempted to use Adobe Photoshop since this allows the editing of GIFs in Timeline View however this didn’t work out in the end as inserting more than one GIF created  quite a few problems since Photoshop works by making each GIF frame a different layer in the project file. This resulted in hundreds of layers for only a couple of GIFs and meant that to position a GIF each every layer would have to be moved manually since only one layer (frame) is made visible at a time. Another issue was that the background still image layer would have to be manually toggled to visible for every frame in the animation. Some of these Photoshop issues can be seen in screenshot below:

Capture4.PNG

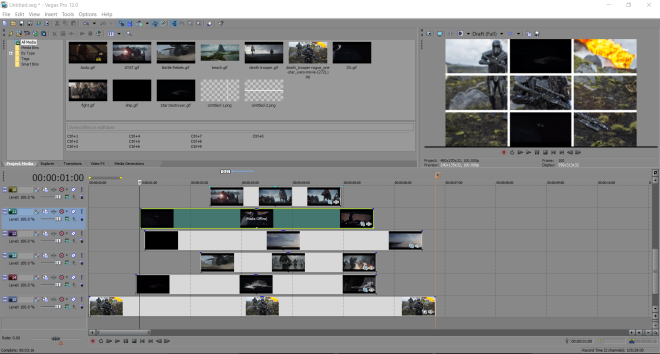
I then decided to move to Sony Vegas instead to compile the animated GIF images with the still image. After importing them into a project file the still image was inserted on the first track on the timeline and then the GIF images inserted on the 9 layers above so they would be overlaid on top of the image. Theses were positioned on the timeline at various points after 1 second of still image to create the simultaneous appearing transitions and the crop tool used to position them in a 9×9 grid. After this white rectangles were created using Photoshop and overlaid to create the outline grid which would mask any gaps in the GIF cropping and be present on the screen at all times like in the assignment example.

Below you can see the Sony Vegas project file with some of the tracks visible on the timeline:

Capture2.PNG

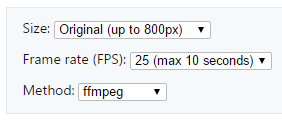
To then make this into a GIF animated image this Sony Vegas project was then rendered as an MP4 video (since Vegas does not allow exporting in GIF file format). This video was uploaded to this website which can be used to convert video files to animated GIF images. Using this online tool the options  as seen in the image below were selected to make sure the animated image plays smoothly in real time and that it is the highest quality possible. I also did re-render and re-convert the video once during the process to cut down on the still image timing at the start of the animation as originally it took too long before the GIF animations appeared.Capture3.PNG

The finished animated GIF mosaic can be seen below:gif-assignment

I think the finished animated mosaic is quite an eye-catching way to view scenes of a movie and definitely takes a couple of loops to view all of the different GIFs that make up the grid.

Don’t Put Baby In A Corner

http://beyernatalie.tumblr.com/post/146720399754

I’ve put multiple ways/links to view my cinema mosaic because WordPress won’t let me insert it into my blog post :(

This assignment was a lot more challenging than any other work I’ve done for DS106 so far. However, it was nice in how it was like a puzzle, making me really have to think about how I was going to make it happen.

I recently revisited Dirty Dancing, one of my favorite movies, and I knew it was perfect to do a cinema mosaic of. There is so many good scenes and moments in this film. Not only that, but this movie also deals with a lot of serious issues so it is not only a surface-level feel good movie. I love everything about this movie from the dance numbers to the actors to just the characters themselves!

Okay, so this is how I made this, the easy way (trust me I tried 10 different ways). I researched some apps that allowed video collages and not simply picture collages. I found Cinepic and downloaded it. Then I downloaded a couple of my favorite scenes from Dirty Dancing via YouTube and inserted them into iMovie. I cut the videos into shorter segments and exported them from iMovie into Cinepic. I placed the movie poster as my main still frame and then added the short video clips into the 3×3 grid. This app exports your media as a movie file so then I went to Giphy and converted it into a gif.

Even though, it took a considerable amount of time, I enjoyed the process of this assignment. I think it really expanded my skills in editing and gif making. Since I tried it the hard way at first (that did not give me clean even gifs) I forced myself to learn new tools in: GIMP, Giphy, iMovie and ezgif (which cuts and crops gifs if you need that capability in the future!). With everything considered, I think I did a pretty good job, the gif looks great and I learned so much!

Assignment Rating:

Unknown

Cinema Mosaic

Pick a film and create an animated mosaic from a single image (like a poster) or gif (a single moment). Divide that image into a grid – 3 x 3 for a total of nine images. For each portion of the grid add a different moment of the film into a new gif. Tile the new gifs together in a mosaic (tumblr does this well). The resulting set of gifs should alternate between the single image and the various moments.

Inspired by Jet Studio’s Cinema Mosaic Tumblr.