Portrait of a Living Room

This collage is made up of photos taken one step apart from each other walking into my living room. The main design principal I tried to stick to was the rule of thirds, but much of that was lost in the collage by virtue of what free collage templates are available for ten photos. I’ve included the original photos below for better exhibition.

These photos give a pretty good idea of the room, as well as a bit about the people who use it. It was at first difficult to find different things to photograph each step, but I think I found something visually interesting each time. The color pallet was limited for most of the photos, but there were a few pops of color, and the light sources brightened up largely dull backgrounds.

and i would walk 500 miles

The goal of this (3 star, visual) assignment was to walk around taking a photo every 10 steps, and then make a collage out of the photos you got. I took a little ~creative license~ with the regulations (i.e. 10 steps is not very many so sometimes it was more like 12-13) but ds106 is all about creativity so I think it’s valid! This assignment was a really really fun one because it forced me to think outside the box- because 10 steps is not a lot and I wasn’t trying to take the same photo 10 times. I’m not vibing with putting all of the individual photos in here, so I’m just going to stick with the collage- which has all the photos in it so its fine! et voila!

This looks really really cool and I’m high key ridiculously proud of it! I’m really happy with how all the colors look, and I think the collage as a whole came together tremendously well! I mostly just took normal photos, but did ~spice it up~ for a few photos. I used flash for the gold heart photo in an attempt to show how shiny it was, which I sort of accomplished. The flash also had the side effect of making the background floor look all dark and cool. I also used flash for the photo with the drain thing (bottom left) and, combined with the forced perspective to make it look big, and ended up with a really neat secret tunnel type vibe which I’m super proud of.

I’m kind of upset that I couldn’t get the suspended rock photo (leftmost center) to focus, but I will admit that the blurriness is kind of a cool vibe, even if it doesn’t really mesh with the clear cut style of the rest of photos.

Out of all of the photos I took, I think my favorite is the one all the way left with the abundance of rocks. Something about all the colors and shapes just really ~speaks to me~. Closely behind it is my drain tunnel pic. My least favorite is the photo of the staircase from above. Its a little off center on all sides which makes it look just the slightest bit ~bad~, and the staircase just looks kind of dirty, which is unideal on all accounts.

In order to actually create this assignment, I took my starting point (the door with the golden hearts), took my photo, and then took about 10 steps to the fire alarm, took a photo, rinse and repeat about 8 times/until I ran out of interesting things to photograph. Then I went to this website and chose a layout and added photos! and voila! a lovely little collage!

keep moving forward! -liz

keep moving forward teen titans GIF

important ps: thoughts and feelings on this movie?

See the World in 10 Steps

The instructions for the “10-Step Photo Challenge” were to “Take ten steps in any direction and with each step take one photo. Think about angles and lighting to create interesting photographs. Don’t forget the Rule of Thirds! Create a collage in a photo editor.”

This assignment was a little harder to do than I thought it would be, because I picked a pretty boring place to do it. I didn’t want a lot of people to see me taking pictures of random things every 10 steps! So I picked a spot out of public view.

I tried to take pictures of lots of things from different angles, keeping in mind the different aspects of photography and storytelling. Once I took enough pictures, I used this site to create the collage.

Can anyone guess where I was?

Snap per Step

This week I took on the 10-Step photo challenge while walking to class. For this challenge, I took 10 steps and each time I took a step, I snapped a picture in different directions at different angles.

Snap per Step

This week I took on the 10-Step photo challenge while walking to class. For this challenge, I took 10 steps and each time I took a step, I snapped a picture in different directions at different angles. Although this challenge was fairly simple, there were a few challenges that came along with it. One of the challenges was trying to find a different focus or view point each time I took a step. I wanted my pictures to capture different views of things around the building so while taking the picture there were times where I had to crotch down low or turn my body somehow to get a different view. While doing this challenge I also had to make sure that I wasn’t in other people’s way. To ensure this, I waited until most areas were clear.

As I’ve stated before in a previous post (mentioned down below), all of my classes take place in Trinkle Hall so my pictures capture some of the things I see every day while I’m in the building.

In this photo collage you will see the main foyer area of the building that you enter when you walk into the building from the main door. You will also see a photo of the main hallway that I walk through. Some days I walk through that hall and I’m cheerful and happy but there are also times that I walk through the hall feeling gloomy thinking about all the assignments that I have to do in such a short period of time. In that hallway is also the information board and the Trinkle Library where I spend a lot of my time working on homework or waiting for other classes to start.

To complete this assignment, I used the camera on my phone to take the pictures. I then used the edit option in photos to change/enhance the color in some of the photos. I used a Layout app that allowed me to create photo collages. The app only allows you to upload 9 photos to a collage. To make sure I used all 10 of my photos, I created a small collage with 3 of the photos. After saving that collage as a photo, I was able to use it as one of my pictures and then I was able to include the other 7. Once the photos were displayed in the layout, I was able to pick a design layout, format the pictures the way I wanted, and crop the pictures where needed. Overall this challenge didn’t take much time to complete. The thing that took the most time was getting the pictures but once I had that, creating the collage took about 5-10 minutes.

Below is a link to the original assignment.

http://assignments.ds106.us/assignments/10-step-photo-challenge/

10-Step Photo Challenge

Fidget Spinner and I went for a walk, we took our 10-steps outside of the house towards the corner of the block. I took photos of the fidget spinner in all different directions, facing all different places. I then took the photos and placed them in my photo collage app in all different angles and sizes, so that they could fit in it.

10 Step Collage

The full assignment is linked and listed in its entirety below:

Take ten steps in any direction and with each step take one photo. Think about angles and lighting to create interesting photographs. Don’t forget the Rule of Thirds! Create a collage in a photo editor.

This assignment is worth 3 stars.

The first step in this assignment was to complete the photo challenge. To go along with my theme of my final project and my character of a college student, I did the photo challenge as 10 steps out of the HCC. All of the photos were taken using my iPhone and then uploaded to my computer. Next, I went to Picmonkey.com and clicked collage on the top right of the menu bar.

Screen Shot 2016-07-21 at 2.17.17 PM

Screen Shot 2016-07-21 at 2.06.26 PM

I chose from the many options of collages offered on the site and picked on that had 10 image slots for my photo challenge. Collages can be found on the left sidebar.

Screen Shot 2016-07-21 at 2.06.40 PM

Screen Shot 2016-07-21 at 2.06.12 PM

I uploaded the images from my computer and then dragged them into my collage. Editing the pictures in the collage was done by clicking on the image and then clicking the edit button in the top left corner of the image.

Screen Shot 2016-07-21 at 2.07.24 PM

After all of the images were in place, I wanted to make the outline framing thinner to fully show the images I had taken. This was done by changing the level of the spacing in the background tab on the left menu bar.

10 images

I saved my final draft to my computer from the website.

10-Step Photo Challenge

For this challenge I had to take 10 steps while taking one picture each step. I organized my pictures into a collage. Here it is!

http://assignments.ds106.us/assignments/10-step-photo-challenge/

image

Up, down, all around

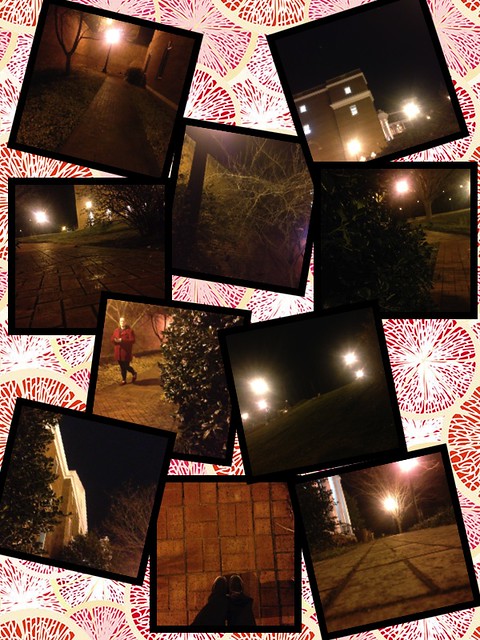
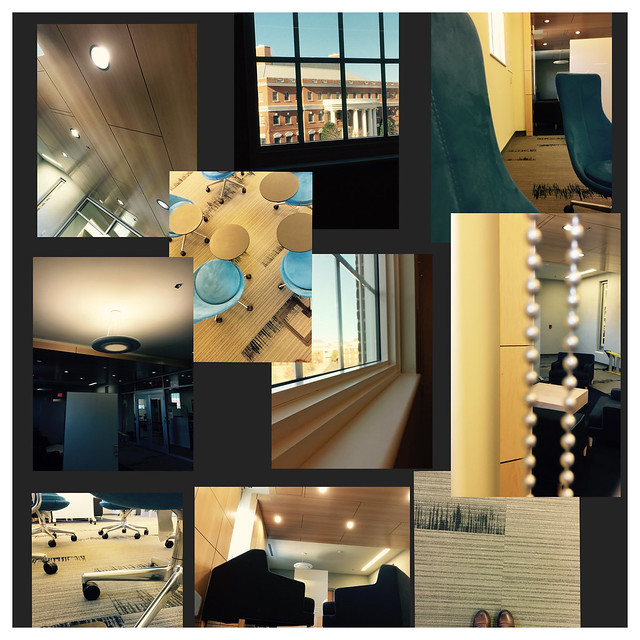
10 Step Photo Challenge (3 stars)

Take ten steps in any direction and with each step take one photo. Think about angles and lighting to create interesting photographs. Don’t forget the Rule of Thirds! Create a collage in a photo editor.

Story Behind the Story:

After reviewing the material on photography at the beginning of this week, I knew I wanted to do at least one visual assignment that incorporated my “fabulous” photography skills. This 10 step photo challenge seemed simple and interesting. That is until I actually started it. The first couple of times, I would forget that I wasn’t allowed to just wander around taking pictures. I had to get used to the idea of taking a step and figuring out what was different from the spot a foot behind me. It was hard. Honestly, I don’t like the first couple of photos. I don’t think I had let my creative instinct take over because I was still awkwardly trying to figure out the step then photo, step then photo dynamic. I struggled for the first couple of steps. How am I supposed to make the new, highly modern, open, simple layout of the ITCC interesting. I guess I just wanted to challenge myself? (Or avoid standing out in the freezing weather).

Each step I took, I would cement my feet to the ground and look around. I had no idea what I was looking at. Then I thought back to the videos and readings about photography. I started thinking about what wasn’t there versus what was and focusing on one interesting detail. About half way through, I started crouching, holding my phone as far above my head as possible, twisting to make something look different than it actually was, and using the focus to heighten or lesson the aspects of the picture. By the end, I felt like I had captured a section of the ITCC center in the most unique way (that may be an exaggeration, but there were a couple of pictures I was extremely proud of).

I learned that is was less about what was right in front of my face and more about seeing something from a different perspective. I turned part of the ITCC into a complex atmosphere.

I will admit that I wanted to start all over after I had the 10 pictures, but first off I was concerned that I wouldn’t capture some of my favorites the same way, and secondly, I think my “failures” and progress throughout the 10 steps really made the assignment more effective. I can’t just assume a photo is going to be creative; I have to make it into something different. We see these objects everyday, so how can I make them different or exciting? That is what this assignment taught me.

Work Itself:

10 Steps


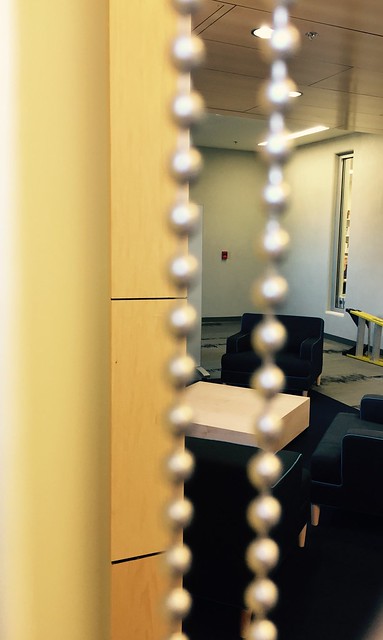
This picture below is by far my favorite of the 10 step photo challenge. I stared at the window for what felt like forever trying to figure out a way to make it different than the last photo I had taken. Finally, I saw the pulley that works the blinds and just started taking pictures of it, once again hoping it would look creative. Without me even thinking about it, it started to lose focus, and I began to get annoyed that I couldn’t get the subject. Eventually, I actually looked at the picture and saw the contrast of the background.

I absolutely love this picture, and I am so proud of it. And to think, it is just a picture of a chair, table and half a ladder. Just goes to show you what a photo can do.

What do you see in 10 steps?

Narrate the Process:

I spent some time trying to find a place that would yield creative pictures and angles, but eventually, I just started in a random place. I think that is the best way to handle this assignment. It makes you look around you instead of already working with a creative atmosphere.

You cannot just take a step and click. Each time I took a step, I looked around, thought about it, became frustrated, and then eventually altered my perspective. It teaches you about turning something simple into something complex. That is why I would say pick a challenging location because it takes you away from comfort and ease.

10 Pictures in 10 Steps

10 Step Photo Challenge- 3 pts

Challenge: Take 10 steps and a picture at each step, use different angles and directions. Create a collage out of the pictures.

This photos were taken around Arrington, while my roommate and I went out for a walk. I thought it would be the perfect time to get this assignment done. Here is the result of the photo-shoot.

10 pictures in 10 steps