pumpkins, pooh bear, photoshop.

My three visual assignments this week took me a LONG time, but they were so worth it! I’m very happy with the results.


Image with a Message

1 star


pooh bear!

I have always had a love for quotes. Maybe it’s my passion for writing or my strive for optimism and inspiration, but I can remember being as young as 11 and handwriting quotes to cut out and decorate my bedroom door. One of my favorite quotes that I’ve ever heard (and I first heard it many years ago) is from the movie Pooh’s Grand Adventure.

I was obsessed with Pooh Bear when I was a kid, and this movie was one of my favorites. A quick summary: Pooh Bear is upset, because Christopher Robin says he won’t be able to come visit the 100 Acre Wood as much as he has been recently. He won’t tell Pooh Bear the reason for his schedule change (turns out, they find a note that says he’s left for “SKOOL,” which Owl–in his infinite wisdom–misreads as “SKULL,” leading the gang on a terrifying adventure to the dark parts of the 100 Acre Wood).

When Pooh expresses his sadness, Christopher Robin gives him a hug and assures him the following:

“You’re braver than you believe, stronger than you seem, and smarter than you think.”

With its alliteration and sheer sweetness, I’ve always kept that quote close to my heart in times of trouble; we are so much more capable than we believe ourselves to be, and we should start giving ourselves credit for all the wonderful things we accomplish.

I found an adorable Creative Commons picture of this crocheted Pooh Bear doll and simply added text via the Paintbrush app for Mac. I chose the handwritten font to add to the fun, airy feel.


Apophenia

3.5 stars


Halloween!

I’M REALLY EXCITED FOR HALLOWEEN, YOU GUYS.

Like you saw in last week’s summary, I have decorative pumpkins, so I thought: why not create my own spooky pumpkin patch in the woods? I combined one of my favorite seasons with one of my favorite holidays (there’s something nostalgic and wonderfully eerie about autumn) by uploading the picture I snapped on my phone of three pumpkins into the aforementioned Paintbrush app.

Then, I let my inner elementary school student run free with the spray can, shapes, and paint tools to create this scene. Note the peering owl eyes from the tree trunk–essential to any Halloween scene.


HISTORICAL SELFIES

3.5 stars


This took the longest out of the three visual assignments, but it was a helpful process to learn more about photo editing and produced an exciting result!

My favorite Golden Age Hollywood actress and one of my beauty inspirations is Marilyn Monroe. I love her wit, charm, and how she’s come to stand as a role model for curvaceous women.

I also really love James Dean: sexy bad boy with intelligence and a good heart deep down.

I’m sure many of you have seen this image around the Internet or decorating 1950s-era diners:

This is an incredible drawing of the two classic stars of American cinema, sex appeal, and popular culture, but before I started researching Marilyn and her life, I actually thought she and James Dean were involved thanks to this image, and that got my romantic, cheesy heart soaring.

Unfortunately, they were not.

According to memoirs, they met once or twice but never became serious. Despite this revelation, I still think they would have made an adorable couple, and I love to see art and pieces dedicated to the two of them today.

The above historical selfie is my contribution to the James/Marilyn collection.

Since I don’t have Photoshop on my personal computer, I was able to do some quick Google-ing and found an awesome online editor that does nearly the same things Photoshop does. The final product doesn’t look quite as seamless as it would have if I had used Photoshop, but it works.

It took a lot of tinkering with layers, erasing, and blending–and before all that actually FINDING two pics with similar lighting to edit–but this was the result.

A tutorial for this would be far too dense for this post, so I suggest you hop on over to YouTube and watch some Photoshop tutorials OR check out the Digital Teaching and Technology Center in the ITCC. They can show you the basics, there.

I decided Marilyn is totally BFFs with Audrey Hepburn in this universe, so Audrey snapped a pic of her bestie with her man being all cute and lazy on a rainy Sunday morning, and Marilyn then posted it on Instagram. Not technically a selfie, but that’s a minor detail.

Also, notice the amount of likes, because you know modern Marilyn would absolutely be Instagram famous.


Bucket Apophenia! (3 stars ish)

So while brushing my teeth earlier today, I noticed that there was bucket with a nozzle sticking out of it in our bathroom. I proceeded to take a picture of it because I thought of some clever and funny ways to interpret the bucket based on our assignment, Aphenia.

The application I used to edit these photos is google drawings, which allowed me to upload the screenshot and proceeded to allow me to draw whatever I please on that image. My first idea was to draw a face with a disgusted expression on the bucket itself while also (attempting) to draw vomit coming out of the nozzle. Here is the result:

Screen Shot 2014-09-28 at 7.46.36 PM

The second idea was that I could flip the bucket a full 180 degrees to make it upside down and put it on a lego head and make it like a bucket hat (since that seems to be a popular fashion trend these days). Lego heads are always awesome with whatever you equip them with. This is the result:

Screen Shot 2014-09-28 at 8.07.40 PM

Overall, I thought the pictures came out well enough for me liking, although of course they’re not professionally done because I like the skill and necessary software for that. This assignment really showed me to use my surroundings and create something cool and funny out of them.

Apophenia (3 stars)

This one was tricky…no doubt! Once I found the stuff and made the first two objects the brainstorming started happening and I created a lot! All of what I did I tried to keep simple and use the exact same things that I used in all the others which was a challenge but it made it more fun.

2014-09-28 10.51.40


First up: A person! Using scissors, an icebreakers can, candles, two random black rubber stoppers, and a plastic lid I made a person with a hat!

2014-09-28 10.50.45

Second: A snail! With all the same objects as before just placed differently I was able to make a snail :)


2014-09-28 10.44.57

This is a bumble bee. The blade of the scissors is the stinger and the candles make up the wings while the lid is the body and the tin is the head!


2014-09-28 10.43.06

This is probably my favorite one…A CAT! Going from a person to a snail to a cat is crazy with the exact same objects! And I think this one is the one that you can tell the intent of the most.

2014-09-28 10.41.10Crazy hair bird! Keeping with the whole animal and person theme I used the candles as the crazy back of head hair and the round objects stacked up nicely to make a head! With the blades being the beak!

2014-09-28 10.42.06


This is probably the least noticeable object, it is supposed to be a flower! The blade is the stem while the rubber stoppers are the seeds and the candles are the petals and the round objects act as the core/center.   2014-09-28 10.40.35

Last but not least, another person…BUT this one is holding a ball to show action! This was one of the harder visual assignments but it was fun once I got the hang of it!

Coke Apophenia

So today while eating lunch I was drinking a can of coke. I was struggling to think of ideas for the visual assignments for this week. Then I looked at the required visual assignment for the week, Apophenia and decided that my coke can should be utilized in the assignment. So I started out by taking a picture of my can and began thinking of ideas for how to make it look different.

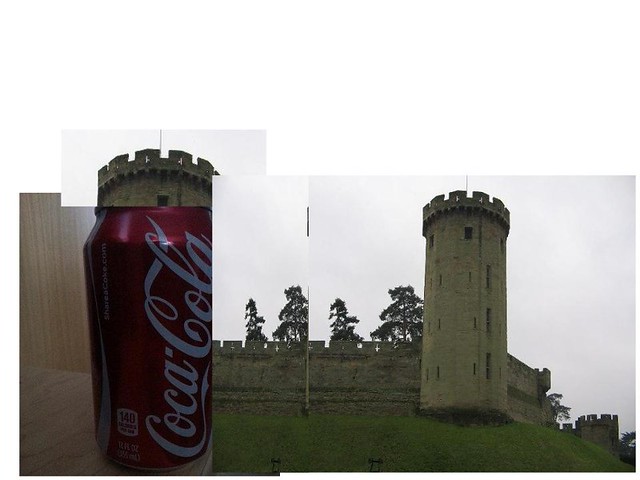
I started out by opening google docs and inserting my photo of the coke can into a new drawing document. I had an idea immediately. I wanted to make my coke can look like the tower of a castle. So next I started looking up images of castles and once I found one that worked I added that into the document. I cropped the top of a tower and put that on top of the can. I also made pasted a wall in to connect the can to the other tower, and the results are down below.

Coke castle

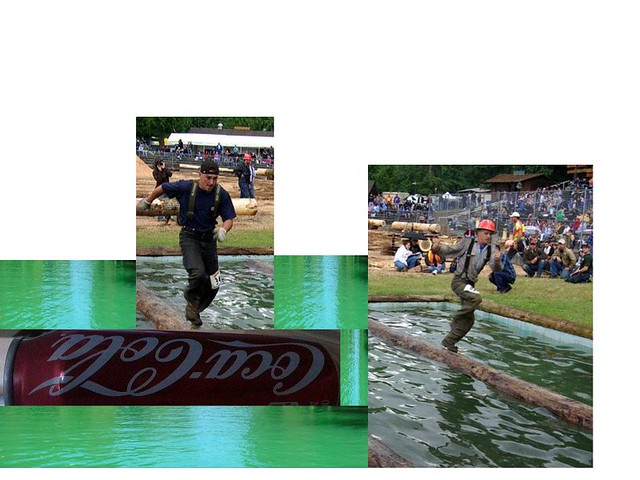
Next I had to think of another idea. This I had a harder time with, but I started out the process the exact same way by putting the coke can in a new drawing document in google docs. Eventually the idea of those lumber jacks who run on logs came to me. So I decided to try and make that a reality. I started out by rotating the coke can image sideways so that it would like the man was running on the can. I looked images of people running on logs. Then I place a man on top of the can and had a second man running on a log next to him so that people would be sure what my photo was about. Then I cropped in water around the can so that it would look like he was actually surrounded by water. The results are below.

Lumber Jacks

I think they can came out well, definitely not professionally done but I think they look pretty good. Its funny that the whole assignment started out with me just having a coke with my lunch today. This assignment really showed me that you can do a lot with anything you find around you.

Mr. Sun Tan Lotion

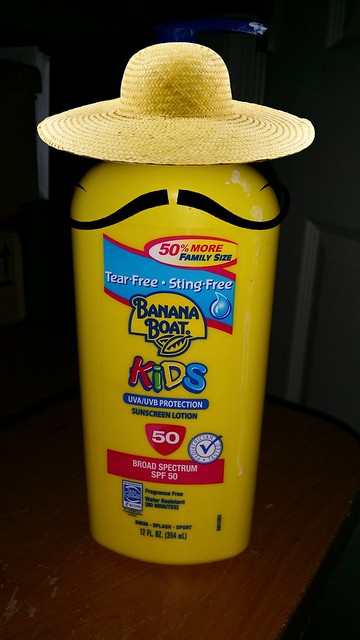
This particular assignment called for the use of everyday items.   Thus this assignment being worth three and a half stars.  I used my Samsung Galaxy phone to take a picture of my children’s sun tan lotion bottle.   Despite these visual assignments I do not have access to Photoshop.   Therefore I utilized a picture editing tool from the website PicMonkey which allowed me to add items to my inanimate object such as a hate and a mustache thus resulting in “Mr. Sun Tan Lotion.”


Mr. Sun Tan lotion

In terms of the creative process, I didn’t want to overdue it with the lotion bottle.  I decided to only add two items of the hat and facial hair because those two items alone personified the bottle of sun tan lotion enough for me to consider it more life like than what it had originally looked like before.

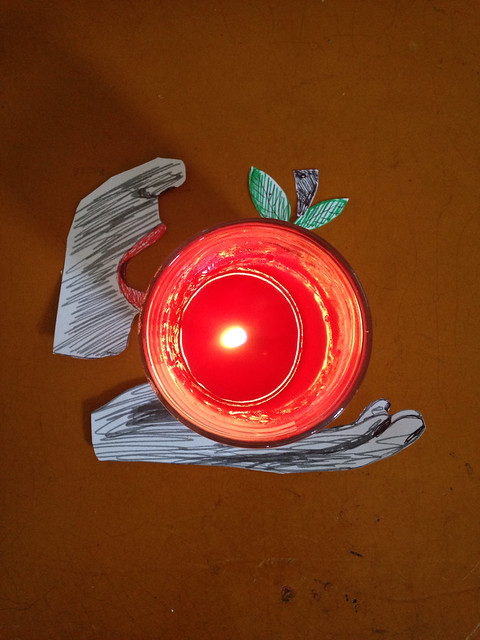
Apophenia (Candle)

Assignment: Find something in your house. Take a picture. Let your imagination churn. Make as many different augmented versions as you can think of. Help others see what’s in your head. (3.5 Stars)

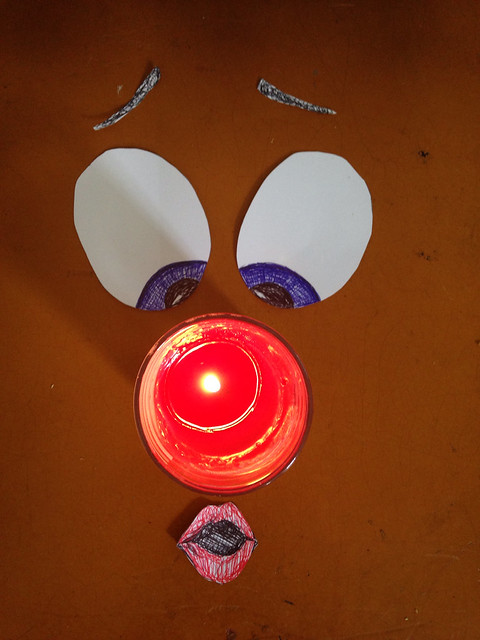
This mandatory assignment intimidated me because I don’t feel like I’m very creative, and this certainly requires a lot of imagination. While I was sitting, trying to decide what object to use, I decided to just go with my candle, and ended up having a lot of fun with it. These drawings took a lot of work, but it was cool to see the final products. I didn’t edit these photos, I just cut out the pieces I wanted, placed them around the candle according to what looked best from the camera, took photos and then uploaded them to Flickr.

Photo 1: Nose on Fire

Apophenia 1: Nose on Fire

Photo 2: Biting An Apple

Apophenia 2: Biting An Apple

Apophenia (3.5 Stars)

This assignment was very fun and interesting for me. However, starting out it was very difficult to figure out what object I wanted to use and how I wanted to use it. After looking around for about 30 minutes I finally found a toothpick, and I was able to think of the first picture that I wanted to draw. After drawing the first picture, it became easy to think of a couple more pictures that would work. Another challenged that I faced was, because the toothpick was white, I could not draw my pictures on white paper. So I had to go dig up some color construction paper in order to make my drawings work. After I found the materials I needed it was just drawing out the images I wanted. The drawings I created I think are very simple, but they do show the different ways the toothpick can be used.

toothpick

When I was in middle school, I was into music and I use to play the guitar. When my friends came over to my house we would play together. I would take lessons at a local music shop in Fredericksburg along with my sister, who played the drums. We also did small concerts together that the music store hosted. So when I saw this toothpick the first thing that came to my mind was a man with spiked hair with his guitar.

15189299930_1e8aec9e9c


My second drawing does not come from any personal story of my childhood. When I was really young like any boy, we were all into soldier action figures. I remember I use to play with small toy soldiers all the time and have different little battles. So the next picture that I made is just a soldier pointing and firing his gun. soldier

My last drawing was inspired by, a hobby I had when I was younger. My dad and I used to mountain bike, we would ride for fun on different trails and we would also compete in races. As I got older, I began to get into road biking. However, one thing that did not change is every summer we would watch the Tour de France which is the largest road biking event in the world. No matter what we would always sit down and watch each stage of the race together. In some of the races, the riders would wear these long aerodynamic helmets to help improve their speed especially in the wind.

Cycle


The Process

The first step of this assignment, was to find an object in my room that I could use to draw different images with. After I found the object I wanted to use, I began to draw the pictures.

The second step, was I took pictures of the drawings with my phone. I took the photos I took and sent them to my email through text messages.

iphone

The next step, was I logged in to my email and opened up the messages that I sent through my phone. Then I would right-click on the image and then click “Save as…” email tutorial

Once I clicked save as, all I had to do was type a name I wanted to save it under and I put it in the “pictures” section of my Media Library, and it would be saved into my computer files.

email tutorial

Lastly to upload it to my blog, I got into the post I want the picture to be shown in and click on “Add Media.” Then I click on the tab “Upload Files” and then click select files. After that I scrolled through my picture library until I found image and then I clicked on it. After that it was posted in my blog’s media files, then I find the picture there and find the blue button on the bottom of the screen that says “Insert Into Post” and it should upload into the post.


Apophenia

I found this assignment (3 1/2 stars) to be the most difficult. It wasn’t the assignment that drove me crazy, it was finding the right object to use. I eventually decided on using these colored shot glasses that were just sitting in a box in my room. But now the real challenge was, “How am I going to get creative with this”?

Since I have not installed Photoshop on my Macbook yet, it kind of prevented me from creating some fun and crazy ideas with this object. I decided to mix it up, using drawings and other objects to create different themes. Don’t expect to be blown off your feet, the following images are amateur and basic.

I thought with the right angle, I could make it look a trash can/bin of some sort. But I needed to take it a step further and make it look as if trash is really in there. So I grabbed some old receipts, ripped them up in tiny pieces, and crumbled them up. Obviously, I placed them in the trash can and Voila!

IMG_4218Next up, was a simple drawing of an unknown character. I placed the shot glasses to resemble bulging eyes of some sort. Now that I look at it, it kind of reminds me of a goofy, evil villain. Not too much thought went into this, I just started drawing around the objects, and this was the outcome.

IMG_4219

So I found this stuffed animal of a baby monkey with his mother. Decided to use the shot glass as a party hat for the young one. It could have been celebrating a birthday or not. It’s all in the imagination (I’m just making this up as I go along).

IMG_4220

Finally, I was trying to think of one more example I could use with this object. When I flipped them vertically, I got the image in my head that these king of resembles teepee’s (spellcheck?). With the best of my ability, I drew some lines at the top of each teepee that is supposed to be twigs to hold up the little fort.

IMG_4221

Apophenia with my waffles

Apophenia 3.5 stars

For this assignment, we were instructed to take a normal, every day object and turn it into something else. I actually put off doing this assignment because I really didn’t want to do it. Something about the idea of it just didn’t jive with me, and it didn’t seem as appealing as some of the other projects.

I made two different images for this, both featuring my breakfast: Mrs. Aunt Jemima and a Waffle Bee.

I’m pretty handy with graphic design, but when it comes to this area of design all skill eludes me and I am reduced to drawing kindergarten level pictures.
unnamed (2) unnamed (3)

To create these images, I downloaded a free app on my phone called “You Doodle” which allows you to take photos and draw directly in top of them. I found this to be the easiest way to complete the assignment.

I sat down after breakfast to work on my assignment, and was trying to think of something to take a photo of when my waffles jumped out at me. They really looked like little wings to me, so I decided to turn them into a bee. I think that one is actually the cuter of the two images. Then I glanced at the Aunt Jemima bottle. I’ve always thought that it kind of looks like a woman, and the handle looks like an arm on the hip. So i decided to give her an extra arm, an apron, and some hair. She looks like a stern mom telling me to stop playing with my food.

Apophenia

This assignment was defiantly a struggle for me. I am not super artistic or creative so just finding something that I could create others things out of was a big enough struggle in itself. I finally decided on a vitamin cap, because it was simple and since I don’t have a lot of artistic skills it was something that I could think of other things to draw with it, that would not be really complex.

Although my pictures are very simple there is a reason behind all of them.

For the snowman I used the bottle cap for his head. I drew on it with an expo marker so that I could easily erase it to turn it into something else. I choose to draw a snowman because anyone who knows me knows that I love Frozen and the first thing I think of is Olaf, the funny snowman in the movie. Although my version of “Olaf” doesn’t match the real Olaf, we can just pretend like it’s Olaf’s snowman friend or long lost relative!!

Mike Wazowski from Monsters Inc. I was trying to think of something creative to do with the bottle cap and for some reason I came up with using it as the eye in Mike Wazowski from Monsters Inc. Although I am not the best artist I still think everyone can get a laugh out of one of the funniest looking characters in Disney…at least I think he looks pretty funny!!

I drew the baseball hitting off the bat in honor of me having to much homework to go watch the Nationals play this weekend. I used the cap the ball, and it worked out well for this drawing, because it gives you more of a 3-D feel with the ball coming off of the page.

IMG_2358 IMG_2360 IMG_2362


This assignment was worth 3 stars.