


Think Before You Act. Save and Save and Save.
As you start to work with your image, please bear in mind that you should always work on a new duplicate layer each time move ahead in the process. Although Photoshop can be considerably forgiving with the wonderful Edit>>Step Backward, it is always good to be able to delete a layer attempt that isn’t working out and go back to a previous stage to start over.
As we work through the process of separating the foreground(s) from the background(s), it is prudent to carefully name each new layer and keep them logically organized so as to avoid confusion.
Isolating Elements
Let’s start with the foreground. In Part 1: Selecting the Image, we identified John’s hands and face as elements we decided to work with as our foreground.
My first step now is to isolate John’s hands and John’s body, making a layer for each of the left hand, right hand, and head/body. For your image, select what you want, and then use Layer>>New>>Layer Via Copy to get that selection on its own layer.
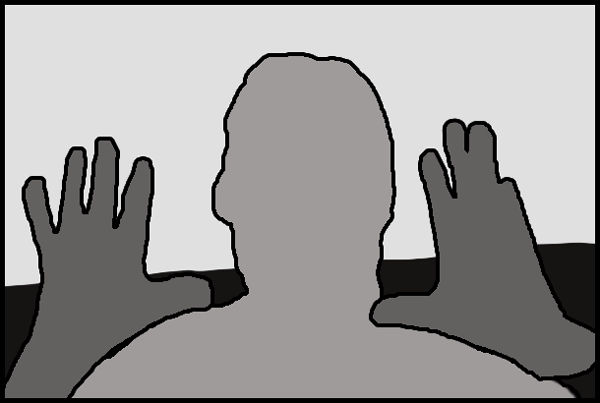
Here is my image of John with the hands and his head/body selected.
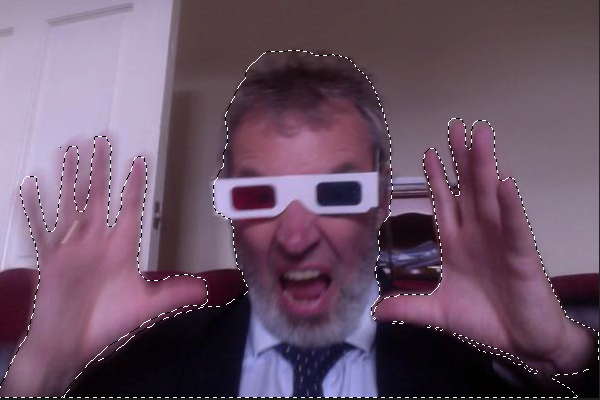
John is selected. The Marching Ants show what I want to use for the foreground.
My technique for getting clean elements tends to depend on how close the Magic Wand or Quick Selection tool can get me to what I want. I will err on the side of getting more, and do some pixel cleaning of the new layer with the eraser (and sometimes the clone brush) to get as best an image as possible. What you select will depend on the image you are working with.
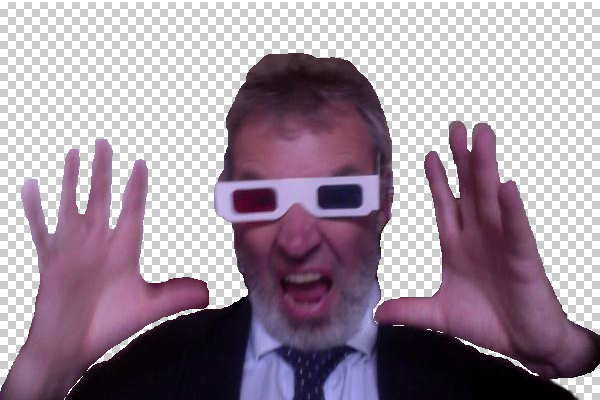
John is cutout. The Layer>>New>>Layer Via Copy action makes a new layer with only the selected parts of the picture.
Once each foreground element is its own layer (in this case: right hand, John, and left hand), we can move on to the background.
NOTE: The “marching ants” image above may be misleading in that I actually selected each element (2 hands, John) one at a time, and made each it’s own layer over three steps. For John’s image, it was a bit finicky and it was easier to work each one on its own. However, we are going to use a nice photoshop trick in a moment to get easily back to this same “marching ants” state from our 3 new layers.
Now for the background.
Although the foreground image will be in front of the background in the completed 3D Anaglyph, I have found that there can be artifacts or ghost images that can interfere, and so it helps to “remove” the foreground objects from the background wherever possible.
Select foreground layers (while hidden) using SHIFT+ COMMAND and then apply Edit>>Fill>>Content Aware to the background. Then tidy up.
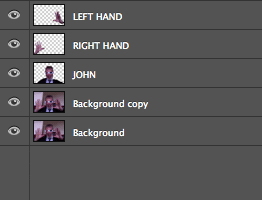
At this point in time, I have 5 layers in my .psd file.
- left hand
- right hand
- John
- Background copy
- Background
We are going to “remove” the foreground element from the background copy layer using the Edit>>Fill>>Content Aware action. This will create a sixth layer (in my example to the right it is shown as, “Background copy 2″)
First, we need to return to something that looks like the “marching ants” image above.
- Hide all layers except for the Background copy layer. (watch the GIF to the right)
- Hold down SHIFT and COMMAND (or SHIFT and CTRL on PC) and click on the thumbnail images of the foreground layers (see the three clicks in the GIF on the right)
- This returns the “marching ants” for the foreground layers, but only the Background copy layer is visible and active. In my example, I am back with something that looks like the marching ants image above.
- Use Edit>>Fill… >> and Content Aware option in the dialogue. After a bit of processing (spinning cursor), Photoshop will provide you with a new copy of your background layer with the foreground stuff removed.
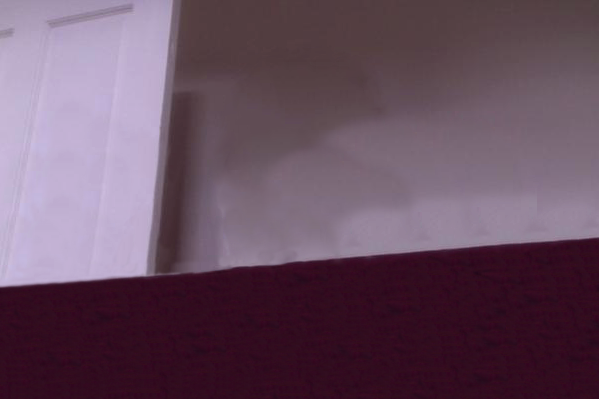
In my case, this is what I got.
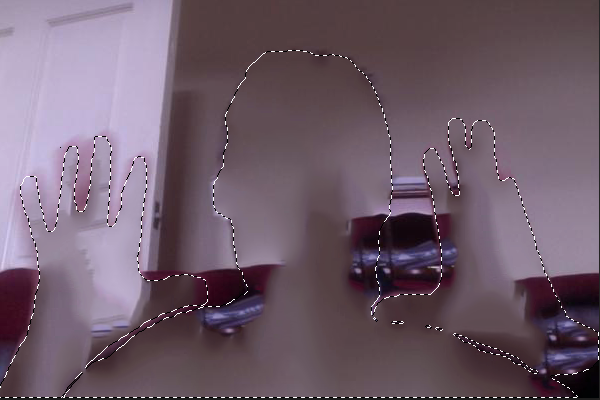
John is removed. There is still some cleanup to do, but it’s a start!
And without the ants.

Messy Background after the Edit>>Fill…>> using Content Aware. We’ll clean it up!
To get something a bit neater, I just used the Clone Tool to make things more uniform. I lost the door lock and re-defined the back of the sofa, but it all works in the end. It doesn’t have to be super perfect, because the foreground will be back in front shortly, but something like this without the foreground elements is desirable.
Here is an animated GIF that shows the process from start to finish.
- Original image
- Foreground elements selected.
- New Foreground layer created via selection
- Back to a copy of the original image
- Use SHIFT+COMMAND to select the foreground layers to apply Fill …>> Content Aware
- New Content Aware replaced background layer (showing selection)
- Content Aware background layer (no selection)
- Edited background layer (liberal use of the Clone Stamp Tool)
- Final Background with Right Hand (foreground)
- Final Background with Right Hand and John (foreground)
- Final Background with Right Hand, John, Left Hand (foreground)

“A GIF of the Process”
So exactly what do we have now?
We have our image now separated into independent layers that represent elements of foreground, mid ground, background, etc. With this saved, we will be ready to move on to colour treating our layers in preparation for making our anaglyph.
In the case of the “John Gets His 3D Glasses On” anaglyph, we have four layers
- our heavily edited background
- right hand
- John
- left hand
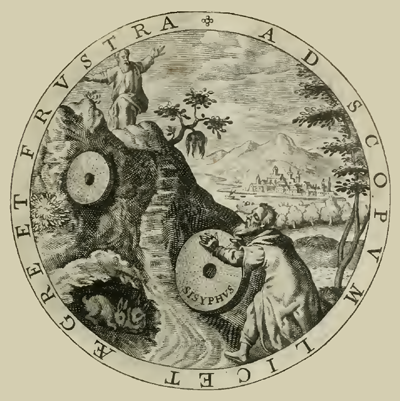
At this point, you may want advance to Part 3: Colour Filtering (link to follow), but first take a look at the result of separating the foregrounds, mid grounds, and backgrounds of the Sisyphus anaglyph:

Separated Layers for Sisyphus Anaglyph (animated)
In the case of the Sisyphus anaglyph, we have six discrete layers:
- Sisyphus and hill foreground
- Large Trees (to the right)
- Smaller Trees (behind)
- Village and Mountain
- Sky
- Ring
As you can imagine, with more layers, this took a bit longer, but some aspects of the separation were easier due to the fact that the edges are very clearly defined and thus easier to select. The monochromatic nature of the image also made it easier to retouch as well.
A couple of notes regarding this one:
- My first step was to remove the ring from the main image, and following that, I applied a 101% scale factor (very small) to the circular image so that its outer edges would be slightly hidden behind the inner edge of the ring. I did this because I noticed a bit of noise/artifacts at the inner ring edge of the pg 8 Skeleton anaglyph.
- Similarly, I extended the “sky” layer outwards slightly in a couple of places using the clone tool because there were a couple of “holes” visible between the ring and the sky.
- I also applied a similar minor scaling of the Large Trees layer, and translated them slightly so that they would blend nicely with the inner curve of the ring.
Some of these adjustments were made later (during steps 3 and 4) but I mention them here as they are part of the layer preparation process. In practice, it is sometimes necessary to return to Step 2 with a layer or two and make adjustments before re-processing that layer again with Steps 3 and 4.
As I said earlier — think and save as you go. Backup if you need to, and keep all of your experimental layers until you know you don’t need them.
- At the end of Step 2, the “John Gets His 3D Glasses On” .psd file has 4 layers.
- In my final .psd file: 29 layers (not all used in the final image, but used in the getting there!)
- At the end of Step 2, the “Sisyphus” .psd file has 6 discrete layers, plus a couple copies of the original image.
- In my final .psd file: 22 layers (again, not all used in the final image, but necessary along the way.)
Next up: Part 3
Next: Step 3: Colour Filtering (link to follow)
Then: Step 4: Positioning the Layers to Simulate Depth (link to follow)
Then: Step 5: Extending the Technique to make an Anaglyph-a-GIF (link to follow)
Get your 3D glasses ready!


