Splash the Color Tutorial

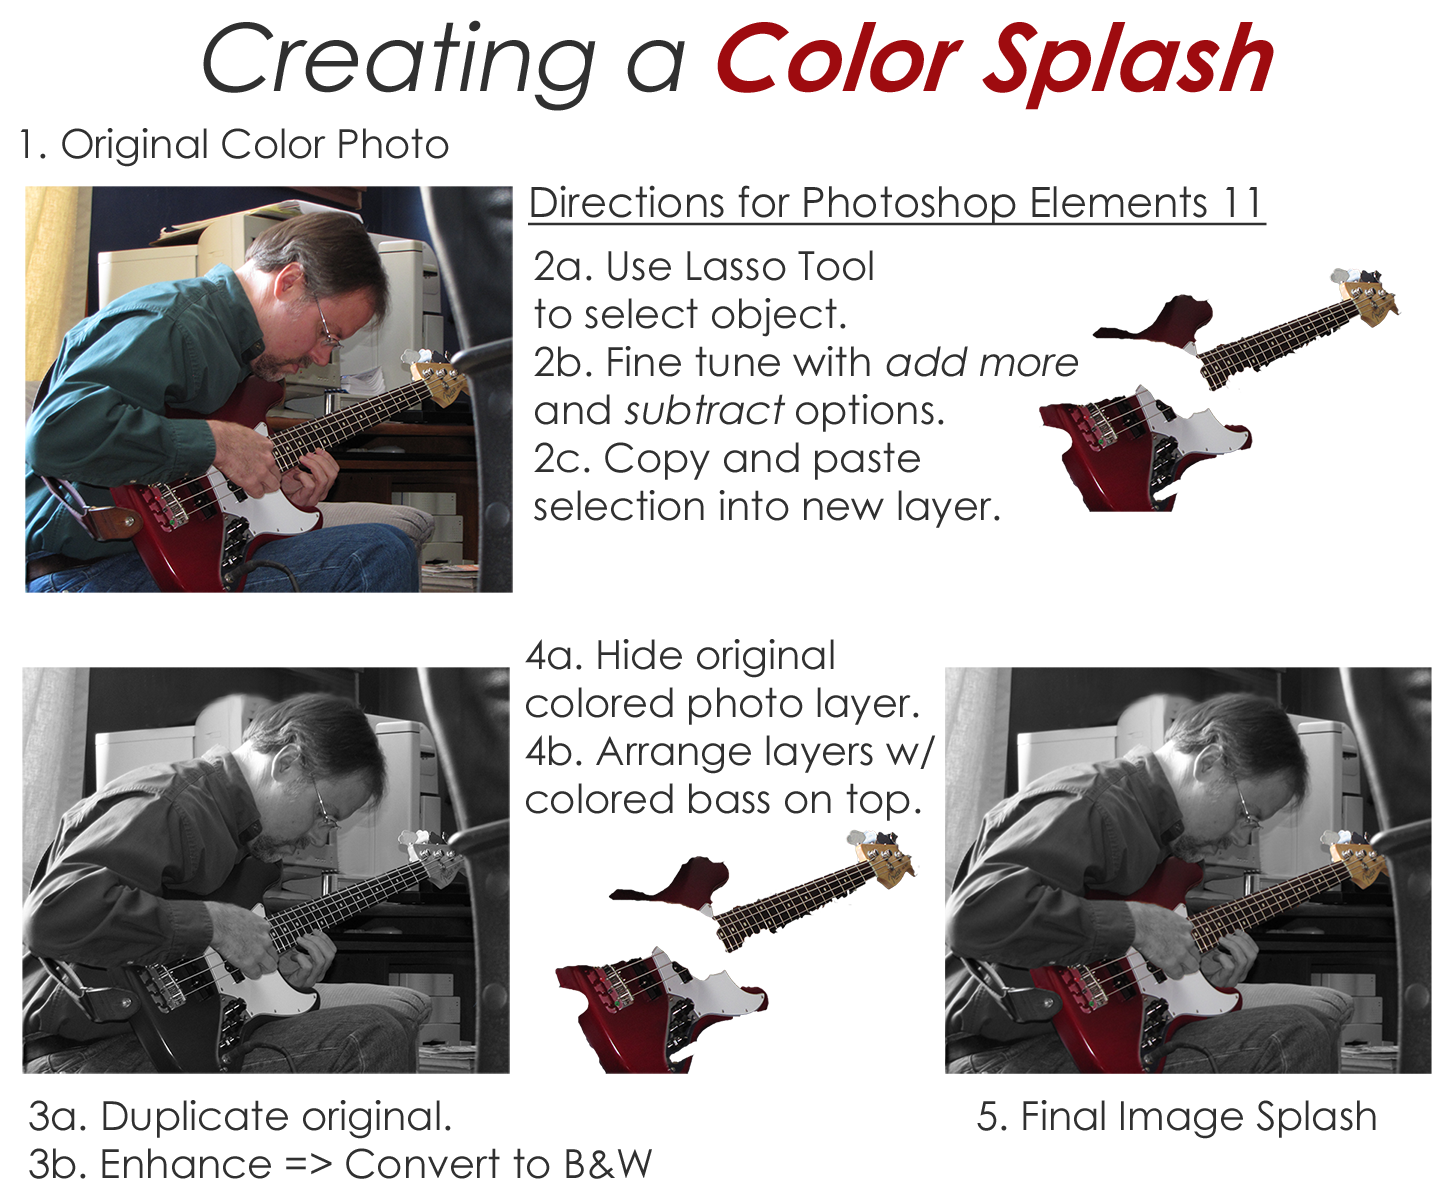
We had to do one assignment this week where we create a tutorial for future DS106 students. I selected to do a tutorial for Splash the Color assignment. I did this assignment earlier on in the semester and it was one of my favorite assignments to do (you can find my post here). Here goes my tutorial.

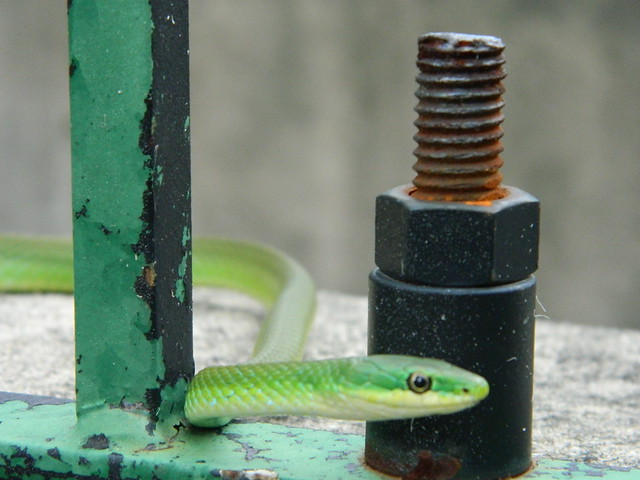
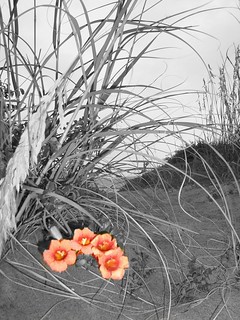
Step 1: Go to Google and save and image that you want to color splash. Here is the image I selected.

little-girl-with-balloons

Step 2: Go to Fotor which is a photo editing program. Click “get started”

Screen Shot 2016-04-04 at 7.34.32 PM

Step 3: Go to open and select computer.

Screen Shot 2016-04-04 at 7.34.56 PM

Step 4: Select the file you with to upload.

Screen Shot 2016-04-04 at 7.35.05 PM

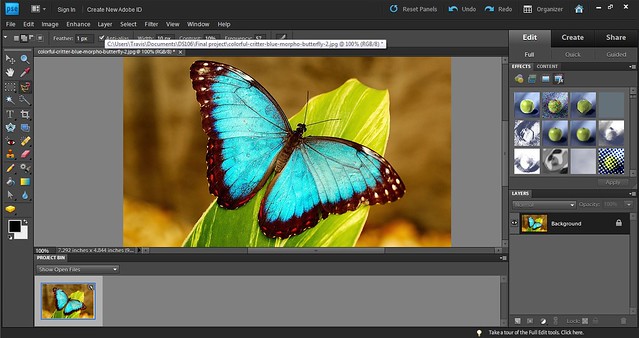
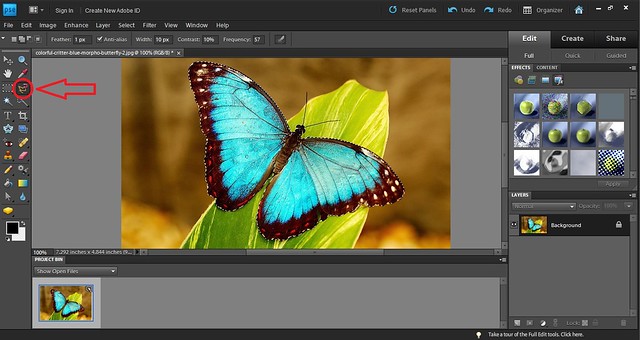
Step 5: Once your picture is uploaded, look at the sidebar on the left and select “color splash”

Screen Shot 2016-04-04 at 7.35.37 PM

Step 6:  Select the first program (the rose picture) which then turns the image black and white.

Screen Shot 2016-04-04 at 7.35.50 PM

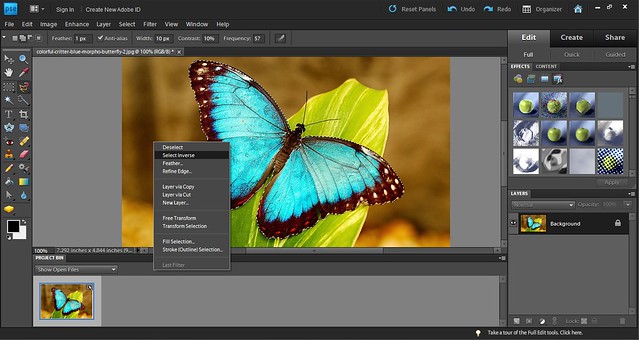
Step 7: You can adjust the brush side on the sidebar by dragging the circle left to make bigger and right to make it small. The brush is what turns part of the image back to color. Hold down on left click while dragging to make something in color. If you mess up, use the eraser which turns it back to black and white.

Screen Shot 2016-04-04 at 7.36.08 PM

Step 8: Once you are satisfied, select “apply”

Screen Shot 2016-04-04 at 7.36.56 PM

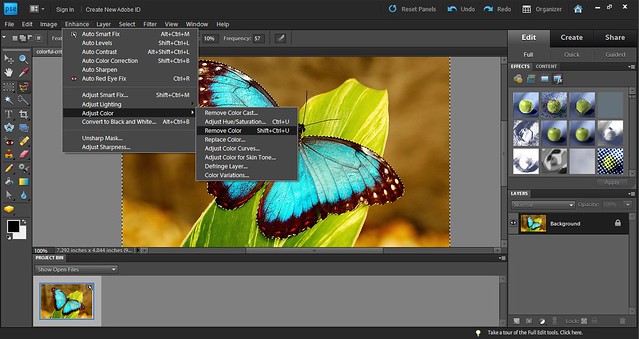
Step 9:  In order to save the image click the little square which is the second to last icon on the bar that you originally used to open the image. Select save to computer and you are done!

Screen Shot 2016-04-04 at 7.37.19 PM

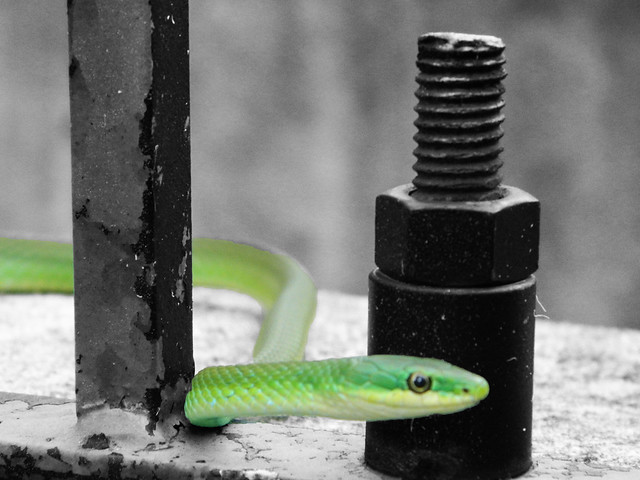
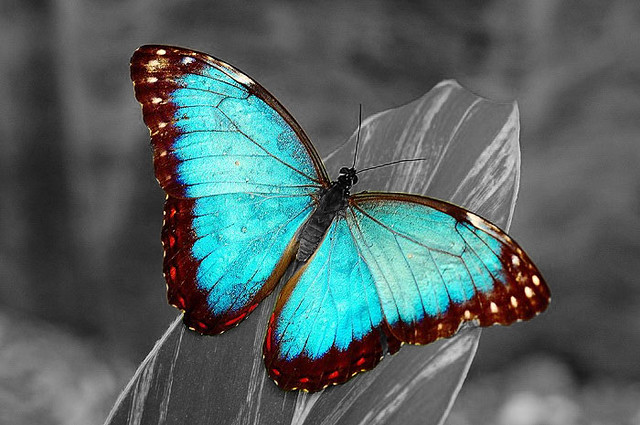
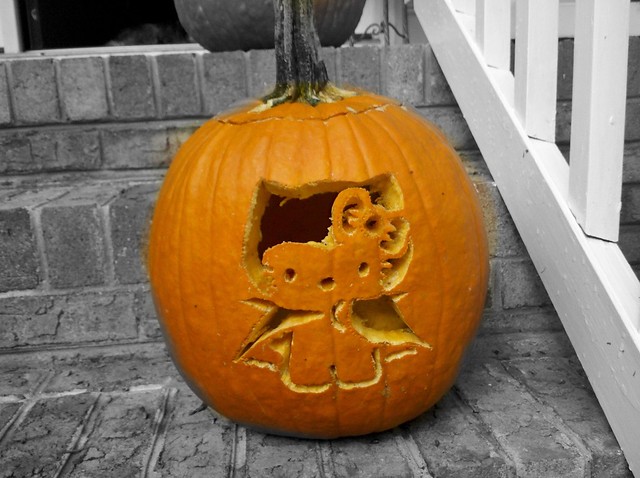
Here is my final image!

little-girl-with-balloons edit

Color Splash Tutorial

How to Color Splash in Photoshop Elements 11

I remembered doing something like this in a Photoshop class in high school so I just played with some tools and techniques until I found the fastest and easiest way. Here is a blog of my original post for this assignment, which equated to 3.5 stars. Although there are many tutorials for this assignment, I did not see one that included Photoshop Elements 11 or the same process that I used. The following is a tutorial of how to create the color splash technique in Photoshop Elements 11.

Start off by choosing a picture with a colorful subject and opening into Photoshop Elements 11.

Screenshot (104)

First use the Quick Selection found highlighted in the tool bar and select the subject you would like to keep its color. Then right click on the selected subject and select Layer via Copy. This will create a new layer within the project that only contains the selected subject. Screenshot (105)

Now select the original photo and go to Enhance –> Adjust Color –> Remove Color.Screenshot (106)

This step may not be necessary for you, but I wanted the colorful selected subject to pop more. So I went to Enhance –> Adjust Lighting –> Brightness/Contrast. Screenshot (107)

Then I increased the contrast all the way to create a more monochromatic background. Screenshot (108)

That finishes this tutorial! It’s a pretty straightforward and easy procedure.

Original Photo

Ssss..

Finished Product

Green Snake


Highlighting the Highlighter (Splash the Color Assignment)

The second visual assignment I chose to complete this week was “Splash The Color.” This is a 3 star assignment. The assignment instructions were

Color splash is a technique to emphasize details- you remove all color from a photo, and then restore original color to a single object, e.g. a green apple on a table. Think of the Girl in the red dress from Schindler’s List.

Here is a link to the assignment page.


First, the final image:

Final


Since this assignment focused on the color on an individual object, I wanted to find something with a vibrant color located in a busy setting . This orange highlighter was exactly what I was looking for. It’s stashed in among many other writing utensils and its bright orange color really stuck out.

I’m happy with the way this image turned out. In the previous visual assignment, I attempted to selectively color something much more complex and it didn’t turn out as well as it could have. Selecting an object with a simpler shape definitely made it easier to get the borders right. As I get better at using these tools, I’ll be able to work on more difficult pictures, but I think selecting the correct image for your skill level is important.

The instructions I used for the rest of this process can be found here.  I took the original picture with my iPhone and emailed it to myself.

Colored

I downloaded the photo onto my computer and opened it up in GIMP. I duplicated the picture and went to Edit->Mode->Grayscale to convert the picture to black and white. I copied the image into a new layer sitting above the original color image.1

I right-clicked on the B&W layer and selected “Add Layer Mask.” 2

I accepted the options seen above and then selected the Paintbrush Tool. I zoomed in a bit and began painting in the middle of the highlighter.3

When I had everything except the edges colored in, I zoomed in further and decreased the size of my brush to get clean edges. I had to zoom in to 800% to get some portions of the border colored correctly. The edge of the highlighter blended fairly smoothly in grayscale in some spots, so I had to zoom in and out several times to see what else needed to be colored.45

After finishing up some spots with a brush as small as 1 pixel, I had completed the coloring. I saved the file in GIMP and then exported it as a png image file so that it could be embedded into this post.

7


“Splash The Color” Tutorial

1.  Install the free “Photo Splash” app onto your iPhone, if you don’t already have  it, and then open it. 2. Press “Start”. 3. Press “Start New Project”. 4. Choose the “Photo Albums” option. A message will prompt you to enable access to your photos.    5. Choose the photo you wish to edit from … Continue reading “Splash The Color” Tutorial

Splash of Color – Tutorial

This tutorial will show you a quick and easy way to complete the color splash visual assignment.

  1. Choose the image you want to color splash. I chose this one.

Colorful Butterfly

2.  The open the picture in the  Adobe photo shop

Tutorial Step 1


  1. Click on the magnetic lasso tool on the left. It is circled in the image below. Using the magnetic lasso click your mouse on the outline of the area you want to have the color. Trace the outline of the area using your mouse. The magnetic lasso should automatically trace the area. If it does not move your mouse and click on the outline for the magnetic lasso to trace the area.

Tutorial Step 2

4. Once you  have magnetic lassoed the area you want right click on the picture and choose  select inverse. This will select all areas other than the area you magnetic lassoed.

Tutorial Step 3


5. After the inverse is selected choose the “Enhance” dropdown at the top of the window. Select “Adjust Color” and the “Remove Color.” OR you can click Shift+Ctlr+U and it will do this action.

Tutorial Step 4

6. The area you selected will be in color and the rest in B&W.

Final


Splish Splash

Musician at Work

DS106 Visual Assignment 340 asked me to emphasize details- remove all color from a photo, and then restore the original color to a single object. Here’s one of my favorite examples from a project I did a few years back along with a printable 1-page directions handout.

My partner is a singer/songwriter who also plays bass and guitar. He’s been a great sport letting me experiment with new digital story telling tools over the last couple of years.  One day while in the recording studio laying down new tracks for his latest CD, he agreed to let me take photos of him in action. The original color image I use in this example is nice enough. It tells a story of a musician hard at work in the studio. But I wanted something that would really grab your attention.  I decided to highlight the bass by leaving it in living color and tone done the rest of the photo by making it black & white.  This was especially powerful when you see his black & white hands holding the colored bass. Talk about a SPLASH.

The trickiest part to accomplishing this effect using Photoshop Elements 11 is the use of the Lasso Tool.  You can pretty easily select the bulk of the object you want to leave in color- or make it a B&W object for another perspective. The hard part to making this look nice is the fine tuning you need to do while using the Lasso Tool.  I had to zoom in very close and use the add more and subtract options alternately to select only what I wanted. You then copy and paste the selection into a new layer.  As long as you don’t move any of the images in the individual layers themselves they will all align properly.

ColorSplashDemo_8X11


Turtorial for Splash Color Effect

This tutorial will only benefit those that have Photoshop, or something similar to this program. I actually searched on Youtube for a video that could demonstrate for me how to apply color onto a black and white photo, to make one object stick out. This video helped me out. Its very simple. Once I conducted what the video told me to do. I saved that copy and added it onto my twitter where I tagged the VisualAssignments tags. This is a really fun process and a great way to make pictures stand out.

Some examples are :

Bartender

Eye


Pumpkin Splash

Through a random search of the visual assignments I came across Splash that Color.  This assignment was very challenging.  I downloaded many different free trial programs on my computer to be able to do this color affect but it all seemed to not work.  After going back to the page and looking over at the assignment I realized that it said “You can do this in a number of ways with photo editing software or using mobile apps.”  When I read using mobile apps, a lightbulb went off.  Why hadn’t I thought about that before?? Well I got my  iPhone, and after a while of searching, and intense review reading for the perfect app, I found it!!

I downloaded an app called iSpalsh Free! Not only was it free, but it worked amazingly!  Being fall season, I decided to use the picture of the pumpkin I carved last Halloween.  I took the picture on my front porch on a cold fall day.  For the splash part of the assignment I uploaded the picture to my app, and made the whole image black and white.  After making it black and white, I had to go around and refill what I wanted to have color and what I didn’t.  This was hard for me because my fingers kept coloring outside of the pumpking which turned out to be a huge challenge.  Maybe my fingers were to big, but for some reason I could not get it to be perfect and the small imperfections showed on my picture but overall I was very happy with the turn out.

Good thing for good apps, and good phones.

PhotoSplashing For Mac’s

This is an easy and great way to photo splash your picture.

Go to your app store and search ” photo splash Smart”. This is a free app you can download to your computer.

Once the app has installed itself, double click the icon in your launchpad to open the app.

Click open file and select the picture form your files which you desire to photo splash.

Your photo will open as a black and white photo. A round, white, circle will appear as your cursor. Use this to click and drag over the portion of your image you’d like to bring the color back to.

Adjusting cursor size: If the area you’d like to color splash is small you can adjust the size of your white dot on the right side of the app’s screen.

Change the options on the right side or the screen form “Red” to “color” and the color will return to the selected portion of your photo.

Use the erase icon by clicking on it at the right of the screen then dragging your cursor and clicking the area you’d like to erase color from.

Walah!! you’ve successfully photo splashed!

Now save your work by clicking file, then export,  at the top of your screen. Save the photo as a JPEG  wherever you please on your computer.

Here is what mine looked like :

beach flower


2 STAR Visual Assignment #3: “SPLASH THE COLOR”

The Splash The color Assignment was interesting, In the past years when i attended high school, in one of my graphic communications classes I remember one of my instructors teaching us a lesson on how to single out the colors of a photo, and just make one particular section have color. So, with that being said i already had an idea on how to turn the picture below which is 2 pink flamingos, and only show one flamingo’s head color while i left everything else in black and white. The tools i used to conduct this assignment was using photobucket.com, I first uploaded my picture then I went to the effects tab and pressed the effect button called “grayscale” which turned the entire image black and white, unfortunately I only needed to have one area show color so instead i went to the adjustment options tab and clicked on the “painted area” button which gave me a brush that focused on coloring the photo to the parts that i wanted to stay black and white. After that i colored the entire background with grayscale except for the flamingo’s head ..even though it kind of looks a bit orange…lol!! :)