Pods embed error: Pod not found

Animated GIF: This is not Timothy Carey

Story: It’s been more than a quarter of a century since I first watched Paths of Glory. At that time, the experience of watching the nearly 30 year old film was profound. As part of my research into Timothy Carey’s career apart from World’s Greatest Sinner, I was delighted to find Kubric’s amazing World War I film available on YouTube (link above). Though Carey is only a supporting character actor, the scene of him approaching the firing squad is at the same time haunting and unforgettable.

My purpose in watching the film wasn’t to find a moment to turn in to an animated GIF. And the one above isn’t even of Timothy Carey. The scene in which this young soldier appears for a cameo comes at the end of the film and is also unforgettable but on an entirely different emotional level than with Carey. It suggested itself to me as an animated GIF immediately.

Assignment: This is my second stab at the Say It Like Peanut Butter assignment in the past week. I’ve heard there are some ds106 participants who think nothing of posting seven or eight animated GIF assignments in day so don’t think I need to worry about going back to the well so frequently. Besides it’s a good way to stay in practice.

Process: The process was essentially the same as described with the Repoman clip last week using layer masking to reduce the file size. As the original video was of higher quality that the stuff I usually find on YouTube and the scene so beautiful, I decide to sample the frames at the higher rate of 8 fps.

I’ve been trying to make the GIFs as small as possible recently and the best way seems to be reducing the number of frames. The color reduction that Mark suggested seems to be done automatically by GIMP as the file is created.

To do the layer masking, I created an oval selection with 5 pixels of feathering around the soldiers face. The layer mas was applied to 14 of the 15 frames that were created by MPEG StreamClip. So the rest of the tavern scene around the soldier is essentially a still photograph. The size of the GIF with layers masked as described above is 975 kb.

I created another one, for the purpose of comparison, with all 15 frames in tact. The size of this file was 1.6 MB.

It would appear that dramatic file size reduction can be accomplished with Jim’s layer masking technique (linked to in the repoman post. We should all be very grateful for the Bava, indeed.

“Turn to the right.” Behold, my first animated gif! …


“Turn to the right.”

Behold, my first animated gif!  This is from the opening scene of Raising Arizona when H.I. is getting booked by Ed.  I love the Cohen brothers’ films, and this is one of their best.  This is my entry in the DS106 visual assignment “Say It Like Peanut Butter.”  Click the image to see a slightly larger version.

I followed various tutorials to get to this done.  Jim Groom wrote a good one that gave me the overall process:  http://ds106.us/wiki/index.php?title=Creating_Animated_GIFs_with_MPEG_Streamclip_and_GIMP

The first steps were to capture the video from a DVD – I used Handbrake version 0.9.6 to grab the section of the movie I wanted.  Then I followed Jim’s instructions for using MPEG Streamclip to trim and export the image sequence that you then import into GIMP.

Since I have version 2.8 of the GIMP for the Mac I needed to look at another tutorial to get some of the finer details down – mainly, that when exporting the file to create the gif, you need to manually enter the .gif extension for the file name to get to the animated gif settings boxes to open.  This tutorial on YouTube helped:  http://youtu.be/HYrzt4hJNJs

TIP! – I found that if I optimize for .gif before I export, the file size shrunk by about half.  It is good practice to conserve the bandwidth necessary for others to download or view your images if you can.  To do this yourself in GIMP, once you are done and ready to export, click the Filters menu, then Animation/Optimize for GIF.  Then go through the regular export process with the optimized images that open in a new window.

Maybe I need to create another now that I know how – just to reinforce the process.  Or, a hundred more, to really reinforce the process?

Venus Transit Swede Animated GIF #DS106

On June 6, 2012 millions watched the transit of Venus across the sun. While millions watched, many others missed this rare celestial phenomenon. Some people missed it because they were looking the wrong way or they live on the wrong side of the planet. Others missed out simply because the didn’t give a hoot, or they were nestled deep underground tunneling through their mine craft worlds.
Whatever the reason, if you missed it, here is a  re-enactment  based on detailed eyewitness accounts.


I don’t know which ds106 assignment this really belongs under.  I used Swede a Scene even though this is an animated gif, not a video.

That’s my story. Any questions?

photo credits
Orange:cc licensed ( BY ) flickr photo shared by richard_north
Venus: Wikimedia Commons

Master of the Flying Guillotine Animated GIFs

And that puts me at about 24 stars for visual assignments. NOBODY!

3d wiggler animated gifs for #ds106

I find these 3d wiggle stereoscopy animated gifs really fascinating, so I tried it.
I took a lot of pictures down at Lake MacGuffin this past weekend, so I found some shots that looked like they would work.
If you haven’t seen them before, here’s the basic idea. You take 2 shots of a subject from slightly different position or angle and then make them into an animated gif. If done right, you get a 3d-like effect.

If they’re not wigglin’, click on the image to get it going.


For the bird gif, I put the two images into separate layers in Gimp. I made one of them 50% opaque while I worked so I could see them both superimposed. Then I used the move tool, the scale tool and the rotate tool to try to get the main body of the bird matched up in both layers. Then I set the opacity  back to 100% and cropped the whole thing so that both layers were the same size and shape. I saved it as an animated gif and set the interval to about 150ms. I used the same general technique for the other one as well.

Here’s a few links with some more examples and explanations of the effect.

Jim Gasperini http://www.well.com/user/jimg/index.html
Wiggle stereoscopy – a new approach http://sunpig.com/martin/archives/2005/12/12/wiggle-stereoscopy-a-new-approach.html

That’s my story. Any Questions?

Dawn of the Dead and Road Warrior Animated GIFs

I’ve been working on a presentation for TEDxNYED that is all animated GIFs—25 in all. I’ll be publishing an annotated version of the presentation here sometime time for feedback, but before I did I wanted to get the GIFs I made last night out on the web because they are jsut that good :)

Here is a few from Romero’s 1978 Dawn of the Dead:

And now a few from Mad Max 2: The Road Warrior:

So, do you think you can guess what at least part of the presentation is about?

Angry animated GIF


Is it cheating if my kid helps me with my DS106 homework? He wanted to make a stop motion video with come of his paper cutouts, so we made a test reel this morning, and I thought I’d use the opportunity to sneak in a DS106 assignment as well. The workflow for creating an animated GIF from a series of images is a little different than the tutorials I’ve seen for making a GIF from a movie clip, so I’ll post a tutorial later when I get the chance.

The history of the animated GIF #ds106

I am sure most of the #ds106 folk will have seen this, but this is a great wee movie with lots of interesting uses of animated gifs. I’ve been a long time disparager of those animated gif clip art things on the web but recently converted to a fan by Jim Groom and ds106.

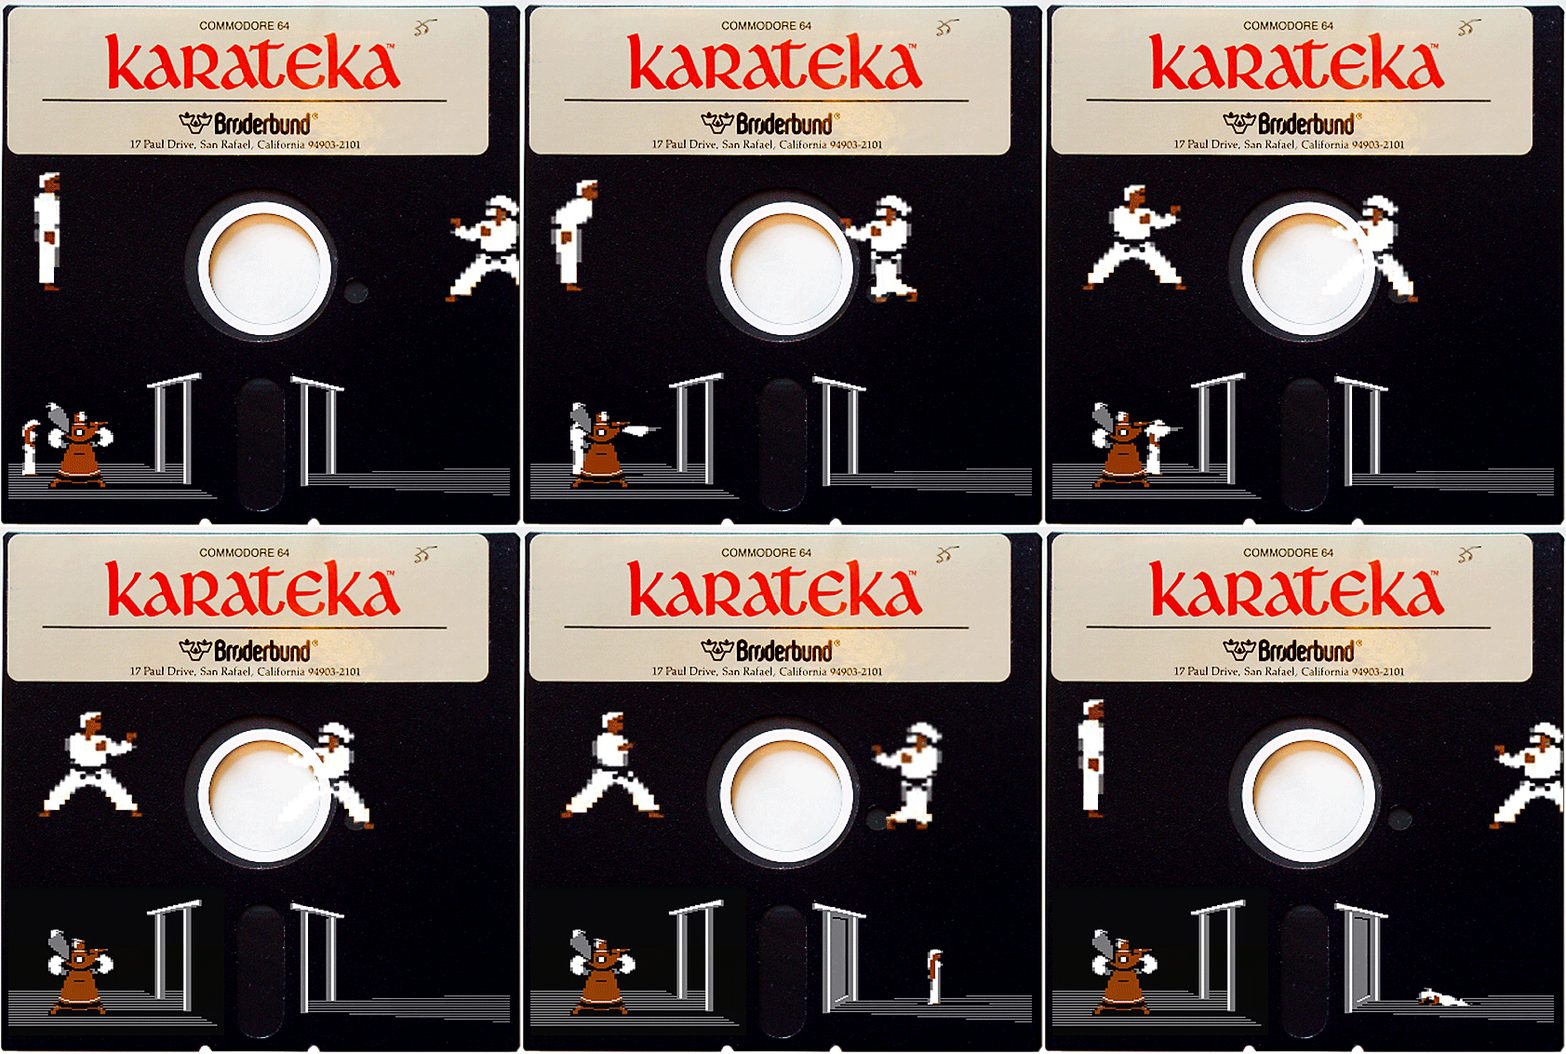
Karateka – Animated Floppy GIF

If there is one videogame I’m certain that I spent a few hundred hours playing, it’s definitely Karateka on the Commodore 64. Karateka a simple fighter game, which like most games of that time was really hard to complete, as there was no option to ‘save’ and pick up where you left off. The game gives quite an extensive narrative introduction, defining the role of your quest, including this text which rolled in the beginning with this music:

High atop a craggy cliff, guarded by an army of fierce warriors, stands the fortress of the evil warlord Akuma. Deep in the darkest dungeon of the castle, Akuma gloats over his lovely captive, the Princess Mariko.

You are one trained in the way of karate: a Karateka. Alone and unarmed, you must defeat Akuma and rescue the beautiful Mariko.

Put fear and self-concern behind you. Focus your will on your objective, accepting death as a possibility. This is the way of the Karateka.

This kind of narrative foundation was fairly unusual at the time of Dig Dug and Donkey Kong, and even more compelling to me was the minimalist aesthetic that went into Karateka.

The bottom half of the animated GIF shows Princess Mariko being locked up by Akuma. The color palette is restricted to black, white, gray, and the tan of Akuma’s costume. Also, the game was effectively ‘letter-boxed’ into a more cinematic wide-screen format.

So this is not exactly an remixed game cover, but it is in the spirit of that particular assignment. I wanted to give homage to the media of the day, the floppy disk, which allowed me to participate in my first bit of software piracy.

It was common to have dozens of boot-leg games copied to 5 1/4″ floppy disks. Back in the 80s you could rent videogames on floppy disk from video stores, and the only piece of copy protection was a little piece of aluminum foil sticker. It was a bit of craftsman’s work to remove and replace it without leaving behind a hint of your deviant copying behavior.

To create this particular animated GIF, I used this lovely scanned copy of the original C64 Karateka floppy. And to make the animation of the characters, I used an emulator of the C64 for Mac OS X called Power64 and then loaded up a Karateka ROM. The whole culture around rebuilding games from scratch and creating emulators is quite remarkable actually – there’s some real amazing geek efforts to preserve game history.

Once I loaded the game, I used Quicktime to do a screen capture of the intro and some game play. These movies were then opened in Photoshop to do work on the frame-by-frame animation in multiple layers. More to describe about that another time.

Funny News Animated GIF

This recent news story comes from Australia, and it was so weird and funny I decided to animate it. Here is the original picture and story:

And here is my animated version:

Animated gifs have been floating around the web for a long time. They are basically a series of images played one after another in a single graphics file. To create the illusion of motion, each “frame” shows an object in a slightly different place than the previous one. There are a number of tools and methods used to create animated gifs; my personal favorite is Adobe Photoshop, as it has the animation tools built in, and I’ve used it for years. I know that Gimp can also make these animated images, but I don’t personally know how with that program.

Process
The process I used in Photoshop is pretty straight forward. I cut the boy out with a selection, and pasted him into a new layer. I also cut out the claw part of the machine and put it into it’s own layer. I had to do some cloning with the clone tool to recreate the parts of his body that were missing. I also cloned in the back wall blue and green colors that were behind the boy and the claw I cut out, as well as added in some of the toys and candy in the machine. I had to cut out the foreground parts of the machine and the kids outside of the machine, and put them in a layer in front of the boy inside, to give the correct 3-D appearance.

With my separated layers – background, boy, claw, and foreground, I was able to do my animation work. Using the animation panel, I created a new frame with a .1 second pause, and moved the claw several pixels over. I repeated this process about 15 times. After doing this for a while, I noticed a “tween” button on the animation panel. I discovered with this tool, I could create a beginning and ending frame, then specify how many steps the computer should put in be”tween.” So after doing it the hard way, frame by frame, to get the claw moved over the boy’s head, I was able to tween the same number of steps returning the claw and boy to the beginning, saving a lot of time and trouble.

Once all of the frames were created, I saved the project as a gif. I downsized it to 400 pixels wide, to keep the file size down and so it would fit in this blog post. That’s pretty much it for the process. I realize this isn’t exactly pop culture, but it is a current event, so I’m submitting it.
clawKid
kidInClawMachine