On the Moon?!

alone on the moon!

For my fifth design assignment, I completed the “Are We There Yet?” prompt.

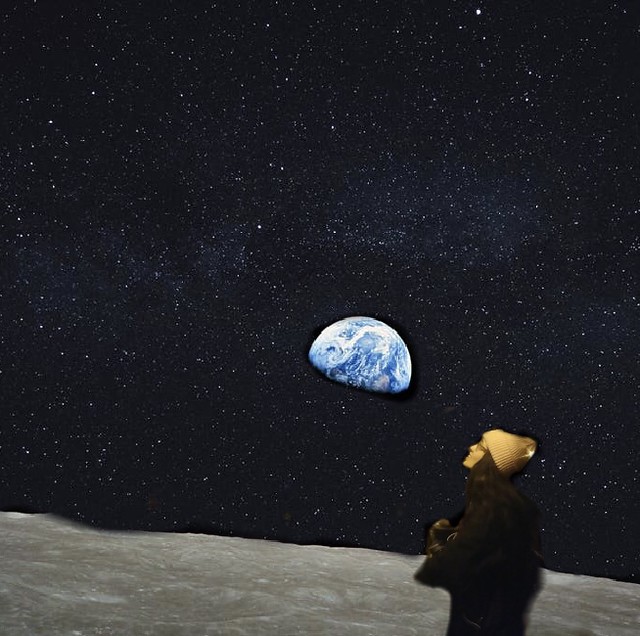
I had a candid picture taken of me by a friend, of me looking up at a tree that had fairy lights tangled around them. As I was deciding on what to do for the edit, I thought, “hey, why not go to the moon?” Now here I am! On the moon, staring back at the Earth, wondering how it’s doing. You know, I was really not dressed for the occasion.. I was just in a coat and a beanie.. not the ideal outfit for walking around in space!

I did not think I was going to have a tricky time editing this photo, but I did! At first, I went to Google images to find a photo of the moon and the Earth. Even though I found an amazing quality photo, I decided against using it. I didn’t want to risk trouble with copyright issues. So I reverted back to pexels.com to chose another photo. I was glad to find a photo that was very similar!

To make all of the edits, I used the Adobe Photoshop Mix app. I took the photo from my camera roll, and pasted it as the top layer. I made sure to use the cut-out eraser tool to get rid of the original background of my photo. Because in the photo I was facing left and looking upwards, I positioned the photo to be on the right side of the Earth.

Originally, I was going to leave the background blank, it was dark and boring. So I decided to add a starry background. I went back to pexels.com and typed in “stars”. To my surprise, there were so many beautiful photos of the sky and stars that I had a hard time choosing just one. I went back to the Adobe Photoshop Mix app to add this photo in the middle of the two existing layered photos. It was a bit difficult to make this as the background. I had to enlarge the photo, so that I am able to covering all the blank space in the back. I went to the cut-out, basic brush tool to make the stars show instead of the black background. I was careful to zoom in while adding the stars because I did not want to accidentally cover the Earth or edit a random part of my photo out.

But hey, now I can say I’ve been on the moon!

are we there yet?

Wait, this isn’t where we’re supposed to be…

Are We There Yet?!

Copycat of famous kiss in Times Square

Last year I took a trip to New York City with my girlfriend and reenacted the famous V-J Day kiss by a sailor and nurse in Times Square.

I did an image search on google for the Life magazine cover of the famous kiss and download it.

Original image of V-J Day Sailor kissing Nurse

I then took the photo of me and my girlfriend and uploaded it to PhotoScissors Online where I removed the background and left just us kissing.

Original photo of me and my girlfriend in Times Square
Photo after I enlarged and changed to B&W

Then I used Fotor to put the Life magazine photo in the background and pasted the cutout photo of me and my girlfriend into the shot. It was a little choppy but the best I could do with a free online photo editor.

Skumboyz and the Mountain

Throwback to when me and the rest of the band went up Mt. Everest, no big deal.


Background photo can be found here.

Original Photo:

Are we there yet? Happily strolling in a dark setting


I used GIMP to create this image. It was hard to keep a good picture quality, but it is still clear enough to understand. I used a picture of me “Jumping out of finals” on the last day of exam week last semester, and put myself in a dark setting. I thought this would be a funny way of showing me jumping out of finals, UMW just doesn’t have the same dark theme as this medieval background.

Summer Winter Wonderland

This is my last Design assignment of the week and it is the required assignment. In this assignment, we had to take a picture and then change where we are and what we are doing. I used a picture I took with one of my best friends from high school last summer at the beach and made it look like we were outside in a winter wonder land. This new picture was taken right before we did the snow challenge where you jump into the snow while just wearing a swim suit and see how long you can stay in the snow before giving up and running back into the warmth of your home. I, of course, won because Matt couldn’t handle laying in the ice-cold snow with no shirt on for longer than 5 seconds.

Assignment: Are We There Yet?

Stars: 3.5

I created this picture on GIMP.

Step 1: Open GIMP and then, at the top, click File -> Open and then choose the original picture that you want to change.

Step 2: At the top, click Layer -> Transparency -> Add Alpha Channel

Step 3: Click the Eraser Tool button on the left side of your screen.

Step 4: You can change the size of the eraser in the bottom left of your screen until it is the size you prefer (you will also be able to change it while you are erasing to make it smaller to be more precise in the small spaces, or bigger for the large spaces).

Step 5: Erase the background of the picture by clicking on the image and dragging the mouse until everything you want to delete is covered in dark and light grey checkered boxes.

Step 6: At the top, click File -> Export As and then change the extension to .png to save the picture.

Step 7: At the top, click File -> Close All -> Discard Changes.

Step 8: Click File -> Open As Layers and then select the picture you want to use as the background.

Step 9: Click File -> Open As Layers then select the png you just saved  to add to the picture.

Step 10: Click the Scale Tool button on the left.

Step 11: Click on the png picture to move and resize it until it is perfect.

Step 12: Click File -> Export As and then change the extension to .png to save your creation.

We Were Already There


Are We There Yet?-Changing the concept of a photo by altering the background of the image.

The Story Behind the Story-

The kinds of adventures you have with your high school buddies are often not really adventures at all. Limited by funds; legality and transportation, the range of possible activities are dwarfed compared to your weekend aspirations. But if you’re cast among a group of people with the exact right chemistry, these non-adventures become something else entirely. In my junior year of high school I alienated myself. School was hard, AP chemistry was making me feel stupid and I wanted to hide from the world. I began spending most of my time alone, making up excuses as to why I would unavailable for yet another weekend plan. But as senior year came around, I was plucked somewhat reluctantly from my solitude and landed somewhere strange.
I had always had friends in school, I was on plenty of sports teams and was inherently social. But something about my junior year had taken all of that out of me, and suddenly I was being coaxed into socializing every weekend. This group of friends were not innovative in their hangouts. There was nothing truly unique about our plans, but everything felt unusual. We placed ourselves in the same basement doing the same activities each night. We played Super Smash Bros and classic card games, we listened to new music and talked about politics. New people filtered in and out of our weekend get-togethers, but the core of the group rarely changed.
I usually felt like more of an observer than a participant at these gatherings, but I felt wanted there. Even if I didn’t have much to say, there was always a place for me. I felt like an ethnographer, diligently taking in the antics of a group I was only just becoming familiar with. I watched freestyle rap battles and listened to the guys of the group as they formed a circle to talk about their emotions, all with Frank Sinatra playing in the background. Our time together was never really based on creating fun or experience. There was no desperation to enjoy a moment or give the impression to onlookers that we were having the time of our lives. It was always about conversation, debate and not being alone. We didn’t feel like we had to manipulate our surroundings or circumstances to have a good time together. The original photo in this gallery was taken during one of the truly adventurous events of our time together. We began a tradition of renting an Airbnb during summer and winter breaks to keep in touch throughout college, this photo was captured on Skyline Drive in Luray, Virginia. No matter what backdrop I place behind to original cutout, the photo is such a clear representation of what we have always been as a group: Simply taking it all in, wherever we go, whenever we get there.

The Tutorial-

This project was relatively straight forward, although I definitely ran into a few issues. To begin, I selected the photo that I wanted to use and opened GIMP. I then used the free select tool to cut out the people in the photo:

Once I had completed the selection process, outlining the portion of the photo I wanted to remove, I clicked Edit>Cut.

From there, I opened another photo in a new GIMP page. I got all of my photos from StockExchange.

With the new background open, I clicked Edit>Paste and the picture I had recently cut appeared over this background photo. I moved the picture around to position it, however I could not figure out how to shrink this pasted image.

Additionally, I was having trouble finding the “move” tool at first and had to re-do the image several times because I kept accidentally cutting out portions of the new photo. I eventually found the “move” tool under Tools>Transform Tools>Move. After many frustrating attempts to resolve the issue, I settled on simply showing a portion of the cut out image in the final product.

Are We There Yet?

For my required assignment this week, I had to take an existing picture and change the environment in which it was happening. For me, this assignment was more of a learning process than anything else. First I had to take the original image (which is a picture of 3 of my friends) and remove the background. I used a mixture of the magic eraser and background eraser tools in Photoshop to do this. Next I put something different in the background and that’s about it! My friends were posing for a picture and now they have a visitor in the background!

Are We There Yet?

I was pretty nervous about this assignment, given that I don’t have a lot of photo editing experience. However, I saw that other students had written tutorials, and so I checked on those, mostly using this one in particular.

To complete this assignment, I used GIMP for the first time to take a picture of my friend’s cat sitting in a cardboard box and place her into another setting, a picture of a river from this page. Here were the two original pictures:


Using GIMP and the tutorial, I placed the cat (Molly), into the river, so it looked like she was floating down it in her little Amazon box. This was the result:

As you can see, very much a first attempt at GIMP. I’m definitely going to have to look at more tutorials and get more practice so that I can make things look more realistic next time. I really wanted to make the box look like it was in the water, but at my skill level, it’s gonna have to look like Molly is sitting on top of it. Still, it was interesting to use a program I’d never tried before!

Guidelines for this assignment can be found here.

Fragile Bridge

Made up photo
Original Photo in St. Louis Missouri

For my 2nd design assignment of the week I chose to do the mandatory one. I was having trouble with this one but after looking through some of the submissions I got some ideas. The original picture is my boyfriend and I when we were on vacation in Missouri and we went to St. Louis for the day. We were waiting to go into the St. Louis Arch in this photo and decided to take some scenic photos because we rarely ever took photos before this vacation. I got the idea for this assignment from http://slightly-off-topic.com/assignments/just-a-little-further/ So I decided to change it up a bit of course. In the original photo I was on his back and laughing because I was convinced that he was going to somehow drop me in the water behind us. So I decided to use a fragile bridge as something we would have to cross and I highly doubt either of us would have a smile on our face, or that I would even cross such a fragile bridge in the first place. I’d take my chances going another way.

In order to create this photo I found the picture of the fragile bridge on google images and opened it in Adobe Photoshop, then I opened our photo and began using the magic wand tool to delete the background of the photo and I also used the lasso tool to do the same thing. I then clicked and dragged it over to the fragile bridge and moved the image to the beginning the bridge the best I could. For the Adobe Photoshop I used the free trial version.