time lapse

I did the time lapse video assignment. This assignment says to create a time lapse from one single location so you can see how the location changes over time.

I wanted to create a time lapse outside while the sun was going down so that the video would hopefully show how the shadows moving across the trees. I used my iPhone camera to film this, which you can use to create and edit time lapses. I set up my phone in a stand outside with a good shot of the woods. The sun was already starting to go down so the initial shot already had some of the trees in the shadows.

You can see the shadows moving, specifically in the second half of the video. Overall, I’m pretty happy with how it turned out, but if I were doing it over I would definitely should have turned my camera (I completely forgot to)!

Time Lapse

Here is a time lapse i took with my gopro of me driving my car around.

Lake Views

This video is to fulfill video assignment #1654, entitled “Time Lapse.”  Multiple one to two second clips of the same location were captured, then combined in a single video clip to highlight the differences seen throughout the day.  This assignment is worth four stars.

The location of this assignment is a man-made lake within the neighborhood. iMovie on MacBook was utilized as the preferred video editing application for the creation of this short film.  The individual video clips were highlighted and selected to be merged together into a single movie project.  A “cross dissolve” transition was placed in-between each clip to create a gradual transition from one image to the next.  Each image is played in realtime, and the actual sounds of the lake can be heard.

Time Lapse Assignment

For this assignment I chose to do something a little different than the description. Instead of taking 1-2 second time lapses throughout the day I took one big one to show some period of time. This really gave a different effect as you can see movement in things you wouldn’t normally see. You can see the movement of clouds and water and the sun and how it all morphs together. I had never done a time lapse before and I was at the beach this past week so my inspiration was to use a sunset to make a time lapse. My thought process was the seeing the sun fall behind the horizon would be super interesting and it was all ruined by a giant cloud! But hey, it still looked kinda cool. The first step to this process was to set the camera up. There are a couple things that are useful to do before you head out. The first is to format your SD card. This will ensure that you have the most space possible to capture as many pictures as you want. With that said, make sure you don’t have anything important on there because this will delete all of it. I am shooting on a Canon 6D so this is what my menu looked like but yours may look different:

Next, you will want to pick a white balance that is appropriate for your shooting conditions. The benefit of shooting with RAW files as opposed to JPG is that we can change this later if the white balance changes.

Next, is to change your file format. I always choose to shoot RAW files because they give you much more light information and you can do a lot with them in post processing. However, they require more work than JPG’s. For beginners, JPG’s are much easier because the camera does all the touch up work. So pick whichever format you think you would like to use.

Finally, just to save a little battery power, turn off image review. This means that when you take a picture, it won’t show up on the rear of the camera.

A couple other instruments you will need are a steady tripod and an intervalometer. This is basically a thing that plugs into your camera and tells it to take a picture after so many seconds. In my case, I use a thing called Trigger Trap which is actually a wire that connects your phone to your camera and I can use the phone app to control my camera. In the case of this time lapse, I set all of the settings on my camera, and then plugged in my phone and use the phone app to tell it to take a picture every 5 seconds.

A quick side note is, for sunset time lapses, make sure your camera is in aperture priority mode. This means that the camera will change the aperture for you so you don’t have to change it as you get less light.

The final step is to do a little post processing and turn your photos into a video. For this I like to use Adobe Lightroom and LRTimelapse. The general workflow for this is to import all of the images you took to LRTimelapse, stitch them, export them to Lightroom to make all of your image adjustments, then export them to make a video. This is what it should look like after you have all of your pictures imported to LRTimelapse:

Export the video and that is it! You have a timelapse made out of the pictures you took. This was a relatively short time lapse. Only about 200 images to make this one. I will definitely be more interested  in making more of these in the future. Check out the time lapse below:

Ripley’s Aquarium !

For my first video assignment of the week I choose to do the Time Lapse Assignment. You were to record 1-2 second videos all day as many as you can and then create a video with all of the clips combined together. I choose this assignment because this week I am visiting my Grandparents for my Grandfathers 73rd Birthday and today we went to the aquarium so I felt these clips would be something everyone would enjoy.

Steps to create this Time Lapse using Wondershare Filmora
1. open the application and then click new project

2. The next step is to import your videos

3. The next step is to add each clip to your video by hovering over the clip and hitting the red plus sign

The last step is to export and create the video

Dorm Room Time Lapse


In this video, I took multiple time lapse videos from throughout the day (from when I wasn’t at class or practice!) and put them together! Notice how in the first clip, the street light turns off and in the last clip, the streetlight turns on. Also, something to note is the shadows throughout the day. This video also shows the unpredictability of Virginia weather as it is sunny, then it rained, and then it fluctuates between sunny and cloudy.

A bit of this, a bit of that, a bit of evereything.

I imagine you’ve all heard of a Time Lapse? Well if you haven’t it’s pretty simple, really long video of anything you want and then sped up so things happen at super sonic speeds.

So my assignment for today is to create multiple Time Lapses and edit them together.

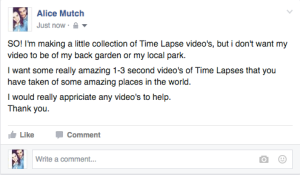
“Take multiple 1-2 second clips of a single location throughout the day (try and get as many as you can), combine the clips together so that you can see the difference in the location throughout the day.”

HOWEVER! I know what you’re thinking, you’re going to get to watch a video of Time Lapses of the view from my flat, (a building) or my garden, (I don’t have one, i live in a flat…). I hate to disappoint you, but I’m afraid you’re not. I’ve put a bit of my own twist on this to create something a bit more fun and personal to me.

This is personal to me because, i don’t know if you know this already, but i love travelling. I love how each corner of the world looks different, and how it looks different at each time of the day. So this was a fun video to make that unfortunately won’t include my ‘back garden’ but will include video’s taken all over the world.

https://youtu.be/WBaAx8-zrwY

So to make this video i took to social media. By using Facebook, Twitter and Youtube i would able to communicate to others to find Time lapses from all over the world.

Screen Shot 2016-02-01 at 17.02.40Once i had been sent enough time lapses from places including: Japan, New Zealand, America and so on, I was then able to create a video.

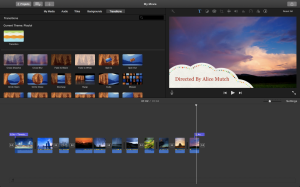
To create my video i used Imovie, just because i find it easy to use and it has some cool ‘movie effects’, however you can use Adobe Premier and any other video editing software.
After importing all the clips into Imovie i could then begin slotting them in place,  i tried to make it so similar clips would be next to each other, also some clips were a little long so i had to cut them down by a few seconds.

Screen Shot 2016-02-01 at 17.05.10

Once everything was in place and i was happy with all the effects and the sound, it was time to upload to Youtube, and share my video with everybody else.

Time Lapse

Take multiple 1-2 second clips of a single location throughout the day (try and get as many as you can), combine the clips together so that you can see the difference in the location throughout the day.