The recordings of Andrew’s father telling his stories appealed to me because I remember my grandfather telling wonderful stories, and luckily some of my family members recorded them so they are not lost.


Remixes/Mashups
Upon watching the videos, the one main thing I’m nervous about is remixing photos. I had a terrible time just trying to figure out how to trim pictures out of background scenes. I have no idea how I will manipulate them to get them into a different form of media. We shall see. That recut version of the Shining is absolutely fantastic. And the poem by Bukowski (one of my favorite writers) just makes me depressed that I don’t write more often. Despite being a dirty old man, Bukowski is a heck of a motivator.
Part 1 of Everything is a Remix – I love the Zeppelin explainer – knock-offs and covers being the legal way to rip someone off. Zeppelin did it illegally – shame that none of the people they stole music from had broad audiences – and were typically from a slightly different brand of music so it may not have been as obvious as if they had stole it from other rock groups.
Part 3 of Everything is a Remix – interesting to think that copying can be seen as an integral part of creating as opposed to a diversion from it. Im not sure I buy that, but I believe its true that you cant create in a vacuum. Inspiration from other great works is proof of that. Copy – Transform – Combine. Meaning nothing is truly original.
I watched both of these videos along with the Fair(ly) Use Tail including the Disney characters. My thinking on what a remix is is that it’s a more blatant form of utilizing others’ ideas than what has been employed in the past. There’s no doubt people steal – but a lot of times I believe people are simply inspired by other works, use them to generate their own ideas or creative motivation and creation. I think good remixes have to be clever enough products to justify the use of other people’s ideas. In other words, I’ll accept that a remix is worthwhile, if in combining previously created elements, it demonstrates new creativity. I think that’s the definition of a good remix anyway. A bad remix is anything that steals other people’s stuff for no interesting or worthwhile reason.
Audio
For examples, I watched Dont Tase me Bro (pretty lame – only inserted two clips and they dont even fit that well), Call Me Maybe/Star Wars (this one is excellent – yes its a little more formulaic, just inserting words – but it’s done well, in time and is creative in finding the clips – i love the part where they put in the subtitles over the alien talk). Scary Mary is the best of them – it shows true creativity, simply using existing clips as building blocks for an entirely new idea.
Remix
The idea of remixing the photo of Doctorow is an interesting challenge….
Admittedly, it’s not my strong suit. I used a site called http://apps.pixlr.com/o-matic to put the effects on the image, then messed with it on Microsoft Paint. Here it is:

I did the popcorn remix. Didnt take me as long as I thought it would. if there’s a way to shift the images so they slant or sit differently, I couldnt figure it out. It was enough for me to figure out how to upload video and lay it in. The laying in of video has become much easier after working with Audacity and Movie Maker. Here’s the final product.
As for the DS106 remix I was given the task of remixing the cover of an autobiography and inserting a random character (like Uncle Bob). I actually went as far as to download Adobe Photoshop to work on this assignment. I didn’t want to mess with the other person’s Flickr account, so I just snipped the image and used it as a basis for remixing that way. Here’s the original.

And here’s the remixed version. Its not awesome but at least I figured out how to blend a picture in and add some new text. The new remix version of this assignment is about what happens when the ghost of your Uncle John (I know it says Uncle Bob in the assignment but I made it Uncle John) is overshadowing your hopes and dreams.

Summary
I like remixes but they aren’t easy for me. I think with more experience – particularly with the still photograph software, it could really enjoyable. Its a challenge to me to take someone else’s work and change it and make it better. As I pointed out before, blatantly using someone else’s work as the basis for your own bothers me creatively. I understand to some it’s similar to using someone else as inspiration, but to me it’s very different. With inspiration, the actual artistic product is still your own.

![]()
Remix of a photo by Jonathan Worth
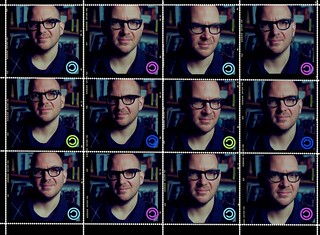
This assignment was to take an image of Cory Doctorow from a collection of images created by Jonathan Worth and remix it. My idea was to take the image of multiple small head shots of Doctorow and make them into postage stamps. Initially I was thinking of making them Canadian stamps with a maple leaf logo, but then I realized that a Creative Commons or Copyleft logo would be more appropriate. I got the idea for the copyleft logo from the cover of Doctorow’s Makers book where the C of his name is a stylized copyleft C. This would probably be a relatively simple project for someone with Photoshop chops, but it took me quite a while to figure out how to do basic things such as create lines of white dots and create copyleft which could then take on multiple colours. After adding the perforations, I realized that the smaller images were not on a grid, so each vertical strip needed to be cut from the original image and aligned on a black background so that the perforations would have a chance of lining up.

![]()
Professional photographer Jonathan Worth has put out an invitation for anyone to take his photos of Cory Doctorow, activist for liberalizing copyright laws and proponent for Creative Commons, and remix them in anyway you like. They will then choose from the best remixes and share any profits with their co-creators.
A series of photographs taken by Jonathan Worth of author Cory Doctorow are now available for you to remix, regenerate, and to make new art, especially in light of the themes and topics of his books. Your challenge is to make something new out of the photos.
This is a new experiment in public art, and a new way of thinking about digital media. Who could be a better figure than an author who releases all of his published works under creative commons license with an open invitation to remix?
This opportunity was presented to the DS106 participants for Remix/Mashup weeks, as well as turned into an assignment MashupAssignments1020. The process of creating these new images evolved through three versions and resulted in the creation by Rockylou Productions of the first GIFAChrome Camera with accompanying GIFAChrome DS106 Film.
Cory Doctorow GIFAChrome DS106 GIFStrip – A new experiment in public art sponsored by Jonathan Worth. Created by Rockylou Productions
And as part of the “rules” of the remix challenge, everything we create must be licensed under a creative commons license too. (Notice the CC license logo on the strip?) So no worry about patent infringement or licensing fees. Everyone is welcome to use this work and remix it for themselves. I’ve even included templates at the end of the post that you can download to make your own GIFAChrome image.
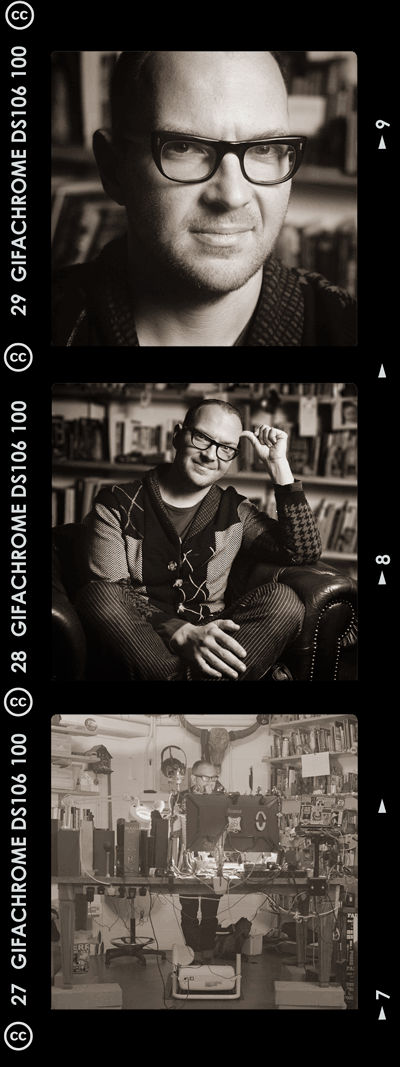
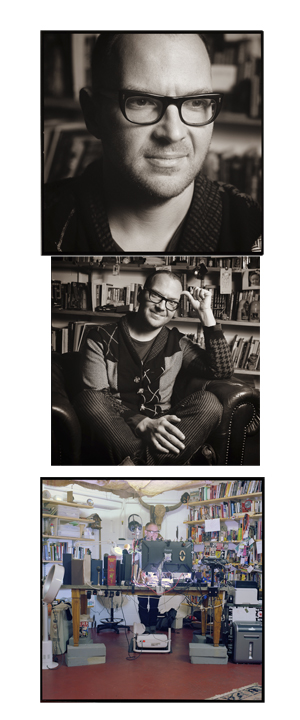
The Manufacturing Process of a GIFAChrome GIFStrip
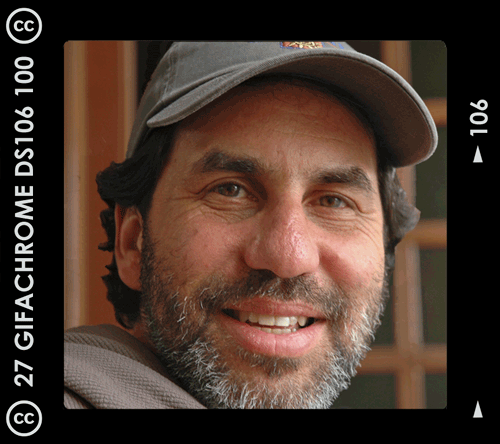
After perusing the photos of Doctorow, and the remixes already submitted, my creativity kicked into high gear. I happily discovered two versions of the Doctorow head shot that could be turned into a GIF. [Head shot 1 and Head shot 2] How about making one of my GIF strips? [DJ BIrthday Dance GIFStrip] Yep… I found two more images from Jonathan of Cory working at his computer that could work. [Working 1 and Working 2]. The third would be the shot of him sitting in his chair in front of the bookcase.
DRAFT 1:
Using Photoshop CS5, each GIF was made in its own Photoshop file. Then the three image composites were combined into one larger canvas strip with one above the other as shown below.
Each GIF and/or image is stacked one atop the other to create an image strip.
I then placed a film strip template on top of everything. DJ BIrthday Dance GIFStrip will walk you through the process. With the first draft finished, I alerted the DS106 community on Twitter and our DS106 Google+ Community, asking for feedback to improve the image. This was after all to be a collaborative project.
1st draft for @Jonathan_Worth Cory Doctorow remix invite. Appreciate #ds106 feedback to improve image. @cogdog http://t.co/dSrvZocpQd
— Rochelle Lockridge (@Rockylou22) November 21, 2013
There were comments from several that the head shot image was a favorite. So I turned it into a single GIFAChrome image.
@Rockylou22 @cogdog – I love the top frame – its mesmerising. The rebate bothers me but I’m being a 120 film geek

— Jonathan Worth (@Jonathan_Worth) November 21, 2013
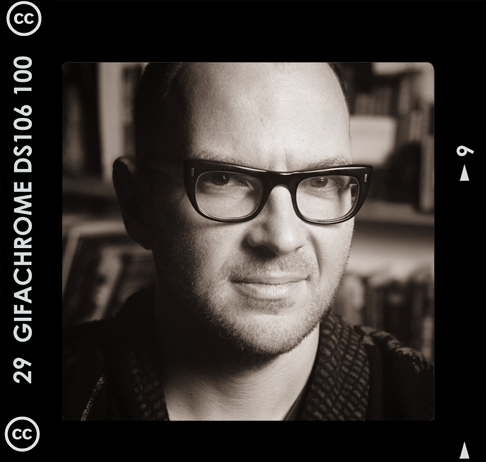
Cory Doctorow GIFAChrome DS106 Image created from original images by Jonathan Worth
VERSION 2:
Adjusting the colored image:
I wasn’t happy with the final panel as colored, I learned how to use layer filters in Photoshop, thanks to a post by Alan Levine, and was able to apply hue/contrast and brightness adjustments to a single layer. I was pleased that it didn’t take me too long to approximate the color scheme of the first two panels.
Redesigning the film strip template:
Jonathan had joked about his disappointment with the rebate He was evidently accustomed to 120 film. What the heck was he talking about?
@Rockylou22 @cogdog Ignore the dog – you can see the rebate on the contact sheet (there are no spool holes etc as its roll film)
— Jonathan Worth (@Jonathan_Worth) November 21, 2013
I had to do a Wikipedia search to find out what a film “rebate” was (the stuff along the sides of the images that give the image number and film type) and that the film template I was using was for 35mm film. 120 film doesn’t have those little sprocket holes on the sides. [Learn more about the differences] I certainly wasn’t expecting a lesson on photographic film types for this assignment. But you never know what rabbit hole the DS106 Matrix will take you down.
I went back to Worth’s photos and found a collage of contact sheets that I used as examples to build the new frame template. The font used on the Kodak strip turned out to be pretty close to Century Gothic. That was easy. Alan Levine joining in the Twitter banter, suggested a DS106 film would be appropriate.
@Rockylou22 @Jonathan_Worth I think you should make it 106 format

— Alan Levine (@cogdog) November 21, 2013
I had toyed with many names for my new invention. RockylouChrome was definitely out. It was clunky. Finally the light bulb turned on and GIFAChrome DS106 film was born.The GIFAChrome DS106 100 film obviously had to have a camera to be used in. With version two of the GIFStrip a new-to-the-world GIFAChrome camera was invented.
I was also watching and listening to the viewers of these new images, and several were concerned with the middle frame not “GIFfing”, and wondered if there was something wrong with the strip.
@Rockylou22 cool! was it an artistic choice to keep middle one still? or am I missing it? love the CC on the strip
— Mariana Funes (@mdvfunes) November 21, 2013
Back to the photoshop for…
VERSION 3:
Alan Levine GIFAChrome DS106 3D Wigglegram
What to do…. What to do…. What I considered an artistic statement by keeping the middle frame still was confusing to others, So I put my artistic ego aside and turned the middle frame into a 3D Wigglegram GIF. A technique I acquired this summer creating Rockin’ The Rocks in 3D. And with Alan Levine as my subject matter while completing this project.
I very carefully extracted Cory sitting in his comfy leather chair from the bookshelf background with the quick selection tool. I then had to use the clone tool and spot healing brush to rebuild some of the bookshelf and applied a blur filter to the entire background. This would help Cory’s image stand out even more.
I made three images of Doctorow and off-set each slightly. The 3D wigglegram GIF looks better if it “wiggles” faster than the other GIFs I was using. To create this effect I made 12 animation frames for the entire GIF sequence at 0.06 seconds in duration. The top and bottom frames remained stationary for 6 frames each (a total of 0.24 sec) while the center frame rapidly oscillated at the 0.06 frame rate.
GIF Download: Cory Doctorow GIFAChrome DS106 GIF Strip- 100ppi
We were requested to save our files in the high resolution of the original images. At 3000ppi this resulted in a final Photoshop file of a whopping 1.4GB. Ouch! That’s huge. It’s amazing that my computer didn’t crash- just slowed down during processing. If you’re interested you can download the whole thing here. All were created in Photoshop CS5.
TEMPLATES:
GIFAChrome Templates are in the .png format so you can easily insert your own GIF images with a transparent center frame.
GIFAChrome DS106 GIFStrip template DOWNLOAD
GIFAChrome DS106 Single Frame Template DOWNLOAD
I was late night tinkering on a current remix effort of For The Remix, an open invitation to generate remixes from Jonathan Worth’s photos of author Cory Doctorow (also a ds106 assignment)
For this go around, I wanted to do something in code, and in the web. I cannot remember where the dim light bulb first flickered on, but my idea is a modernization of the 1970′s mood rings which purported to indicate a person’s mood when really it reacted to skin temperature (disclaimer: I honestly owned one) (( never wore it in public).
To jump to the final remix chase, my concept reflects that Cory has many things on his mind- books, privacy issues, technology, copyright– and in his private think space he can ponder these and his skin would radiate a mood color. As you mouse over some of these topics, see how his mood color changes. See it in action at http://lab.cogdogblog.com/cory/:

I started with a screen sized version of the photo of Cory where he is seated on his chair, library behind him (with irony, I used the same image on my last remix) this is image Cory 004f1 duo. This one works well because he has bright skin color on his hand, face, and chest that I figured I could find a way to dynamically colorize.
In my original idea, I would place little objects on the shelf to represent the topics, but for a first cut, I found a jquery code library designed to allow web sites to create color options for products like t-shirts — Niko Rablin’s Product Colorizer jQuery Plugin. I used the basic example to color one item, in the original it looks like:

When you click a color chip, the t-shirt changes. The method uses two images- one a JPG of the entire scene making sure the thing to be colored was light toned. The second needed image is a mask, a transparent PNG image where the parts that are to be colored are transparent.
These are the two final images:

Background image
Doing this involved some meticulous PhotoShop selection work, especially since some of the margins were not clean boundaries. I ended up using some new techniques, especially the pen selection converted to a selection I learned from Michael Branson Smith.
There are about 8 different contiguous sections to deal with.
I zoomed in on the area and use the pen tool to select the general shape I would fine tune and diffuse the selection later.

Pressing command-Return (on Mac OSX) turns the pen path into a selection. I then go to the menu Select -> Save Selection…. This saves the selection as an alpha mask channel– everything selected is white, and what is not selected is black, like a mask.
I continued doing this for all the light skin spots, loading about 7 selections. I added tow more which were shaded (I named them “minus” so I would know the difference) parts of his hand and the shadow under his nose that are shaded.
Next it is time to make a layer mask to combine all of these. I duplicated my base image to a new layer. I then go through a process of using Select -> Load Selection… to each time select a new area and make sure I click the option to “Add to Selection” (the very first one is of course “New Selection”)

And for the twi “minus” selections, I change the option to “Subtract from Selection”. When done, I save this entire selection to one called “Final Skin”

I still have some fine tuning to do as it has some sharp edges and some places where some shadows should be eased out. I do this by activating this channel, and I can use paint/erase tools to deal with this using black and white as colors, remembering that black is what is blocked and white is what is seen through. I can go back and forth to my main image, and load this selection to test my mods.
For the final mask, I make a copy once again of the main image, load the selection, and finally delete. Hiding all the other layers shows me the image, which I save as a transparent PNG.

If you want to see the Photoshop file, here ya go
http://cogdogblog.com/code/cory-mood-psd.zip
Now i have the two images needed for my template. I actually made a copy of the demo code for the Product Colorizer jQuery Plugin, and remove everything but the demo (taking out text). I resized a few of the dimensions in the style sheet.
For the background I use a trick I use on several other sites, the jQuery back stretch. This enables me to have a single image which changes in size as the window changes to fill in cleanly. I used a creative commons licensed flickr image of mood ring.
Each of the colors is done by creating in the index.html file a link that looks like:
<a rel="r,g,b" href="#mask" title="Topic">Topic</a>where r,g,b are 0-255 colors (I used the photoshop color picker to get these values). The name in the title and the link are what it repreresents.
Now where did this topics come from? A melange of guessing and googling about Cory Doctorow. From my notes:
Some sources for these include:
Tech Essentials: How Cory Doctorow Gets Around (Wall Street Journal)
http://online.wsj.com/news/articles/SB10001424127887324354704578635792701857784
I’m Cory Doctorow, and This Is How I Work (Lifehacker)
http://lifehacker.com/5993401/im-cory-doctorow-and-this-is-how-i-work
The NSA’s Prism: why we should care (The Guardian)
http://www.theguardian.com/technology/blog/2013/jun/14/nsa-prism
I cannot say the colors really indicate much, except for the dark tones for negative ones.
I did not like the functionality that you have to click on a chip to change the color, so I edited jquery.productColorizer.js and moved the code that changed the color from $(swatches).click $(swatches).hover (actually removed the click code completeley). I also added an empty div to index.html to fold the text above Cory’s head
<div id="marquee"></div>
positioning it absolutely to be in this spot via my CSS
#marquee { color: #fff; display:inline; position: absolute; top: 80px; left: 80px; width: 500px; font-size: 180%; }Then back in
jquery.productColorizer.jsI added some code to update this text based on what item is being hovered over
$('#marquee').text('This is my ' + $(this).attr('title') + ' Mood');I also added some more code to make this disappear (set the text to blank) when a mouse leaves a swatch
$(swatches).mouseleave(function(e) { e.preventDefault(); $('#marquee').text(''); });I likely lost y’all with the code. Sigh, I swear I spend 3 times as long writing things up than creating.
But if you want to poke around, I share:
a full archive of the site (you can run this from your desktop) just open index.html
http://cogdogblog.com/code/cory-mood.zip
So I am looking at Headless Weeks 13 & 14: ximeR and M@$#up, there is a lot of stuff to watch, read and think about. There is also Alan’s Triple Dog Dare for one is:
Which I’ve done before.
So I end up on my usual ds106 pattern, browsing through the assignment bank until I circle back to the first one (Cory). By this time I’ve forgotten some of the details, but I am busy dreaming and googling.
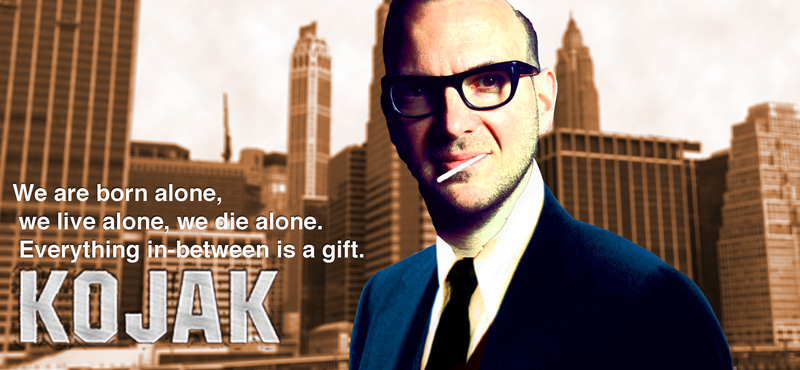
I start with Yul Brynner, and veer to Kojak. I’ve now forgotten all of the details and heading for a Troll Quotes. The idea in my head is a wonder, perfect photocopying, I’ve forgotten I don’t know photoshop and a searching flickr for a background.
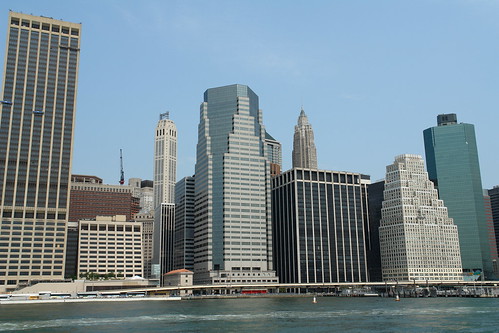
Lower Manhattan Skyline, New York, NY, USA | Flickr – Photo Sharing! by Flickr: MD111′s Photostream
used under a Creative Commons — Attribution-NonCommercial 2.0 Generic — CC BY-NC 2.0 license.
My imagined assignment is now better than perfect. Then it is all cloud filters, saturation for the brown ‘kojak feel’, a bit of a mask on Cory to try and get a drawn feel.
By bedtime I am delighted, in the morning I realise I am probably missing the target on a few levels, driving to work I decide to post anyway, maybe I could get a story out of the making?
The quote: Quote by Yul Brynner: We are born alone, we live alone, we die alone….
For FTR!, I decided to take the office photo with the picture frames on the wall and put a portrait of Cory Doctorow into the frames. Both the picture of Doctorow and the photo of the office were taken by Jonathan Worth. In order to do this, I had to measure the dimensions of each frame by recording the coordinates of each corner and finding the width and length. After recording them, I scaled and pasted as a new layer the picture of Cory and moved them to their appropriate frame.

This was more tasking than I was previously aware. For some reason I couldn’t figure out how to make the first image I placed (the one you can see in the screenshot above) to fit the frame, but I think I did a decent job with the rest of them.
Here’s the final product:

Those three words pretty much haunt every geometry student at some point in their life. A square is always a rectangle, but a rectangle is sometimes a square? How can that be? It’s all about the properties. Quadrilaterals share a lot of different properties, but there also are a lot of differences between them. We could even say that they are remixes of each other (do you see what I did there?). This is leading me to the assignment of For the Remix in which us ds106 students have the opportunity to adjust a photo in whatever way we see. It’s really a cool idea, and I am excited to see how far it can go. Want to take part in it? Click here!
So looking at all of the different pictures, I decided to go with the one of Cory’s face in 12 different squares. It’s simple, yet together it makes art. You see very subtle differences in his movement which really helps to express his emotion, which seems calm and serene. When I think of being calm and serene, call me crazy but I think of math. Currently I am in no math classes and that makes me so sad. There is just something very soothing about being in a math class, so I usually find myself doing the homework for the class that I am a PASS leader in as a way to calm my nerves.
Looking at this picture just for some reason made me think of math. Yeah sure, call the nerd alert, but it’s true. So I decided to do a play on mathematics, for this artistic interpretation. For starters I wanted to have the squares now be different quadrilaterals, and I also wanted to be in a picture (because I have glasses similar to his anyway and mine have math symbols on them so it’s better).
So I did what they told me not to do, and I opened the picture in Paint (I know I am such a bad ass). I did this in order to cut and paste each individual square into GIMP where I did the editing. However, GIMP and I do not get along in the cropping front, so I figured I would just save a bit of time and have a few (or 11) layers.
The main tool that I was using was the Perspective tool in which I changed the shape of the square, thus changing the perspective of the photo. I was actually really surprised to see what I was going to get. So I decided to make the whole first column be parallelograms. Deciding that just simply tilting each square a bit to the right or left wouldn’t do much, I decided to make the second column trapezoids. The third, rectangles and the 4th is the perfect square.
I then took a picture of myself on my iPhone and used an Intragram filter in order to the framing as well as the tinted color (which looks nothing like the coloring of his photos, but I enjoy to stand out a bit).
So now I bet you are trying to visualize what I came up with?
Well here it is!

I was actually really happy with how it came out, but I wanted to add a bit more. I decided to go for writing the different equations in different ways to show how math can be different, even if a rectangle is always a parallelogram.
Thanks for reading!
Princess Karissa
For this assignment I was tasked with remixing photographs by Jonathan Worth. While I’m not quite sure if a video was meant for this assignment, I went for it anyway. I was at a complete blank as to what I should do, so I went with what I feel most comfortable with, iMovie.
I downloaded the three pictures I felt I could make the most out of, and developed a dialogue between the same person at two different angles. Here is a screenshot of my workspace.

And here is the final product.
The most challenging assignment of the week: For the Remix!
I don’t like physical/3D art. Let me just put that out there. I don’t get it. My roommate is in a Studio Art course, and I don’t get anything she does.
So, that was off the table. I downloaded the photos from the wordpress site and opened them up in Corel PaintShop Pro X5. I wasn’t sure what to do yet, but I wanted to see them all laid out.
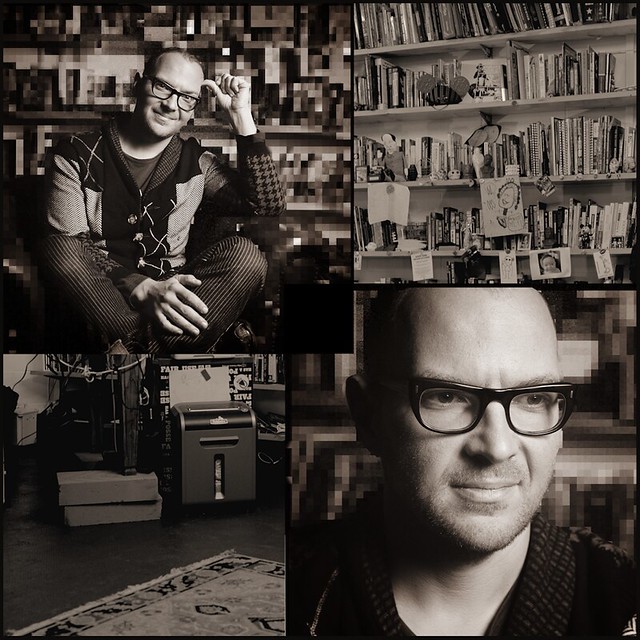
I work better when it’s off-the-cuff. I opened the photos I liked best and started to mess around. I used to do this pixelated, grid-like thing to photos in middle school. Under Texture Effects, there is Mosaic - Antique. I duplicated the photo layer then used the effect. I erased the parts I wanted to be visible and clear–his face, etc. That’s it! I put the pictures all together on one and created a black square in the middle so they weren’t overlapping.
I wasn’t originally sure I was going to keep this “remix.” After staring at it for a good while, though, I realized it had a computer-pixelated effect that went well with the topic of Cory’s books.
I hope this was appropriate, though!

This work is licensed under a Creative Commons Attribution 3.0 Unported License.