Movie trailer

Have you ever tried to describe a movie or a TV show to someone but you just couldn’t find the right words? Well you know what they say a picture tells a thousand words; in that case a moving picture must tell about a million words. For my next original assignment, movie trailer,  create your own movie trailer for a film or even a TV show and show people why they’re worth seeing. The examples I have made for this assignment are actually all part of my final project, each detailing an anime I reviewed:

Like I said your movie trailer should try to capture the attention of the viewer and make them want to go out and watch whatever you’re promoting. Now I took two paths to doing this, the informative and the curiosity. For informative the examples are Eden of the East and Katanagatari, these trailers go over the grand plot. Telling you what the situations these characters are in and will face; and should incite your viewers to want to know what happens next for the man with the mysterious phone or what is so special about these blades of Shikizaki Kiki. For curiosity the example is Kill me baby, this trailer is supposed to make you question why these things are happening. It’s presented in a manner that gives you very little information, who are these girls? Are they friends, are they enemies? What led up to a situation where the blonde girl had to pole vault over a bear? In overall this should make your viewer want to know the answers and watch. Lastly my Fairy Tail trailer is kind of a mix. The start off is very informative, you’re told this is a world of magic and wizards who form and work in guilds. After presented with this information though you’re sort of blasted straight into the action of the series. You don’t know who these characters are or really what trials they’re facing but the action is moving by so fast that it becomes appealing to see these fantastical powers.

As an additional source of help I would like to walk you through the process I took with making these trailers. To be specific I’m going to show you how to make an anime trailer, since obviously that’s what I made, but you can no doubt take these same steps and apply them to any other sort of film, that is if you’re using Windows Live Movie Maker like I was anyways.

Step 1: Choosing your anime (obviously) Picking a series you like is a plus, but another thing you may want to consider is if the show has been dubbed in English yet. This honestly serves little purpose in the grand scheme of things, but let’s say there’s a scene you want to present muted with a score associated in for dramatic effect. Although you can remove the sound, the subtitles will still be showing throughout the video. This may just be me being a perfectionist, but those subs are really quite distracting to the viewers; not to mention may spoil a scene you may want to be mysterious. So the obvious method to solving this is to use dubbed anime as a material which for the most part has no subbing; or you can even try and use raw episodes, which are episodes in their original form and language; but those get increasingly harder to find after it’s finally subbed.

Step 2: Downloading or ripping material After selecting your series clearly the next step is to acquire as many clips and scenes as possible. If you have a DVD of the series then congratulations you just made your life easier. All you need to do is rip the material off them. The method I used was with the VLC media player which allows you to record the movie while playing. If you do not see this option, go into the view drop down menu and select advanced controls. After that just record any scenes you want, can’t be any simpler than that.

However if you don’t have a copy of the series then this gets to be pretty tedious. First and foremost, you need a way to download these videos online. What I have been using is the video download helper Firefox add-on. Where after downloading, you can easily download most videos online in varying formats. Next you need to find these animes and download them, this is where it can get tiresome and annoying if you’re searching for the best quality. A source I’ve been repeatedly using is the FUNimation Youtube page which actually offers many series online; you do have to make a trade-off with the FUNimation logo being stuck on the video but chances are if you got your materials from any other site they too have their logo or site name printed all over it. Download as many episodes as you need, I’ve downloaded literally entire series before just to compile into a 2 minute video.

Step 3: Editing With your clips in hand, now we move onto using Windows Live Movie Maker. How you start out your trailer is completely up to you, but the simplest and maybe even best way is to use the opening dialogue of the anime itself; which could be very informative or foreboding. This leads me to the tools you’ll be using, now hands down the tool I used most while editing is the split tool. If you want to take out a specific clip or scene from your video you can use the split tool to remove it from the original video which can then be placed any where you want. Alternatively, you could use the set start and end point function to do the same thing, but I prefer the split tool as you can still use the rest of your video while the start and end points remove anything that wasn’t selected. For the most part this is all you really need to do in selecting what to present in your video lather, rinse and repeat till you have all that you need.

Step 4: Audio Along with Windows Live Movie Maker a program that I use hand in hand with it is Audacity. For me, how long each clip made from the previous step would last depended on how long the audio I had accompanying it. You can of course just stick any old MP3 file on your video by dragging and dropping and have it play throughout; but that’s pretty lazy. I however, like to develop a score for my movies which usually involves me cutting highlights and fading in and out of songs. I would go into greater detail about this but Audacity is really quite straightforward, you just have to feel around for the controls at first and then you can mix any sound you like. But as for attaching sounds to your clips, what you may want to do first is mute them which is a rather easy process through the sliding bar pictured below. There are also more options on Movie Maker itself such as fade in and out, but since you’re using Audacity for most of your sound work already it’s not really necessary.

Step 5: Publishing Once you have your scenes and audio up there really isn’t much more to do, just simply save your video to your desktop. Keep in mind though that the point of a trailer is to show a preview of a film, don’t try to tell the whole story, leave the viewers guessing and wanting more. Try to keep it around 3 minutes maximum.

Lastly I just want to add that yes this tutorial would probably be much more bearable in video format, but just like all of you I am swamped with last weeks of classes and if I had more time I would gladly make this a video tutorial.

“Silent Era” Back to the Future – Dr. Brown Rescues My Sense of Play

My fifth grade teacher, Mrs. Piraino (you can imagine the nicknames we had for her), was a teacher that loved creativity. Every year she transformed her entire room into Santa’s workshop, letting her students build life size reindeer out of cardboard and decorate the walls with paper-crafted strings of garland. During the small group novel studies, she encouraged students to build dioramas, even entire set pieces for scenes from her favorite books. But while she would let our creativity run wild for large projects, I always sensed that her comfort with letting her students “play” with learning concepts was always a bit more straight-jacketed.

What elementary student wouldn't find this both funny and awesome?

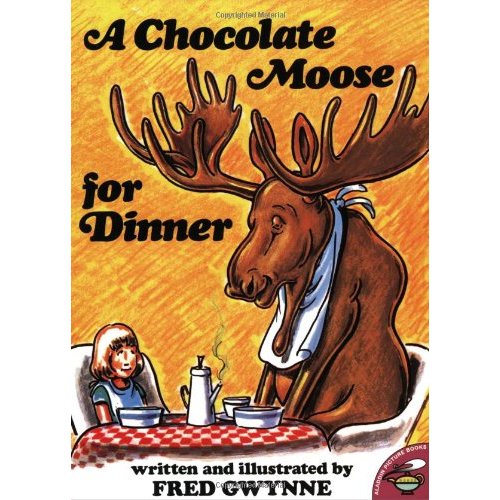
I remember while learning about homophones, she read aloud to us from “A Chocolate Moose for Dinner“, a popular children’s picture book filled with images depicting what idioms and homophones might actually look like if they were real. She gave us an assignment to try and come up with our own homophones and idiomatic phrases, then illustrate them for comedic effect (i.e. “my dad put a new wing on the house” would turn into a drawing of a house with a feathery wing stuck to the side of it.). I failed miserably at the assignment. It wasn’t from lack of effort though; I illustrated half a dozen homophones that I hadn’t seen or heard in any of the books my teacher had used, and I was proud of “playing” around with the concept. Sadly, I had the assignment returned with red marker all over it, so I gave it a second go; still no good. After a week of trying to play around with the concept, and receiving little to no feedback beyond the red marks of “try again”, I finally just turned in some copies of illustrated homophones and idioms lifted from one of Fred Gwynne’s books. I passed the assignment.

While Mrs. Piraino had an amazing streak of creativity that I will be forever thankful for, I remember that one assignment as an example of how she didn’t really allow us to “play” when learning new concepts, or rather, she didn’t take into consideration or make note of the progress we were making while we played, and sometimes struggled, to make sense of some new piece of information. To this day I’ll never know if I actually understood homophones back in 5th grade, but what I did take away from the experience is that as a learner, I feel that I’m learning best when someone is supporting my playful learning, failure, and struggles, rather than just saying “copy what’s in the book”. I’ve found that trying to build new understanding, whether it’s difficult topics like encouraging social activism or just learning how to edit in Adobe Premiere Pro, I usually learn best when working, failing, playing around with ideas,  and building something new with the support of a community.

Which is why I’m so enamored with the ds106 community. They are a powerful community of educators that understand how to support one another through play, social media, and constructive criticism. To be fair, the ds106 community has its own set of quirks, trolls, and problems, but any group of people that gives me the opportunity to re-mix the train chase at the end of Back to the Future 3 as a silent movie, and then applaud my sophomoric video editing efforts, deserves high praise in my book. Check out “Silent Era Back to the Future – Dr. Brown to the Rescue”, my “Return to the Silent Era” ds106 assignment submission below. If you want to view it on youtube, just follow the link here.

So why the lengthy introduction for this movie? I felt my experience offered some value in helping to better understand how I learn, and why I teach the way I do. Whether it’s working with young learners or adults, I have always despised the “carbon copy” approach to learning, in which the students are expected to produce a reasonable facsimile of the teacher’s example in order to prove they’ve acquired new skills. Whether it’s learning a new writing form, practicing math skills, or learning a new piece of software, I find myself growing ever more fond of allowing learners to create what they want to create, or at least giving them a challenge to create something in a particular style, but giving them completely free reign over the subject. I followed that belief in my attempts to learn Adobe Premiere Pro, a terribly difficult video editing platform (I come from several years of just using the simple iMovie and Windows Movie Maker), and rather than just follow some simplistic “paint by number” tutorial on how to use the tools that Premiere Pro provides, I decided to do it the hard, yet infinitely more enjoyable way, by choosing a project and jumping in with both feet.

How I made “Silent Era” Back to the Future – Dr. Brown to the Rescue

I started with the following clip of the original train chase scene from Back to the Future 3:

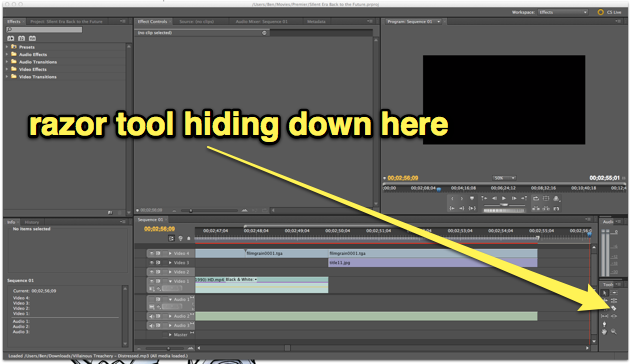
In order to make it look like it came from a silent film, I had to get it downloaded from the web first, so I used my good friend KeepVid, which allows you to download many different formats of YouTube videos. I chose the 480p version in hopes that would keep my video project on the small side. After downloading the clip I imported it into Premiere Pro and used the “razor tool” to slice it up and remove some of the bits of video. Note, the razor tool was great after getting used to it, but I much prefer having a nice keyboard shortcut so I could just line up the playhead and cut away with the shortcut. If I missed that shortcut, or an easier way of using the tool, please share!

You can find the razor tool with all the editing tools, but I couldn't find a keyboard shortcut

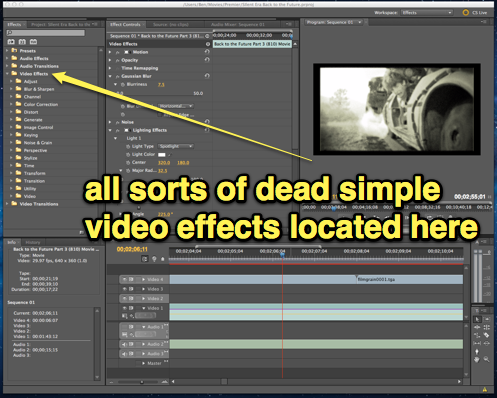
After slicing and dicing the original video clip to remove a few unwanted portions (although in retrospect I would have cut a lot more out to create a more polished flow with the music), I was ready to start playing with the “aging” process. Apparently there are a a lot of thoughts on how to best make a piece of footage look like it came from the silent era using Adobe Premiere Pro. Some people suggested using posterize and fast blur effects on keyframes to produce the “jumpiness” and uneven exposure of old silent film. I wasn’t quite ready to dive into key frames (perhaps on the next project), so instead I just focused on the degradation of quality, black and white, and film grain.

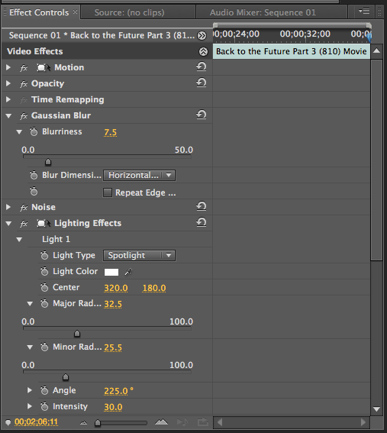
I selected all of my video footage and then applied some of Premiere’s built in video affects by dragging them over to the Effects Control pane. Noise, Black & White, and Gaussian Blur effects helped produce the right low quality look I was looking for, while the Lighting Effects allowed me to add that “vignette” like effect with a few soft spotlights.

The video effects and the setting I used to create the "aged" look

Merely making the film look old didn’t quite do it for me. I played around with a lot of the other video effects (there are a ton more than what I’m used to in iMovie), but none of them seemed to add what I was looking for without investing a lot of time fine tuning each setting. That’s when I decided to go digging around the internet some more and came up with this great Particle Illusion project that had a video overlay of 8 seconds worth of film grain, scratches, noise, and flickering. I simply looped the 8 seconds over and over for the entire length of the film to ensure that it had all of the same noise from beginning to end. Making the film look like it had come from the silent era was only half of the task, however. After making sure that the video footage looked reasonably old, I had to make sure that it sounded right (since silent films were typically accompanied by a piano), along with some title cards to share dialogue spoken on screen.

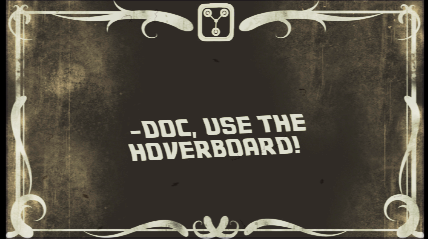
I decided to complete the title cards first, since I like to save music and audio for the very end. By finalizing the video and stills first, I have a clear idea of just how much music I’ll need, so I started looking for a “silent film” title card. I came across this awesome silent film title card by Farrin who blogs over at CopyCatFilms. Not only was this a high quality piece of work that she had produced using Adobe Illustrator, she had provided it for free, yay! If you take a look at an image of the original title card below and the final version you’ll notice a few changes. I opened up Farrin’s title card in Photoshop, removed the fleur-de-leis, and replaced it with a snippet from this graphic of the flux capacitor (it’s what makes time travel possible, don’t you know). I’ve already blogged about the awesome Back to the Future font that I found on dafont.com, so I just used it again to create each of the title cards. I turned down the opacity of the flux capacitor image and the text to help age it a bit to match the aesthetic of the original title card. Notice the “yellowish” tint to the final card? That’s from the film grain and noise video overlay that I mentioned in the previous paragraph.

title card before I made a few modifications

title card after adding the flux capacitor and text

Once I had successfully spliced together all of the title cards, my aged video footage, and the video effects, my last stop was music. While many people have commented that they would have liked to have seen this video with an “old timey” piano version of the Back to the Future theme, I was hard pressed to find one. Oh sure, you can find plenty of piano renditions on YouTube of the main theme, but many of them aren’t terribly polished, and none of them really captured what I was looking for. It worked out for the best, because I was able to find this amazing collection of royalty-free silent film scores over at Incompetech (such as awesome name) by Kevin Macleod. I used a couple of tracks from the site, one being “Iron Horse Distressed” which was perfect for producing that stereotypical “silent film train chase” atmosphere while Doc Brown and Clara are struggling to hold on for their lives. The second piece, “Merry Go Distressed” was a chance to be a bit playful with the storytelling, as this much more cheerful music kicked in after Doc successfully rescues Clara with the help of Marty and the hoverboard.

The original speed of the tunes didn’t quite fit well for me (they were too slow for the action in the video), so I used the Clip Speed/Duration pane in Premiere to adjust the speed of the audio clip to produce a much more “frantic” train chase. Although I didn’t alter the speed of the video, having the faster music almost makes it appear as though the action is sped up as well to me. Having access to “distressed” music also helped add to the ambience of the piece in my mind.

playing with the speed of a music clip can often change he entire mood of a video

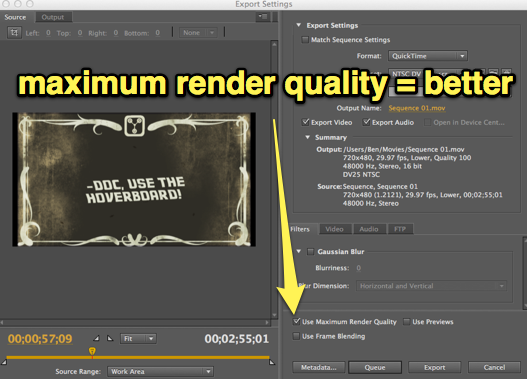
Once everything was tweaked to my liking, I then had the the fun task of learning a new way to get my finished project out of Adobe Premiere and uploaded to the internet. It seems as though no two video editing application are alike for even the simplest of tasks like exporting your final piece; iMovie uses the Share menu, Windows Movie Maker Live has you Publish your videos, and Adobe Premiere uses a much more straight forward Export command. My first attempt to export the video resulted in a helper application being opened, the Adobe Media Encoder. While it was quick, I realized I had exported a low quality version of my movie, so I went back to the FILE>EXPORT>MEDIA command, choose the Quicktime format to export too, and then checked a tiny little box that I hadn’t before called “Use Maximum Render Quality” which took a bit more time, but apparently didn’t need to open the Media Encoder (at least I didn’t see it open), and produced a much higher quality video.

Sometimes it's easy to miss little things like this checkbox

With that, my day long editing and remixing task was over! While I had worked on this piece off and on for the better part of the Friday before Spring Break (I had the day off of school), in total I must have spent about 5-6 hours editing this together; not terribly long or difficult, just time consuming as I learned what each of the video effects did, searched for tips and resources, even stopping to figure out just how to export the final product. It probably took me longer than if I had followed some basic tutorials in a text or watched a few prescribed videos, but the end result was a labor of very playful love, and I value the time spent with the entire project that much more because I was able to play, and fail a few times, on my own!

Want to try remixing one of your favorite films as a “Silent Era” movie? Head over to the ds106 assignment bank and give it a try!

DS106 – Now Available on Blu-ray Disc!

The overwhelming majority of individuals who are engaged in the DS106 course are doing so remotely. Today’s statistics indicate that there are 596 active DS106 members whereas less than a total 80 are in attendance in the two sections facilitated by Jim Groom and Alan Levine at the University of Mary Washington.

However, if you are part of the vast majority of off-campus DS106 participants, imagine if you could acquire a Blu-ray Disc which contained the following:

  • all DS106 lectures of both Jim Groom & Alan Levine
  • guest lecturers including Gardner Campbell & Zack Dowell (“the Noise Professor)
  • featured student reflections from past DS106 courses including the talented artist Giuila Forsythe, two of Saskatchewan’s most influential educators Dean Shareski & Alec Couros, and inspirational designer and DS106 facilitator Tim Owens
  • tips on how to acquire a personal domain and quick-start steps to setting up a WordPress blog & theme
  • time-saving tips on how to use GIMP and Photoshop
  • sample student and instructor progress conferences
  • top three assignments (voted by peers) for each of the eight assignment categories from past DS106 courses

How much would you be willing to pay for such a Blu-ray resource? I know that as a non-credit online “freeloader”, I may not have paid money to enroll in the DS106 course, but I would certainly pay handsomely for such a DVD if it saved me time and provided me with additional resources to improve my learning experience.

When I was considering enrolling in this course, I was impressed by what Jim Groom stated in his welcoming post entitled “ds106: We’re open and you’re invited“.

… what made it amazing was that anyone can do as much or as little as they wanted as part of the open, online section and leave the rest. We don’t accept apologies and we don’t believe in guilt, there is no sorry in ds106. Simply come prepared to make some art, have some fun, give some feedback, and leave when you want.

This important statement “there is no sorry in ds106” resonated with me. True, it provided me with a guilt-free opportunity to learn. However, this quote was also quite similar to an important line and theme from the 1970 movie “Love Story” staring Ali MacGraw and Ryan O’Neal. In fact, it was this quote that motivated me to consider designing the following Blu-ray Disc cover as part of the “Animated Movie Poster“.

In that most participants in this DS106 course were likely born after 1970, and may not be familiar with the original movie, I thought that I would share the following original image:

I realize that my attempt to animate this image is somewhat elementary when compared with my colleagues’ more sophisticated submissions. However, I am just learning to use Photoshop Elements and I hope, in time, to eventually improve on the animation process using this application.

In the meantime, I chose to use a free, Windows tool called Ulead’s Gif Animator Lite (GALE). I concentrated on the word “STORY” because the focus of DS106 should be on the STORY (and not the software). Unfortunately for me, I am spending many hours becoming familiar with the intricacies of the Photoshop Elements software and I can assure you that I do have a story to tell about my learning experiences.

To animate a word, I knew that I would need to save several copies of this Blu-ray Disc cover, each with the word “STORY” in a different color. I began by changing the black “STORY” in the original “Love Story” font to red and learned that one does not want to have to change the letter colors pixel by pixel. This discovery only took me 2 hours! I then decided to replace the original black “STORY” with a similar font in Photoshop Elements where I could highlight all 5 letters and select a new color. Since only .BMP and .JPG images can be loaded into GALE, each Blu-ray image, with its own “STORY” color, was saved in a .JPG format.


In GALE, one selects the “Layer > Add Images” menu items which allows selection of the prepared colored “STORY” .JPG images using this important technique. Each of the individual color images were then set to display for half a second. By clicking the “Start Preview” button, one can determine if there needs to be any changes in the respective color time delays. Once the animation test looks reasonable, one can click the “File > Save As” menu items and save the result as an animated GIF.

In summary, there is no doubt in my mind that my engaged learning within the DS106 community is indeed a “Love Story” of sorts. My only concern, is that I have not added too much friction, with this Blu-ray fiction.

Take care & keep smiling :-)

Fair Use Educational Image Credits:

  • “Love Story” Blu-ray Disc cover -
    http://www.starpulse.com/news/Paramount/2011/12/26/love_story_debuts_on_bluray_february_7
  • Alan Levine photo – http://www.flickr.com/photos/cogdog/6318291537/
  • Jim Groom photo –

    http://www.colecamplese.com/2008/11/the-revolution-is-in-full-swing/

4 Icon Challenge

Tim Owens posted Kyle Tezak’s  challenge “Description: Reduce a movie, story, or event into it’s basic elements, then take those visuals and reduce them further to simple icons.”  Here’s my attempt with my favorite movie…

Four Icon Challenge!

I admit that I’m a bit late to jump on this bandwagon, but it looked like fun and I wanted to update with SOMETHING. It didn’t take that long, but I wound up asking Mauve and Twitterless Boy for feedback because, naturally, I got stuck on the last one. I knew what I wanted to impart, but I didn’t want it to be too complex or specific.

So here you go: Guess the movie.

I might just do another.