I Have Never Met a Sunset I Didn’t Like

For like the one thousandth time I am going to say it… I love sunsets. I know you all are probably annoyed with how many times I’ve gushed about them but I don’t care get over it. So with that being said it only makes sense that for my next visual assignment I… drumroll please… use sunsets!

My second visual assignment of the week was a four star assignment called “time of day”. This assignment asked individuals to take a picture of the same spot several times throughout the day and then merge them together to show the differences that occurred in that particular spot over time. I really liked what this assignment was asking and have seen numerous people post things similar to this such as time lapses on platforms like twitter, Instagram, snapchat, etc. Ultimately I considered my image like a time lapse. Like wise I felt this assignment allowed for the telling of a story through a similar photograph, however showing slight variation. The contrast is what I found fascinating.

Inspired by my first visual assignment of the week which told a story of my summer trip to New England; I decided, instead of taking numerous pictures of something around me currently, I would rather use photos I took on that trip. I began to look back at my photos and realized first of all, I took one too many sunset pictures but that I actually captured exactly what this assignment was asking for without even recognizing it.

While in Cape Cod, Massachusetts I had witnessed the most breathe taking sunset in the history of sunsets. So what did I do? Of course take just about 100 photos of it. Well I can now thank my past self for helping current me out. I felt by using these photos I would be able to show something worth looking at. Not that there isn’t anything worth looking at, but I figured it’d be more meaningful than something like a tree that at this time of year isn’t changing much. Similarly I wanted to continue with the theme of using my New England summer trip.

The images I combined together ultimately created a visual time lapse of the sun setting. I found this to be an incredibly cool way to see the progression of a sunset. Yes, videos do a great job of capturing beautiful things like this however, these still images allow viewers to truly see just how slightly the sun changes creating an even bigger picture. Similar to the readings I read earlier in the week about photography, I kept in mind things such as contrast, perspective, lighting, moments, etc. I am a stickler for good lighting and I think while I am not even close to a professional photographer, I was able to capture decent lighting in these photos. I didn’t have many of these things in mind when capturing each individual picture back this summer, but as I was merging the images together for this assignment I began to dissect each one and think back to what makes a good photograph.

Ultimately I had fun creating this assignment. I built off of my last visual assignment and used it as a source of inspiration. Furthermore I utilized photographs from the past rather than capturing images from the present. The images I merged together told a story of a sunset, one of the best sunsets there is to see. However every sunset is different and this serves as a narrative of a specific one set in Cape Cod, MA. I’m glad I was able to also reflect back on different aspects of photography and what makes quality photos. I plan to continue to keep this in mind when it comes to further assignments.

as the sun goes down

Richmond International Speedway over the course of 4 hours

I took these photos back in April at Richmond International Speedway during a race. I messed up the spot of the first picture, but the rest of them were pretty good…

The Magical Island of Gwynn


Worth 4 stars I did a collage of pictures from the same place but instead of doing it at different times of day I choose to use pictures I had taken of the sunset because I knew there was a place I had taken many pictures of over the years. I had a chance to take many pictures of this specific place because I’d pass it any time I was leaving my house. It’s a view of the sunset reflecting off the water in each picture. I live on Gwynn’s Island in Mathews, VA so I drive over a bridge and right along the water to get to and from my house. It is my favorite spot on the island also the land area that you can see across the water is where my best friend lives so its nice being able to look over and think about her! I used Photoshop to enhance the pictures and also create them side-by-side it was a little difficult figuring exactly how to place them but eventually I got it figured out and I love the results.

Looking out the Window

I was inspired by the Time of Day visual assignment to make this piece for my story.

embed

To make it, I first took several pictures from my window, just like the protagonist of my story painted. Then I applied a filter to make the photos look like paintings.

Just Over Half Done

Hicks Court

For the next visual assignment I reached even higher for the sky with a 4 star challenge. “Time of Day” consisted of taking several pics of an image throughout different times of the day. I captured the view from my a bedroom entry door while watching my daughter board the school bus as it was the earliest part of the day in which I look outdoors. Again later in the morning I took another pic as well as at noon. The final pic I took in the evening just as my day comes to an end. The pics tell a story of how our day transitions and it is a beautiful sight to pause time and just be in the moment.

Remix #1: Time of Day from My Window

My New Appreciation for Photo Editors
I’m not going to lie…When asked to edit an image in Pixlr or Photoshop, I was a little nervous. I have never done anything but a collage. In fact, the biggest difficulty I encountered while trying to complete this task was figuring out how to navigate the picture editing program, Pixlr. However, after I figured out how to navigate, it was pretty easy. YouTube tutorials help a lot, even though I did have to figure out some things on my own still.
I knew I wanted to do the option of Time of Day because the beach picture was beautiful, and I love nature images. Although I would have loved to travel to Jamaica and spend a week on the beach gathering different images throughout the day, I settled on a tree in my backyard. Usually, there is a beautiful sun set in my back yard, but I did not luck up to capture the images on a night that was red, orange, pink, and yellow. However, I still am very happy with the final image.
For those that would like to try this on their own, I hope these instructions are easier to follow than anything I found online.

How To:
1) Take multiple pictures throughout the day and upload them to your computer.
2) Log on to Pixlr, Online Editor.
3) Click on the “Open Pixlr Editor (Advanced)” link.
4) Click on the “Create a New Image” link. It’s the first option.
5) You then have to chose a size. You can manually set the size, or there are some options to chose from. My images were 2448 x 3264. I had to load an image first to see the size. If your size is not set the same as your images, it will crop out a large portion of your image, which gets frustrating. After that, a white blank working box will appear.
6) Next, click on “File” and then select “Open Image.” Find the base image (mine was the image on the far right) from your documents on your computer and upload it.
7) After that image appears, you need to unlock it. There is a box on the right, middle side of the screen titled “Layers.” There will be white box with “background” written next to it. There is a lock next to that. Double click on that lock. You will need to repeat this for all images and the initial blank box.
8) In the toolbar, there will be a Marquee tool, found under the crop button, that you need to click. Then use that tool to select all of the first picture. (You will select less and less of each subsequent image, subtracting an equal amount from the right side of each image.) After you have selected the portion you want to use, press “Ctrl + C” to copy that portion.
9) Click on the Blank box and press “Ctrl + V” to paste that into the working blank box. If you need to move the image, which you probably will move more as you paste each subsequent portion into the box, click on the Move Tool and then move the image into place.
10) Repeat steps Step 6 – Step 9 for the number of different images that you want to include. Make sure you divide out the space equal to however many images you want to combine. Don’t forget to unlock each image that you upload so you can copy and paste it.
11) Last, go to “File” and select “save” to save your image.

Boarder: I then entered into the “Open Pixlr Express (Efficient)” mode, uploaded the image, and added the feather boarder to smooth out the edges that didn’t line up perfectly.

Visual Assignment–Time of Day and TDC 149

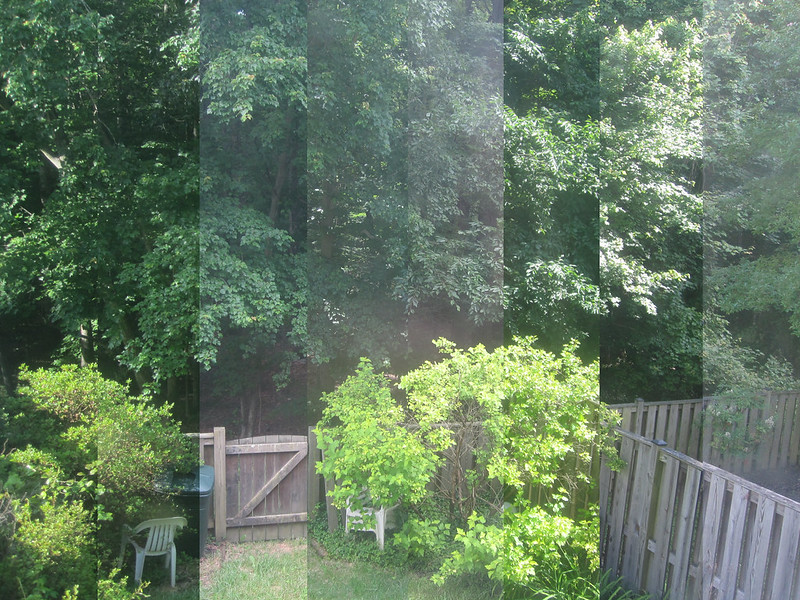
My second attempt at one of the Visual Assignments from the DS106 repository is Time of Day, which appealed to me because of the image appearance and because I wanted to try some more work with layers and combining photographs.

Take a picture of the same spot outside several times in a day, then merge them all together in a way that shows the differences in appearance over the day.

When the Daily Create for that day turned out to be take a picture multiple times over the course of a day and represent it as one picture, it seemed an obvious choice.   So I set up a small camera on a tripod and took a picture every hour at 6 after for 12 or so hours.

This was my finished product with the earliest photo in the strip on the left and the latest in the strip on the right, but it didn’t come easy for me.

Time of Day

The editing of these images (I ultimately used 8 of the 12) was particularly difficult one for me, mostly because of my unfamiliarity with Photoshop.

Scott Plunkett‘s tutorial for the assignment gave me a good approach for what I needed to try to do (specifically to just cut off increasing slices and layer them on top of the base image), but he used MS Paint and I wanted to try to figure it out in Photoshop.

I tried multiple wrong ways to edit them down and managed to crash Photoshop three times and my computer twice  in the process.  I walked away and came back the next day.  This is the process I finally figured out:

  • I opened up all of the images I was going to use in Photoshop
  • My base image here was the last image taken (on the finished photo, you can see the strip on the right side).
  • Then I took the next-to-last image and selected the section I wanted to keep – I calculated that each section would need to be 1/8 of the photo (in this case, I was using inches, ~2.75 per slice).  That meant that each section would be 2.75 inches smaller than the previous one.
  • For each photo, after selection the section that I wanted to keep, I right clicked on the photo, chose Layer via Cut, which creates a separate layer with just the selected material.  Then I right clicked on that layer (Layer control is usual in the right lower corner of the PS screen) and chose Duplicate Layer.  For output, I used the pull down menu to choose the base layer photo.  That places the cropped layer onto the original photo.
  • Then I just repeated the process, in reverse chronological order, cutting more and more off of the succeeding photos until the last one was just a single 2.75″ wide strip from the far left size and layering them onto the base image with all the other images.  The result, an image with 8 layers, saves as the image you see above.

Once I figured out the process, it was fairly easy, but it was a bit frustrating as I flailed around a bit.  Still, I’m pretty satisfied with the result.


Time of Day

Take a picture of the same spot outside several times in a day, then merge them all together in a way that shows the differences in appearance over the day.