Many, Many Me’s

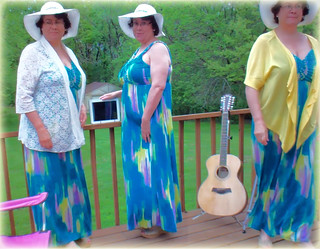
In this universe, many me’s have joined together as partners in crime. Earth 27 me has just stolen the milk out of your fridge for Earth 42 me’s cereal, and Earth 212 me drove the getaway car.

I used Gimp to edit multiples of myself into one photo. Each photo was a layer, and for the first 2 layers I selected the section I wanted with the lasso tool, inverted the selection, and cut the background. Then, I merged the layers down into one and tried to smudge some of the harshest seams.

Wait, I Have Siblings?

For 4.5 stars this week, I completed the Multiply Yourself Assignment.

Take two or more photographs of yourself in one location. You must not change the position of the camera and take care that the light does not change either. Use a photo editing software to arrange yourself two or more times on the same location. You may use masks and layers or simply the selection tool and the paste command. It may be helpful if you have already experience with photo editing.

I started learning Photoshop over the summer, so I already had a little background in the software. I used a tripod to keep the camera steady and in one place, then set the timer, so I would have enough time to get to each position.

Once I had all of my photos, I opened them in Photoshop as layers.  I then created masks for each layer, in which I was the only thing that you could see.  Creating the masks was the easy part, but then getting all of the shadows to line up was the hard part. There were some of the images that there was a shadow in it, so it was hard to try to get the shadow into the final photograph.

There were some errors that I found after I had completed the photo, but hey, it’s not like I’m submitting this to a World’s Best Photo Contest or anything — This was all about the learning experience!

If in reality there were this many copies of me, I wouldn’t know what to do! I’m an only child, so that would turn my world literally on end (or upside down)…


Many Noras


Seeing Forest Folk x7!

Multiply Photo

puffintransblogIcelandic Week at the Bovine County Fairy Tale Festival seems to be causing multiple sightings of wee forest folk! Cousin Ron has hinted that we are not alone in Bovine County – but I am seeing more elves, fairies, and gnomes than terrestrial beings so far.

This is a visual assignment from the ds106 assignment bank. Multiply Yourself. I decided to multiply a Gnome named Boo (wonder if he is related or knows MamaBoo?) He is a playful guy popping out of the garden with a hearty laugh.

I had to set the scene. Set the camera on a tripod so it wouldn’t move and then place Boo in different places. Since he is a little stiff – I could only pose him at different angles of direction and depth from the camera.

After getting some shots, I uploaded to Photoshop and loaded them as a stack so that they all went into the same project file and at the same size.

From there it was selecting one as a base and then using the selection tools to cut Boo out and then cut the backgrounds placing him with the base photo in place. Since he is mostly in the foreground there was not as much detail in layering needed.

Another reason for choosing this assignment was to see how it might be useful in creating a fairy garden tour….still have that on my mind and bubbling.

I think I might teleport over to the Village and see if any of the forest folk have been in the gardens….


Trying to sleep

Will Smith once said, “We all want to be in love and find that person who is going to love us no matter how our feet smell, no matter how angry we get one day, no matter the things we say that we don’t mean.” So this particular assignment, when I saw it I was interested in doing it. A friend was laughing at this assignment and I was like:

not-funny


So all we have to do for this assignment is multiply myself in one picture. I used a previous program that we can edit for our GIF but this time I’m using it to create my picture which was not that difficult as I expected and that was GIMP 2. All I did was put my Samsung Galaxy S4 Active on my desk and I took pictures multiple times.

When I used GIMP 2, I first chose an image that I would use as my base map. Then I did my way by copying the other picture and then pasting it as layers at my base map (Edit->Paste as->New Layers), I afterwards knew where I was in the picture so I basically got myself into my base map picture by using the Rectangle Select (Tools->Selection Tools->Rectangle Select).

I exported it as a JPEG first and then did it one more time the same process over again. I followed a Youtube video that explained the concept of doing it and it was useful! After I finished it, I was so happy I just had to have this moment like Gus:

you-know-thats-right


Here’s my picture for this assignment:

Duplicate of me


In the picture it shows that I’m trying to sleep in different places but I’m so hungry that I can’t sleep and went to get some Swiss chocolates to eat.

How I Procrastinate

I did the Visual Assignment “Multiply Yourself,” worth 5 stars.

How I did this was I simply put my camera on our dining table, set the timer to ten seconds, and took siz different pictures of myself doing different things in the living room. I did not move the camera at all, and made sure the objects in the room did not move in between shots.

After I took my photos, I imported them into Pixlr, even though Photoshop would have made the process easier. After the were in Pixlr, I picked one of the images to be my base image. The image I picked to be the base was the one where I’m sticking my head through the door. I then used the lasso tool with the feathering set to eight to cut myself out from the whiteboard picture and paste myself into the base picture. In order to make sure I lined everything up between the cut out and the base image, I made the opacity of the cut out layer about 50-70%  until it was in the right position. Once lined up, I raised the opacity of the cut out layer back to 100%. Then, I cleaned up the edges with the circle eraser tool that has feathering. I repeated this process of cutting myself out of the other pictures and pasting myself onto the base image four more times until I had all six of me in the same room. The hardest Jess to clean up was definitely the dancing/jumping Jess because I had to make sure that the Jess laying down on the couch was actually visible, so I really had to basically outline the dancing/jumping Jess with the eraser almost down to the pixel. Once I got all of the Jesses in same image, I double checked to see if there was anywhere the furniture or the wall colors were off and touched up the spots I found with the eraser tool to make sure that the room layout was all from the base image.

If I try to do this kind of image manipulation again, I will definitely go out and buy a tripod for my camera, that way I won’t have AS much erasing to do.

twitterredditpinterestlinkedinmail

Multiply yourself

4 of me ..#swag

ManyMe In Spring

ManyMe Spring

I was cruising the DS106 visual assignment choices for something that looked fun and challenging – yet would only take a couple of hours to complete. The MULTIPLY YOURSELF assignment (Take two or more photos of yourself in the same location and combine them into one photo.) really jumped out at me.  And it was worth 5 stars!

The project unfolded in three phases.

Phase I woke me up in the middle of the night, my mind wouldn’t rest as it started planning how to set-up the shots so that the photo editing phase would be easier to handle.  I initially contemplated enlisting the aid of my partner or daughter to snap the shots, but then decided to take on the challenge of doing this all by myself from start to finish.  I decided to use my FlipVideo camera on a tripod to take video footage of me in different places in the frame. Then I’d capture still images on my Mac with Adobe Premiere Elements 11 and meld the images together in Photoshop Elements 11.

Phase II was all about setting up the location, shots and shooting the video clips.  I tested a few different scenarios before I had something I thought would work.  I added interest and personality to the mix by wearing something a little different in each shot.  (As an aside, just in case I wanted to use the video later to make a “live” version of the photo, I made sure that I entered the shots from different places in the frame so that I wouldn’t cross over into another shot when I melded them together.) The weather outside cooperated by not being too windy, the overcast morning meant I didn’t have any shadows, but I still needed to work quickly as it looked like rain was on its way.

Phase III was spent putting it all together.  I downloaded the video clips into Premiere Elements 11 for the Mac and selected several still images from each of the three “Rochelles”.  I was a little dismayed that the resolution of the images wasn’t all that great.  My decision to do this assignment without a helper or the need for a timed shot delay function was now suspect. I would have had higher resolution images if I’d used my regular digital camera on the tripod instead of capturing the stills from the FilpVideo. Alas, as I’ve found so many times before, creativity abounds when I’m seemingly “stuck” and need to find another way out. Not wanting to set everything up again, I moved forward with the “sub-optimal” material I had before me. I trusted everything would work out. Besides, I’m one of the online outside participants of the course, and there’s no real grade at stake here. ;-)

I diligently went to work cropping and blending my three images into one.  It was fairly easy except that the center pose lighting was slightly lighter than the two outside images.  Why??  I haven’t a clue. I shot the entire video in one 4 min session and the lighting matches at both ends.  Maybe the clouds thinned a little or something half-way through?? Who knows…. To fix this I used Enhance=>Adjust Lighting=>Brightness and Contrast on each of the 3 poses until they matched as best I could get.  While playing around I chanced upon a combination of adjustments that slightly blurred the photo even more and suddenly it looked great.  As usual I don’t exactly remember what I did to make it happen… it was “Magic”. Finally, I wanted to give the photo a border of some kind.  I like to play with all of the dials and sliders to see what shows up. EUREKA! The combination of Edit Layer Style=>Glow Inner=> Yellow was perfect.

I now have a beautiful feathered yellow glow surrounding my ManyMe photo that matches the yellow jacket I am wearing. Yippee!

I’m a terrible Game Master….

For this assignment, I decided to multiply myself. After a few different set ups, I was only able to accomplish two of me. I’d like to try another one later because I think this is a really fun idea and has a lot of cool potential.

I tried to mimic the board game environment, but it’s usually a lot more people and a lot more confusion.

multiply


Link to Original Assignment Page

Multiply yourself ds106 assignment 1

Here is my “failed” attempt at the Multiply yourself assignment, I chose this one because it seemed really cool and I didn’t think it would be as difficult as it turned out to be. Either way it’s more than one me in the picture so I still completed my task

fotoflexer_photo


http://assignments.ds106.us/assignments/multiply-yourself/