We Actually Are Here!

Original DS 106 Assignment: Are We There Yet? (3 stars)

Step 1: Find two photos that you want to alter. I am currently in the process of switching jobs! And naturally I don’t want to work at all. I would much rather be at the beach, relaxing, sleeping… anything but working.

Step 2: Open Microsoft Word and insert both photos. One photo is from the beach and the other is of someone working… how worlds collide. I was going to use a photo editor, but started playing around with Microsoft Word and found out there is a possibility of doing it on there! This is an upper hand for not having to download sketchy software or opening weird websites.

Step 3: Remove the background of the photo that you want to add/lay on top of the other photo. This is done by selecting the photo that you want to Edit > Picture Format > Remove Background. It will automatically generate the background parts it believes will need to be removed, but also has to option to select areas to remove/keep. This takes some playing around with to edit on how you want the final result to look.
Step 4: Add some text! Make the photo a bit more interesting and add context to it. I wanted it to look like a thought bubble so I added a shape. I went to the Insert tab > Shapes > Callouts and added text.

Step 4: Saving it as an image! I was not able to erase of the bottom parts of the computer/desk area enough to how I wanted to, so I am going to crop it as a photo to make it how I want. To do this I am going to use the Snip & Sketch feature on my computer. This application can be accessed by the Start menu or selecting the Windows icon, Shift and S all at the same time.

Step 6: Job transition… I mean, final product! We are here! Working from home at the beach… I mean completing the project! Overall super cool to find out Microsoft Word has this feature when I have been possibly opening unsafe websites trying to do other assignments. Save the image as JPG, PNG, or GIF and name accordingly.

Dreams do come true? We finally made it.

I am leaving my jo of 3 years… I have been here since I was 20 and just turned 23 in mid May. It feels bittersweet and the rest is unknown, but I have been complacent. If you want to hear a couple more of my thoughts regarding my job change, check out my Soundcloud below!

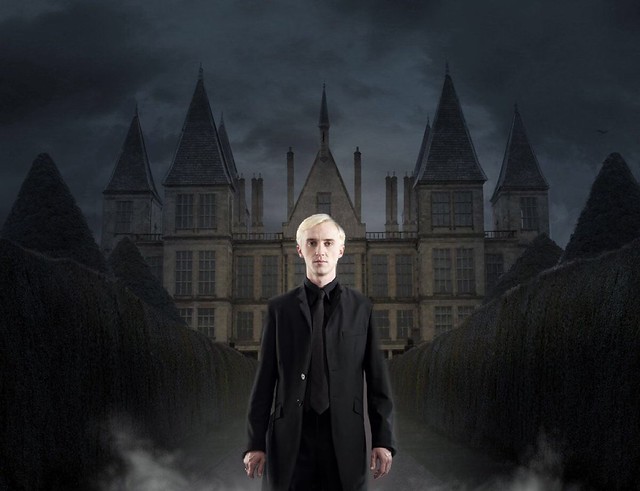
How to: Draco’s Return

Draco’s Return

I made this photo edit, inspired by the design assignment prompt, Are We There Yet?.  I took two separate photos, the character Draco and what is supposed to be his home back in the Wizarding World. Because in the story, he left, I wanted to make an edit of him returning home.

How I made this edit:

  • I found the two images on Google Images.

  • I went over to the Adobe Photoshop Mix app and started a new project by clicking the + button on the top right corner and Image – On my iPhone.

  • I added the house photo first, then added Draco as the second layer, on top. I pressed the + button in the middle right side of the screen,  Add a Layer – Image.

  • To get rid of the background of the picture of Draco, I used the Cut Out Basic Eraser tool.

  • After the editing, I saved the photo to my Camera Roll. Done!

We’ll Get There Eventually

This week’s mandatory assignment was very daunting to me. I am not proficient at extensively editing pictures, so I needed some guidance. I found a tutorial using GIMP, which is what I use, on another blog. This made me feel much less overwhelmed by the project by giving simple, step by step instructions. I did do some things differently, but I never would have known where to start without the other blog post.

Two Original Photos:


Final Product:

I chose these two pictures to combine because they were two of my favorite memories of 2016. The background is a photo of UMW’s campus during our one (lame) snow day this past year, and the second picture is of my best friend Meredith and me in the Bahamas last summer. Meredith lives 5 hours away from me and I don’t see her a lot, but the summer before we both went to college we took a cruise with my family to the Bahamas. I made some of my favorite memories there, like swimming in bright blue waters with dolphins, watching Star Wars in the middle of the ocean, and 24/7 soft serve ice cream service.

I have also made amazing memories and new friends during my first year at UMW, especially on this snow day. My friends and I just hung out and enjoyed our short reprieve from classes in the cold. I also chose these pictures because they are from two opposing climates; the Caribbean beach and a Virginia campus in snow. I thought it would be a more interesting picture to have these two opposites joined together.


The first step is to import the photo you want to cut out into GIMP. Then, using the free select tool, that looks like a lasso, click and drag around the image you want to cut out. I cut out the two people.

Then, right click and select edit > cut

Next, open a new GIMP file and import the photo you want as your background.

Right click on the photo and select edit > paste as > new layer, which will add your previous cut image to the top layer of this image.

While the new layer is still selected, right click and select layer > scale layer which will allow you to increase or decrease the size of the new layer to fit the background.

You can then move the cut and scaled image by selecting the move tool, which looks like fours arrows pointing up, down, left, and right. Just click and drag the image to where you want it.

Then use the zoom tool, that looks like a magnifying glass, to zoom in to about 200%.

Now, using the eraser tool, click and drag over the pixelated edges of the cut image. Just go slow and do little by little. This part doesn’t have to be perfect!

Then use the blur tool, that looks like a water drop, to click and drag over the edges that were just erased so that they can be smoothed out.

At this point, zoom out and male sure the picture looks good. I then saved my image and exported it as a JPEG or PNG file. I then uploaded the image to fotor.com to edit my picture and make the two layers blend together. I mainly made the overall color cooler and lowered the saturation. Then I downloaded the finished image, and it’s all done!

Happy editing!

hell has frozen over

This season, there has been an unusual amount of deaths of Mt. Everest climbers. Five people have already died climbing the world’s highest peak. Mt. Everest has never been on my bucket list, and it definitely isn’t going to be on it now.

If faced with the choice between hot vs cold, I will always choose hot. I don’t care how sweltering it gets outside; being too hot is always better than too cold. I know there are some weirdos out there who prefer Winter to Summer, which is okay with me, as long as they stay far away from my personal circle. Kidding! Kind of.

Joking aside, it’s extremely difficult for me to relate to people who would want to be on top of a freezing cold mountain, let alone risk their lives to do so. Utterly baffling. Mind-blowing. Anyone out there who can explain the appeal? Going on an expedition is expensive- if you have the money to go to Everest, then why oh why wouldn’t you rather relax on a beach in Bali?

I’ve had the Mt. Everest news on my mind, and thought it would be fun for this design assignment (three stars) to juxtapose me in my element with me in my living hell. The original image is from Italy this past summer. I was on the water, under the Mediterranean sun, exploring the jagged Sorrento coastline. In my personal happiest-ever place. I then overlayed my body onto a shot of Mt. Everest. This is the closest I will ever get to one of the world’s most dangerous and most uncomfortable places.

Oh, and can someone come and teleport me back to Italy? Thanks.

arewethere


Process:

First, I opened an image of me and selected around my body using the ‘scissor’ tool. I then inverted the selection.

Screen Shot 2016-05-29 at 2.38.34 PM

Next, I clicked ‘Clear,’ so that the background became transparent.

Screen Shot 2016-05-29 at 2.38.59 PM

I then copied my selection over to a picture I found of Mt. Everest that I had already opened in GIMP. I moved my figure around so it was placed where I wanted it, and was all done!

Screen Shot 2016-05-29 at 2.58.30 PM

Make your own violinist debut !

Since you’re here I’m assuming you checked out and liked my “Are We There Yet?” design assignment. Well lucky you! I am now going to show you how to make your very own!

Start out by first selecting the two pictures you are going to merge. Here are the initial two that I selected.

Photo I cropped:

IMG_1712

Photo for my new location:

chorus-photo-dec-2015

I then headed to FotoFlexer.com which is a website that allows you to edit photos. I started off by selecting upload photo on the main page.

Screen Shot 2016-05-24 at 10.14.26 PM

Upload the photo you are cropping first. Once the photo is up select the “Geek” tab, this is the last tab in the top row. Once on the geek tab click on the “smart cut out” option. You can see all of those options in the picture below.

Screen Shot 2016-05-24 at 10.18.09 PM

Don’t be scared away by the “smart” aspect of this… it was actually more simple that I initially thought. When you click the smart cut out option its going to switch your view to full screen.  They also have a tutorial that talks you through each step once it opens up.

Screen Shot 2016-05-24 at 9.22.07 PM

I followed the steps on the tutorial which direct you to select keep and drag the mouse (green color) over the parts of the photo that you want to keep. In my instance it was just my little brother and the violin. I won’t lie the violin stick was so hard to do ! Once you’re all set on keeping what you want move on to the delete option right next to it. This is going to allow you to drag the mouse (red color) over the areas that you do not want to keep.

Screen Shot 2016-05-24 at 9.23.49 PM

Once you’re all done and the photo is completely covered in green and red areas select “predict unknown areas”. This option is going to completely remove all of the red area from the picture. Once finished select ok and save the image as .png to your computer.

Click the new option at the top of the screen and open up your “location” photo.

Screen Shot 2016-05-24 at 10.26.51 PM

Once thats all done, go ahead and select the “layers” option at the top, next to the geek tab. You’re going to click add image. That will then allow you to upload the cropped picture you just saved. Once uploaded it will appear right in front of your location photo, like this…

Screen Shot 2016-05-24 at 9.47.50 PM

Resize the cropped image by dragging the corner boxes in and out until you reached the desired size to match your background image. Once it looks right to you go ahead and save it. you’re all done !

Final result:

FotoFlexer_Photo


DesignTutorials1668

Step 1: Pick an image that includes an object in a place. ( The objects I’ll be using are the people) Step 2: Pick a place you want your object to be in. Step 3: Pick an item you want to include with the object. Now let’s begin t he image editing! Step 4: Using … Continue reading DesignTutorials1668

Are we there yet?

Take an existing image and change the concept in where you are at and what you are doing.