I’m going to explain how you can contour something in Gimp with the Path Tool to gain an exciting animated gif. You also can use a tablet and pen, it is just not what I’ll show here. I thought people without a tablet should also be able to do this assignment.
For this tutorial you need to know how to make single images from a video clip and how to import the images into Gimp. You can read about this in the ds106 handbook.
Once you have imported the images do the following:
Choose Shift + the eye symbol of the bottom layer in the layer tab to make only this layer visible.
Next create a new layer by clicking the New Layer symbol (1) in the layer tab. Choose a white background (2) and name the layer 0001 (3). (The next will be 0002 and so on.)
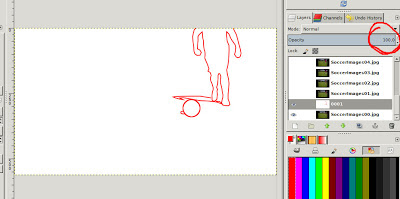
After This set the Opacity of the layer to 50%..
Now it is a good idea to zoom in where you want to start drawing the outlines. Just enough to keep an overview.
(Zoom Tool or Ctrl + Mouse Wheel together with Space Bar + Left Mouse Button)
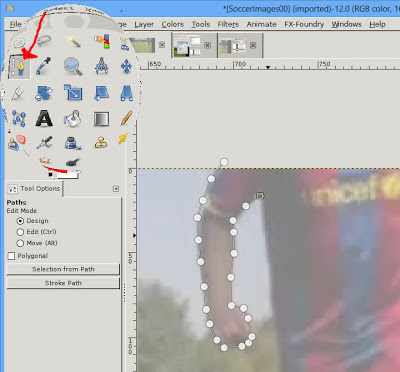
After you have selected the Path Tool, click along the outlines. (If possible don’t move the mouse while clicking, you may come into the edit mode, where you can shape the path.)
If you reach the edge of the screen just use the Space Bar together with the Left Mouse Button to move the visible part or just use the scroll bars.
Don’t overdo this, we are going for the motion, not for the detail. Maybe I’ve already set too many points.
?
?
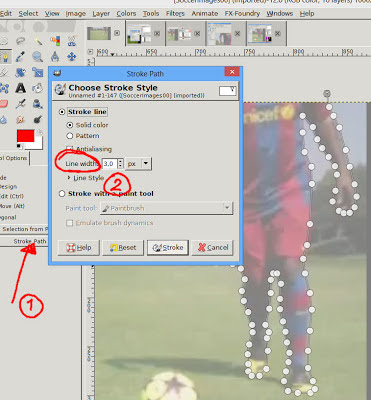
When you’ve finished your first outline, click Stroke Path (1) at the Tool Options palette of the Path Tool. Then choose a Line Width (2) and confirm. (I’ve chosen 3 appropriate to the resolution of my image. You may need a different width.)
Normally the stroke will appear in black, which is the default foreground color. For changing the stroke color, change the foreground color.
?
To position the path tool anew you have to select another tool first and then again choose the path tool. (There may be a better ways which I don’t know.)
For the ball you can use the Ellipse Select Tool plus in the Edit menu Stroke Selection.
When you’ve finished the outline of your first image set the layer opacity back to 100%. The result should look something like this.
You now can delete the layer with the original image or you can do it when you’ve finished all images.
Go back to the start of this tutorial and do the same with any of the imported images.
When you’ve removed the original images you can play back the action.
Go to Filters in the menu bar and choose Animation -> Playback.
Maybe you have to scale the image now. For an animated gif the image should not be larger than 800 in width. In the end this is up to your choice, but note if you save something as a gif file the file size is restricted. The more images you need the smaller they have to be.
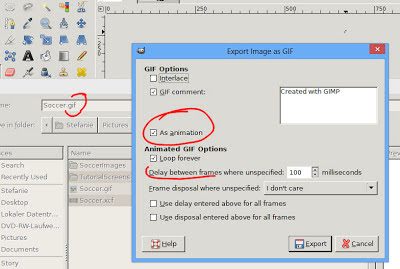
Just try to save your work as a gif file now (File menu -> Export to -> Filename.gif). If it is too large you will have a pop up window which tells you about this.
Don’t forget to check the option As Animation.
You should also experiment with the delay between the frames, to find out which speed is the right for your animated gif.
Go to your gif file and open it in any preview. I personally open it with the internet explorer. If you’re fine with the result you’re done. If not correct what ever you want, but don’t forget that there are many more assignments to do.
?


