As part of this assignment I was to take a trailer and render it so that it would look like it came from the silent film era. Meaning, I added a black and white filter, and took all of the audio out, replacing it with a silent film soundtrack. I also added different slides to add dialogue like a silent film would do. So while I was looking at different trailers to use, I went to this YouTube Channel MOVIECLIPS Trailers. This channel is chock full of different trailers, of new movies that are just coming out this week to older movies that have come out this year. I stumbled upon this trailer and I thought I would give it a shot:
So once I had my trailer picked out, I converted the video so that I could download it to import it to iMovie. I used ClipConverter to do this. I then imported the video file into iMovie. I first turned the entire clip into black and white so it would look like a silent film. Then I went through and split the clip, within the film strip, into smaller pieces where there was some dialogue. This way it organized the trailer so that I could add the text slides. Here’s a shot of it in iMovie:
This also helped when it was time to move around a small clip. The title of the movie was moved from just before the end to the end of the trailer. Once I had the clip split up, I went to create the text slides I added to show the dialogue. I found this border on google that I thought was great to use. The original was white so when I added it to photoshop, so I changed it to black to match the traditional silent film text slides.
After adding all of the text, I went through and muted all of the sound so I could add the music. Then I went to find some music. I wanted it to sound like it would be used in a silent film but I also wanted it to work with the mood of the trailer. I tried different YouTube videos until I found this one. I found this video with a compilation of silent film music. After I found the music I wanted I downloaded it and added it to the video. I ended up using the first song that was in the video because I thought that one fit the best with the trailer.
This is the final product, and I have to say I really like how it turned out. But anyway I hope you enjoy it!
Also here is probably my favorite part of the entire trailer:
1. Choose a movie that you absolutely love. Find the trailer on Youtube.
2. You will be using keepvid.com for a lot of the ripping of the audio and video from Youtube. Copy and paste the URL of the Youtube video to the keepvid page. There is a box with a download tab.
3. After pasting the URL, press the download tab.
4. Java will ask permission to run. Press “run this time.” Another box will open, check the I accept box and press run again.
5. A new page will open up and ask the type of format you want to download.
6. Click on the format and the file will be in your downloads folder.
For searching Youtube for good audio, I typed “silent film music” and used keepvid to download just the mp3 of that particular video.
Once you have video and audio for your assignment then it’s time to open Window Live Media Player. I know this tutorial has its limitation. Sorry for all the Mac users but this tutorial isn’t for you.
Editing:
1. You can drag and drop both your audio and video files inside WMP window for editing.
2. Cut off all audio from the video. In the video tool tab, there is a video volume icon, click it and a bar will show up, put the indicator all the way to the left of that bar like in the picture below.
3. Put a Sepia video effect on the video, or one of the black and white video effects work as well. I am partial to Sepia.
4. There will be times where you have to use cards that tell a little about the story since audio dialogue wasn’t possible in the silent film era. Use this or something similar:
Add splits where necessary in the video and drag the picture file between the split you made and add a caption layering on top of that image.You want the entire feel of a silent film movie so you need the a font that was popular back then. This blog is your guide to downloading that font you will be using.
5. Things should be coming together seamlessly, and everything during editing should be smooth. It’s usually all the pre production stuff that gets me. Once you have put all the cards you need in the video. I suggest putting a medium or fast fade out in the audio.
Exporting to Youtube:
The greatest thing about Windows Live Media Player is the feature to upload straight to your Youtube account. You can do so by pressing the Youtube icon on the home tab.
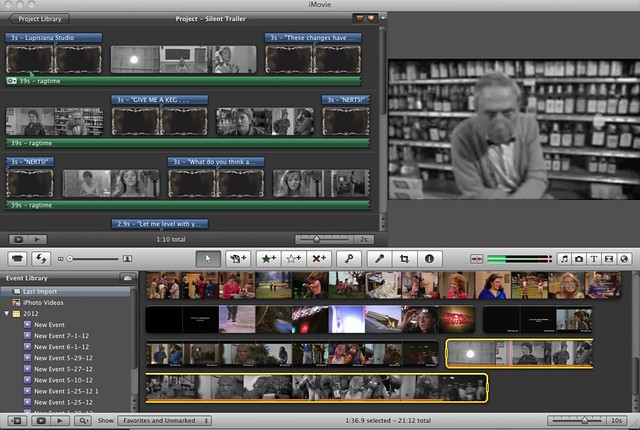
For the assignment “Return to the Silent Era“, the object was to take a movie trailer and edit all the words out to make it like a silent movie. I chose the movie Drive, because it did not have a whole lot of dialogue to begin with, but also because I liked the movie a lot. The first thing I did was to use keepvid.com to download the movie trailer from youtube. After it finished downloading, I used Mpeg Streamclip to take the sound out of the clip. All you have to do to take the sound out is import the clip to the program, then go to the edit tab and click delete audio track, then save the new file (with the deleted audio). Next I used iMovie. The first thing in iMovie that I did was create a new project and import the new, silent trailer clip from my files. The next thing I did was to break the clip down into shorter scenes so that I could add the text. I highlighted the part of the clip I wanted, then dragged it to the top left so I could edit it. Once I had the part of the clip I wanted, I clicked the little “T” in the middle right side, to bring up the text options. I then dragged the text I wanted to the piece of clip I had selected, and typed in the text I wanted to have shown. I then repeated these steps, highlighting each bit of clip, dragging to the editing box, selecting text, and adding the text I wanted to show up for the entire clip until I had given text for the whole trailer.
1. I found a solid version of the scene I was looking for and downloaded it. Next, I opened up iMovie, imported the clip, and messed around for a little while with the effects. I wanted to get a sense of what was possible. I wanted that jittery effect from silent films, but evidently iMovie doesn’t have that feature anymore. They do have “Film Grain” and “Aged Film” effects, however, which provide that old, deteriorated quality.
2. I needed some silent film title cards, and I found a template pretty quickly online. I downloaded the template, cut and pasted it into a Powerpoint slide, added a black background, copied the slide a number of time, and found a decent old-timey looking font. I worked on “script” of sorts and created appropriate cards. This is probably an area I’d work on a bit more in the future… I think I captured an Edwardian sort of diction–part of the humor I was attempting was in contrasting styles–but I could probably amp up the clever here.
3. I saved the PPT slides as jpegs, and imported them into iMovie. Then is was just a matter of splitting the clip, inserting the text cards, and adjusting each piece of the film for timing and look (based on the effects mentioned earlier). Part of the trick was establishing silent film pacing–I shaved off more than half the time from the original clip. Even with text cards, a silent film doesn’t seem to have the luxury of extended exposition or comedic build-up (or maybe that’s just a product of my amateur work).
4. I needed some old-time piano ragtime-ish piano music, and found a pretty good royalty-free resource with some interesting piano pieces. (Interesting how the short samples on the site evoke specific mood and character.) I found several I liked, downloaded them, inserted them into the project, and tinkered a little with timing. And I turned down the sound from the original clip.
5. I could have finished the project at this point, but I decided that some more text cards were needed (for the opening, credits, and the classic “The End” convention). So I went back to the PPT and repeated the process to create those… pretty easy.
6. I used Export tool to create the finished film.
Not gonna lie – I’m pretty good with iMovie. In fact, I teach people how to use it professionally. (I’m an instructional technologist.) So instead of planning out my video projects this week, and then executing them next week, I’m just going to stagger the projects. And maybe do a couple extras just for fun, we’ll see.
My first project is inspired by the recent acquisition of the Star Wars franchise by Disney. As soon as I saw the Disneyland commercial starring Darth Vader (and a few anonymous storm troopers, as all storm troopers are) I knew I wanted to use it for one of my video projects. And given the brilliance that is Silent Star Wars, I felt inspired to make my own attempt at a Star Wars silent film. A Disney one, that is.
To create this, I followed my usual process of pulling the video from YouTube via PwnYoutTube. I then imported the video into iMovie (File -> Import -> Movie) and copied the entire thing into a new Project. I removed the beginning and end stills and added my own. The introduction uses the “Far Far Away” title format, and the end uses a basic “Centered” title. I then removed the audio from the main portion of the commercial:
Hover over the footage until the blue Options gear icon appears.
Click on the gear.
Select Audio Adjustments.
Bring the Volume down to 0%.
I liked the sound of Darth Vader breathing from the beginning of the original commercial, so I selected that portion of the video in the Event Library and dragged it onto my opening title slide (be sure that the playhead cursor is at the point where you want the audio to begin, in this case the very beginning of the footage). This brought up the overlay menu and I selected Audio Only. The audio clip wasn’t long enough, so I had to duplicate it to cover all of the opening.
For the main portion of the video, however, I wanted to use a traditional silent film score. Some Google digging brought me to Incompetech’s listing of freely available stereotypical silent film scores (if you are looking for a particular film’s score, you’d probably have better luck with the Internet Archive or another repository of copyright-free resources). The song “Merry Go – Distressed” had the playful tone I wanted (plus, Vader actually rides on a Merry-Go-Round, so it seemed like a felicitous song to use). I dragged it into iMove (again matching the playhead). The song is longer than the footage, so I had to add a fade-out. To do this:
Click on the green Options gear icon on the audio track.
Select Audio Adjustments.
For Fade-Out select Manual.
I set it to a 1.9s fade. I find that slower fades are less jarring.
The most challenging part of this was generating the film grain – iMovie has some default options available, but none of them had the look I wanted. I went with the Aged Film effect (Options gear -> Clip Adjustments -> Video Effects), and then started to dig for other options.
I really liked what Ben Rimes (@techsavvyed) achieved with his Silent Era Back to the Future (and discovered that apparently we had used the same score source), so I looked into the Particle Illusion graphics he used. I found working with the individual images to be cumbersome, so I converted them into a separate movie, which you can view or Pwn on YouTube. I then imported the movie into my Events Library and dragged it onto the footage to create an overlay. From the overlay menu I selected Cutaway (some tutorials will tell you to use Picture in Picture, but this doesn’t allow you to change the opacity). I then went to the Options menu for the grain overlay and under Clip Adjustments set the Opacity to 21% (the exact percentage will vary depending on the main footage you are working with, but I’ve found that somewhere in the 20-30 range allows you to see the grain without making the footage difficult to see).
Finally, inspired by the gorgeous title cards Ben had used from CopyCatFilms, I redid the end still of the twitter hashtag #starwarsdisney. And thus was born the Silent Era version of Darth Vaders first trip to Disneyland.
I decided to spend tonight relaxing in my bunk and working on a Video assignment. I chose Alan’s “Return to the Silent Era” challenge.
I really had no idea what movie I wanted to do. Everything I thought about seemed like it would be kind of flat. And the, out of the blue, I settled on a movie that I don’t even really remember liking but that is a quintessential symbol of the decade I grew up in: Teen Wolf.
Then, I pulled it into iMovie. I knew I wanted to make it black and white and use the iMovie “Aged Film” effect. But, unfortunately, in my version of iMovie you can’t apply to effects to a clip. So, I did the B&W effect, exported it, and then imported it back into the program. Then I was able to add the “Aged Film” effect.
Next, I began thinking about where I wanted to insert cue cards. The trailer soundtrack is mostly a voiceover with bits of dialogue beneath. Strangely, they seem to show each of the scenes the dialogue come from, but they are lined up together. I was able to pretty easily figure out, however, what dialogue went with what scene.
I wanted a realistic cue card graphic, so I did a quick Google image search and came up with this one (which is free to anyone to use!).
I pasted that image in wherever I thought the cue card should go, and started typing the dialogue straight from the movie. It was pretty easy to settle on a font that looked right. I did have to play with the title effects so that the text didn’t fade in and out (which wouldn’t make any sense on a cue card).
At this point, I felt like something was missing. I decided to see if I could replace some of the language in the movie dialogue with more “authentic” slang of the silent movie era. I found a bunch of Web sites with 1920s slang dictionaries. This PDF was probably the most thorough and useful. The translation isn’t exact in some cases, but I felt like it added some kind of additional authenticity to the project.
Next, I worked on the music. I knew I wanted to use ragtime piano, and I found this great radio show on the Internet Archive that was available with a Creative Commons license.
There’s a point in the original trailer where Teen Wolf turns on the car radio, and the music in the clip changes. I used this point to switch to a different ragtime tune. I’m not sure if the music works that well, but it is authentic!
Finally, I decided to speed up all of the video a bit. It seems to me that silent movies often have the quality of speed being off, so I thought this effect might work. I think it’s okay.
I added an opening and closing cue card, and that’s basically it! (Note I changed the title because the term “teenager’ didn’t come into use until after 1930! I’m not sure “Young Adult Wolf” is as catchy, though. :-)
I felt I was overdue to sit down and do a ds106 assignment, one to do some iMovie work as a demo for our current students. I was called back to do Return to the Silent Era (one I added myself) with the hopes that I could push iMovie a bit farther than the last one I did — 2001 a Space Odyssey set back 100 years.
The assignment is:
The dawn of cinema had no audio; silent movies created an atmosphere with music and the use of cue cards. Take a 3-5 minute trailer of a modern movie and render it in the form os the silent era- convert to black and white, add effects to make it look antiquated, replace the audio with a musical sound track.
I was trying to think about what would be interesting to set to silent era- it’s easy to look to science fiction or movies from the future. Too easy. I combed through my video drawer and saw the Dirty Harry disc there, and said hmmm, the opening action sequence that defines Harry’s character, his lunch ruined because of some criminal activity that just lands in front of him, the first of the “Do You Feel Lucky, Punk” lines would be fun. It’s the whole juxtaposition of the same lines played out at the end that defines the criminal mind of Scorpio.
The look of the original film had all the stampings of the 1970 era (filmed in 1971), the big cars, mutton chop sideburns, the semi flattened lighting, the lingering feel of the hippie era– all of this seemed interesting to try and take back to a different era via the silent film treatment. Would Harry be as tough with that big gun back in 1908? Would his isolationist character command the same results?
Go ahead…
I started by finding and downloading the 740p version of the scene
I started by making up my title frame in Photoshop, starting with one I found out there. I wanted to add an icon, so I pulled apart the top figure to leave room to insert a 44 Magnum:
(click for full size)
I added some noise and cracelature filter to make it a little more dirty.
Here is a snapshot of my working area in iMovie (this is iMovie 11, so some of the tools and menu names are different in earlier versions):
(click for full size)
After loading the clip in iMovie, I first dragged the graphic for the title card I made to right in front of the video clip. I use the small on the clip to go to clip effects and added the “romantic” one which made it glow.
For the text I dragged the Center style right onto the frame, and added my text. By highlighting the text, and selecting “Show Fonts” I switched it to “Goudy Old Style”. Later I will show you an easy way to replicate this.
The next steps are going through the clip and making splits on key segments. These include points right after some dialogue that I want to add the title cards, pretty much in this case, all of Harry’s lines. To break up clips, just move the cursor to the point where you want a split, press control to get the contextual menu, and select “Split Clip”. I also split in places where I knew I might want to have different clip speeds.
COpying the title card is a matter of clicking once to select its frame (it lights up yellow) and then command C to copy. Move the cursor just to the right of another split to paste a copy of the card.
Then for the title, click an existing title (the blue bar above), and press the option key and drag it until it drapes over the entire new card (the blue should fill the rane, my screen shot is off a bit). This will make a copy of the text track with all the same settings and make it fit in the same length of time as the card.
You might have to mess with the font size to make things fit.
I did this for all the dialogue. Once I had that in place, it is time to remove the original audio. I selected each clip, and selected Mute Clup from the Clip menu (or just command-Shift-m).
The next steps are to give the video the old style treatment; while there is an aged film effect, I dont like it because it does a sepia tone, and it is too bad you cannot apply more thane one effect (like adding a black and white). I have a trick though!
On the small menu on each clip (looks like a gear) first sslect Video Effect, and set the saturation to 0- this makes it black and white:
I then press the Clip tab for these adjustments. I found that the “Glow” effect worked well to give it a washed out look, your mileage may vary and the vignette or the Romantic work well. For the action sequence I sped up the clips in various amounts to give it that frenetic energy, anywhere from 120% to 400%.
I repeated these steps on every section.
There were a few places I trimmed the clip, and one or two when I needed Harry’s mouth moving, so I would copy and paste a clip of him, reversing it so he would not be an exact duplicate each time.
Once the video was all ready, I went to the Internet archive, and found some ragtime music in the 78 RPMs & Cylinder Recordings collection called Ragtime Echos (1918) featuring Samuel Siegel on mandolin and Marie Caveny on ukulele.
I downloaded the mp3 version and dragged it onto the iMovie track, making sure it lined up below the tracks (so it is not made into a background for the entire project). Here is another trick, since my audio track is longer (you can drag the right and of the clip to extend it as far as it will go) I click the audio track gear icon, and chose “Audio Adjustments”. I set the fadeout to be manual so ti will fade before it ends abruptly.
Thats pretty much the editing. I had planned to do a longer feature, a middle clip of the Harry/Scorpio confrontation in the football stadium, and the closing chase scene which bookends the original. But alas, you get the idea, and the “Do you feel lucky” scene sites fine with me as a single thing.
I wanted to try the trick Michael Branson Smith does to add more effects to his videos by using the 8mm app on his iPhone but alas, I could not figure out how to upload it so the app would see it. I hope it is not as crazy as just filming it off the screen!
I’m pretty happy with the way this turned out, but oh, I stayed up way too late doing this.
The dawn of cinema had no audio; silent movies created an atmosphere with music and the use of cue cards. Take a 3-5 minute trailer of a modern movie and render it in the form of the silent era- convert to black and white, add effects to make it look antiquated, replace the audio with a musical sound track.
Backstory
To complete this, I looked at several clips that could be used. I started by looking at trailers, as suggested in the assignment. I considered Jaws, Forrest Gump and Pirates of the Caribbean but I found that the trailers either contained too much talking and not enough action or jumped from one scene to the next too quickly to provide enough context. So, I decided to look for a purely action sequence. Since my previous assignment featured Quentin Tarantino, I figured that I might as well return to his work. I found a clip from Kill Bill Vol. 1 that someone posted to YouTube that already contained two fight scenes. I liked the idea of combining this modern, dark, samurai-type of film with some dixieland music. This incongruous combination appealed to me!
Process
I have worked with iMovie quite frequently to document school events but rarely played with many of the features. I was able to easily convert the clip to black and white and sped up the film to produce what I hoped would look like a silent movie but the image still felt too crisp. I decided to Google some advice and found iCreatemagazine.com which I immediately added to my Flipboard! It offered easy to follow tips for making a silent movie look and, I’m hoping, will have a decent feed to follow. One tip that I found there suggested that I should not accept the default of 30 frames per second but instead reduce that to 24 to achieve a jerkier motion. It also explained that the Aged Film effect would add those vertical lines one sees on old films. However, since I had sped the film up, these lines were not visible. I decided that I should speed up the film and make it black and white and then export it. I could then re-import it and add the Aged Film effect. Worked like a charm!
Best:
My original clip was 10 minutes in length. I doubled the speed to seem more like an old movie but, at 5 minutes, it still felt too long. I am hoping that the further two minutes that I edited out are not too obvious. This is where I impressed myself most: I was surprised how seamless the final version appeared! I took out a good chunk of the first fight scene (more obvious) and several sections (mostly amputations) in the second. This allowed me to keep the video to just 3 minutes. I was pleasantly surprised with how the scenes still flowed from one another.
Disappointments/ Ideas for Next Time:
Only the Organic Main template seemed appropriate for a silent movie but the iMovie Titles are a dead give-away to the fact that one has used that software. I wish that there was an easy way to create your own. I suppose that I could have created my own and saved them as jpegs and then inserted them as photos. Maybe next assignment…
Music was a challenge. I really need to do some more audio work. I started to fool around in Garageband but didn’t find the sounds that I wanted to easily create some dixieland music so I opted for the built-in iLife jingles (Gelato, Vino and Tigris). I added these three themes to my movie and left it at that.
Take-Away:
I may have taken some liberties with this task but I did learn more about iMovie than I knew before… if nothing else, the quick keys for splitting a clip (shift-command-s) will come in very useful in the future!
I need to remember to take some in-progress screenshots to add to these posts. In the meantime, enjoy Silent Bill.
My fifth grade teacher, Mrs. Piraino (you can imagine the nicknames we had for her), was a teacher that loved creativity. Every year she transformed her entire room into Santa’s workshop, letting her students build life size reindeer out of cardboard and decorate the walls with paper-crafted strings of garland. During the small group novel studies, she encouraged students to build dioramas, even entire set pieces for scenes from her favorite books. But while she would let our creativity run wild for large projects, I always sensed that her comfort with letting her students “play” with learning concepts was always a bit more straight-jacketed.
What elementary student wouldn't find this both funny and awesome?
I remember while learning about homophones, she read aloud to us from “A Chocolate Moose for Dinner“, a popular children’s picture book filled with images depicting what idioms and homophones might actually look like if they were real. She gave us an assignment to try and come up with our own homophones and idiomatic phrases, then illustrate them for comedic effect (i.e. “my dad put a new wing on the house” would turn into a drawing of a house with a feathery wing stuck to the side of it.). I failed miserably at the assignment. It wasn’t from lack of effort though; I illustrated half a dozen homophones that I hadn’t seen or heard in any of the books my teacher had used, and I was proud of “playing” around with the concept. Sadly, I had the assignment returned with red marker all over it, so I gave it a second go; still no good. After a week of trying to play around with the concept, and receiving little to no feedback beyond the red marks of “try again”, I finally just turned in some copies of illustrated homophones and idioms lifted from one of Fred Gwynne’s books. I passed the assignment.
While Mrs. Piraino had an amazing streak of creativity that I will be forever thankful for, I remember that one assignment as an example of how she didn’t really allow us to “play” when learning new concepts, or rather, she didn’t take into consideration or make note of the progress we were making while we played, and sometimes struggled, to make sense of some new piece of information. To this day I’ll never know if I actually understood homophones back in 5th grade, but what I did take away from the experience is that as a learner, I feel that I’m learning best when someone is supporting my playful learning, failure, and struggles, rather than just saying “copy what’s in the book”. I’ve found that trying to build new understanding, whether it’s difficult topics like encouraging social activism or just learning how to edit in Adobe Premiere Pro, I usually learn best when working, failing, playing around with ideas, and building something new with the support of a community.
Which is why I’m so enamored with the ds106 community. They are a powerful community of educators that understand how to support one another through play, social media, and constructive criticism. To be fair, the ds106 community has its own set of quirks, trolls, and problems, but any group of people that gives me the opportunity to re-mix the train chase at the end of Back to the Future 3 as a silent movie, and then applaud my sophomoric video editing efforts, deserves high praise in my book. Check out “Silent Era Back to the Future – Dr. Brown to the Rescue”, my “Return to the Silent Era” ds106 assignment submission below. If you want to view it on youtube, just follow the link here.
So why the lengthy introduction for this movie? I felt my experience offered some value in helping to better understand how I learn, and why I teach the way I do. Whether it’s working with young learners or adults, I have always despised the “carbon copy” approach to learning, in which the students are expected to produce a reasonable facsimile of the teacher’s example in order to prove they’ve acquired new skills. Whether it’s learning a new writing form, practicing math skills, or learning a new piece of software, I find myself growing ever more fond of allowing learners to create what they want to create, or at least giving them a challenge to create something in a particular style, but giving them completely free reign over the subject. I followed that belief in my attempts to learn Adobe Premiere Pro, a terribly difficult video editing platform (I come from several years of just using the simple iMovie and Windows Movie Maker), and rather than just follow some simplistic “paint by number” tutorial on how to use the tools that Premiere Pro provides, I decided to do it the hard, yet infinitely more enjoyable way, by choosing a project and jumping in with both feet.
How I made “Silent Era” Back to the Future – Dr. Brown to the Rescue
In order to make it look like it came from a silent film, I had to get it downloaded from the web first, so I used my good friend KeepVid, which allows you to download many different formats of YouTube videos. I chose the 480p version in hopes that would keep my video project on the small side. After downloading the clip I imported it into Premiere Pro and used the “razor tool” to slice it up and remove some of the bits of video. Note, the razor tool was great after getting used to it, but I much prefer having a nice keyboard shortcut so I could just line up the playhead and cut away with the shortcut. If I missed that shortcut, or an easier way of using the tool, please share!
You can find the razor tool with all the editing tools, but I couldn't find a keyboard shortcut
After slicing and dicing the original video clip to remove a few unwanted portions (although in retrospect I would have cut a lot more out to create a more polished flow with the music), I was ready to start playing with the “aging” process. Apparently there are a a lot of thoughts on how to best make a piece of footage look like it came from the silent era using Adobe Premiere Pro. Some people suggested using posterize and fast blur effects on keyframes to produce the “jumpiness” and uneven exposure of old silent film. I wasn’t quite ready to dive into key frames (perhaps on the next project), so instead I just focused on the degradation of quality, black and white, and film grain.
I selected all of my video footage and then applied some of Premiere’s built in video affects by dragging them over to the Effects Control pane. Noise, Black & White, and Gaussian Blur effects helped produce the right low quality look I was looking for, while the Lighting Effects allowed me to add that “vignette” like effect with a few soft spotlights.
The video effects and the setting I used to create the "aged" look
Merely making the film look old didn’t quite do it for me. I played around with a lot of the other video effects (there are a ton more than what I’m used to in iMovie), but none of them seemed to add what I was looking for without investing a lot of time fine tuning each setting. That’s when I decided to go digging around the internet some more and came up with this great Particle Illusion project that had a video overlay of 8 seconds worth of film grain, scratches, noise, and flickering. I simply looped the 8 seconds over and over for the entire length of the film to ensure that it had all of the same noise from beginning to end. Making the film look like it had come from the silent era was only half of the task, however. After making sure that the video footage looked reasonably old, I had to make sure that it sounded right (since silent films were typically accompanied by a piano), along with some title cards to share dialogue spoken on screen.
I decided to complete the title cards first, since I like to save music and audio for the very end. By finalizing the video and stills first, I have a clear idea of just how much music I’ll need, so I started looking for a “silent film” title card. I came across this awesome silent film title card by Farrin who blogs over at CopyCatFilms. Not only was this a high quality piece of work that she had produced using Adobe Illustrator, she had provided it for free, yay! If you take a look at an image of the original title card below and the final version you’ll notice a few changes. I opened up Farrin’s title card in Photoshop, removed the fleur-de-leis, and replaced it with a snippet from this graphic of the flux capacitor (it’s what makes time travel possible, don’t you know). I’ve already blogged about the awesome Back to the Future font that I found on dafont.com, so I just used it again to create each of the title cards. I turned down the opacity of the flux capacitor image and the text to help age it a bit to match the aesthetic of the original title card. Notice the “yellowish” tint to the final card? That’s from the film grain and noise video overlay that I mentioned in the previous paragraph.
title card before I made a few modifications
title card after adding the flux capacitor and text
Once I had successfully spliced together all of the title cards, my aged video footage, and the video effects, my last stop was music. While many people have commented that they would have liked to have seen this video with an “old timey” piano version of the Back to the Future theme, I was hard pressed to find one. Oh sure, you can find plenty of piano renditions on YouTube of the main theme, but many of them aren’t terribly polished, and none of them really captured what I was looking for. It worked out for the best, because I was able to find this amazing collection of royalty-free silent film scores over at Incompetech (such as awesome name) by Kevin Macleod. I used a couple of tracks from the site, one being “Iron Horse Distressed” which was perfect for producing that stereotypical “silent film train chase” atmosphere while Doc Brown and Clara are struggling to hold on for their lives. The second piece, “Merry Go Distressed” was a chance to be a bit playful with the storytelling, as this much more cheerful music kicked in after Doc successfully rescues Clara with the help of Marty and the hoverboard.
The original speed of the tunes didn’t quite fit well for me (they were too slow for the action in the video), so I used the Clip Speed/Duration pane in Premiere to adjust the speed of the audio clip to produce a much more “frantic” train chase. Although I didn’t alter the speed of the video, having the faster music almost makes it appear as though the action is sped up as well to me. Having access to “distressed” music also helped add to the ambience of the piece in my mind.
playing with the speed of a music clip can often change he entire mood of a video
Once everything was tweaked to my liking, I then had the the fun task of learning a new way to get my finished project out of Adobe Premiere and uploaded to the internet. It seems as though no two video editing application are alike for even the simplest of tasks like exporting your final piece; iMovie uses the Share menu, Windows Movie Maker Live has you Publish your videos, and Adobe Premiere uses a much more straight forward Export command. My first attempt to export the video resulted in a helper application being opened, the Adobe Media Encoder. While it was quick, I realized I had exported a low quality version of my movie, so I went back to the FILE>EXPORT>MEDIA command, choose the Quicktime format to export too, and then checked a tiny little box that I hadn’t before called “Use Maximum Render Quality” which took a bit more time, but apparently didn’t need to open the Media Encoder (at least I didn’t see it open), and produced a much higher quality video.
Sometimes it's easy to miss little things like this checkbox
With that, my day long editing and remixing task was over! While I had worked on this piece off and on for the better part of the Friday before Spring Break (I had the day off of school), in total I must have spent about 5-6 hours editing this together; not terribly long or difficult, just time consuming as I learned what each of the video effects did, searched for tips and resources, even stopping to figure out just how to export the final product. It probably took me longer than if I had followed some basic tutorials in a text or watched a few prescribed videos, but the end result was a labor of very playful love, and I value the time spent with the entire project that much more because I was able to play, and fail a few times, on my own!
I used Sony Vegas to make this. One of the techniques I used was layering of multiple audio files in a timeline. This technique can be used in almost any video editor I believe. What I did was have one layer of music playing throughout the whole video. On top of that I had another layer or two with snippets from another audio as can be seen in the screenshot below (highlighted in pink):
For example, when something intense is going on in the footage, I’d layer some dramatic music to blend on top of the underlying music, such as percussion instruments. It all adds to the dramatic effect of the video. A screenshot of this is below (highlighted in pink):
Having that underlying music and fade in and fade out effects of the audio files on top, it blends in the audio very nicely. Another thing you can do is slightly decrease the volume of the underlying audio when you overlay a section of audio on top and turn it back up after the overlying audio is done – works well if you blend this shift of volume.
Most of the other effects seen on the video are presets within Sony Vegas. Effects such as saturation adjustments, film grain, and other film effects including jitter, flicker, and hairs to give it the vintage look. This can be seen in the below screenshot highlighted in red. Another thing in Sony Vegas you can take advantage of is when during the video the effect appears or disappears, and this can be done by adding keystrokes to the effect timeline (highlighted in purple in screenshot):
That concludes the tutorial. Hope you learned some new tricks in Sony Vegas and in video editing in general.


