Splash the Color – It’s all downhill from here

Today’s DS106 assignment, entitled “Splash The Color“, was submitted by Alan Levine (aka CogDog). He states:

“Color splash is a technique to emphasize details – you remove all color from a photo, and then restore original color to a single object.”

Bird's Hill Bike Path - Color Splash

I began the task with the help of Annie Belle’s excellent video tutorial. Although she provided two different techniques to create her color splash, I soon learned that the tools that she described in her “Photoshop CS4″ corresponded in no way to the limited number of tools I had in “Photoshop Elements 6″. However, learning is all about discovery… so I forged on.

First I selected a color photo that I had taken on a new bicycle path in Bird’s Hill Park. I thought that the yellow colored signs would be easy to crop and work around.

My process involved the following two repeated steps:

  • Use the “Polygonal Lasso Tool” to select a portion of the colored photo
  • Use menu items: Enhance > Adjust Color > Remove Color

Once all the color, except for the yellow on the signs, was removed my “splash” image was saved and uploaded to Flickr for sharing. Although the “tweaked” photo is shown above, those who wish to compare it with the original, should visit my DS106 creations in Flickr which are referenced at the bottom of this post.

The Teachable Moments:

  1. As a “newbie” to Photoshop Elements, I found it very difficult to find the starting point of my polygon when using the “Polygonal Lasso Tool”. After selecting a polygon area, I would click repeatedly in the vicinity of my starting point hoping to hit the exact initial pixel from which my polygon boundary was formed. What a hassle! Thankfully an “unknown hero” in a forum recommended that one simply double-click when one was close to the starting point and a line would automatically join the present location to the starting point. Thank you Google!
  2. Although I believe I created a colour splash, in hindsight, I am not certain that I did it correctly. I know that Annie Belle demonstrated how she could change the color saturation of the door that she had selected. I know that I have no control over the yellow intensity in my signs as the colour shown in my photos is only the original.

Knowing that I may have faked by way through this first “Visual Assignment”, I know that there are many creative DS106 users who are much more experienced with Photoshop Elements 6. I trust that they will provide constructive feedback through the Comments area.

Take care & keep smiling :-)

Brian Metcalfe’s DS106 “photostream”
http://www.flickr.com/photos/life-long-learners/

Color Splash

Converse

This was one of the saved photos on my computer. I thought it looked better when I changed it to black and white, but I still liked the color of the shoes, so color splash was the perfect tool. I wear Converse shoes almost on a regular basis, so it was easy to think of something simple to do a visual assignment on.

I used GIMP to create this image. Here is a tutorial:

Step One: Go to “File” and “Open” an image

Step Two: Go to “Image” and “Duplicate

Step Three: Go to “Colors” and “Desaturate” (Luminosity Option)

Step Four: Minimize the duplicate image and go to the original image and select “New Layer” on the Layers toolbar on the right (it looks like a sheet of paper)

Step Five: Select the duplicate B&W image, go to “File” and “Copy”

Step Six: “Paste” the B&W image on top of the original image.

Step Seven: On the right toolbar select the icon that looks like an anchor.

Step Eight: You will see the  ”B&W” image and the “Background” on that toolbar- Right click the “B&W” image and select “Add Layer Mask”

Step Nine: Select the icon that looks like a paintbrush and paint the image

Step Ten: Save the File

Splash The Color – Apple

If you’ve ever used apple products, you know how reliable they are and rarely ever break on you (unless of course you smash it against a brick wall or drop it on concrete). That’s what inspired me to make this, these are all products I own, and all of them, except the iPod are broken in some way. The iPod hasn’t given me any complications and I’ve owned it for years now. Zunes always break!! As you can see I had to learn that the hard way. The two on the ends are portable game systems, the Sony PSP on the left and the Nintendo DS on the right.

I also choose these specific items because the iPod itself can do almost everything the devices surrounding it do, including music, pictures, gaming, etc. So apple products are truly amazing (but still very pricey :/) and it made sense to have the splash of color on the iPod while the rest were in black and white.

I made this in photoshop, first by creating a blank ‘color’ layer on top of the image and painting white everywhere except for on the ipod. I then added the Apple logo on top.

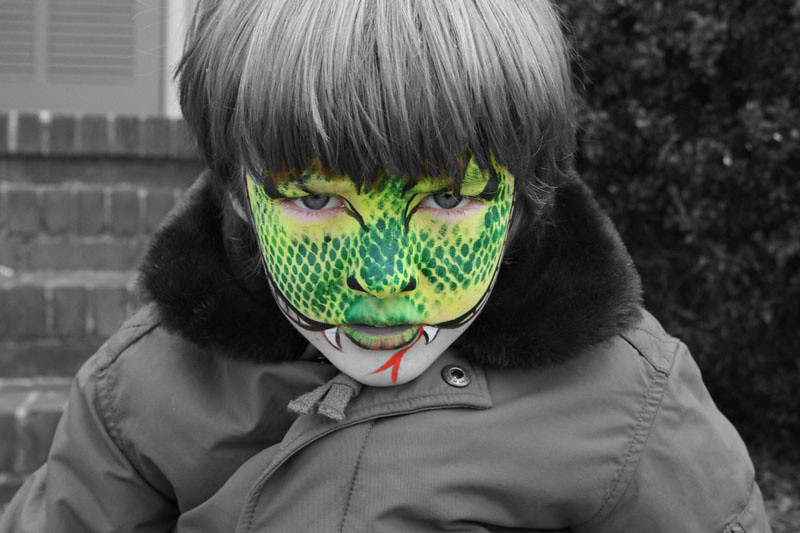
Colorized Snakeboy

I revisited an earlier image I had taken of Miles to experiment with Alan Levine’s “Splash the Color” visual assignment. I always wanted to learn how to experiment with color masking in Photoshop (I used PS for this one, not GIMP—sorry!), and thanks to Annie Belle’s brilliant tutorial here I can and did. I won’t give myself full credit for this attempt because I messed up the hair and don’t think I chose the perfect image because the hairline made it really tough, but I wanted to try it before class tonight to get my assignments started (I was feeling creatively stifled for the first 3 weeks) and I am happy with my new found understanding of masking in photoshop as well as the use of an adjustment layer, both a first for me. So, while worth 2 stars according to the assignment repository, I will only give myself one star until I redo this assignment again with a bit more precision and creativity, kinda like Annie ;)

Spying on People

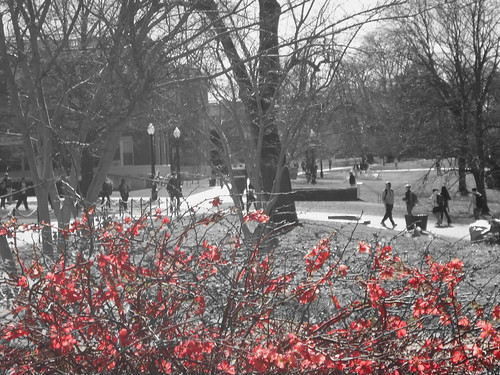
I was on campus today and had a 3 hour break between two classes. For once, I had no work to finish up. Well, at least work that I had with me at the time. I decided to take the opportunity to walk around campus and take pictures of random things that I thought were interesting. My adventure took me past the Judicial building, where the landscape was surprisingly dull. One my way out, I saw a series of red bushes which stood out a great deal so I decided to take a picture of them. After snapping the picture, I realized that seeing a guy walking around in a trench coat with a camera (a pink one, nonetheless) lurking in bushes catches students attention.

Then I remembered the visual assignments for this class and figured I might be able to knock some out with my new pictures.  For my first official Visual Assignment, I decided to take care of the Color Splash option and came up with this.

Spying on students from behind the bushes

What I used:

You can use multiple tools to make this effect. I wanted to use photoshop, but I realized did not have access to it on the campus computers and started to cry. I was excited to get this done. HOWEVER! Hope was not lost. I decided to try out Picnik for the first time and  I was pleasantly surprised.  It is very simple to use, however, below is a tutorial on how to apply this effect if anyone has any questions.

Tutorial for Color Splashing (Step by Step Video is on the way)

1. Once on the Picnik website and upload the picture that you want to edit from your computer.

2. Once the photo is finished uploading, you will see a multitude of options. You only need to go to the “Effects” option on the top bar.

3. Then click on the option “Black and White”. This will do what it implies, convert your color picture to black and white.

*Note* This may seem silly to state, but make sure that the photo you are uploading is indeed a color one or else you will not be able to                  continue  with restoring the color in the next step.

4. The last step. After you click on the Black and White option, a side menu will appear. Congratulatons, your now in Paint Mode! Two tabs should be available, Effect and Original. Make sure it is in original because the whole purpose of the painting is to restore the original colors to specific items. Then  adjust brush settings if need be, and get to painting. You can also play around with the other features to see what interesting things you can do to it. For example, I played around with the shadows and contrast.

*Another Note* Brush size can be important. If your dealing with small details, make sure your brush size is also small or else you will be painting items that dont want to be emphasized.

Tutorial 3: Splash the Color Visual Assignment

This tutorial is for the Splash the Color visual assignment, submitted by Alan Levine. Go here to see how my Splash the Color assignment turned out. Please don’t hesitate to ask if you have any questions. I rushed parts of this, in order to show you both ways I know how to complete the assignment, [...]

Splash Some Color


cc licensed ( BY ) flickr photo shared by cogdogblog

I made this as an example for a new ds106 Visual Assignment, Splash The Color- this is the effect of accentuating parts of an image by reducing it to black and white, and then re-coloring or restoring the color of parts of the photo. See examples from Photobucket or many groups on flickr.

Color splash is a technique to emphasize details- you remove all color from a photo, and then restore original color to a single object, e.g. a green apple on a table. Think of the Girl in the red dress from Schindler’s List.

You can do this in a number of ways with photo editing software or using mobile apps. The answer lies in the Google

The tags for this assignment are: VisualAssignments, VisualAssignments340

I’ve come across a few variations on how to do this, the easiest (how I did it) via Photoshop and the history brush, a slient demo is here:

In my words–

  • Open the color image in Photoshop
  • As a precaution duplicate the layer so you are working on a copy
  • Select Image -> Adjustments -> Black and White to remove all color. You might tweak the sliders to give the image a boost, or more contrast.
  • Zoom in on the area you will work with, you want to be able to get close to the edges.
  • Selcet the History Brush tool.
  • Select a brush size from the top menu, preferably with a feathered edge.
  • Start brushing the object you want to colorize; as you paint, the original color is painted back in. Its better to work from the middle out. As you get to the edge, make your brush smaller to fine tune the margins (you know, all that old coloring book stay inside the lines stuff)

  • Do just enough to bring out the detail of one object, or a group of similar object.
  • Save, post, and blog about it!

A more complicated approach would be to paint an object a different color than the original…. That might be for another day.

Splash The Color

Color splash is a technique to emphasize details- you remove all color from a photo, and then restore original color to a single object, e.g. a green apple on a table. Think of the Girl in the red dress from Schindler’s List.

You can do this in a number of ways with photo editing software or using mobile apps. The answer lies in the Google