Turn down the lights- switch up the mood

Mr eggy CC licensedĀ by sultoner

TrainĀ CClĀ licensed by ELEOTH

The Assignment

I did the Switch up the Mood visual assignment. The details are:

This assignment is to change the mood or tone of a photograph by altering the contrast, brightness, hue, saturation, exposure, etc.

I decided to use 2 photos of trains

The Process

After finding two suitable pictures with creative commons licensing, I opened up photoshop and got to work.

For both pictures I used the Image adjustments feature in the same order, but with different levels.

  1. Color balance
  2. Hue/Saturation
  3. Brightness/Contrasts
  4. Levels

I adjusted the levels until they were appealing.

The Story

There is something magical about a train, a feeling that IĀ have had since early childhood. I still remember my first house by the train tracks. I would run outside when I heard the train coming, hoping toĀ get a glimpse of the conductor. I would wave and pray for his wave back, and on some lucky days he would grace meĀ with a toot of the trains horn. ThatĀ is why I chose these photos to change-up the mood.

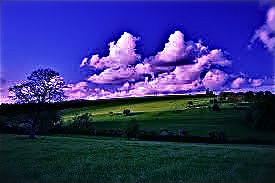
I really liked the original two photos, the ones on the left. I especially was attracted to the redness of these pictures. I wanted to adjust that redness to more of a blue feel, to “Switch up the Mood” T

The top picture reminds me of some sort of scene on the surface of Mars, but I feel that the new mood is a midnight train travelling through the mist of the twilight.

The Second photo has a very rustic andĀ vintage feel to it. I changed the mood for a feel that is more modern.

More RAW Photography

Here is a RAW photo I edited of my girlfriend, Alanna; using Photoshop Elements 8. I was going for an HDR feel without actually using HDR software; boosting the saturation and noise levels. Also, increasing the shadow levels helped to give the photo some extra depth. Overall, I’m happy the way it turned out.

Switch up the Mood

This is for the assignment Switch up the Mood

awesome landscape

i got to mess around with iphoto and it was cool seeing what i could get with the tools that they provided def a cool experience for someone who doesnt typically or ever use photoshop. for this picture when i used iphoto i got to mess around with different features like enchancing or retouching the image, i also got to adjust the highlights and saturation of the image and after messing for about 15 mins figuring out what i can and cant do i came up with a image of landscape that i got to change the colors of the sky changing it from a typically sky blue day to a more darker blue like the sun has been setting but has a hint of purple that you can see in the clouds.

Lasagna Attack

Altered Lasagna Attack

Change the mood or tone of a photograph by altering the contrast, brightness, hue, saturation, exposure, etc.

I decided to use Picasa photo editor by Google to manipulate the photo for this assignment. Picasa is great because it is Google style user friendly and offers a plethora of options and tools for manipulation.

I took many liberties in the alteration of this photo, but had a lot fun because it!

Original
My initial idea was to change the attitude of the couple and center their focus on the lasagna. The lasagna was to be toxic. To begin with, I used the Gooify tool to stretch and twist the lasagna and the pan to give a bubbly look. I then used the Boost effect, selecting the concentrated pen tool, I highlighted the now bubbly pan to brighten the colors.

Picasa also has a number of tools created by users available for public use. Under Sandbox Effects, I used the HSL Filter again on the lasagna. I selected the reverse of the concentrated pen and highlighted the area. I changed the effect to Subtract mode, increased the saturation and altered the hue to give a mixture of neon greens to the dish.

Also in the Sandbox Effects is the Hex Cells tool that makes the photo pixilated by overlaying it with hexagon shapes. I only used this on the dish and made the hexagons smaller while applying Multiple mode.

Using the Adjustable Threshold tool next, I altered the look of the couple. Changing the White and Black balances, I reduced the strength of the effect while increasing the fade. Switching the effect to Hardlight mode, I made the couple appear faded while increasing the strength of shadow upon their features. I felt as though this offered a feeling of concern and seriousness between the two.

I then applied the Orton-ish effect on the entire photo and increased its fade and brightness.

Pulling into the final stretch, I drastically raised the clarity and sharpness levels to create a gritty, surreal feel. Finally, I lowered the temperature to bring out blues and upped the Vibrance.

VoilĆ !

A Blue Ocean ā€” Switch up the Mood

This photo is for the Visual Assignments, “Swith Up the Mood.”

blue ocean

I used GIMP to create this photo. I took the original picture on theĀ  beautiful beachĀ in a tropical island.Ā IĀ changed the brightness, contrast and color balance by using GIMP’s filterĀ functions. But I do not remenberĀ howĀ I changedĀ them actually. Although theĀ colors of the original photo wereĀ beautiful enough,Ā they became more fascinating after some processes, don’t they?

Moody ds106

Today I chose this DS106 assignment, which requires us to

change the mood or tone of a photograph by altering the contrast, brightness, hue, saturation, exposure, etc.

I enjoyed working with Gimp, and feel for the first time that I used it rather successfully (it’s about time!)

Below is the image I started with– tulips in the park by Ontakesan Dorm. I took this photo during my first semester in Tokyo.

I wanted to make it feel older, and a little more nostalgic, so I began by increasing the contrast and lowering the brightness. After that I changed the color balance, bring out the yellow and muting the red a bit. Below is what I ended up with.

Nothing fancy, but I feel like it changed the mood a bit, and I’m looking forward to playing with some more images in Gimp.

A Predatorā€™s View of Monticello

I started playing with Annie Belle‘s “Switch Up the Mood” assignment on this image of Thomas Jefferson’s Monticello I took this past Summer which, unfortunately, is rather predictable and unremarkable unlike the house.

Image of Monticello

So I wanted to play with some settings to change the mood, I adjusted the hue, saturation, contrast, etc. in GIMP, but it all seemed rather lckluster to me. The sky was too consistently blue, making the effect hard to pull off. I then started messing with some filters and came across the Predator filter (under Filters > Artistic > Predator) and I got this pretty awesome view of what Monticello would look like to a Predator. I love movie geeks who program.

Image of Monticello as seen by a Predator

So, while I copped out a little on truly playing with the mood through hue, saturation, contrast, etc., I did discover a way to actually make this photo remotely intriguing.

Create an Assignment #3: VisualAssignment348

This is the second assignment I have created for DS106. This assignment is a Visual Assignment called “Switch Up the Mood.” To objective of this assignment is to use any photo editing tool to drastically after the mood or tone of an image. When you have done this, be sure to display the edited photo, [...]

Switch up the Mood

Color, lighting, saturation, contrast, and many other factors all play in to taking a decent photo and making it fabulous. This assignment is to change the mood or tone of a photograph by altering the contrast, brightness, hue, saturation, exposure, etc. You do not have to change all of those things about the photo, but you can if you would like to. Experiment. Don’t be afraid to take it to the extremes, and don’t be afraid to be subtle. Familiarize yourself with your editing software, whether it’s Photoshop, GIMP, Picnik, or any number of other editing platforms. Most of all, enjoy what you are doing!