Pods Embed Error: Pod not found.

Run! Trailer Mashup

This trailer contains clips that some people may consider violent. Do not watch if this will upset you.

The Story

For this week’s DS106 assignment I was required to create a mashup which I have not done before. After browsing Read more…

The post Run! Trailer Mashup appeared first on Robert Grotans – Professional Website.

Mashing it up: Change, Graffiti and a great flick

By now you should know that I am not a great rule follower. I let my kids listen to their music with explicit lyrics during class, allow the use of phones, deviate from the crap curriculum that the district has laid out for use of a more creative states (NYC and WA)that hold art to the highest standard. So the same should be expected as I complete another assignment, in my own way, following instructions, kind of.  Sometimes it is hard to really follow the directions explicitly and keep your focus on the topic at hand. My focus is street art/public art and Social Justice, which I hope you have sensed in my previous posts. 

The assignment: 


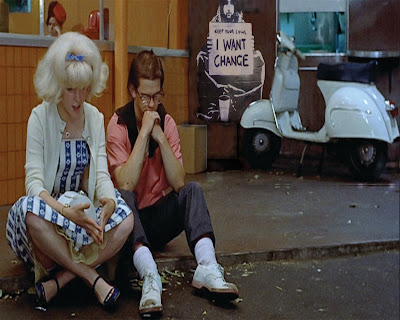
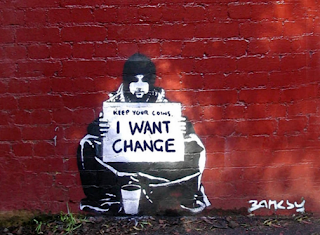
Mash up two iconic movie scenes, aim to be subtle. So here’s a girl that loves vintage cars, the attire, hair and music. Really I should have been my grandmother’s child not my mothers. So there are only a few movies to choose from: Grease( the first one of course), Dazed and Confused, and American Graffiti. Being that one of my focuses is on graffiti, I had to bring one more Brit onto the American scene. The clip is from American Graffiti, and the graffiti is from Banksy. A little play on words I suppose, American Graffiti, British artist, Graffiti in two contexts… You get it, right? 
I suppose I could have follow the directions explicitly, and grabbed some graffiti from West Side Story, but that only came to mind just as I was writing this blog, and that perhaps would have been too subtle or too obvious.  

What you see: 

I used Ps and a film still from American Graffiti, here pictured is Charles Martin Smith “Toad”, and Candy Clark as ‘Debbie’, appropriately they sit and ponder what will come of their relationship as things and time changes as they go off to college. If you are not familiar with the film, it is the perfect stereotypical example of white middle class America set in the 1960’s. 

The original picture had a few things to take out: trash can and the reflection in the window of the trash can, to fit the graffiti in. After multiple layers, cutting and re-imaging a bit of the scene, I could place the graffiti in place, using a new layer and changing the opacity helps to create the ‘realness’, along with a little dodging and burning to re-create highlights and shadows. 

Original Images: 


I picked Banksy’s work specifically because of his normal commentary on current society. The sign being held in the graffiti, ” keep your coins, I want change”.  Even deeper than thinking about departing a relationship, I thought I would throw a little irony in the picture, as that is what they should be thinking about, but of course the actors surrounding removes them from any real cause for deep critical thought on the current progress of society at the time.    

period piece mashup tutorial

For this assignment, first download the videos you want to use from YouTube. I installed the SaveFrom plugin for Chrome, which makes this super easy. When you go to YouTube, there will be a little download button below the video:

Screen Shot 2016-06-16 at 8.30.58 PM

Open iMovie, and import your videos. Now, select the sections of the videos you want to use, and start dragging them onto your timeline.

Screen Shot 2016-06-16 at 5.35.20 PM

Alternate between the videos.

Screen Shot 2016-06-16 at 5.35.51 PM

I chose 10 second clips at first, then 8, 6, and 4. This effect will help build the drama as the clips begin to change more rapidly by the end of the video.

Go to Titles, and select the intro and outro slides you want to use. Type in the text you want, and drag the slides onto the timeline the same way you added the video segments in.

Screen Shot 2016-06-16 at 5.45.02 PM

You’re done! Click the Share icon at the top and select the platform you wish to publish your video on.

Screen Shot 2016-06-16 at 5.45.47 PM

Period Piece Mashup

Take two period peices (can be movies or TV shows), ideally that tell very different stories, and bring them together so that they tell a new combined story. I recommend starting with longer clips, then alternating with faster ones to create drama.

Beautiful Mess Mashup

For this weeks DS106 Assignment Bank Audio creation I chose to complete “Sounds of Your Day.” I first discovered this assignment last week, when trying to understand what exactly an “Assignment Bank” was exactly. I was first drawn to it, because right now my days are pretty LOUD. With one week left of school, my kids are LOUD.

The audio assignment asked us to record the sounds of our day, and to then combine them into one long sound of our day. Originally I thought, no problem…I’ll just record a bit here and there throughout the day…I got this. However, life quickly got in the way, and I recorded bits and pieces over two or three days-totally breaking the rules. In my defense, my days during the week all have similar sounds throughout, so I planned to cut them all together to make one long sound of a day.

In order to create the audio I first recorded sounds on my iPhone. What I planned on doing with them next was a mystery to me until I came across my classmates blog (thank you Lauren!). We had luckily chosen the same audio assignment and she connected me with a full tutorial, thanks to this blog. Social networking at its finest.

I had never used Audacity before so once I had downloaded it and imported my audio I happily discovered that I could listen to all of my audio recordings, together, at the same time, overlapping, in a crazy jumbled mess, and I sort of fell in love. The past few weeks have been busy, and as I said earlier, my fourth graders have been loud, so the jumbled mess seemed appropriate. Instead of cutting and pasting the sounds together, I let them overlap. To most I think it will sound awful, but to me it sounds like my life, with kids singing, Kid President advice, 5th grade graduation assemblies, throwback music, and more kids.

Here is a list of what you will here in order (as best I could):

Outkast’s Hey Ya!, Lion King, my students celebrating about taking a selfie, 4th graders singing along to Lion King, Gangsta’s Paradise by Coolio, typing at my computer, me thanking a student for raising her hand instead of shouting out, 5th grade graduation, Kid President video, 4th graders doing partner work

Warning: it starts out loud


Piskel Mashup!

I used elements from Nintendo’s Kirby and Mario games

Check out the gif!

Assignment details

I did this using Piskel.

I started by drawing my background.

1st

Then I would duplicate the frame by clicking on the bottom right button.

2nd

from there I would add the next step to the animation.  I would duplicate the frame each time to keep track of work I had already done.

3rd

Then I changed the rate at which the frames would change.  FPS stands for frames per second.

I would repeat duplicating and changing frames till I was done.

Mashup Assignment – This Doesn’t Belong Here (with Tutorial)

For this assignment, you mash up two distinct movie scenes into one. I chose a scene from 2001: A Space Odyssey, and Godzilla. 2001 has many great shots, so I felt it was a fitting movie to try and find a background to Photoshop something into. Once I picked my scene, I thought of what to add, and the idea of putting a giant monster in the background sounded pretty interesting, so I picked the classic, Godzilla. My two base images are below.

2001.A.Space.Odyssey.1968.1080p.BluRay.x264.anoXmous_.mp4_snapshot_00.17.27_[2016.04.08_15.53.57]
Godzilla in a scene from the film 'Godzilla VS. The Smog Monster', 1971. Toho/Getty Images
And the final product below:
monkey

Instead of vaguely telling you how I did this, I’m going to go step by step, with pictures. First, open up the picture you want to crop out in Photoshop.

2016-04-08_15-55-15
My go-to cropping tool is the pen tool, so I just outline the entire image that. Below is a start to my process.
2016-04-08_15-55-54

And this is the finished product:Photoshop_2016-04-08_20-43-22

Once you have a path around what you want to crop, go to the path menu and right click your path. Then, click make selection.

Photoshop_2016-04-08_20-53-01 Photoshop_2016-04-08_20-43-47

Your path is now a selection, which lets you copy and paste it into the receiving document, like so. You may need to resize your image; The Godzilla below is about 25% size.

2016-04-08_20-46-13

Now move your image into place.

Photoshop_2016-04-08_20-48-47

Now we have to find a way to put him in the background of the image. This is accomplished by selection the foreground objects you want to cover an object up with, and making a mask. First, select the rocks; I used the pen tool again. It’s helpful to lower the opacity of your pasted in image, so that you can see the objects behind him, while still being conscious of its position.

Photoshop_2016-04-08_20-51-51

Do the same process as before to turn the path into a selection. Once you have a selection, and while still on the Godzilla layer, click the mask button at the bottom of the layer panel.

Photoshop_2016-04-08_20-53-25

Click on the mask part of the layer, and invert it.

Photoshop_2016-04-08_20-53-46

You’re mostly done, but if you’re a perfectionist like me, you can use the brush tool on the mask layer to clean up the rocks a bit; as you can see, it wasn’t perfectly cropped.Photoshop_2016-04-08_20-54-16

And voila! Your finished product!
monkey

Holiday Mashup

Holiday Mash

In this mashup, there seems to be an issue with the holiday calendars for 2016.  Everyone thinks its their holiday.


In this assignment, I struggled finding images that were comparable with the photo background.  I really wanted to get a turkey that looked like it was going to eat the Easter Eggs.

Mash Thyself before ye Trash Thyself

Mash Up


This photo incorporated three different photos I have used previously in the class.


The photo has a few of my friends and I doing some yoga, with my self created Donald Trump shirt, and in the background, is the eye of Andy the Bank robber with the gunslinger in his sights.  Also kinda resembling the Lord of the Rings (big fan).

Movie Mashup (Remix)

For this mashup assignment, I had to use my favorite movie trailer and mash it up with a different trailer to completely change the meaning of the trailer. So I thought that it would be fun to make a normally happy trailer into a more mature or horror version. I decided that this assignment should be related my character because I had a movie in mind.

I thought of the happiest movie that I thought that I could make into a scarier version and thought of the animated 1995 movie “Toy Story”. This relates to my created character of Buck, because the character in Toy Story of “Woody” is a cowboy sheriff that shows leadership and bravery around the people in the area. Woody is basically the inspiration of me creating Buck Smith.

I searched on Youtube for the original trailer and found 2 very good trailers that I could use scenes from. I then converted the trailers into MP4s for iMovie and imported it into the software. From that point, I wanted to use scenes that would either show anger; or would look creepier with a different tone of background music. I decided that the best way to show anger was show some of the scenes of Toy rivalry between Buzz and Woody. After I had mashed the trailer together, I still needed to put the background music into the trailer.

This part was the hardest part to think of because I couldn’t think of any particular music that would make it creepier. Until I thought of the Walking Dead Theme Song, which in my opinion portrays intimidation, eeriness, and is dramatically creepy. So I downloaded the MP3 from a Youtube video and imported the audio into the iMovie trailer with Toy Story. I actually had to put 2 Walking Dead theme audio clips because each were only 48 seconds, but I was able to make it work.

Then the last thing that I did to complete the assignment was place the darkest filter I could find on iMovie. Surprisingly it was the scifi filter which made it the darkest, so I went with it.

Overall, this was a very fun assignment that I wouldn’t mind doing with other movies. All I would need are some more instrumental songs to use for the trailers.