

Have you ever walked through the bookstore and seen a book with a GIF playing on the cover? I bet not! If you have, please tell me what book! We’ve all seen the books that if you tilt them back and forth the image changes, but it’s not a GIF!
A few weeks ago, I created a book cover for California by Edan Lepucki. However, it was not a GIF! Here’s the original!

Now, I have created a new cover in GIF form as part of a 5-star assignment! I tried to stick with the same theme of having husband-and-wife duo, Frida and Cal, on the front cover, but also added a twist at the end! Enjoy!

In order to create this GIF, I downloaded and compiled two videos from YouTube.
To finish it off, I added the “Sci-Fi” filter over the first video! If you’ve read California, let me know what you think! Even if you haven’t read it, let me know what you think!
For this assignment the task was to create an animated mosaic about a movie using a single image that then splits up into a grid of 9 different animated GIF images of various scenes in the movie.
My inspiration for this was from the Jaws example on the assignment page and from my last mashup assignment which was Star Wars Rogue One related. Differing to the Jaws example I had thought that the mosaic would be more easily created if it was using a landscape still image for the start as the GIF animations would be landscape orientated shots from the movie. During the thought process for this I also took inspiration from the Jaws example in that the GIF animations would appear momentarily one after another rather than at the same time.
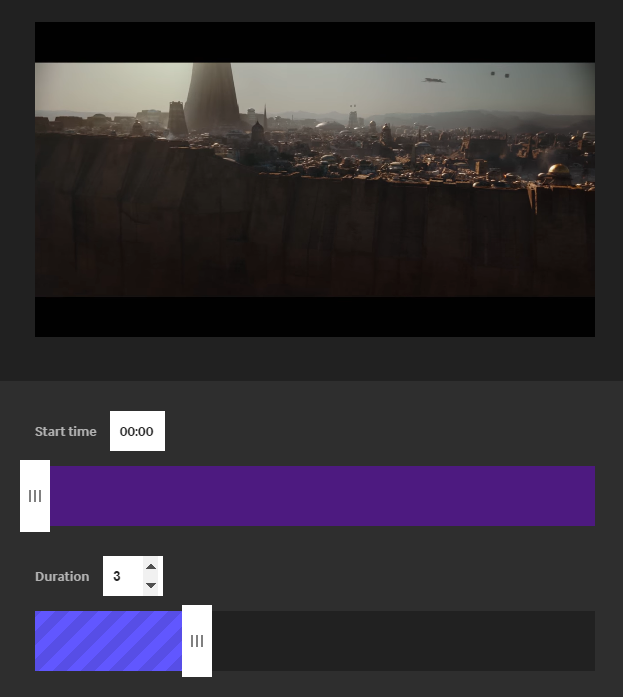
To make this Star Wars Rogue One GIF mosaic I first sourced the starting still image of from this website. I then set about souring the 9 GIF images using the Rogue One Trailer 1 and Trailer 2. I copied this links to these videos and then using GIPHY as seen below specified the start points and duration of the animation which would make the selected part of the video as a GIF image which I could then download.
After I then had all of the images I then set about compiling them together to create the final product. I first attempted to use Adobe Photoshop since this allows the editing of GIFs in Timeline View however this didn’t work out in the end as inserting more than one GIF created quite a few problems since Photoshop works by making each GIF frame a different layer in the project file. This resulted in hundreds of layers for only a couple of GIFs and meant that to position a GIF each every layer would have to be moved manually since only one layer (frame) is made visible at a time. Another issue was that the background still image layer would have to be manually toggled to visible for every frame in the animation. Some of these Photoshop issues can be seen in screenshot below:

I then decided to move to Sony Vegas instead to compile the animated GIF images with the still image. After importing them into a project file the still image was inserted on the first track on the timeline and then the GIF images inserted on the 9 layers above so they would be overlaid on top of the image. Theses were positioned on the timeline at various points after 1 second of still image to create the simultaneous appearing transitions and the crop tool used to position them in a 9×9 grid. After this white rectangles were created using Photoshop and overlaid to create the outline grid which would mask any gaps in the GIF cropping and be present on the screen at all times like in the assignment example.
Below you can see the Sony Vegas project file with some of the tracks visible on the timeline:

To then make this into a GIF animated image this Sony Vegas project was then rendered as an MP4 video (since Vegas does not allow exporting in GIF file format). This video was uploaded to this website which can be used to convert video files to animated GIF images. Using this online tool the options as seen in the image below were selected to make sure the animated image plays smoothly in real time and that it is the highest quality possible. I also did re-render and re-convert the video once during the process to cut down on the still image timing at the start of the animation as originally it took too long before the GIF animations appeared.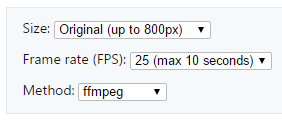
The finished animated GIF mosaic can be seen below:
I think the finished animated mosaic is quite an eye-catching way to view scenes of a movie and definitely takes a couple of loops to view all of the different GIFs that make up the grid.

![]()
Since my first assignment was a brand new concept I decided to try another more in my previous experience. I decided to pick the Animal’s Doing Funny Things GIF assignment. Before this class I had already created GIF’s for other classes, as well as had the honor of helping with a GIF workshop for incoming freshmen. So it is safe to say that I really like GIF’s and have practice in making them. However I had never made a GIF from my own video so I decided that would be a fun way to take this assignment and do something new with GIFs.
Since the assignment of animal’s doing funny things I used a video of my dog I took awhile back. We had attached a balloon to her collar and she thought it was chasing her. I decided to pull a few seconds from the clip of her trying to see the balloon as it kept disappearing behind her. Once I had decided what to choose for my GIF I opened the video in the program MPEG Stream Clip. MPEG Stream Clip is a pretty simple to use video editor, I selected where I wanted my GIF to start and end and then trimmed the video. Since I knew I was going to use GIMP I chose to export my video into still images at 8 frames a second. (I ended up with 21 frames)

I created the GIF in GIMP which I had not used in quiet a time (usually I use the university computers that have Photoshop on them). GIMP is a great free image editor and you can do a lot with it. To refresh my brain I went to a look at a quick GIF tutorial. After I remembered how to make the GIF, I took all the series of image layers and saved it as a GIF from there. In the end I got a goofy GIF of my dog. Except! I went to upload my GIF and realized I had made a mistake. I forgot that to get a GIF to run on WordPress you have to display it at full size. I had forgotten to scale down my GIF so it was huge and you had to scroll through it. So I had to go back and recreate the GIF again in order to get it to appear in the proper standard size of about 500px.
Then finally I had finished it correctly. So here is Sugar sneezing in fear of a balloon.


For this assignment we had to take a moment from on of our favourite movies and turn it into a GIF animated image which captures the essence of a key scene.
For this I chose the movie Need For Speed which is one of my favourite movies due to it’s automotive subject and since I used to play the Need For Speed video games. For the GIF as you can see above I used a scene of the iconic one-off Ford Mustang which is used throughout most of the movie. It’s an action driving scene showing the car racing on public streets which sums up most of the movie subject/content.
To create this GIF I sourced the movie scene from YouTube and then used the online service Giphy to turn the video into the animated image. This was a simple process by just inserting the video link and then specifying the start time from the video and the duration that the GIF should be. The website will then process this and render the image for you to save.

I also created this second GIF for fun using this YouTube video for the movie footage. I think this is somewhat more effective than the first GIF since the scenery and background of the shot stays mainly still while the cars through it.
If you wish to view this assignment you can do so here!

![]()
This is my second GIF post. I chose the assignment, The Music of GIFs. This assignment asks for a GIF that suggests music or dancing in some sort of way. Luckily, I found a cat that obviously has “puuuuurrrrfect” hearing and good rhythm.
Take a look at my little furry friend. He enjoys listening to artists such as Drake and Beyonce and bobbing his head to the beat. As you can tell, he is quite the catch!

For this assignment, I used the same process as I did for the first GIF assignment. The link to that post is here. Feel free to ask me if you have any questions but I can definitely tell you the second GIF was a lot easier than the first! I do recommend the Giphy website because it makes the process very clear. I really enjoy creating these miniature videos and finding funny, interesting pieces to capture. Enjoy!

Here is my GIF for GIF Your Sassy Animal assignment. As you can see, Bruce is giving some serious sass. Not really he’s just playing.
Bruce is my one year old cat and like most cats we play hide and go seek. Usually he will be around a corner and I slowly stick my hand out and he will jump on my hand, it’s extremely cute. People have told me that it is not always alright to let your cat use your hand as a toy, and they are probably right. When he was a kitten I use to do it all the time and there was no harm but he is bigger now and I still let him play with my hand. He does hurt me a little bit on occasion but I have gotten use to it so I never really care for it, though I could see why a person who is meeting him for the first time would be freaked out by that behavior. He mostly play bites, and you will definitely know when he is actually mad at you vs when he is playing.
I used the same tool I used for my Messi Breaking Ankles GIF assignment, Giphy. The process of creating this GIF was exactly the same. I uploaded the video from my phone to YouTube and just copied the video URL into the creator for Giphy. If you want to see how I made the GIF, then refer to the tutorial in the other assignment I mentioned.
http://assignments.ds106.us/assignments/best-sports-play/

For this GIF assignment, I decided to get a clip of Lionel Messi’s second goal for Barcelona when they played in the UEFA Champions League semi-final against Bayern Munich. RIP Boateng and his ankles (the defender who fell over). Not only did he break the defenders ankles, he then went on to chip the ball over goal keeper.
I am a huge fan of European soccer and my favorite team has been Barcelona. I have been following them for over 7 years. This was a very big match for Barcelona since it was a semi-final in a big competition and Bayern (the team they were playing against) are a high quality team. Barcelona had lost to them pretty badly the year before this one in the same competition, they were humiliated over two legs (during the knock-out phase, teams play each other twice. Once home and once away). Barcelona had lost to them away 4-0 and then lost at home 3-0 making it a loss of 7-0 on aggregate. A year late, this fixture was a redemption match for Barcelona. They beat Bayern 3-0 in that match and eventually went on to the cup final where they won as well.
To create this GIF, I used an online tool called Giphy. It was very clean and incredibly simple to use.

The first thing to do was to get the YouTube link for the video I wanted to make a GIF out of. Once I had gotten the link, I copy and pasted it into the text field.

After I copied the link into the text field, the video would appear as so. I could then adjust the “Start Time” slider to pick where in the video to start the GIF and the “Duration” slider to choose how long I wanted the GIF to last

As I move the sliders around, the video player above gives me a preview of how my GIF will look with the setting I have provided from the sliders. I moved the sliders to my preferred positions.

After I was satisfied with my settings. I scroll to the bottom of the page and clicked the “Create GIF” button to make my actual GIF that I could share.

After clicking the button, the button turns into a load bar for which you have to wait so it can create your GIF file.

After the GIF creation is complete, I have some options to share my GIF. Also, the created GIF file is show above in the video player (the quality will be downgraded from the original video). I clicked the blue “Download” button so I could save the .gif file to my local computer.
I don’t even know where I stand on this whole #Sockgate thing. But I am standing somewhere. I think it’s kind of over on the side. I mean, sure, I’d take some socks. Are there socks? AnimatedGIFAssignments, AnimatedGIFAssignments972

![]()
I have definitely put of this assignment.. I have never made a GIF before and it did make me feel a bit nervous! So after fretting about my Photoshop skills and choosing what to make the GIF of, I perused the Assignment Page ‘Say it Like the Peanut Butter‘ on ds106 which outlines the assignment, I came across this post which was one of the tutorials submitted for the assignment. It was submitted by the bavatuesdays blog, and details some of their struggles with the task and they found a handy online tool for this – IMGUR’s Video to GIF site, which is incredibly easy to use! I had looked online for a similar service, but had only really come across image to gif sites, which this site also does, but really wasn’t what I was after.
IMURS Video to GIF service allows you to use video URL’s such as youtube videos, and selects up to five second clips to create into the gif, it also allows you to enter text over the top of the gif. This was a far easier method of creating it, I didn’t even have to upload a video! Although it was slightly lower quality than something made in Photoshop or with the footage exported from disk, it did take a fraction of the time and is definitely a service I will use again in the future!
On to the actual GIF, we were tasked with creating a GIF of a key scene from a favourite or least favourite film. I didn’t fancy staring at a film I didn’t like in order to find a good scene to make a GIF from, so I had a long hard think about films I like to make a good gif from. I’m a big fan of superhero films, with villians or morally conflicted characters as my particular penchant. So who better than Loki, right? There are a huge number of fantastic scenes of Loki in Thor, The Avengers and Thor: The Dark World, but the scene I chose to make the GIF is from The Avengers; when Loki is trapped and almost taunting Natasha Romanov (Black Widow), and says one of his best known quotes, ‘That is my bargain, you mewling quim!’.

The phrase ‘Mewling Quim’ I thought really showed the conflict within Loki’s character and also the viewers conflict with his character. He is a bit of a fan-favourite in the Marvel world, but things like this show how much the villain he really can be. The phrase was seen as somewhat controversial after the film aired, as it’s meaning is ‘Whining C*nt’, and it being one of his better known phrases goes perfectly with his character for me.

![]()