In continuation of my final project, I have put together a few of my favorite scenes (some of the best scenes) from the first half of the first season of Archer. I think this will be a really effective way of recruiting a trainer for the ISIS space voyage, especially in combination with the posters I created. WARNING: This video contains a lot of crude and lewd behavior. If you don’t find this sense of humor funny, I suggest you not watch it.
To create this highlight reel, I combed through the first half of season one of Archer. This was time consuming, but totally worth it. It was hard deciding which scenes to pick, but I ended up going with the ones that I LOLed at. That seemed to be the most reliable way. I watched them in MPEG, and every time I stumbled upon a scene that I laughed at, I trimmed the video down, saved the clip, and then re-opened the entire thing. I tried to pick clips that related to each other from scene-to-scene (for the most part, since obviously not every episode relates to the last). Once I had picked out a selection of clips, I opened them all at once (in the reverse order) and then saved it all together. And voila–recruitment video and highlight reel all in one. This puts me at a whooping total of 12 stars for my final project.
In order to help recruit a new trainer for ISIS (and the on-going space mission), I have created a series of design media.
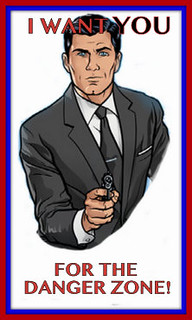
1. Propaganda Poster
This poster corresponds with the Propaganda Poster Assignment in the design assignment repository. I created it by taking a screenshot of this picture of Archer. In Photoshop, I carefully edited out everything around him, and left only his upper body. From there, I saved the picture and opened it up in the ever-so-handy Picasa. I used this WWI poster as inspiration, and added the typography to the poster, and threw on a ‘museum matte’ boarder using red and blue to give it the patriotic touch that it needed. This poster also poses as something a little less with the color theme that you will see in the next two posters.
2. Minimalist Poster
Corresponding to the Minimalist Poster Assignment in the design assignment repository is my minimalist poster for this glorious tv show. To achieve said poster, I took the “a” from the title of the show–literally cropped straight from this picture, or a bigger version of it–and edited it in Picasa. This time, I used two features in Picasa, the ‘museum matte’ and the regular old ‘boarder’ feature. I stuck with the original color scheme, because it suits the show, and makes it more recognizable for the audience–if they have seen the show at all.
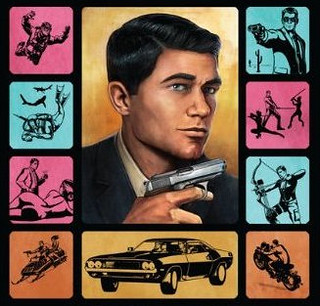
3. A “How To Archer” App
This is the icon for an app that teaches the Archer fanatic How To Archer. It corresponds with the Create Your Own Smartphone App assignment in the repository. I also got the idea from a book that was actually written for the show called How To Archer, written by Sterling Archer himself. I even used part of the original book cover in my icon, so that the targeted audience can relate back to it. Perhaps it will become the logo for the show one day–this or the minimalist poster would be cool.
This series of design assignments sets me at an initial 8 stars. More to come soon. We are on the brink of recruitment!
I did this as part of my final project. The idea behind it is that it’s something relatively fun to do and gives the person freedom to explore accents and voices and just really have fun!
I describe it as:
Yes! Make a vlog to explain anything! Vlog about your day, confide in your vlog, love your vlog. Use an accent to make it more interesting and fun! Be a youtube sensation like Jenna Marbles or Nicole 337!
Here’s my fake vlog:
I used my webcam and then edited it together in premiere (there’s a reason it still looks unedited, but that will be revealed in the final project). I thought it was a lot of fun and something that could present challenges in terms of character building and accents!
DIGITAL SHORT MASH UP!-Make your own Digital Short-the crazier the better; can be from existing digital shorts or your own!
For this assignment, I took four different digital shorts from SNL. [There are over 100 to choose from]. The ones I chose were I’m On A Boat, Boombox, The Creep, and Threw it on the Ground. These are four of my favorites.
In order to make this, I first downloaded the youtube videos from the Lonely Island’s VEVO channel via iLivid. This exports the videos into my videos folder. I opened Adobe Premiere. I went to File->import and control clicked on the video files I wanted to import so that it could import multiple files at once. Once they were in premiere, I right clicked on each one under the project tab in the lower left corner to import it onto the editing table thing [sequence 1 is the default name] in the lower right hand side of the screen.
[Sometimes you can drag and drop too]. I used the razor tool to clip out the parts I wanted or didn’t want and deleted the ones I didn’t want by clicking them with the pointer and then pressing delete [because, let’s face it, that editing table gets pretty crowded.] I then used the pointer tool to put all of my clips in to place, dragging and dropping them where I needed them [be careful here—it is very easy to accidentally overlay video; adobe will show you when you are lined up with the video by this thin black bar that has arrows] , and played through to make sure I had edited everything clearly and concisely. I went to file->export-> media. When the screen pops up be sure you’ve got entire sequence selected [sometimes it will say work area DO NOT EXPORT JUST WORK AREA].
This appears on the left hand side of the export screen, below the video. I export in an MPEG4 because it compresses pretty well, although the video quality is higher in other export formats. Make sure you click maximum render quality too. Then, click export. You can decide the destination folder by clicking on the orange title and then seeing where it will appear. Congrats! You did it!
The new assignment I created is called, I am me. I wanted to do a video assignment that shows a bit of our personality and who we are. With ds106 being mostly an online course, sometimes it’s nice to know a little bit about whose blog you are commenting on. I felt that it was necessary in this assignment to show a little bit of personality and what we are about. This assignment can be expressed in many different ways using videos. It doesn’t necessarily have to be multiples pictures of you, but perhaps have different things that you enjoy doing, or even talk about who you are.
I’m the kind of person that makes a million faces all the time! You know those people who you see randomly, and kind of think why is she making that silly face? Well I’m probably the one making the faces. I decided that a big part of my personality was just kind of being goofy, more down to earth, silly. I wanted to portray this in the I am me video to show my fellow ds106er’s who I am. I also decided to add music to this for people to get a sense of the kind of things I listened too. I picked the song Video Killed the Radio Star by Buggles. Who doesn’t love the Buggles, plus the song is a little ironic. :P
This assignment is meant to be fun, and it’s suppose to express who you are and maybe some things that you like. Allow your creativity to flow, and most importantly, HAVE FUN
p.s. excuse the hair, it’s finals week
In case you wanted to see the video for Video Killed the Radio Star:
For this assignment, it helps to begin with an overarching story in mind. I chose to do this assignment in a way that it would contribute to the story I’m telling in my Final Project for ds106 – Spongebob’s Best Day Ever.
So, I went digging through my kids’ toys for inspiration. What kind of inanimate thing can I bring to life with a bunch of pictures? What kind of story could I tell?
Somehow, I found inspiration in the Queen Rubber Duckie in my daughter’s room, and the McDonald’s Happy Meal Spongebob toys in my son’s room – the happy dancer and the karate master. I won’t try to explain how those things inspired me. This is not a tutorial for finding inspiration. It’s a tutorial for making this assignment. I don’t have time nor space to try to teach inspiration (it’s a monster I don’t even really understand myself, anyway). So sorry. Moving on now.
So, I grabbed the rubber duckie queen, the Spongebob toys, and my daughter’s mermaid/ocean beach towel and laid them out on a card table. I quickly noticed, in positioning my iPhone to take pictures, that I could create the appearance of different scenes, or camera angles, based on the positioning of my phone.
I learned simultaneously that this meant that for each scene, I would have to keep the camera rather still. My husband came over to help me reposition the toys for each camera shot so that I could move the camera less between shots. I purposefully included some shots showing the hands involved in the process to add to the corniness, and the obviousness that we’re propelling this inanimate thing ourselves. I’m going for cheesy here.
So, I took several successive shots for each progressive scene. I kept the pictures in order of what I wanted. This made it super easy when it came time to upload. I went into Windows Movie Maker, and clicked the gigantic box that says ‘Click here to browse for photos and videos.’
You can also click and drag photos into this window, but this was the easiest method for what I was trying to accomplish. I went into the location of my photos (after importing them to my laptop from my phone using an iPhone cord), and used shift to select all of the photos for the project. They uploaded in perfect order for the project.
In a few places, I wanted to copy photos to duplicate an action, such as Spongebob chopping the Queen Rubber Duckie, or the up and down positions of his bouncey victory dance. For these, I right-clicked on the appropriate frame and selected copy, then left-clicked in the spot I wanted the copied photo and right clicked again and selected paste.
Then I clicked on the Edit tab under Video Tools. Once there, I used Ctrl + Shift to select each of the frames that I wanted to change and went up to the Duration window. I edited the majority of the scenes to 0.50 seconds. I allowed for longer for the dramatic scene of the initial encounter with the Queen, as well as the transition to karate master Spongebob and the final dancing Spongebob scene to help draw out the fade-out.
Next, I went into the Visual Effects tab under Video Tools. I selected the single frame where Karate Master Spongebob appears, and selected the Fade in from White feature for it. You know. To help make it extra dramatic.
I also went to the final scene and selected the Spin 360 degrees Visual Effect to help make a definitive end to the scene.
I then recorded a few clips of some songs on YouTube using the Voice Memo Recorder on my phone. I emailed those to myself (because iTunes wouldn’t work right for me at the moment) and then uploaded them into Audacity and trimmed them down to the selections I wanted and for the correct lengths. Then, I uploaded them into the Movie Maker project in order by selecting Add Music under the Home tab in Video Tools, and selecting ‘Add Music from PC’. It matched just fine when done this way, since the appropriate editing of the audio was done in Audacity.
I saved my work in a number of ways. I saved the project using the floppy disk button on the top left of the screen. Once all of the editing was completed, I clicked Save Movie, and For Computer.
Once finished, I uploaded the completed video to YouTube for easy posting, and Voila! Spongebob’s Epic Battle via Inanimate Motion is completed!
For my final project, I’m working on a media mess of projects all about Spongebob’s Best Day Ever. I decided to create my own assignment for this to kick it off. I’m going for incredibly cheesy and over-the-top, so I settled on this idea as a perfect fit.
Picture this: Spongebob’s dancing along, whistling to the music playing in his head, enjoying his Best Day Ever, when all of a sudden, *dun dun DUUUNNNNN*
…he runs into the evil Queen Rubber Duckie! Instantly, he transforms into karate-master Spongebob and whacks the evil queen into oblivion. Joy and peace are restored to Bikini Bottom once more, and Spongebob does a bouncey dance in celebration as the scene spins off into the rest of the unknown happiness of Spongebob’s Best Day Ever.
It’s a beautiful sight. <3
This is my very own brand-spanking shiny new Video Assignment that I named Inanimate Motion, worth 3 stars.
REVISIT!
I had to come back. After viewing my own assignment on YouTube, I clicked on another link that populated after mine (in the usual manner in which we all get sucked down the rabbit hole of YouTube).
I shouldn’t have been surprised to find that I was completely shown up. I guess I’m not, really. And I don’t know that I’m necessarily ashamed, either. I’m proud of my little amateur crap, because I made it. So there.
Still, it seems necessary to go ahead and show you what the professionals look like when they do this assignment. So, here ya go:
‘Bring joy to the world, it’s the thing to do, cuz the world doesn’t revolve around you.
Don’t be a jerk!
It’s Christmas!’
In order to complete this assignment and earn the star it says it’s worth, there are three options.
1) Make or take a picture that is a part of a story of something meaningful to you. Write up the full story, in the manner that I have done on this post, and include your photo as a supporting piece to your story to help put us there. Of course, the photo should be as COLORFUL as possible, whatever that means to you.
2) In lieu of a story of words, embellish your photo in another way that takes the color to the extreme and brings smiles to your audience, so that it tells a kind of story all on its own. This can be through any of your favorite editing programs such as Aviary, Photoshop, Cornify (thanks, Michael, for finding this awesome gem), Instagram, GIMP, Paint, or paint.net. Abbey‘s submission is an awesome example of this option.
3) This assignment can also be satisfied through creative presentation of your photo, in such a way that it creates a story in and of itself through its presentation alone, such as in this epic submission.
So, use the picture to tell a story, one way or another, either by giving the background of the picture with words, in great detail, or with fantastic editing, or by creative incorporation into your blog through a clever concept or perspective on the assignment.
It’s that simple! The work behind this assignment is in the brainstorming of the story behind the photo and how to incorporate it. Have fun!
Inspiration: For this assignment I was just simply inspired by the week when we learned how to use X-ray Goggles and learned all about Web Designing. I thought this would be a cool fun way for students to play around with x-ray Goggles.
Rating: When I initially created this project I forgot to give it a rating. (So, hopefully my professor will go back and do that for me) However, since their are a lot of steps in this assignment I would give it a 4 star rating.
(The details about this assignment are on this page)
Inspiration: During the past few months I’ve noticed that funny pictures have become really popular on social networks, especially Facebook, Tumblr, and Instagram. Inspired by this, I thought it would be a great idea for students to try to come up with their own. I figured that this would be a really cool and fun assignment for them to get creative with and it wouldn’t be a struggle to complete.
Rating: I gave this assignment a two star rating mainly do to the fact that students will have to use their resources or the internet to find a program that will allow them to add text to an image and that they will have to be creative in some way in order to make the image funny.
Here is are two examples (I got both of the images off of Facebook):
Here is the original image that I used in my example:


