Yellow is my favorite color, but coral is a close second

In addition to the other visual assignment bank posts we had to do this week, we also had to pick six more stars of visual assignments to do. For my first of the extra stars I did a three star assignment called room tour. For this I took four separate pictures of different angles of my room and then put them together in one collage by using the iPhone app called Pic Stitch. This app is beyond easy to use, you simply just drag the pictures into what square you want them. The instructions for the post tell you to talk about what is in your room, what you would change and why did you design it this way. I have a medal hanger for all my full and half marathon, pictures of my family/friends, trophies from my competitive soccer years, my high school homecoming queen sash, pictures of surfing/beach, several Boston Red Sox items, and there is also a green yoga mat on the floor that isn’t in the picture. I listed the items above because they tell a lot about me. Soccer was my life, then I switched to swimming (which are the ribbons in the bottom left picture) and then finally to running. I also have surfed before and thought the pictures fit well with the coral colored walls. My favorite team in the whole world is the Boston Red Sox so I have a lot of stuff in my room! I am actually going to opening series this year in Boston with some friends! I picked the coral color because it was actually a suggestion by one of my best friends named Catie. She picked the color out for me at Home Depot and I loved it! I picked white and black accessories to accompany it because I thought it matched well. I put my bed in the corner up against a wall because I like to sleep up against the wall. My room doesn’t normally look this clean though. What I would change is maybe a coupe of paintings on the wall that I have done myself because I love to paint. Painting is actually one of my hobbies that I don’t get to do too often, but when I do I can spend over a month on a project. I also have a back of chair from the Boston Red Sox stadium that was given to me as a gift that I want to hang up, but I am unsure where to put it. Overall, I am happy with how the pictures came out for this assignment and how the collage came together.

1528588_718141508197528_1951990649_n

Hakuna Matata

One of the visual assignment bank posts we had to do this week was to recreate a famous movie scene. Of course the first movie that came to mind to recreate in a picture was the Titanic, but I decided to go with something a little different. This assignment instructs you to simply recreate the picture and I picked to do… The Lion King!!! We own it on VHS and we have a cat so I thought why not?! I put the movie in our ancient VHS player in my basement and fast forwarded it to the correct scene and then paused it. After this, I went and found my cat Snowball who is 14 years old (he is also 24 pounds, but it’s hard to tell in the picture). I had my younger sister take the picture for me on my iPhone as I held Snowball up to recreate the picture. The instructions for this assignment told you to post the original picture next to the one you made, but since the original is in my picture I did not do that. Hope you enjoy! Snowball did not!

IMG_1528

I really like how the picture came out. The quality isn’t the best because we had the lights dimmed so you can see the TV, but overall I think I did a good job!

Favorite Musician GIF

When you see these guys live you can’t take your eyes off of Gord. That is why he is the winner of the Favorite Musician For Me To Make A GIF of in January 2016 Award!

Congratulations Gord!

qppBfFr.gif

What is a country that I have heard of…

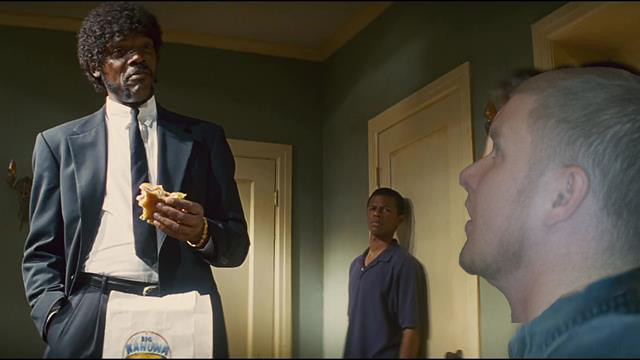
For this assignment, creep on a move scene, I originally thought it would be a good idea to put myself in a horror movie, maybe even cover myself in blood or something. Although this was admittedly easier, it is, to me, somewhat more entertaining. After I decided against a horror film, I thought a Tarantino movie would be a good idea. I was going to make myself into the cop in the trunk in Reservoir Dogs, but none of the images contain both the characters and the officer. So, I went with this iconic image instead. Imagine, if you will, that Samuel L. Jackson just came along with a gun and an armed compatriot and started eating your Big Kahuna burger. I tried for a look of apprehension in the photo, which I had to take specifically for this image because of the angle, but I think the angle obscures the wonderful face acting that I had done.

Process wise, it was all rather simple. I found the image, took note of the angle of the character in the picture, and had someone snap a photo from the appropriate angle. I added the scared look for a nice touch. There was one take of the photo where I looked more scared, but the angle was bad so I discarded it. It was harder to recreate that look than I imagined. After that, I added the face image to gimp, added a transparent background, cropped it around my face and saved it as a layer. Then, I added the face layer to the scene image, resized it, flattened it, and voila!
I am entertained enough with the results that I think I will make this my facebook profile pic for a while…

scene

Say it Like The Peanut Butter

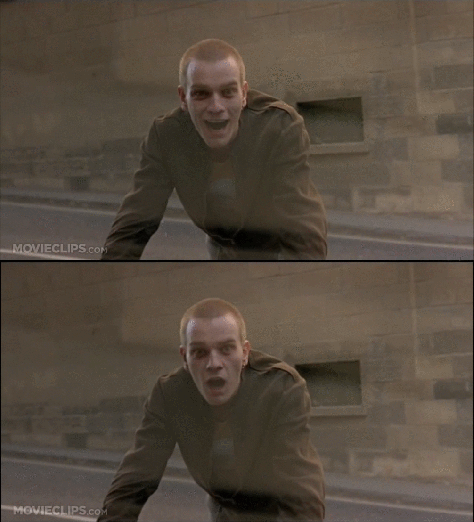
First ever GIF here for Western106 assignment and I went ultra complex using two whole images making the results worth two thousand words. Although lots of those words are the same so if you cross reference, eliminate remainders and carry the zero, it’s worth about 1150.

I fear I did not quite capture the essence of this scene, but this visual from Trainspotting always stuck with me. From Holy S%^t to S%^t-eating grin in 100 milliseconds. GIF is a hell of a drug.

output_rvNDDc

Say it LIke the Peanut Butter

As a general rule, animated gifs annoy me. But that was my first assignment for DS106. Turned out to be fun to do.

I created mine with help from this tutorial. I used MPEG Streamclip and GIMP to put this together. Both are open source. The original assignment can be found here. Basically, we were to create an animated gif from an essential scene in our favorite (or least favorite) film.

Who doesn’t love this moment from the Shawshank Redemption?

Andy Dufresne escapes from Shawshank

How to Make a Story Map

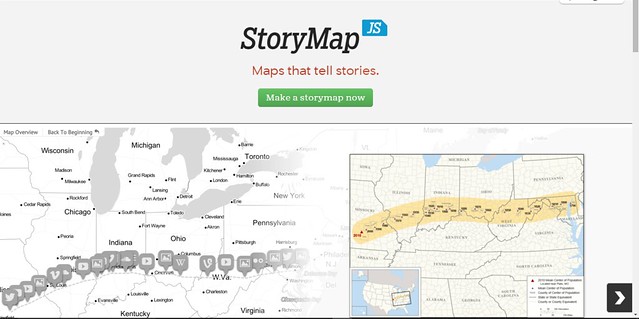
The KnightLab Story Map is a fun way to tell the story of a trip in an organized manner.  I used this in my final project about a wanderer to help me tell their story from their various destinations.

Steps:

  1. Click the “Make a story map now” button in the center of the KnightLab home page.

Map1

2. Name your story map whatever you want

Map2

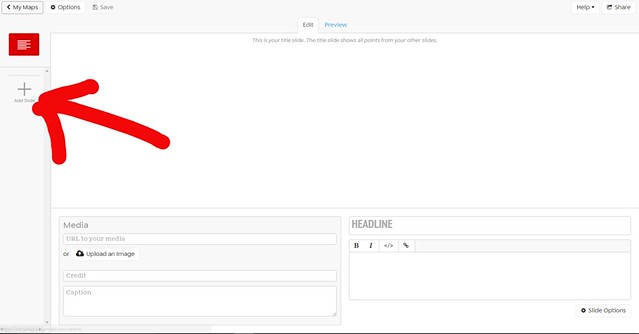
3.  Click add slide on the left side to create the first point of your trip

Map3

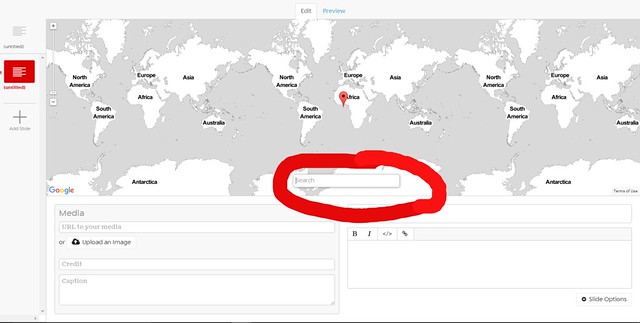
4.  Search for the location of the destination in the search bar in the center of the screen.

Map4

5.  Add media to your slide by posting the URL to the image or upload an image.  Make sure to give credit in the credit field as well.

Map5

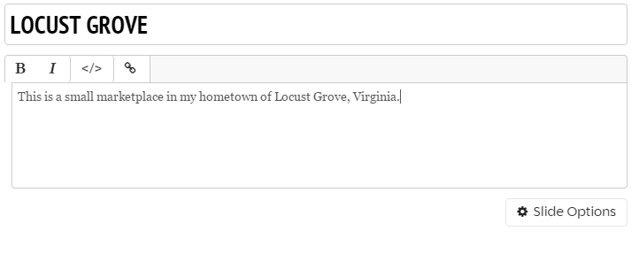
6.  Add the story and title to the slide in the right side of the bottom half

Map6

7.  Repeat the first 6 steps for as many destinations as you have in your trip

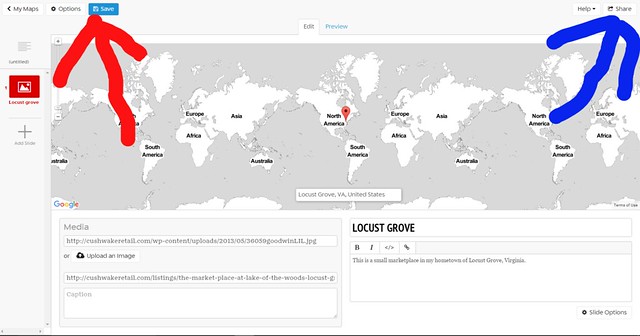
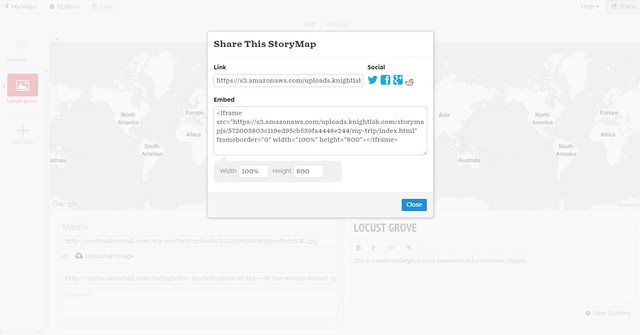
8.  Save the map by clicking the icon in the top right.  Then click the share button to bring up the embedding options.

Map7

Map8

9.  To embed your post in WordPress, you must install the KnightLab Time Table plugin.  Add a new plugin and search for “KnightLab” in the plugins store.

Map9

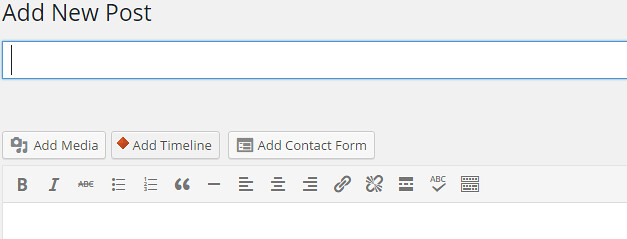
10.  After installing the KnightLab plugin, an “Add Timeline Option” will be added in the blog editor.

Map10

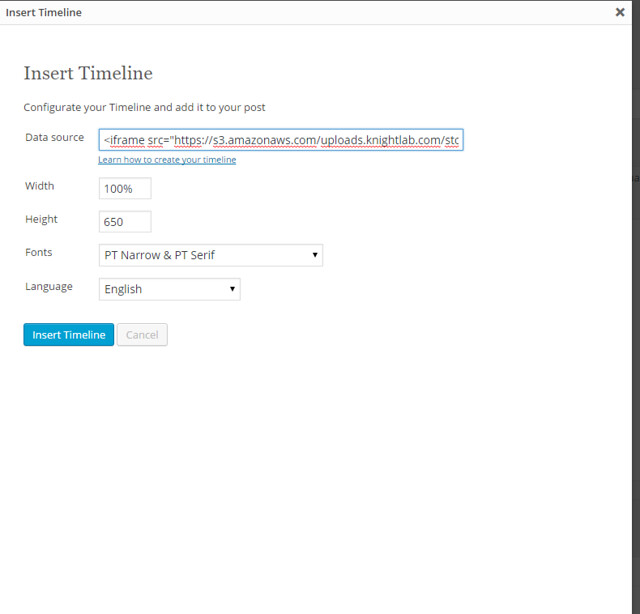
Click on it and copy paste the embed code from the embedding options in the story map editor into the Data source field.

Map11

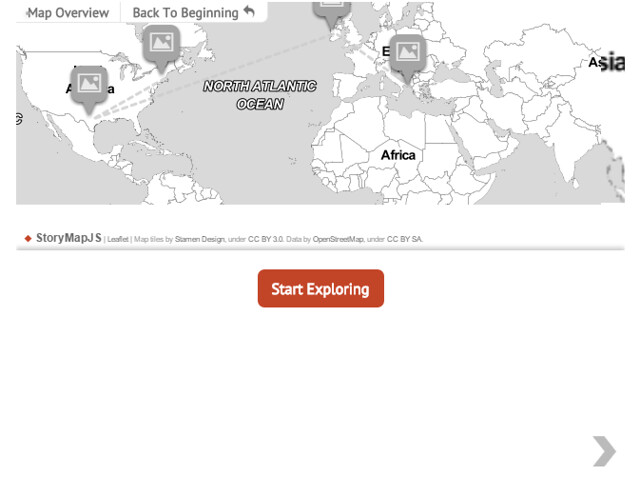
This will add an interactive story map to your blogpost.  You’re done!

Map12


GIF Your Day Tutorial

For the GIF Animate Your Day Like Ben assignment, you need to create 5 animated gifs of your life. While it may seem daunting, this task is super simple! Here’s what a finished product might look like:

1

And here are the steps to reach that!

Steps:

Step 1: Film what you want

It can be whatever you do daily, and you can film it however you want. If you have a fancy camera for filming, that’s great! But a phone camera will work just as well.

Step 2:

1

Transfer your videos onto your computer, by whatever means necessary.

Step 3:

4

If you filmed a lot, it helps to cut things down a little, just to save on load time. I cropped mine in Windows Movie Maker, but you can use whatever video trimming tool you prefer.

Step 4:

2

Go to Giphy.com, and click the “Create” button in the top right.

Step 5:

3

It’ll take you to this page. You can put in a video url, if you’re using Giphy for a different assignment. But, if you’re using videos you took, press the browse button, and open the video file.

Step 6:

5

Adjust the point where you want the gif to start, and how long you want it to last, then scroll down and hit “Create Your Gif”

Step 7:

6

Once it’s finished loading, right-click the gif and hit “Save image as…” to save it to your computer. Then you can freely upload it!

Just repeat these steps for all your gifs, and the assignment will be completed in no time.

Word of warning:

15Make sure when you’re uploading the gif to WordPress, make sure it’s full sized! Otherwise, it won’t play at all.

Happy GIF-ing!

That’s Not What I Expected

image1-4

I created my own assignment for this category. I chose to do a visual assignment where you had to take a picture of something close up and have other classmates guess on the object in the picture is. For this picture, I took it of something that could be used around the house. Something maybe for cleaning.

For this tutorial, the assignment is fairly simple and easy to understand. The purpose of this assignment is to find something cool and interesting around the house that if you were to take a picture of up close, it would be tough to figure out what it was up close. I’ve seen these pictures done with orange peels, dog noses, and even tires of a car. It is very interesting to see how things look up close. The best thing to do for this activity is to grab your camera or cell phone and take a picture of what you want. Upload the picture onto your blog to submit for the class and the assignment. Tag the appropriate tags.

Color Changer Tutorial

Here’s a tutorial for the Color Changer assignment!

There’s another tutorial for this assignment using computer software, but incase you don’t have any picture editing software here’s how to do it on the web!

Step 1: Pick a picture that you want to edit. Try to pick one with a color palette that will look really interesting once edited.

Step 2: Go to PicMonkey and go to the “edit” page.

Step 3: Once on the edit page, upload the photo that you want to use. This is the photo that I used:

IMG_9455-e1442537514651-225x300


Step 4: Do whatever you want to it! You can pick different color changing effects from the “exposure” and “colors” menus. For my picture, I dialed up the temperature and contrast, and down the saturation.

21488756342_50ab551b0e_z

Step 5: Save your new picture to your computer, and upload into your post!


Hope you found this tutorial helpful! :)