Love: Not Enough Frames

Original DS 106 Assignment: Love: In Three Frames

Our love in three photos. This was the “try a random one” assignment I got, which perfectly fulfilled my need for 10 total stars. I took pictures of my long-time boyfriend, Andy, and realized I was able to get one from every other year. We are going to get married soon and I though this was such a cute thing to be able to make in light of all the stressful planning! Andy and I met through friends and immediately clicked… I liked to talk and he liked to listen. 5 years later, we have a kitten, have lived in two apartments, have gone on countless trips to many states, traveled internationally for the first time and going through college! Among all else, Andy and I are best friends. We don’t have to sugarcoat things to prevent the other from getting upset. We like watching reality shows, going to the beach, and working to save for the future we both want. *cries*

Step 1: Open canva.com
Step 2: Download all photos you want to use and have them on standby in Flickr, Google Photos, or even your desktop.
Step 3: On Canva, click “Create Design” and scroll down to select “Instagram Post”
Step 4: Under templates, search “Photo frames” and select one that has space for three photos.

Step 5: Import photos into template and hover over the frame you want them to go into.
Step 6: Edit the text to say something endearing or funny! Click on “Elements” on the left hand side to add any stickers as you see fit.
Step 7: Click “Share” and scroll to “Download” and select the format that you want this download, or shared to your social media.

Not Really A Bad Photo


Original DS106 Assignment: Pick A Bad Photo, Apply A Vintage Effect And Write Something In Helvetica (2 stars)

For this bad photo, I used an old photo I had that is funny, but had no real use because it is bad quality. I took the photo, added a filter that Canva provided, and used Helvetica*-ish font provided to make it into something useful. Now this can be used as an advertisement or when teaching kids about crossing the street.

Safety Photo for Crossing Guard Training

Step 1: Open Canva on canva.com
Step 2: Click on “Create A Design” and scroll down to “Instagram Post”

Instagram post format is best for this type of content to get shared across multiple platforms.

Step 3: Upload photo you want to edit. Photos can be uploaded from Flickr, Google Photos, Instagram, etc.
*Intermission music while you find the photo you want to use*
Step 4: Click on the image, on the left hand side there is Edit Image, and click on filters. Apply the filter you want.
Step 5: Click on text on the left hand side, add the text you want in Helvetica font.

Step 6: Click Share on the top right hand side, and save the image in the format you want or share it to your social medias.

Another City Graphic Poster


Original DS 106 Assignment: City Graphic Poster (3 stars)

I love scenery photo so this seemed like a no brainer to do. I had this photo of National Harbor skyline I took when driving one day, yes I did drive around with no destination, but with recent gas prices, I refuse. 0 people have completed the assignment so there was nothing to follow, maybe I will upload a tutorial of my own when I figure out how to do that!

How most people feel about gas prices right now.

With my major being in Communications and Digital Studies, being able to transfer photos into posters and advertisements is something I need to be able to do quickly, this is where a majority of the job market is. Ok, well not majority, but for entry level positions the grunt work may be producing multiples of these everyday. I am hopefully going to be using some of my work from this class and creating a portfolio to present with job opportunities.

Step 1: Open Canva at canva.com
Step 2: Select “Create Design” and scroll down to “Poster” or the desired size.
Step 3: Select the photos you want to use and edit for the graphic poster. Adjust the photo to fill the poster as much as needed and crop.

Step 4: Add any gradience, stickers, or add any filters with the tabs on the left hand side.
Step 5: Add text! This can be promotional, something basic like the city, state or town.

Step 6: Add any more fixings! This can be great for town events, fundraiser, or upkeeping town morale. This can be taken far more beyond just adding a town name, and is multiuse.
Step 7: Click “Share” and select how you want to save your media or share it towards any social medias!

Draw It! EASY

Original DS106 Assingment: Draw It! (2 stars)

I cycled through some tutorials by other classmates, as well as looking at other classmates posts finding what to do. Hopefully I did not get any viruses from clicking on so many links, but I did find one that got it done quickly! I screen recorded probably one of the EASIEST tutorials to follow to get an assignment done (at the end of this page). I have been wanting to get a photo of Muffin as a drawing, but finding people who do drawings of animals is harder to find in this area, so this will probably be an alternative I will do! Also for family photos, memoirs, military, etc this would be a great way to add some more sentiment.

Step 1: Go to dumpr.net (opens as picjoke.org)
Step 2: In the search bar for the photo effects, type “sketch” since we are trying to make a photo look like a drawing.

Step 3: Select the photo effect/frame you want to use to convert your image.
Step 4: Upload your image and lets the processor do its work!

Since this is a free site there are MANY ads, try to avoid click any.

Step 5: You can save your image to your computer or use the link to share it or post on Facebook.

Draw it Assignment completed by dumpr.net/picjoke.org
EASY TUTORIAL!!

Julie Andrews the Animal Whisperer Remix

So I decided to mashup my Julie Andrews Assignment. I wanted to think of a new movie name for this movie poster, and the first thing that came to mind was We Bought A Zoo.

Look Ma! See What I Learned!?!

My skills have blossomed, and so has this photo collage! What was once a static set of five photos is now a photo video with background sound. Wonders are not ceasing. I took the five images from VisualAssignment2109 and decided that if these are supposed to be Places of Peace, then there should be sound effects to go along with them, to give the viewer a much broader experience. I did the project in Canva, first importing the five photos and with the video feature, putting them in frame for 12 seconds each so the piece would be a total of one minute in length. Then I found background meditation music on freesound.org and added it to the file. It was actually pretty easy once I had learned that this was all possible. When I first did this assignment, I did not know about Canva, freesound and how to add still photos and audio to a video file.

My Places of Peace by Jenny Holbert

The second assignment I improved upon was AudioAssignments75, SongStory.  With the original, I had a lot of difficulty figuring out how to use Audacity and I recorded directly onto Audacity tracks from my laptop speakers for both my voice track, then from YouTube.  It sounded very thin, hollow, metallic–you name it.  I still don’t have all the answers but this is MUCH better.  This time, I recorded the voice and background music using my iPhone and converting them to MP3 files, then importing them to Audacity.  Since I am still not adept at manipulating Audacity, I simply moved the music to start a few seconds after the voice began and lowered the volume until the voice was over then brought the volume up at the end.  Those small adjustments took me plenty of time and frustration because I kept adding a loop somehow so had to delete the whole file an start over again.  The second time, I kept it simple, got it done with an overall much cleaner, more polished product, and went on to the next assignment, claiming success on this one.

My Favorite Photo

This is my favorite photo I’ve ever taken mostly because of the the subject, my cat. Artie doesn’t often sit still long enough to get this kind of portrait of her. I also really liked the lighting. This was probably taken one day when I got home from practice just a few minutes before sunset, so snugly in the golden hour. She is also oriented well in the frame, with her eyes around the top third and looking into a third of empty space.

Many, Many Me’s

In this universe, many me’s have joined together as partners in crime. Earth 27 me has just stolen the milk out of your fridge for Earth 42 me’s cereal, and Earth 212 me drove the getaway car.

I used Gimp to edit multiples of myself into one photo. Each photo was a layer, and for the first 2 layers I selected the section I wanted with the lasso tool, inverted the selection, and cut the background. Then, I merged the layers down into one and tried to smudge some of the harshest seams.

Save Me From Myself

Me attacking another me

If I ever met myself, I can’t imagine we’d get along terribly well. And I imagine we’d be laughing the whole time.

This panorama was a bit difficult because it kept clipping when I jumped on or off the chair. I tried it a few different ways and this was the best result. With some slight blurring and if you ignore the curved floor, one can almost imagine the epic showdown. Earth 3000 me has finally caught up with Earth 42 me after years of hunting. How will it end?!

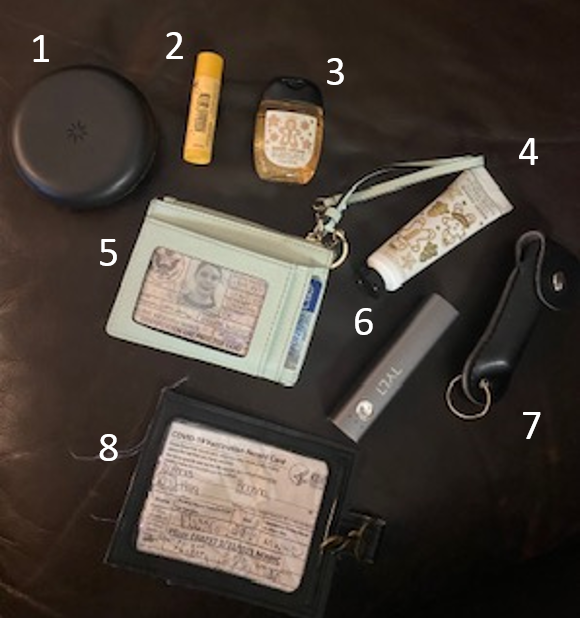
What’s in My Bag

Here is a breakdown of the essentials of what I carry in my backpack every day.

Sorry for the poor picture quality
  1. Invisalign case: I take my liners out when I eat and drink
  2. Burt’s Bees Chapstick: Got to keep those lips moist
  3. Bath and Body Works Hand sanitizer: For obvoius reasons, gingerbread scented
  4. Bath and Body Works Hand lotion: To keep hands soft after using hand sanitizer, gingerbread scented
  5. Kate Spade Wallet: Where I keep my IDs and credit cards
  6. Portable charger: For when my phone is low on battery
  7. Pepper spray: I hate that I have to have this, but I do
  8. Vaccine card: Proof that I am safe to be around in public