Apophenia

So for this assignment, we had to make as many augmented versions of something in our house.  I chose this (totally copyright free) jar of Planters peanuts:

IMG_0111[1]

Now I can imagine somebody might really kind of despise peanuts.  Just starts screaming at the sight of them.

I hate nuts

I could also imagine a peanut rocket flying through space to expand the horizons of the peanut people.

peanut ship

And that’s all I can imagine.  I’m boring.

This assignment, honestly, was not thrilling to me when I first saw it.  Mainly because my photo manipulation skills extend to Microsoft Paint and it’s obvious tools.  So I knew from the get-go that my creations wouldn’t be too exciting.  Then I made the brilliant decision to use a jar of peanuts as my object.  Because that’s something that can be used to create a lot of things.  Really, I’m surprised I even came up with these two beauties.  Now that’s not to say I didn’t enjoy making silly things out of a jar peanuts.  Just that it’s not exactly flexible when you imagine it in other situations.  Kind of illusion breaking.

To make these, all I did was take a picture of the jar of peanuts on my desk and put it into Microsoft Paint.  Then I used the free-form selection tool to outline the jar (poorly) and crop the rest of the image out.  Then I copied the image and pasted it onto another image I used of a man screaming from a daily create I did (he was originally screaming at a laptop).  I whited out the laptop using the paintbrush tool.  For the rocket, I opened the cropped image in a new picture, then used the triangle shapes to add wings and used the fill-in tool to make them black.  Then I used the marker tool to create the fire.

Just a Little Imagination

For the assignment Apophenia(3.5 stars) we were instructed to imagine different versions of everyday item. Being that I did this assignment at my desk, the first thing I found was a pen. ds

This is the original photo I used before letting my imagination transform something so boring into something fun.

Using pixlr.com I made different objects out of this simple pen.

visual

This website had many different tools to choose from on the left panel so that’s what I used to complete the assignment.

The first thing I imagined was a flag ds flag

and the second thing was a watermelonds watermelon

I used the brush, paint fill and erasing tools to create these and it was all very simple.

Recycle Bin is alive Apophenia

I took a photo of a recycling bin and created four augmented versions of it using Pixlr Editor. My versions are of flowers, a monster, a fire can, and a human face.

Apophenia “Recycling Bin”

The Work Itself: This visual assignment asked to take a picture of an object and create as many augmented versions of it as possible. My object is a recycling bin in the convergence center. I chose this object because since it has a lid on top, it makes sense that fictional objects could be emerging out of it. I used clip art for two augmented photos and then drew two other augmented photos. Here are my separate flickr links to the three augmented pictures of a recycling bin.

Links: original recycle bin, flowers, monster, alien, fire can man
Telling the Story Behind the Story: A recycling bin may not be as it appears. Who knows what could be living down there. With all the stuff that is thrown inside, the bin takes a life of its own. The bin is a supernatural object that miraculously can grow flowers, or even monsters. This fact is not revealed to the public, because the government is studying it and is afraid it could be related to aliens.
Narrating the Process: I took the original picture of the recycling bin with my iPhone. For the augmented versions, I used Pixlr Editor. I pasted the recycle bin as the first layer and then pasted my google images such as the monster for example as a second layer. I used the tools to position the objects as I saw they best fit. For the flower augmented version, I drew the flowers using the brush and sketch tools. For the alien or human recycle bin photo and fire can man photo I had to do the most edits.

I went to new layer and choose the drawing tool and selected the circle. I created two circles for eyes and used the Paint Bucket tool and choose white as the color and poured white into the circles for the eyes.
Next, I created another layer and chose the drawing tool and selected the circle. I created two circles for the pupils and used the paint bucket tool and choose black as the color and poured white into the circles for the eyes.
 I then created a mouth. I created a circle for the mouth and used the paint bucket tool and grey as the color and poured grey into the circles for the open mouth. I created another layer, I used the brush tool and created a tongue and used the paint tool to pour in red. I input another layer, I used the brush tool again and changed the filter to the 85 star and used black for the eyebrows. Finally my last layer, I used the drawing tool to make a circle and the brush tool for the sides of a bow tie and used the paint bucket to pour in purple.


Turn on the Moon and the Baseball

Hello everybody!

This week’s assignments all focused on visual creativity and storytelling. I was glad to spend some more time in photoshop. I used to love creating things when I was younger and had significantly more time and now I am getting back into it with these assignments.

THE ASSIGNMENT

“Find something in your house. Take a picture. Let your imagination churn. Make as many different augmented versions as you can think of. Help others see what’s in your head.” The assignment can be found HERE and it is worth 3.5 stars. This was also required of everybody.

WHY THE MICROPHONE?

From previous blogs that I have read, it seems people had the most trouble with finding an object to use. I can see why this is difficult. I knew that if I started walking around the house, I would begin overanalyzing and never get anything done. That’s just how my brain works. My choice occurred when I plugged in my Microphone and realized that it’s a beautiful little ball and could become anything. These microphones are called SNOWBALLS I believe. I chose to do two image placements of it: one as the moon in a beautiful landscape and the other as a baseball in a glove. I chose the first one because I imagined how great it would be if the moon was a beautiful microphone that played music for people. Everybody would spend more time outside looking up at the sky and enjoying the evening. Maybe people would dance more and have more fun breathing the outside air instead of being stuck in the house all the time. I also chose to make it a baseball because Baseball is a popular sport, not just in the U.S. but in other countries as well (Japan!). Placing a piece of technology in these situations is a representation of how technology is shaping our lives and what a big part of our daily activities it has become. What if the game of baseball in the future will no longer require physical baseballs or bat but instead holograms that you can control? What if we colonize space and use the moon as an actual speaker to communicate with Earth? That might be a crazy idea but I believe there is no end to human creativity. Also, the placement of the microphone made me realize how spheres and circles are a very typical part of life. The sun, the moon, things we play with, tires, cakes, the “circle of life”. When I see something spherical, I am immediately want to pick it up and hold it in my hands. I’m not sure if that’s just me or some type of  evolutionary human response.

THE RESULTS 

Snowball Moon

baseball_glove copy

THE PROCESS

After I figured out what to use as my object, it didn’t take long to find the other two pictures. I knew I wanted to make it a moon and I knew I wanted to make it a baseball so I googled these images and chose the ones I liked. Next, the photoshop magic began. I made a tutorial video that is included below and it takes you through the process that I used for both images (although the tutorial is of the baseball). First, I opened my background image (moon landscape or baseball) and then I went into FILE and PLACE and selected the photo I took of my microphone. Luckily for me, the microphone was already an almost perfect size. Seeing that I did not need to make any crazy changes, I deleted the placed microphone picture and opened it in a new tab in photoshop by going to FILE and NEW. I made sure that the width and height of this new blank canvas was about the same as my background picture. Once I had my microphone picture opened, I used the Elliptical Marquee tool and selected the microphone. The next step is to FILE and COPY it and FILE, PASTE it onto the background image. Use the MOVE TOOL (V) to move the microphone into its proper position and use the ERASER tool to erase the extra pixels around the microphone. Zooming in and making the eraser size smaller helps with precision. Finally, I blurred (BLUR TOOL) the edges of the microphone to make it fit more smoothly into its background. I saved both images as JPEG formats and uploaded them to this blog. That’s all folks!

The Pen Is Mightier than the Sword (Apophenia)

My third and final visual assignment of the week is the required assignment, Apophenia. It’s a 3 star assignment, bringing my total for the week to 9 stars. The instructions were

Find something in your house. Take a picture. Let your imagination churn. Make as many different augmented versions as you can think of. Help others see what’s in your head.

A link to the assignment page can be found here.


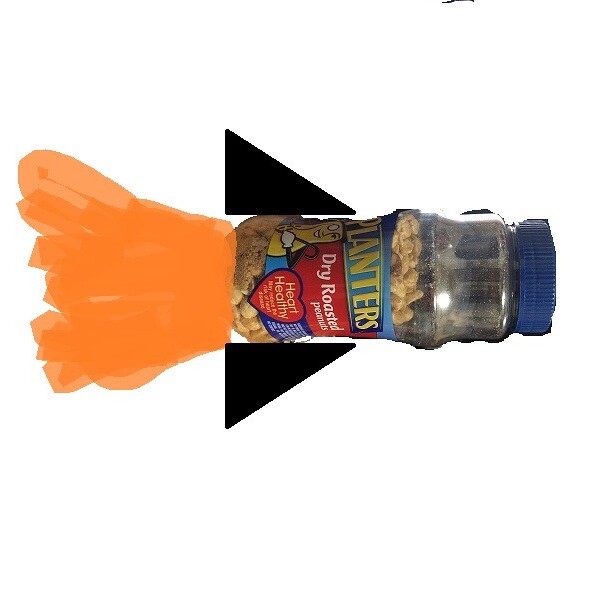
The image I started with was a picture of my pen that I took with my iPhone.

Original

The images I was able to create with the original picture are below.

JoustFinal

SurferFinal

PinocchioFinal

EmpireFinal


For this assignment, I wanted to use an item that people use everyday. I looked around the room for something I could use and my pen is what jumped out at me. It’s something that most people use everyday and it’s not terribly difficult to edit into photos if you’re still a beginner when it comes to using GIMP. I wanted to make at least three images, with the pen playing a different role in each image.

My first thought was somebody using the pen as a sword, hence the title of the post. I imported my photo into GIMP and used the Free Select Tool to outline the pen. I zoomed in 400% to make sure I got all the curves of the pen and as little of the floor as possible.1

When I had the whole pen outlined, I copied the selected region and pasted. I right-clicked the pasted layer and chose the “To New Layer” option to isolate the pen.


2

I searched for an image of jousters, found and saved the image I wanted, and then opened it as a layer in GIMP. I used the Rotate Tool to try to match the pen to the angle of the sword.

3

The pen was much larger than the sword, so I right-clicked the pen layer and scaled the layer down to a better size.4

I added a transparent mask to the pen layer to bring the knight’s hand back over the top of the pen – the technique I used in the Splash The Color assignment. I merged the two layers together and had my first image.


I forgot to get screenshots for the second image. I used a tactic similar to the one employed above. The pen and surfboard were not as good of matches as the pen and the sword though, so I had to do a bit of editing around the edge of the pen. I copied small patches of the water of the remainder of the surfboard and the back end of the pen. Then  I used the Smudge tool to try to make the pen blend in better.


For the third image, I started by removing Pinocchio’s nose. I copied over most of it with patches of white or the color matching the rest of his face. For the outline of his face that was originally covered by the nose, I copied a small section of his cheek from above and pasted it several times to complete his face.

5

Then I added the pen layer. I resized and rotated the pen to make it have a similar size and orientation as his nose.


My original thought for the final image was to have the pen completely replace the Empire State Building, but then I realized that the building was wider than the pen at the bottom. I would have had to do a lot of blending work at the base of the pen, something I’m not great at yet. I decided to just have the pen as the top of the building. For this image, I did something a little different. Since the pen has clear sections, you can see the color of the floor in some of the images. I used the Color Picker Tool to try to color in those sections to match the color of the sky.


Having completed the other visual assignments beforehand, this assignment was a little easier than I expected. The techniques I picked up and the practice with the tools made my work much quicker. I didn’t have to Google around for instructions on how to complete any of these steps, which is exciting. It’s fun to be getting a handle on a fun tool like GIMP.

Flower Power

After I read the description for this assignment I immediately started looking around the room for something that I could use as the main object. The first thing I saw was a pumpkin but I had some difficulty figuring out how to make a pumpkin more than just a pumpkin. But alas, Sitting right in front of me was a pot full of flowers so I picked those and went with that. A flower is shaped a lot like an umbrella and so that’s where I began. I’m really terrible with anything art related so cutting out my paper person was a little harder than it should have been but I did get him cut out. He looks a little bit creepy, but I didn’t have time to think about that, it was raining and he needed his umbrella! I tried to prop him up to make it more realistic but that proved to be too difficult so I just laid him down on the floor and got his picture. I then started to think what else a flower could be and in my infinite wisdom I flipped the flower upside down and made it into a broom. I know what you’re thinking…. How did I come up with that? Well, it’s just that kind of inverted thinking that makes me smarter than you.

Here’s my guy. Either he’s cleaning and getting rained on, or dry and has a dirty house. He can’t do both. That would take TWO flowers.

Click to view slideshow.

Three and a half stars*

If Fail, Try Again

   Here is the prompt to this assignment.

   “Find something in your house. Take a picture. Let your imagination churn. Make as many different augmented versions as you can think of. Help others see what’s in your head.”

As you can see, I took a regular TV stand and turned into a tee-pee, ice cream cone, and an extremely buff man that forgot leg day. It is so great when someone is able to turn an ordinary object like a folding table into so many different things. In high school, I had an art teacher tell me that the world is just an assortment of lines and shapes and projects like this one prove that. The TV stand is not just in the shape of a TV stand, it is able to take on the form of several things when you start to think about it long enough. I know that this table could be transformed into so many objects; however, I was not able to think of any more because my mind is not creative like an artists.

The process for this project was fairly simple. I took the picture of the table and opened it in Photoshop Elements 11. For the tee-pee, I flipped the picture around because I thought the bottom of the table seemed more like the top of a tee-pee. Then I used the quick selection tool to select the middle of the table in order to fill in the color with the paint bucket tool. Next I proceeded to use the line tool to create the rest of the shapes within the tee-pee. The ice cream was a little easier than the tee-pee. I only had to use two shapes, the triangle and the ellipse tool. Then I dotted the ice cream with chocolate chips and strawberries by using the paint brush tool. Finally I cropped the bottom legs out of the picture because they are not essential to the ice cream. Now the buff man was my first attempt at the project, before I figured out a better procedure to use than making several different. For his picture, I only used the line tool because I was not thinking and did not realize that the triangle tool would have made much more sense to use for his upper body.

I almost gave up on trying to make more objects after I finished making the man but I wanted to try and do better than that. I am much more satisfied with how the tee-pee and the ice cream turned out and I am so happy that I decided to continue to try out other shapes in hopes that I would improve. Practice makes perfect and these photos truly prove that. You can really see improvement after the fiasco of the man I attempted to create. If there is anything this class has taught me so far, it is that you cannot give up after a little discouragement. It is always best to continue and persevere.


teepeeDSCN5344Buff Man WalkingDSCN5344

Feather Duster Apophenia

raccoon

feather duster

mtndewspray


Is that a green raccoon tail hanging on the wall? Nope, that is just a plain ol’ feather duster. If you stare at it long enough, you can easily mistake it for a raccoon tail or even Mountain Dew spilling out the can. It’s possible that you could mistake for something else, but with my knowledge of GIMP and the Flickr album above, I can  help understand what I see when this feather duster comes into my view.

To create this three and a half star assignment, I found an image of a raccoon and a can of Mountain Dew online and opened them up as layers in GIMP along with my image of the feather duster in my room.step 1

I then went under the Tools section and used the Selection Tools to select everything around the feather duster in order to make its background transparent. I used the Fuzzy select tool since it is best at selecting a large chunk.

step 2

In order to make the actual background transparent, I had to go under Layers and hover over Transparency and select Add Alpha Channel. I then pressed the delete key and everything, but the feather duster itself was deleted.  step 3

I then re-sized the image of the feather duster for each image respectively in order to simulate the look of a raccoon tail or Mountain Dew spewing out of a can. Once again, you can see these images in the Flickr album above.

The Ludovico Technique

Our third and final Visual Assignment for the week is also the one all of my classmates had to undertake, as we took a simple household object, and tried to see it in a new way. Naturally, I decided to go with a tomato, since it was the only thing I could find on such short notice. As for how I made all of these images, it’s simple: Use the tomato to start with, and then let my imagination, and the junk drawer, go wild. For these pictures, I started with the “Tomato Captain,” which set the theme for pirates and the ocean. I added gadgets to the tomato, to represent different things, took pictures, and took them into Photoshop. Then, I changed the hue, the saturation, added layers, and kicked it up a notch. As always, I uploaded all the finished products onto my Flickr account, thus completing the assignment in full.

tomato captain
tomato diva
tomato fishy