Pods Embed Error: Pod not found.

Tutorials

PhotoFunia_Tutorial

For this section, I chose to do tutorials for the assignments I’ve created. The first tutorial is a video, getting the through the software (website) PhotoFunia. I explain everything in the video below. Enjoy!


Y.O.L.O is the Motto!

Creating this video was fun but very time consuming. If you were thinking about doing this video, I would give yourself at least an hour to productively finish the assignment. I’m not as quick or technologically savvy when it comes to some software’s so I just went with my safe bet.

I used…

YouTube to get the videos I wanted

Keepvid to download youtube videos into MP4

MPEG streamclip à to trim the videos I uploaded from YouTube

IMovie  to put the videos together

Google Image for some pictures I used in this project


Step 1: Finding material to use!


If you are thinking about using other videos on YouTube already created then mashing it up to whatever you want your project to be I would first go through videos that relate to what ever way you want to show what Y.O.L.O means to you.


i.e. I chose to use about five videos so I can upload it to MPEG stream clip and trim just the parts I wanted.


Step 2: Downloading and MPEG streamclip (Trimming the clips)


After downloading the videos through http://www.keepvid.com/ , I used MPEG Streamclip to trim just the scenes I wanted from the YouTube videos.


I.e. Save the trimmed copies as new files so that you can upload them into iMovie however you want it.


Step 3: iMovie


After trimming the clips and saving it as a new file, I uploaded my new files onto iMovie and started rearranging it. I wanted to start my video with a couple of images of Y.O.L.O therefore; I uploaded the images onto iMovie by dragging the images from my desktop and dropping it in there.


I then imported all the videos in the order I wanted and kept adding the images after every other video.


Step 4: Adding Music


After I finished assembling my project into what I wanted it to look like, I wanted to give it a sound track. I then uploaded music my clicking the music note icon on iMovie and getting the music from my iTunes.


I.e. make sure the music follows the scenes (strips of film you just want the music to play on) and not the whole project. (If that’s what you want to do)


Step 5: EXPORTING and downloading it on YouTube

After you’ve completed the assignment, go to the share button on the top on your iMovie and export your file into whatever mode you want it to be. (I saved mine as HD) Then after that’s complete, you can then upload your project on YouTube.

Here is the final product….

Hope my tutorial helped! Enjoy doing the assignment.

Wind Plain, ruined city of the Gradient-Masters

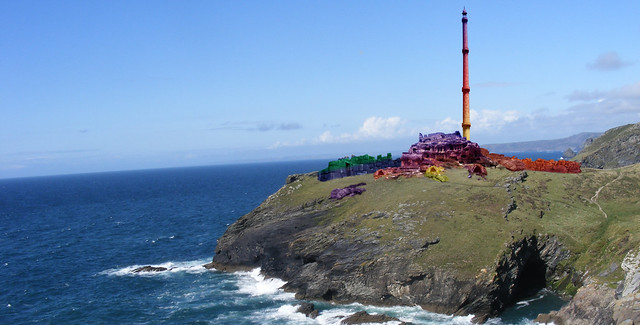
Seriously. Someone needs to take the gradient tool away from me. Oh whoops, damage done, TOO LATE. I created this rendering of a ruined Earth-Master city from McKillip’s trilogy to complete my own Imaginary Places assignment.

Wind Plain

First things first, here’s a list of all the stock images I used to create this image:

Main ruins – http://fav.me/d2k842p
Cairns – http://fav.me/d1gwgth
Walls – http://fav.me/dhizbr
Walls and boulders – http://fav.me/d162n6r
Sea and cliff background image – http://fav.me/d1non7z
Tower – http://fav.me/d5hrp55

Many, many thanks to all of them for sharing their images so dorks like me could slap ugly gradients on them in an attempt to create fanart. MOVING ON.

Technically, I kind of screwed up  my own assignment here. This is kind of a mashup of three different places in McKillip’s world: King’s Mouth Plain and Wind Plain. Both are sites where the ruins of Earth-Master cities can be found, but they’re miles apart, and only King’s Mouth Plain is near the sea. That said, I really wanted to depict the dramatic image of the tumbled stone perched atop a cliff and the striking tower on Wind Plain that is so important to the end of the story. There were two descriptions of these places that always caught at my imagination while I was reading. The first was of Wind Plain:

It was a maze of broken columns, fallen walls, rooms without roofs, steps leading nowhere, arches shaken to the ground, all built of smooth, massive squares of brilliant stone all shades of red, green, gold, blue, grey, black, streaked and glittering with other colors melting through them… the one whole building in the city [was] a tower whose levels spiraled upward from a sprawling black base to a small, round, deep-blue chamber high at the top.

Riddle-Master Trilogy, pg. 40

The second was the first sight Raederle ever had of King’s Mouth Plain:

There was a stonework, enormous, puzzling, on a cliff not far from the city. It stood like some half-forgotten memory, or the fragments on a torn page of ancient, incomplete riddles. The stones she recognized, beautiful, massive, vivid with color. The structure itself, bigger than anything any man would have needed, had been shaken to the ground seemingy with as much ease as she would have shaken ripe apples out of a tree.

Riddle-Master Trilogy, pg. 248

I tried a few different methods to create the gorgeous, vivid stonework McKillip described, and honestly nothing quite achieved the effect I wanted. Part of that is simply my lack of practice with manipulating and combining images in Photoshop; it’s decidedly harder than it looks to do it well! The other part of it was trying to alter the color of each section of the ruin without losing any of the detail of the original image. I ended up creating layer masks for each section and colorizing them differently. At some point I decided to try screwing around with gradients just to see what would happen, and found that gave me by far the most interesting results in terms of color. As I’d been working for hours by that point on this one image, I made the dubious decision to throw aesthetics to the wind and run with it. You have seen the results, and may judge them for yourself.

In combining the two locations from McKillip’s work, mostly through the inclusion of Wind Tower, I’m committing to an inaccuracy that really bugs me in fanart and drives me up the wall in official adaptations. Why can’t people just get this stuff right? It’s not that difficult! I’ve now realized through firsthand experience that some of the alterations that occur when adapting print to visual mediums happen not because artists aren’t trying to be accurate, but because they are trying to convey more in a single image than they might with several more “accurate” pictures. Here, I wanted to capture the feeling of the looming, desolate city hanging over the sea as well as the iconic image of Wind Tower, giving the viewer in one glance what McKillip spends pages on. That ability to condense and distill a concept is one of the biggest advantages of any visual medium, and it was interesting to be able to play with it here in a way I’d never attempted before.


Archer Meets Spock

The gang finally gets up into space. Woohoo! Their training ended up being entirely inadequate, as Archer is incapable of doing anything anyone tells him to do. However, while up there, they stumble upon, you wouldn’t believe it, Spock himself. Spock drops some knowledge on Archer. Archer doesn’t really understand what he is saying at first, but as he starts to grasp the concepts, he begins to get really excited. Have a listen in on the conversation overhead by those on earth (Houston, can you read me?)

[soundcloud url="http://api.soundcloud.com/tracks/71187910" params="" width=" 100%" height="166" iframe="true" /]

To create this video, I took audio clips from the last two episodes of season three of Archer–the two where they do travel into space (also my inspiration for this project, but we’ll get to that later). I found a clip of Spock from Star Trek on YouTube under some random search that I did (I am not Star Trek savvy) and took the first thing I could find. Using audacity I mashed up the two to create a type of dialogue.

This was one of the toughest assignments (Dialogue Mashup from the audio assignments repository) that I have done–well worth the four stars, if not five. Using the tools and finding the clips that I wanted were not the most difficult part, surprisingly. Rather the thing that I had a hard time with was putting the audio together to create a coherent(ish) conversation. But I did it.

This assignment tops off my final project, bringing me to a whooping 16 stars. And adds the third genre to the mix. Let me know what you think.


Dorothy and Robert Mix It Up

This should be the last piece of media for my Dorothy ds106 story. I have been wanting to the dialog mashup assignment since I heard the first examples from listening to the stellar examples from The Truth’s episode of Movie Mashups:

As demonstrated by the Movies Mashup episode of the radio show The Truth, take two different movies and extract the dialogues scenes of actors form each, then re-edit them to create a story as if the characters from different movies were in the same conversation.

Listen to examples from the show including The Terminator and Legally Blonde (“Terminally Blonde”) and from the TV shows that become “The Sopranos in the West Wing.”

The challenge is to take two different movies, slice up the audio for different characters in each, and then re-edit them as if there were having a coherent dialogue.

That should be about 92 stars.

I knew my Oz example would be when Dorothy first lands in Oz “We’re not in Kansas anymore” and where she meets Glenda and the munchkins:

I went through a lot of gyrations to find the companion piece. it would need to eb something that involved someone talking about going to a place (since she mentions not being in Kansas) and ties in to her denials of being a witch. I had this idea of finding a 1960s travel film, since I felt the colors and weird people of Oz were right out of the hippy era.

For some reason I came back several time to Jack Nicholson in Five Easy Pieces, notably his Robert Dupea character’s over the top end around in the diner to get that waitress to give him his ” omelet, plain, and a chicken salad sandwich on wheat toast, no mayonnaise, no butter, no lettuce. And a cup of coffee.”

Its such a classic playing out of tension.

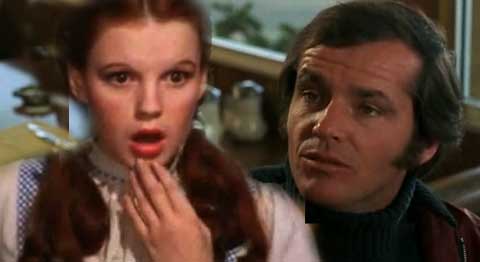
I was not sure how they would work, but just decided to put it together. Here is what I ended up with (along with a merged image of Dorothy and Robert):

What I wanted was for Dorothy to have a confrontation in Oz that would set her into confusion, does she want to be there or Kansas? Dupea messes with her, yells, throws things, and maybe even abuses her.

I made this by downloading both of the segments as mp4 using PwnYoutube. I imported them directly in Audacity. For each track, i separated out the phrases the lead character says by using thee Edit->Clips -> Split tracks command, and deleting the other stuff. I end up with little fragments that I can slide around or copy paste, and more less got luck assembling them:

There has to be some gaps between people talking (like real conversation, pacing, etc), but these sound weird if there is silence between them.

So I took some but of music from OZ, about 3 seconds, and pasted it back to back in a new channel. I copied it end to end, reversing a few sequences, and dropped the amplitude to it is background. I did the same from the Five Easy Pieces scene, using a few seconds of diner crowd noise in the beginning. This lower background gives the audio a bit of texture.

I cannot say this is nearly as good as the examples I heard from “the Truth” – this is one of those assignments that really take a lot of work and/or a lot of familiarity with dialogue to do it up.

But it was fun to try.

Assignment Idea #2

DIGITAL SHORT MASH UP!-Make your own Digital Short-the crazier the better; can be from existing digital shorts or your own!

For this assignment, I took four different digital shorts from SNL. [There are over 100 to choose from]. The ones I chose were I’m On A Boat, Boombox, The Creep, and Threw it on the Ground. These are four of my favorites.

Here’s the finished product:

http://www.youtube.com/watch?feature=player_embedded&v=bY_P3PXEmCM

In order to make this, I first downloaded the youtube videos from the Lonely Island’s VEVO channel via iLivid. This exports the videos into my videos folder. I opened Adobe Premiere. I went to File->import and control clicked on the video files I wanted to import so that it could import multiple files at once. Once they were in premiere, I right clicked on each one under the project tab in the lower left corner to import it onto the editing table thing [sequence 1 is the default name] in the lower right hand side of the screen.

[Sometimes you can drag and drop too]. I used the razor tool to clip out the parts I wanted or didn’t want and deleted the ones I didn’t want by clicking them with the pointer and then pressing delete [because, let’s face it, that editing table gets pretty crowded.] I then used the pointer tool to put all of my clips in to place, dragging and dropping them where I needed them [be careful here—it is very easy to accidentally overlay video; adobe will show you when you are lined up with the video by this thin black bar that has arrows] , and played through to make sure I had edited everything clearly and concisely. I went to file->export-> media. When the screen pops up be sure you’ve got entire sequence selected [sometimes it will say work area DO NOT EXPORT JUST WORK AREA].

This appears on the left hand side of the export screen, below the video. I export in an MPEG4 because it compresses pretty well, although the video quality is higher in other export formats. Make sure you click maximum render quality too. Then, click export. You can decide the destination folder by clicking on the orange title and then seeing where it will appear. Congrats! You did it!

Growing up with Drew Barrymore Assignment/Tutorial! 4 Stars

Firstly, this assignment can be found at here, and I certainly recommend it because it is a lot of fun.

For my assignment, I used Drew Barrymore, although afterwards I realized I could have chosen someone else, so I hope this doesn’t affect anything, but I had a good time making this project. I used clips from some of her major movies, including E.T., Scream, 50 First Dates, and Music and Lyrics.

Below I will include the clips that I used.

So again, I could have chosen any actor/actress who had been a child star or started their careers early, but I think Drew Barrymore is such a great example, as well as a great actress, with an interesting past. I started the assignment by going onto IMDB to get a fuller picture of the movies she has acted in, which was also very helpful for the timeline aspect of the project. So after I chose the movies that I wanted to use for my mashup, I went and found the clips on YouTube, which I assume I don’t need to explain how to do.
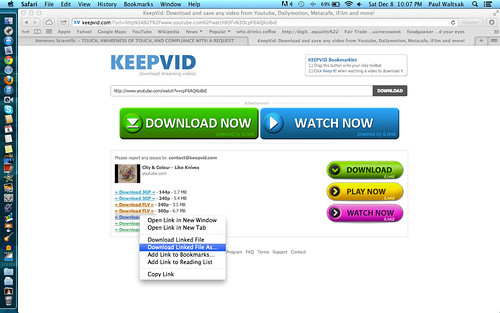
In order to download the videos from YouTube onto my desktop as MP4 files, I went to KeepVid, which is a pretty easy way to do this sort of thing.

Tutorial Image 1
As you can see in this photo here, I copied the youtube video link and pasted it in the bar. After this you want to click on the Download button beside the text bar.

After you click the download button, you will see a pop-up box that asks you if you want to run the application, so you need to click on “Run”. The next step, you will see a screen similar to this…
Tutorial Image 2
The best thing to do at this stage is to right-click on the Download as MP4 link, which is highlighted in blue, and click on Download Linked File As, and save to wherever, but it’s easiest to save to Desktop.
Tutorial Image 3

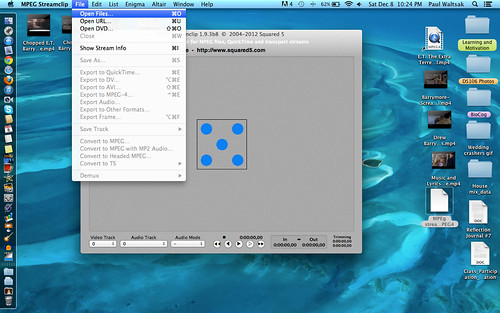
The next thing you want to do if you wanted to edit stuff out of the various clips, is open up the program MPEG Streamclip. Using this program you can Trim clips, copy them, cut pieces out of them, take out the audio or video from a clip, and all other sorts of fun things.
Tutorial Image 4

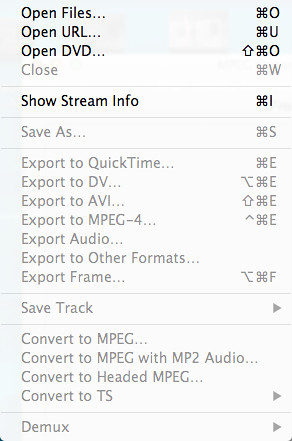
Abover you see a picture of MPEG Streamclip open on my computer, and I have highlighted the Open Files option under “Files”, which is one way to open up a clip into the program. Another easy way to do this is to just drag a file from your desktop right into the window where you see the five blue dots. From there you can edit the clip by going to edit, where you’ll find numerous options, such as “Trim, Cut, Copy, Select In, Select Out” and others. The ones that I used for my assignment were the Select In, which is how you select a point in the clip that you want to start from, and Select Out, which is how you end the selected clip. One you have a clip selected you can do a few things:
1) Cut the selection out of the clip that you are editing.
2)Trim the clip to include ONLY the selection.
3)Copy the selection.

So now that you have a pretty good idea of what goes on in MPEG streamclip, it will be useful to learn how to export the edited clip. Tutorial Image 5
Here you see a list of options (although some are grayed out because I am not actually editing anything). The option I used was Export to MPEG-4, which allowed me to export the new, edited clip to my Desktop, which I then imported into iMovie.
Tutorial Image 6
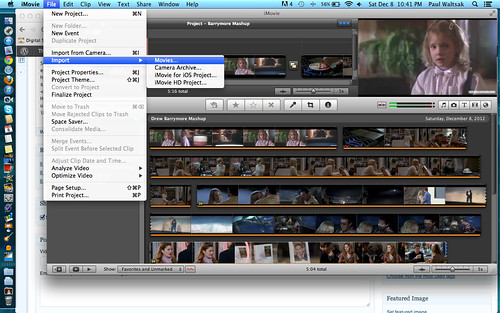
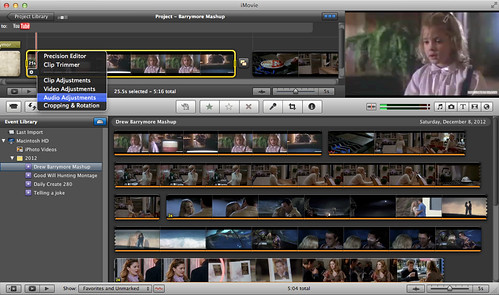
This photo above shows you how to import movies from your computer into iMovie. For my project, I did this 4 times since I used 4 clips for the Mashup. As you can see there are two levels, the one on bottom being where the clips import to, and the top representing where the clips for the project go. Once I had each clip imported I dragged them into their appropriate slots up top. One of the major editing things that I did in iMovie was add Fade-Ins and Fade-Outs for the audio to make it flow more smoothly. Below are a few pictures of how I did this..
Tutorial Image 7

Tutorial Image 8
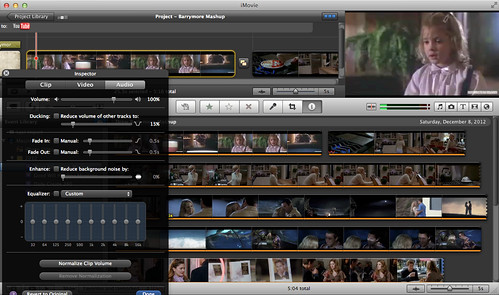
As you can see next to each option (Fade-In or Fade-Out) there is a little box that says “Manual”. I clicked on this box which allowed me to edit the length of time the audio would either fade in or out, which was useful. It is best to use your own judgement for these types of things, so it really depends what the clip is and how you feel it should sound.

Overall I really enjoyed this assignment because I think that it had a cool idea behind it. In order to really show the progression of Drew Barrymore’s career, and her physical growth, it is necessary to include all of these clips from her movies as a way to illustrate this. I also enjoyed this assignment because it allowed me to experience more video editing, which is challenging but rewarding in of itself.
So after all of this time, it is probably time to show the actual final version of my mashup, so here it is and enjoy!!

My Very own Assignment 2: Electric Boogaloo

Oh boy, I created another one!  I’ve seen a few examples of this on the internet now, which kind of sucks because I thought I was being original when I came up with it.  I guess it’s true what they say, everything good has already been created (note: not what I actually believe).  Anyways, I created the “Inappropriate Laughter” assignment under mashups.  It’s important to inject laughter into everything we do, no matter how inappropriate it may be!

I started off by finding a few laugh track clips on freesounds.org.  Then it was off to decide on which clip to use.  I wanted something that could still be seen as funny in the right circumstances.  What better scene than in Pulp Fiction right after Jules and Vincent take Marvin in their car for a ride!  Very minor spoilers ahead in the video, so beware.

I started by converting the file to an AVI format from MP4 using MPEG Streamclip.  Then it was just a matter of matching up and trimming the audio clips and aligning them in appropriate (inappropriate?) moments in the scene.

In the future, I would recommend using multiple laugh tracks.  I only used one throughout the whole assignment and although it creates a certain cheesiness to the assignment, it would still be better with multiple tracks.

Inappropriate Laughter

Mashup a scene from your favor serious movie with a laugh track. You can find some appropriate laugh tracks on freesounds.org. Download a clip of the scene, and compile the laughter track within the audio, keeping in mind that you are trying to change the meaning or the scene by introducing laughter. What is the story now?

Hey! Ho! Recycle That Media Like Whoa!

Assignment: For this assignment we were asked to mashup at least 7 different pieces of this media to make a new story, and use at least 2 different types (e.g. audio and image, and video).

Inspiration:
I honestly looked through all the media and just tried my best to come up with something that looked like it could all flow together.

Process:
After going to the website and looking through all the material I decided to make a video of a boy growing up showing different pictures of his life through stages. I picked out 6 pictures from the website that looked like they could have been one person and I used some audio of the website as well. I thought that it would really go well with the story that the video is trying to convey.

Previous Example:

I thought that this person did a great job with using all the recycled media and linking them together! The story had a really cool theme and was very creative! The only picture that didn’t really seem to work for me was the first one. But, other than that I thought that they did a fantastic job.

My Video:

What could that Strange Sound be? Opposites Attract with Bhangara and Reggae Music

Description:
For this Mashup Assignment I was asked to take two songs from separate genres and create a new song using audio editing software.

Inspiration:
So I decided to use a song from the music genres reggae and classical. I decided to use Bhangra music because I love that music genre. The music is so upbeat and it is completely different from classical music. I used to be on the Eagle Bhangra Dane Team here at the school and this is one of the songs we used at our tryouts. I decided that this would be really easy to combine with reggae music because it is also very upbeat and is great dancing music.

Process:
I picked these two songs out of each music genre from my Itunes library. I then used the program Audacity to edit each song so they would sound like one. I then tried to uploaded my sound to SoundCloud account. But, I kept getting an error message because of a copy right issue. So instead I made a video using Windows Movie maker and uploaded it that way. I decided to combine Balle Balle Hogaye Mitro by DJ Sanj with I’m Okay/Drinking Rum & Redbull by Beenie Man ft. Fambo. I took out the chorus and the ending in Balle Balle Hogaye and replaced it with the one in Beenie Man’s song.

Previous Example:

I thought that this person did an amazing job with their Remix of these two songs. Not only did the use each song evenly but their transitions were great! The only thing I wish that I could recommend to make for this was possibly trying to use two songs that didn’t go so well together, just to give the project an extra push.

Here is the song that I came up with: