Pods embed error: Pod not found

Up Up And Away

Photobucket

Design Assignment: Animated Move Posters

For this assignment, I created all my images in Photoshop. To move the balloons, I first had to cut out the balloons by using the quick selection tool and move it into a new layer. Then for just the background, I used the cloning tool to erase the balloons from the picture. Once I just had a plain background and the balloons in a separate layer, I was able to create multiple images by moving the balloons and it’s shadow for each screen shot.

I Read Birds

Here is my take on the I Can Read assignment. I created a cover of the first horror movie I ever saw, The Birds. If you haven’t seen the film it’s an Alfred Hitchcock classic about a costal town in California being attacked by ordinary birds-not birds of prey.


Melanie: Have you ever seen so many gulls? What do you suppose it is?

Mrs. MacGruder: Well, there must be a storm at sea. That can drive them inland, you know.


The cover captures the theme of the movie that thousands of birds are always chillin’ everywhere. The sheer number of the birds makes this film eerie and unsettling.

The Process

I mimicked the format of Spacesick’s design. First, I uploaded one of his designs in GIMP, and cut out his work. I was left with a clean slate. Next, I found the bird icon in the NounProject. I used the cloning tool to stamp out each bird. Then I painted each bird with the paint bucket.

It was an easy process but it was time consuming. If I had the time I would create a different design, but instead I used my free time to fiddle with the minimalist poster (see yesterday’s post).

City of God

For my final design assignment, I chose to do the Minimalist TV Poster. I thought a long time about which movie to do; I had really wanted to do an older movie, but I couldn’t think of any (that I’d seen, at least) that had a simple enough iconic image that I could use for a poster. I decided to just look at IMDB’s Top 250 Movies list for ones I had seen.

I selected City of God, which came out in 2002. In case you don’t know anything about it, it is about two boys growing up in Rio de Janeiro through the 1960s and ’70s, surrounded by an atmosphere of violence and gangs. One boy grows up to be a journalist and photographer; he is represented by the camera. The other boy turns to drug dealing and violence, and he of course is the bullet – aimed at the camera. It’s a really great and very intense movie, so I tried to keep the poster as simple and stark as possible.

City of God minimalist poster

As for creating it:

I used these two photos for the bullet and the camera:

Equalizers

Pentacon six TL

I used the lasso tool in GIMP to cut them out of their respective pictures. For the camera I put it into black and white and used the Posterize tool to remove as much color as possible. The posterize tool didn’t work as well on the bullet, so I just put it into black and white and heightened the contrast as much as possible.

Fonts have been my problem all week, and they were a problem for me today too. I just couldn’t find one that I felt fit in with the image of the movie. I settled on simple Verdana, a bold sans serif font. I thought the poster still looked too empty, so I added the text at the bottom for a little context. The original movie is in Portuguese, which is why I mentioned that there are English subtitles.

Fun project and a great movie – I may have to watch it this weekend now….

At the Mountains of Madness

I found this through a google image search. Since it was posted on a discussion forum, I was able to contact the creator (stuart) for permission to molest his work. I’m not sure if this movie project is still underway, but that’s okay. I doubt it would have been an improvement on the book.

The first thing I do when working on something in Photoshop is duplicate the background layer, then hide the background by clicking on that eyeball thing. That way if I totally mess something up, I still have the original handy.
I don’t know how I’m going to animate it at first, but I think I could do something with the stormy sky and the text, and maybe that face on the mountain. So I start breaking the image apart. I carefully trace along the mountains’ edges and the upper sides and top of the image, so I have a sky/background selection, then copy and paste it on a new layer. I use the magic wand to select the blank part of the new layer, then select-invert and go to my background duplicate layer and delete the sky area. That gives me a foreground and a background on separate layers, but the image appears the same.

Separating out the type is a little tricky. I used the rectangle selection tool to copy each block of text and paste it on a new layer, and I tried to keep very close to the letters so I was only getting a minimal amount of background. But then I had to delete the type from the background. On the bottom part of the poster it was easy, because I could just fill my selection area with black. For the lines of type in the sky I would copy and paste bits of sky and use the clone stamp tool to cover the letters, then use the smudge tool to blend the hard edges. It doesn’t look quite right, but it’s passable.

I then decided to separate out the face image from the mountain. Trace the face, copy and paste, and then I had a face layer. To cover the face on the mountain layer, I filled the area with black, then I selected other parts of the foreground and copied and pasted them. The blurry snowflakes were helpful. I found that using the lasso selection tool with 10 pixels of feathering worked pretty well too. Feathering softens the selection edges so the bits and pieces blend better. I selected all the patch layers and the foreground and used the merge function in the layer panel to combine them.

It helps to name the different layers so I know which is which. I made a copy of the background and played with the layer adjustments – levels and so forth – to make a darker sky. I could use that for a lightning effect.

Once I had all the parts, I copied and pasted frames in the animation pane and experimented with turning layer visibility on and off. I tweened between some frames and let others flash to make it look stormy. I think it came out okay.

Hover Boards as Digital Storytelling Devices

"Hey McFly, you bojo! Hoverboards don't work on water!"

What is digital storytelling? Rather than bore you with a rather lengthy history of the term, and how it has been applied in the past to both the realms of education and entertainment, allow me to illustrate how I see it with a highlight from Wikipedia:

You can continue to read on, and ponder why someone would arbitrarily decide that 8 minutes is the acceptable limit for digital stories, but what’s most important about the term is the practice of “ordinary people” creating meaning through the use of digital tools. Further exploration of the term through the lens of ds106 could even cause someone to conclude that digital storytelling is in fact, NOT just movies. The use of movies to tell a story is merely one facet of the digital storytelling spectrum, and as far as I’m concerned, a much better definition of the term exists further down that same entry on Wikipedia:

“One can define digital storytelling as the process by which diverse peoples share their life story and creative imaginings with others.”

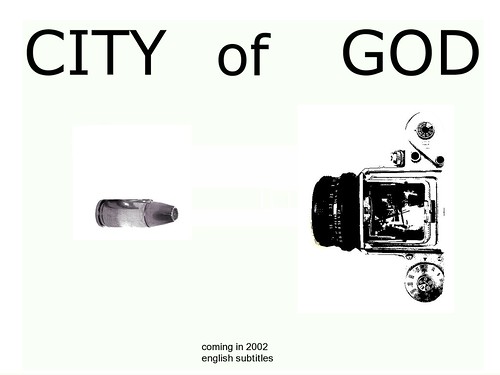
As I prepare for a presentation on digital storytelling at the upcoming 2012 MACUL Conference, I’ve begun to ask myself how teachers can more easily adapt newer technological tools to allow students to share their own “creative imaginings”. Not being someone who is comfortable “talking the talk” without producing some actual goods, I decided to create another entry in my “Warning to the User” series, which is my own creative take on the Warning Assignment on the ds106 site. The assignment in question asks creators to imagine a warning poster or label for something that exists only in your own imagination or a movie. I had previously created a warning poster for the flux capacitor (the device that makes time travel possible in the Back to the Future movies), and I wanted to extend upon that thread in a playful way, hence a warning poster for the hover board used by the main character in the series, Marty McFly.

The first in my series of warning posters for BTTF

What speaks to me most about this assignment is that while I put a considerable amount of time into the process using Photoshop to assemble the images and the text (even going so far as to find and install a custom font inspired by the movie), it’s actually a rather simplistic assignment.

Any teacher or student could achieve the same with a word processing program and some clipart quite easily. Making sure that images are set to floating or “wrap behind text”, it would be quite easy to fill a page with a few choice elements from a film or book, and then use text boxes to place key points, main events, or themes from the story. I could see elementary students using a “warning label” to describe the main events in the book Hatchet by Gary Paulsen, or perhaps some magical warnings for using a wand from the Harry Potter series (highlighting all the times wands were mishandled in the series). I choose to mix plot points, scenes, and over-arching story elements from the first Back to the Future movie in my warning poster (lightning storms and technology don’t mix well in any timeline). However, any teacher could ask students to focus just on main events to practice sequencing, or include quotes from the main characters to help identify how mood is established in a story.

While all of us in K-12 continue to “hover” around the impending implementation of the Common Core Standards, it might serve us well to begin to explore how a little bit of creativity might help students (and ourselves as educators) figure out how to reintegrate some of the process standards and college readiness standards in ways that will encourage students using a diverse set of tools to write, produce, and publish. Case in point; I used Google image search, an image editing program, and a blogging tool to create, narrate, and publish this particular piece. Toss in a little piece on using the advanced image search or a creative commons search for images and you have yourself quite the well-rounded 21st century project for your students!

The Elite 8

Assignment: Create a Minimalist travel poster based on a movie using the pioneers.

Process: I used photoshop to create this. I used a total of 20 layers in photoshop to complete this project. the first ten layers were used to upload each and every individual picture. i then cropped and erase the pictures to allow them to fit. the next ten layers were used to create the words using text. nothing fancy, just time consuming.

Story: The inspiration that lead me to create the elite 8, was from my indescision to pick a single pioneer. so i decided to use all the pioneers and our professor (mainly cause he asked me if he could be in the project.)

Source where pictures were taken from: Google… Vannevar Bush. Alan Turing. Norbert Wiener. JCR Licklider. Doug Englebart. Ted Nelson. Alan Kay.

DS-106 Horror

DS106- "Horror"

NO JOKE!!!

Here it is, my first DS-106 assignment!

DS 106: assignment link

THE ASSIGNMENT:

I chose to do my first assignment on Horror 106.  The idea was to create a picture making the word DS 106 appear scary to its viewers.

THE PROCESS:

In this particular assignment I wanted to create something that most people could relate to as being scary.  I’ve never done anything like this before, so, It was a bit difficult for me to figure out how to set this up.  The only design program that I have on my computer at home is Microsoft paint, so I had little to work with.  The Joker and the skull pictures both came from internet designs that I found.  I copied the pictures and saved them to my desktop.  I then transferred the pictures into Microsoft paint and began to transform the pictures into what I thought was scary.  The first step I took was to set up the background color for both pictures.  The Joker was easy to do because the background was already black, however, the skull picture took me almost two hours to complete because of the intricate design that I’ve created.  The way I did this was to use the pencil and paint bucket tool to make almost a spider web design in the background of the skull.  This was not easy, and very time-consuming.  The lettering on the skulls head was made using the programmed lettering in Microsoft paint, and the lettering on the joker picture was done using the paint brush tool.  In the end I was very satisfied with the outcome of this project.

THE STORY:

The reason that I’ve chosen this project is because I grew up watching horror movies and have always been interested in them.  I thought it would be fun to try to create a horror film poster of my own, so I chose this assignment.  I am now a master of the program Microsoft paint and available for lessons (by appointment only)…….enjoy

DS106 "Horror"

6. minimal (ds106 #2)

Since I haven’t really been able to keep up with the Stranger Portraits assignment like I wanted to, I felt I should take the time to at least make a submission for one of the other assignments in stead.

This is one that I had my eye in early one while browsing the ds106 database: the Minimalist Travel Posters Based In Movies. I Had to think a bit about what location I wanted to feature since I watch more reality-based movies than not. In the end I decided to do an ad poster for Yubaba’s bathhouse, from Studio Ghibli’s spectacular Spirited Away.

The Process: I spent on and off about and hour and a half putting this together, haha. Overacheiver. Perfectionist. Geek. Anyway. Though I’ve been using Photoshop for about six years now, I’ve mainly used it for photo editing and simple graphics. I feel like this sort of poster would have been better made in Illustrator – if only I knew how to use it ><. Anyway. I was a bit up in the air about whether the poster should feature onsen imagery or an image of the bathhouse; I decided to go with the bathhouse itself because it's more recognizable. For about a second I played with the idea of sketching it out freehand in PS, but having no tablet and no drawing skills I instead went with finding an image and manipulating it.

The base image is a beautifully sketched drawing by deviantArt user Yuko324. At first I used the Filter > Artistic > Poster Edges option, and then continued to add layers in Mode > Hard Light against a blue background (#C5E2E6, found through ColorLOVERS) to create thicker and simpler lines. Then I used the Filter > Artistic > Cutout option to remove even more details for the minimalist look. Added some Layer > Adjustment Layer > Curves and B/C to up the contrast of the white to remove even more details for minimalism sake. It took a while to get it right – I wanted the bathhouse to be recognizable while still removing as much detail as possible, not to just look like a blob of white, black and grey. Ack it’s been too long since I did anything but photo editing.

Anyway, then I tried to figure out a slogan and text of some sort to go with the image. Having zero creativity in that department, I simply went with having Yubaba’s Bathhouse as the name, and the “get spirited away” as the tagline. Figured an obvious reference to the movie couldn’t hurt too much. I don’t much like the fonts, but since I’m doing this on the school Mac I don’t feel like downloading a bunch of stuff for it (and unfortunately I no longer have PS on my own Macbook ><) Played with the kerning and line height for the text, used a copy in the blue background color and moved it to create a "shadow" for the white text so that it wasn't too harsh.

At first I was just going to leave it in blue and and shades of white for you know, even more minimalism – but it was kind of boring so i decided to color the tree to the right in the poster. For this I turned to ColorLOVERS again and found a beautiful palette bassed on Chihiro (the main character)’s in the beginning of the movie and used two of the colors, era smoke and sen to chihiro, to do the tree.

So yeah, basically. This is the result. I probably spent more time on this than necessary but graphic design is something I always wish I could learn, so I don’t mind spending a lot of time on it. Learning experience. Plus a lot of my time was spent searching up images and scenes from the movie, and browsing for color and other inspiration, which beats most of my other homework by a mile! Makes me wish I’d actually pursued a creative degree…. Anyway.

Get spirited away.

Yam Trek! Star Yam!

(full size is one click away)

Star Yam 13: The Final Leftovers is the next series of adventures for Captain James T. Fork of the Starship Yamterprise, it’s 9 year mission, to sek out new plates and new celebrations, to boldly go where no yam has gone before!

It’s a Yam Jam Theme, starting with Lisa Lane sailing the Yam Boat, Scottlo showing the Yam Who Would Be King, and next, MBS taking my favorite starchy movie, Cool Hand Yam (goes well with eggs).

How could I resist? I’m no spud.

Now someone needs to make this assignment for ds106, as this is getting out of yam. It could put a whole now flavor on mashed-up assignments.

Ingredients for this image:

UPDATE for red shirted ensign ds106ers! This is now officially an assignment with the tag VisualAssignments311

Captcha Art (ds106 assignment)

Among other TEDx Talk videos I have seen recently, the one by Luis von Ahn on Massive-scale online collaboration, Stephen Downes notwithstanding, generated a number of ideas for me. von Ahn is the man behind the idea of reCaptcha- originally a Carnegie-Mellon project eventurally gobbled up by Google. What I liked most is his example of looking differently at a problem- digitizing texts via OCR and turning a normally wasted amount of human activity- proving themselves to not be bots by entering the text into a box of scrambled letters– into a useful activity by making the captcha images not random, but ambiguous words in the proces.

The video alone is worth watching for von Ahn’s description of his newest project, to translate the web into all languages via free language learning lessons (see the video or http://duolingo.com/)

I signed up for to get an invite for dulingo, but it was von Ahn’s examples of humorous random examples that got me thinking, e.g. “Bad Christians” showing up on a theology site

Then he talked about how some people were setting up sites to illustrate the word combinations, such as “Invisible Toaster”

And thus SHAZAM! Here’s a ds106 visual assignment idea.

Go to any site that uses a repcatcha e.g. the repcatcha site itself and recycle them until you get something that might be illustratable. The recycle button is the one at the top:

Take a screenshot of the word pair, then find some re-usable image(s) that might cleverly illustrate the words, mix them together to a single image that includes the captcha.

Now here is the thing- the reCaptcha images seem to have gotten more complex; most have one recognizable word and the other is a fragment or maybe a word in some other language (?), so you might have to be super creative.

Like this one I might illustrate someone talking to a confused waiter in a restaurant trying to order something strange:

I ended up cheating a bit- a few years back I had noticed interesting word pairs in reCaptcha and played with building a story out of the images, so I used some of the ones I had saved for my two examples.

My first one tries to describe what dentists really eat for dinner, foods that are easily chewable and always floss, hence Dentist Dinners:

Image credits:

For captcha art number two, we see how we can ascertain that bulldogs are above taking bribes; they have stanps of approval by the US government as Ethical Bulldogs:

image credits:

So what can you make with random captchas?