Grow A Mustache

It seems like a lot of you really liked my Multiply Yourself Remix of the Gnomes with the mustaches, and some of you made it sound like this was a very daunting task to undertake. It really was not that hard, and to prove it to you, here is a tutorial for how to help our gnome friends grow some mustaches!


Pre-Photo Editing

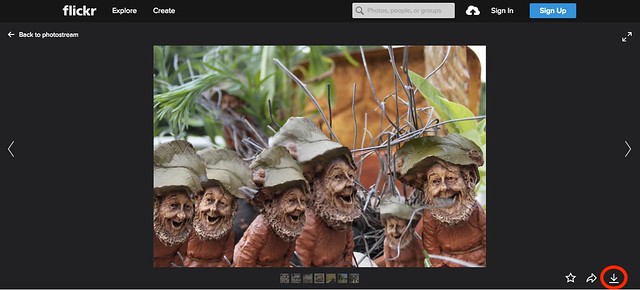
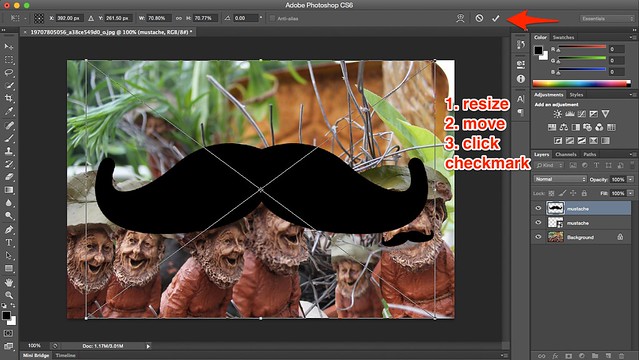
1. You will need to find whatever image you are using as your base image.  If you are using existing content, simply find the image and download it to your computer.  Most of the time, if someone else from ds106 has posted an image, it will be on flickr.  On flickr, there is an option to download images.  If it gives you an option of size, choose the original size.

Mustache 1


2. You will also need to find whatever version of a mustache you want to use. Usually a google image search will suffice.  When viewing the image, right click and choose “Save as…” or “Save Image as…” depending on if you are using a Mac or PC.  

Using Photoshop

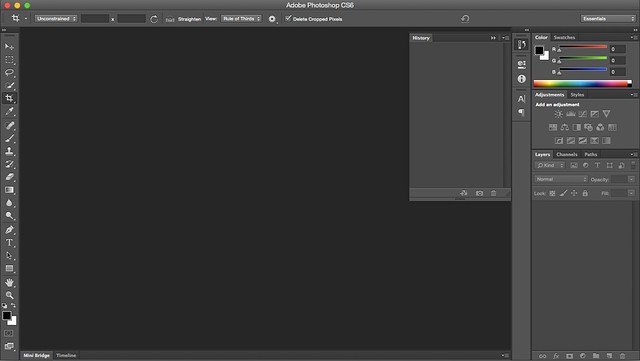
1. Open Adobe Photoshop

mustache 2

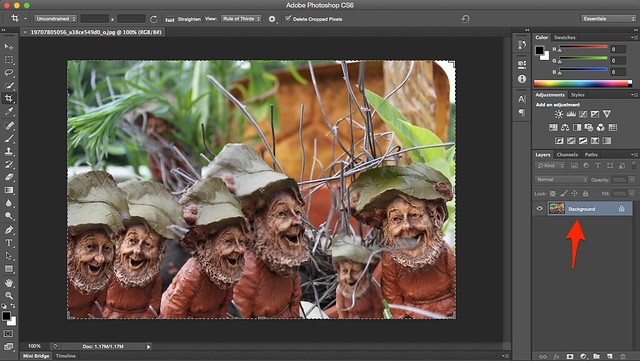
2. Drag and drop your base image into Photoshop.  It should appear as a background layer.

mustache 3

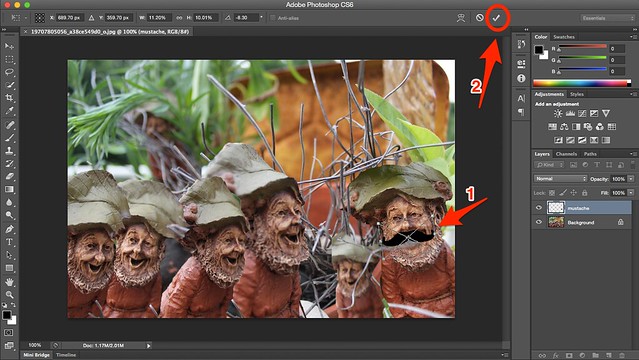
3. Drag and drop your mustache file into Photoshop.  It should appear as a Smart Object, and you can then rescale it and move it to wherever you like.  To keep the aspect ratio, hold down the ‘shift’ key while resizing.  To rotate the image, hover around one of the corners until a curved arrow appears. Click and drag to rotate. 4. Once the mustache is placed and you are happy with how it looks, click the checkmark in the top right corner of the window.

mustache 4

5. Your mustache is now placed on one gnome! In order to place another mustache, simply drag and drop the same original mustache image into Photoshop.

mustache 5

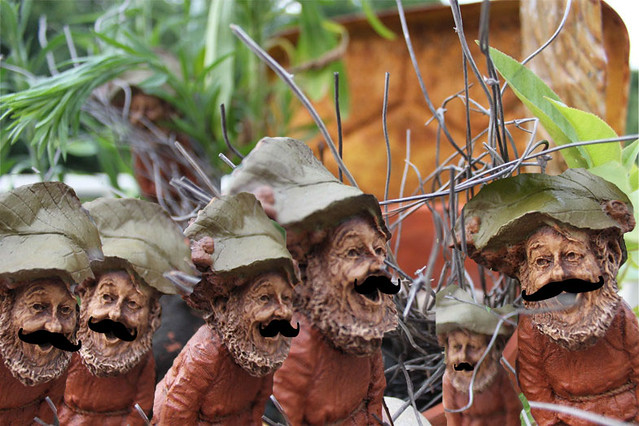
6. Resize, move, rotate, and place the second mustache on another gnome.  Continue this process until all gnomes have a mustache! Voila! You have just remixed the Multiply Yourself assignment! Congratulations! Upload your final image to flickr and share it with the world!

Gnomes & Mustaches

eM ehcatsuM

For one of my remixes this week, I chose to remix the Multiply Yourself assignment, with the ‘Stache it! Remix.  Originally, I wanted to remix my own image for this assignment, but after looking at the other ones that were completed, I really liked Kathy Onarheim’s Gnome photo, so I chose that instead.  This remix was fairly simple.  I downloaded Kathy’s photo from her flickr feed, and then found a mustache image online. I then opened the gnomes as a background in Photoshop, and then continued to add and place ‘staches onto each of the k=gnomes in the image! The tricky part was making sure the ‘staches were correctly placed under the nose of each gnome.  On the two center gnomes, it was also challenging, because they are not facing the camera straight on, so instead of trying to turn the mustaches into the image, those two just have shorter ‘staches! On some of them it actually looks quite natural..


Gnomes & Mustaches

Remixing My Signature

For for my first remixed assignment, I decided to do the “Your Signature” assignment from the design section. I went straight to the design section, because those tend to be the ones I most enjoy! When I came across this assignment I thought it would be fun, I really like personalizing things to myself. Then, I got super excited when I “remixed” it. The “remix” part was to make it “pretty in pink”, which is not hard for me to do! Pink is definitely my favorite color!

Screen Shot 2015-11-11 at 11.40.31 PM

I figured I’d do something a little more different than a typical “signature”. I didn’t want it to be totally boring, because I wouldn’t consider myself to be a boring kind of person. I started out with a heart, because I always sign my name with a heart next to it. Then I made it pretty in pink! I chose a lighter pink color, because I’ve always been more attracted to lighter colors. The heart shape that I chose had a little bite mark taken out of the bottom, which I think is super fun. To make it more like my “signature” I added a “K” for Kaitlin right into the bite mark. I thought it was cute, almost like my name was taking a bite out of the heart. Lastly, I changed the outline of the heart to a slightly darker pink color to add a little more dimension. Hope you guys like my signature!

The making of this assignment was really a piece of cake (coffee cake to be exact, which happens to be in the oven right now!) I went to my favorite photo editor site, PicMonkey, and looked through all of their different symbols. I chose the heart symbol that I liked, and made it the size that I wanted. Then I added the “K” using the text editor, then placed it where I wanted it. Then I changed the colors of the heart, and saved it all!

Remixing a DS106 assignment

For my task to use the Remix Generator on the DS106 Assignment bank, my random remix was to Dr. Suess an existing assignment: which was to turn a normal picture into a cartoon!

I chose to take a classic, Mr. Grinch, or Jim Carrey, and turn him into a cartoon. To do this, I used the suggested website Be Funky and turned the original picture into a cartoon by using the “cartoonize” effect number 4, and did some tweaking with the advanced effects, and then made a collage to put the original picture and the cartoon one next to each other. Here is the outcome!


mrgrinchcollaage.jpg

Remix: An Art Critic Reviews My Pokemon Card

Image

Artist Comments: Strongbad is the essence of my rage. When I am angered by the Internet, by ignorant people working in tech or the gaming industry or other things I love that are known for being sexist, racist, transphobic, and all the other Bad Things, when something is unfair, when I speak up for myself and no one listens. That is when Strongbad is unleashed. Strongbad has sarcasm and writing and will make you repent your injustices.

Pokemon template courtesy of http://www.mypokecard.com/en/

Critic Comments: On initial glance, Strongbad Pokemon Card appears to be a piece of juvenilia. The cartoon nature of the self-portrait, the minimalist icons, the simple, repetitive color scheme, the imbalanced layout. It all suggests an underdeveloped design skill, an unrefined taste. But ultimately rage is simple, unrefined. It is a base instinct. So to have a visual representation of rage, it must be emblematic of that nature. We see a lone figure on a barren white field. He is pugnacious, bright red, a caricature of anger. But also the truth of anger. Anger exaggerates just as a caricature does.

We can also see this in the chosen “energies” – the simple icons that adorn the card, the background color. Strongbad isn’t primarily fueled by fire as one might expect in an underdeveloped concept of anger. Strongbad is fueled by grass – by nature. Strongbad is a righter of wrongs, a defender against injustice, he stands up for those who are treated unfairly because of who they are. Their own natures. Strongbad is much more sophisticated than pure fire, though fire does fuel his more advanced anger, the fire of writing.


This piece was created for the DS106 remix assignment Pokemon Card: Stuffy Art Critic.

Greetings from a land of the midnight sun

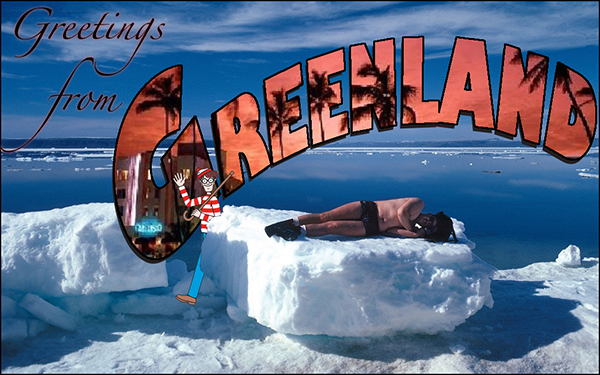
greetingsfromgreenlandI watched the Midnight Sun episode and thought about what kind of assignment could go with it. Splash color on one of the paintings? Maybe, but I did something like that already. I thought about the radio guy doing the weather and how that might be a nice audio assignment – something like, “Do a radio weather report, but make it colorfully descriptive.” But then I decided to look through the design list to see what was there. I thought there was a travel poster assignment. I could do Visit Sunny Alaska! I found the Greetings from DS106 assignment and clicked the remix button and got a Where’s Waldo? card. That had possibilities.

I did a Google image search for Greenland and found the picture of the swimsuit guy on the ice block. Another search found a good picture of Waldo. I did a third search for “greeting from” pictures, mainly for font inspiration. That gave me the curved type idea. There’s a way to do that in Adobe Illustrator by creating an ellipse and using the path type tool. I used Gill Sans Ultra Bold because it has those really thick strokes, which are necessary if I was going to try to do that image-inside-the-letterform thing. I saved the Illustrator file, opened up the Greenland photo in Photoshop, and used File-Place to bring in the type from Illustrator. I opened up the Waldo image and used the magic wand tool to select the white background, then did Select-Inverse so that I had just Waldo, and copied and pasted him into the Greenland picture. He came in about the size of the Statue of Liberty due to the difference in pixel dimensions, so I spent quite a bit of time resizing him. When I had him at the right size and place, I made his layer invisible and used the polygonal selection tool to trace around the ice block where he overlapped, then turned the visibility back on and deleted that chunk of him so it looks like he’s coming out from behind it. I wanted to play on that temperature inversion idea from the episode so I did another search for images of Miami Beach. I pasted the Miami picture in as another layer, sized it, then made al the layers invisible except for the Greenland curved type. I used Select-Color Range to get the black type, then switched to the Miami layer, made it visible, all while keeping the Greenland selection outline, and copied and pasted that portion of the image as a new layer. I moved it slightly to get the drop shadow effect. I needed to make the upper edges of the letters a little more solid, so I used the magic wand/Select-Inverse trick again to get the type, then did Edit-Stroke to put a black line around the letters. I stuck the “Greetings from” in the corner in a font called Zapfino and moved the “from” so the ascender flows into the descender on “Greetings.” I flattened the layers and saved it as a JPG 600 pixels across. It could use more work – I think the type could be more legible – but I don’t feel like going further right now.

Whew! I think typing this up was more work than making the design.

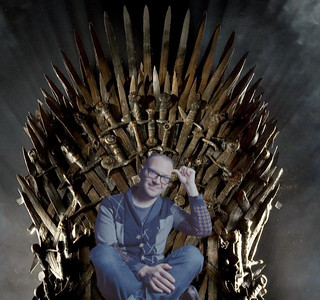
Another King

So for one of this weeks assignments, we had to remix a photo from a designated list and make a story for it.  I had a good time doing it and did all my work in Gimp.  I originally made a different photo, which I decided wasn’t remixed enough for the assignment.

coryremix

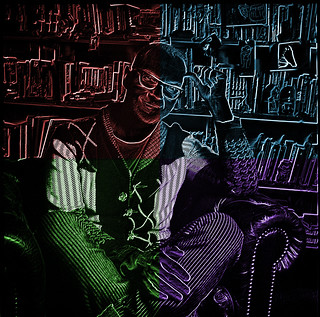
honestly, I didn’t change much in the photo.  I made the picture in the background a picture of my foot instead of a little girl, which was funny, but you can’t really tell after I made the guy on an acid trip with all the colors…  I actually tried to make it like one of those scratch off images that has the rainbow in the background with the black over top, but I couldn’t figure it out.  So then I changed my thing and made something else.

coryremix2

So what I did was put him on the Iron Throne.  Origninally, I was going to make him replace Mace Windu on the Jedi Council chair, but I couldn’t find a good picture to put him on there.  Then Game of Thrones was on TV, and the rest was legendary.

Cory outsmarted the Lannisters and invaded the Golden City through the tunnels that Tyrion used to defend them.  After the city was taken over, Cory sat on the Iron Throne to lay his claim to the kingdom.  Now all he has to do is defend himself from the dragons.

I got the picture of the Iron Throne off of google and the other image from the website mentioned earlier.  I also tried to change the color of Cory to something that matched more, but I couldn’t figure the scheme out so I ended up getting rid of it :(
Creative Commons License
This work is licensed under a Creative Commons Attribution 3.0 Unported License.

THE TRUE ABOUT GOOGLE STREET VIEWS

our general views of google street maps are ones of views of roads and homes not pictures of naked people or girls gone wild. but these imagines show us how every day people get caught on google street cameras.

This is for the Google Street View ds106 assignment.