One Shot Tutorial

Welcome to the tutorial for the One Shot Assignment! This assignment can be tricky so I’m making this tutorial to offer my advice and instruction on a simple way to complete it.

What you will need:

A photo with multiple subjects

Microsoft Word

A photo cropping tool

Step 1: Choose your photo

Either take a new photo or choose a photo that you have saved. I would suggest picking a photo that includes a lot of different subject in it so that you can split it up into a lot of different segments. There is not much instruction for this assignment, but one way to think about it is to try and tell a story through the rearranging of your selected photo. If you do not have a personal photo that you think would be appropriate for this assignment then try finding one online that has lots of subjects. I will be using a personal photo!

Fullscreen capture 1282015 103946 PM

Step 2: Editing the Photo

Once you’ve chosen your photo, open it in your photo cropping tool. Before you crop it, make sure you’ve decided how large you want each segment to be.

Crop the photo that you have used the entire picture and you have the desired portions of the photo separated and saved individually.

Fullscreen capture 1282015 104000 PM Fullscreen capture 1282015 103953 PM

Open a word document and insert all of the individual portions into the document. Resize them and arrange them next to each other.

Fullscreen capture 1282015 104034 PMFullscreen capture 1282015 104142 PM

Play around with the position of the photos until you’ve got your desired format. Maybe try to tell a story. Maybe try to create a new photo. Make it your own!

Take a screen shot and open up your cropping tool again. Crop the screen shot so that only your photo creation is selected and save this new picture. This new pic is your final product! Easy, simple and fun!

Fullscreen capture 1282015 104813 PM

I tried to make my story about a girl who visits a park and then sees some kids reading a plaque about some U.S. history. It’s not the best story, but you’d be surprised how hard it is to come up with a cohesive story out of just one picture.

Good Luck!


Poetry Art Tutorial for Dummies

Welcome to the tutorial for the Poetry Art Assignment! This tutorial is titled Poetry Art Tutorial for Dummies because I will be using some very simple and easily accessible software to complete the assignment.

What you will need:

Microsoft Word (seriously)

Photo Editing software with a cropping feature. I will be using Picasa (It’s free)

Your Imagination!

That’s It!

Part 1: Choosing your poem and background picture. If you already have a poem and a background picture, skip to part 2.

For this assignment you will need a poem and an appropriate background picture.

-The poem can be one of your own or one that you like from another poet. For the purposes of this tutorial I simply google searched “nature poems” and found one called “the way through the woods” by Rudyard Kipling. Open your a word document and copy and paste your selected poem into a text box.

I used this source for my poem:

http://www.familyfriendpoems.com/poem/the-way-through-the-woods-by-rudyard-kipling

Fullscreen capture 1282015 91025 PM

-The picture should be related to the poem and it should exemplify what the poem means to you. For the purposes of this tutorial, I again google searched “nature pictures” and found an appropriate background picture to match my poem. Save the image as a jpeg and and insert it into your word document.

I used this source for my photo:

http://www.imagescatalog.com/nature-beautiful-hd-wallpapers/

Fullscreen capture 1282015 91154 PM

Part 2: Editing Process

Once you have your poem and picture selected, go ahead and screen-shot your text box that has the poem written inside of it.

In your photo cropping tool, crop around the text box and save the picture as a jpeg.

Fullscreen capture 1282015 92743 PM

Insert the new cropped photo into your word document

Fullscreen capture 1282015 92715 PM

Set the background photo to be in the background and place your poem over top of the picture

Fullscreen capture 1282015 100003 PM

If it’s a long poem, just select a small portion so that the poem will fit well inside of your background picture.

Screenshot your word document

Go to your cropping tool and crop around the edges of your new creation and save the photo as a jpeg!

Fullscreen capture 1282015 100354 PM

You’re done!

This tutorial demonstrated the how-to of this assignment but you can make it much more creative and or personal by using your favorite poems and pictures or even ones of your own!


How to Chimeratic

Tutorial on How to Make a Chimeratic Composition

Assignment prompt:

Take at least three pictures (your own or someone else’s) mash them together into something that makes them more than the sum of their parts, something that would have been impossible in real life. Include the original images so we can see how they build on one another to make your final composition.

Even though I did not actually do this assignment worth 3.5 Stars during the course of the semester, when I saw it, I thought it would be something cool and fun to do!

I used Photoshop Elements 11 to create this assignment and tutorial but if you have Photoshop you should be able to following this same process. It is a pretty easy assignment and you will only need to use one tool throughout the project.

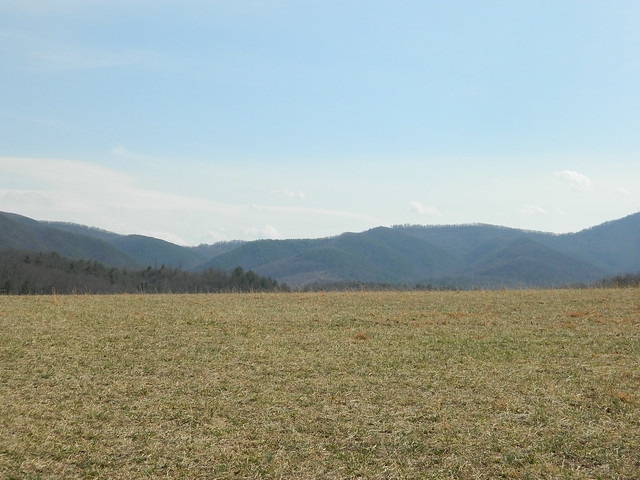
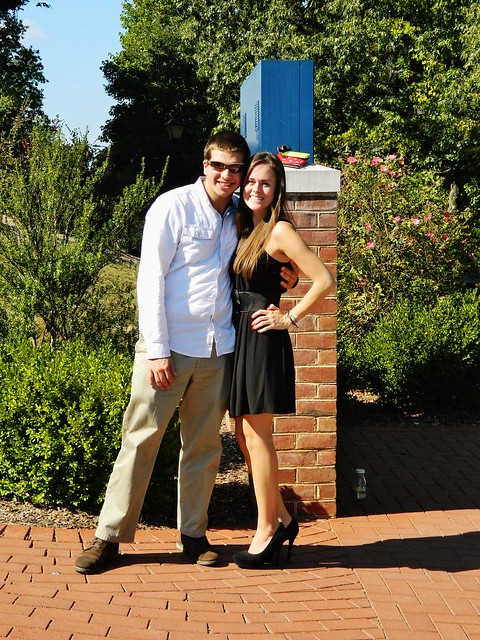
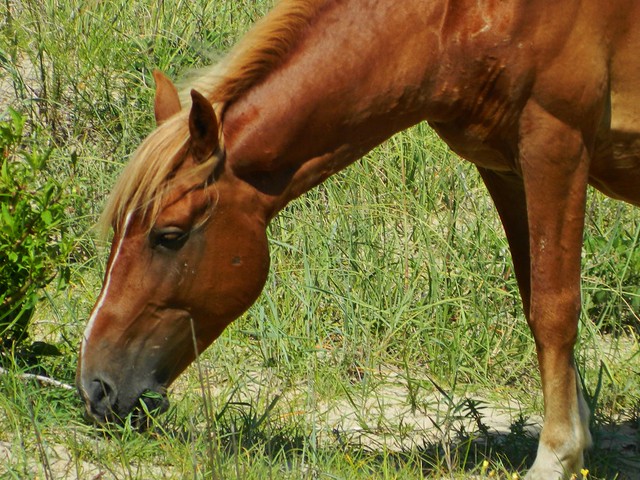
First find the photos you would like to use and compile together. I started with a plan landscape photo, and then picked four other photos that had objects I wanted to crop out and place onto the landscape backdrop. The following are the photos I used for the project:

Landscape

Izzy

Couple

Horse

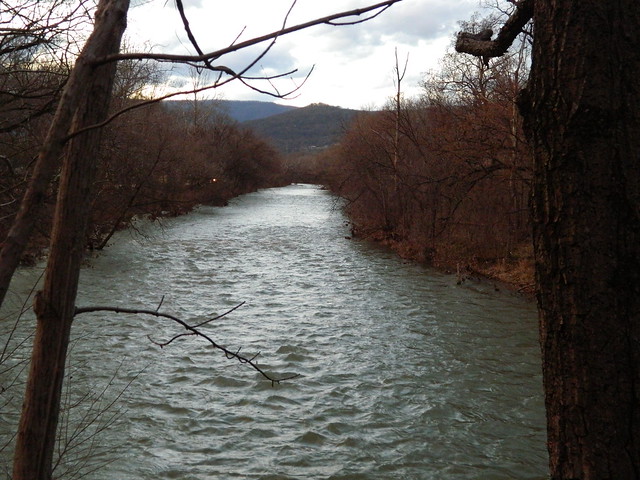
River

Now that you have your photos compiled together, upload each of them into Photoshop Elements 11 in order to begin editing. Start with one of the photos you would like to crop the object out of and select the  Quick Selection Tool, which is highlighted in the toolbox below.

Once you have selected the object, right click your mouse and select Layer via Copy.

Screenshot (115)

Next right click your mouse over the new layer and select Duplicate Layer.

Screenshot (117)

Once you have selected Duplicate Layer, a box will appear. In the Destination subsection of the box, place the layer in the same window as the background photo. The name of the background photo in my project, was DSCN3240.

Screenshot (122)

Proceed with these first few previous steps on each photo used until all objects you would like to use have their own layer with the background photo.

In order to adjust the sizes of the objects, right click on the object you would like to resize, and select Free Transform. Now you will be able to adjust the size to your desire and move it around anywhere on the photo.  Do this with each object until you have created your desired scene.

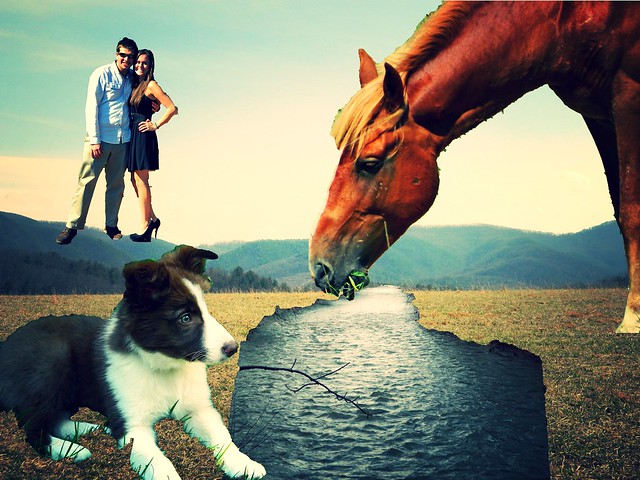
I wanted to make my objects really big because I thought it would look funny with the tall mountains in the background.

Screenshot (123)

Final Product 

Composition

Color Splash Tutorial

How to Color Splash in Photoshop Elements 11

I remembered doing something like this in a Photoshop class in high school so I just played with some tools and techniques until I found the fastest and easiest way. Here is a blog of my original post for this assignment, which equated to 3.5 stars. Although there are many tutorials for this assignment, I did not see one that included Photoshop Elements 11 or the same process that I used. The following is a tutorial of how to create the color splash technique in Photoshop Elements 11.

Start off by choosing a picture with a colorful subject and opening into Photoshop Elements 11.

Screenshot (104)

First use the Quick Selection found highlighted in the tool bar and select the subject you would like to keep its color. Then right click on the selected subject and select Layer via Copy. This will create a new layer within the project that only contains the selected subject. Screenshot (105)

Now select the original photo and go to Enhance –> Adjust Color –> Remove Color.Screenshot (106)

This step may not be necessary for you, but I wanted the colorful selected subject to pop more. So I went to Enhance –> Adjust Lighting –> Brightness/Contrast. Screenshot (107)

Then I increased the contrast all the way to create a more monochromatic background. Screenshot (108)

That finishes this tutorial! It’s a pretty straightforward and easy procedure.

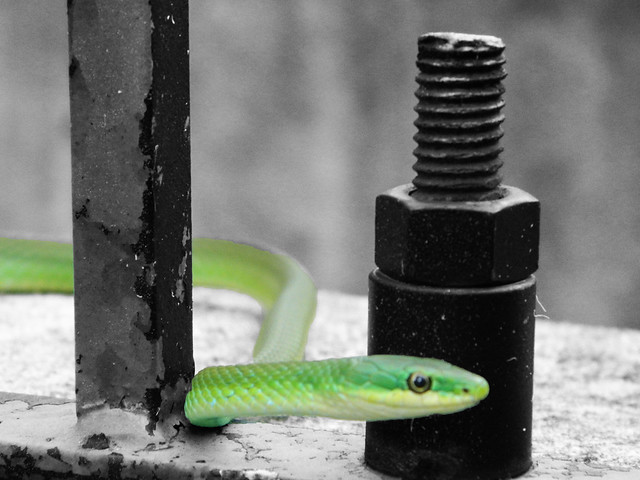
Original Photo

Ssss..

Finished Product

Green Snake


Typographical Horses

How to Make Typographical Picture in Photoshop Elements 11

Photoshop Elements 11 has been a lifesaver for me in this particular class. It has many of the basic features of Photoshop so if you have that, you will probably be able to follow this tutorial as well.

First off I would like to credit eHow Tech for their video that really helped me get started on this project and learn the basics of typographical pictures.

Here is the blog post of my original typographical picture. The assignment is worth 4 stars.

To begin, create a paragraph of text in Microsoft Word in order to copy and paste it into Photoshop Elements 11.

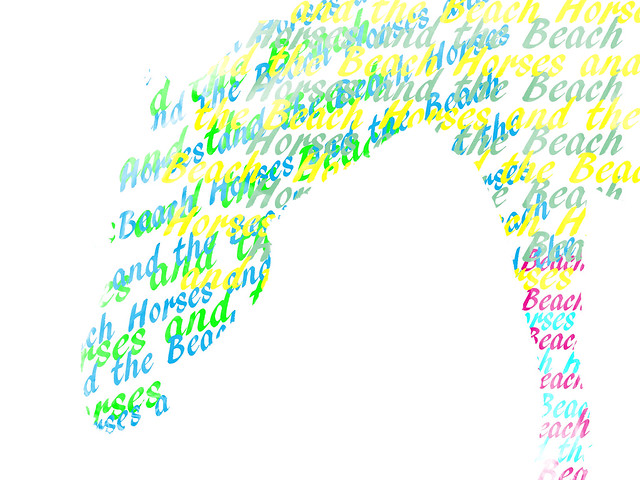
Since the photo I am using was taken at the beach, I used the words “Horses and the Beach.”Screenshot (81) Then open the photo you would like to use into Photoshop Elements 11.Screenshot (82)

If your photo is already black and white, that’s great! You will be able to skip this step. If your photo is not black and white, then you will need to go to Enhance –> Adjust Color –>Remove Color. This will take all of the color out of the photo quite easily. Screenshot (83) Now that the photo is in black and white, use the Quick Selection highlighted in the toolbar below to select the unnecessary background. Screenshot (84) You can see below that I have everything other than the subject of my photo selected. Screenshot (86)

Now select the Paint Bucket tool seen highlighted in the tool bar below and make the selected area white. Also make sure to create another layer (it doesn’t need to include the photo).

Screenshot (88)

Next go back to the paragraph you created in Microsoft Word and highlight and copy the entire text.

Screenshot (89)

Then go back into Photoshop Elements, select the Text tool in the toolbar and paste the text onto the photo. Continue this process until the words have completely covered the subject.Screenshot (92)

This next step is optional but it does help if you want other to see the different words used instead of all of them just blending together. To color the text, double click on a text layer, go to the bottom toolbox and select the color you’d like to use. Continue this process until each text layer is a different color.

Screenshot (95)

Next select each of the text layers. Then go to Layer –> Merge Layers. This will put all of the text into one simple layer.Screenshot (97)

Now select the layer with the picture, then go to Layer Effects right above the layers and select Screen. You should notice that your picture becomes lighter.

Screenshot (100)

To make sure everything will work, the top layer should be the picture with the Screen effect, the second layer should be the merged text, and the last layer should be a white blank background.

Screenshot (99)

Now you have a typographical picture! I do suggest picking objects and photos with very obvious shapes in order to get the best effect out this project.

Final Product

HorseAgain


How To Make Replay Video In 15 Steps Using Sony Vegas Pro 13


Hey guys! Andrew is here to help you create your very own replay video in 15 steps using Sony Vegas Pro.

Step 1. Find A Video

1


What you need to do first is go to a site like YouTube and find the one video that you think would be hilarious if it was slowed down like a replay. I chose the one of the many Pie Pranking  videos. If you already have a video or your own video that you want to use, skip to step 4.

Step 2. Copy The Link 2
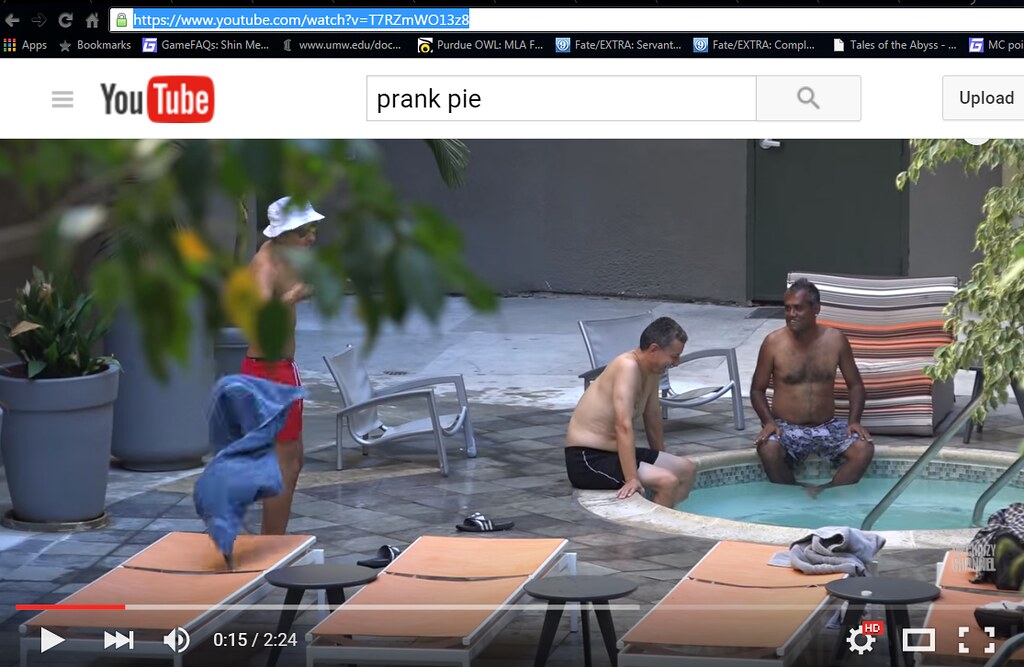
 

Once you have your video, you want to copy the link address for the next step as it is important to continue.

 Step 3. Use a Video Downloading Site
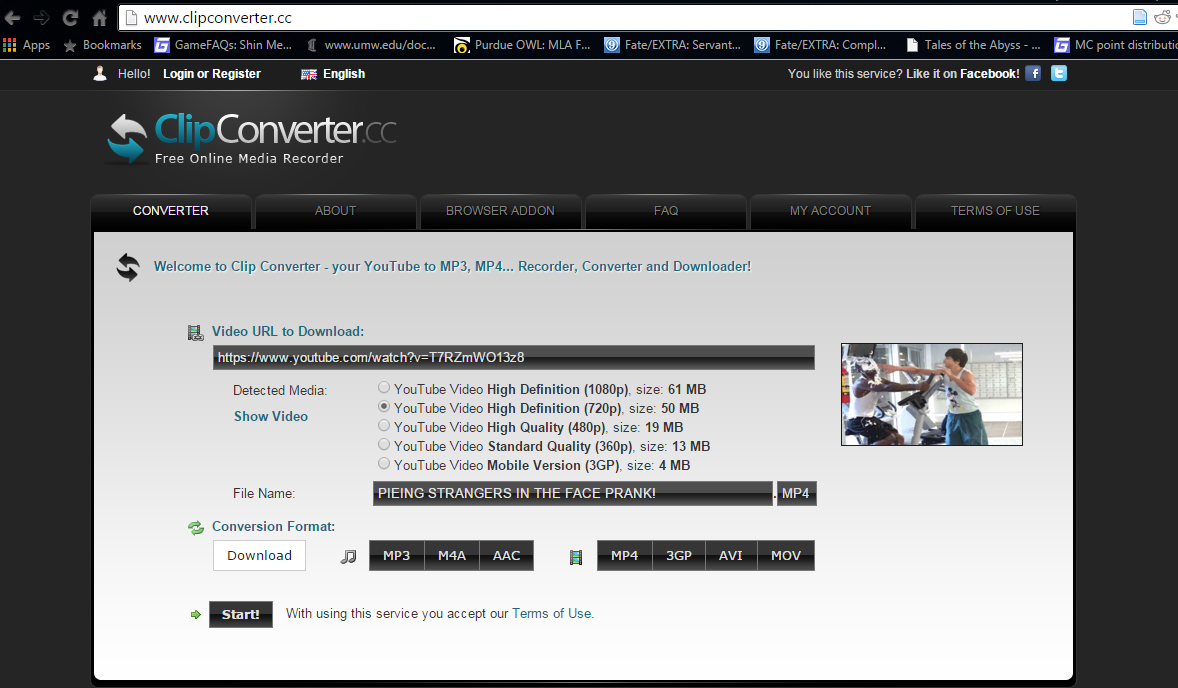
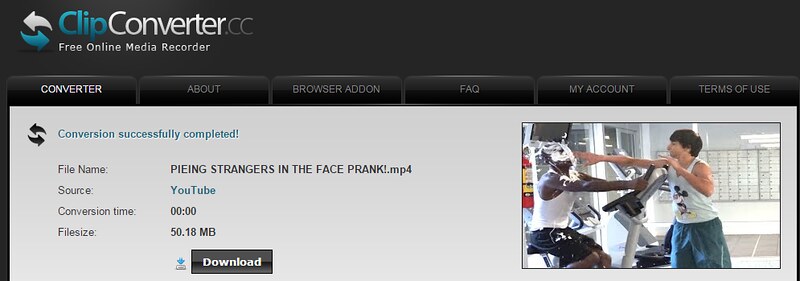
3  For this step, you want to take the link that you copied in the previous step and paste it under “Video URL to Download:”.  You then want to chose the quality of the video and click on the “Start!” button near the bottom.     4     A new screen will appear, allowing you to finally download the file. In order to use this file we need some sort of video editing software, so can you guess what I am going to show you next?
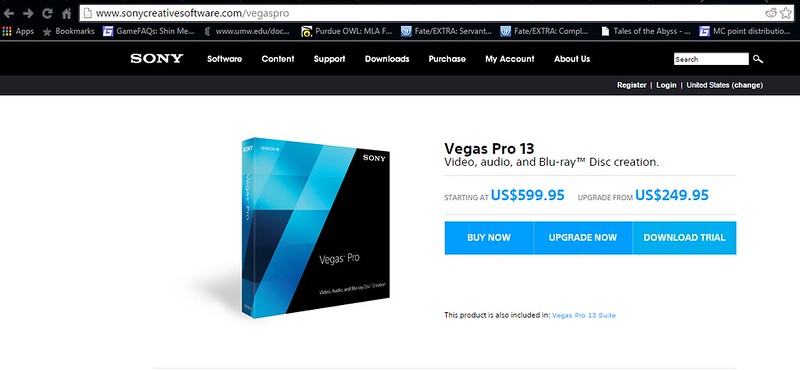
Step 4. Acquire Sony Vegas Pro
5  

For this step, you want to go to the Sony Creative Software website and download the free trial for the Vegas Pro 13 video editing software.
6    Once you click the “Download Trial” button, you will be taken to a page where you can actually download the software. You will then be ask to create an account before downloading, so after you finish that, you will be able to finally install the Trial Version on your computer and it should look similar to the image below.   7
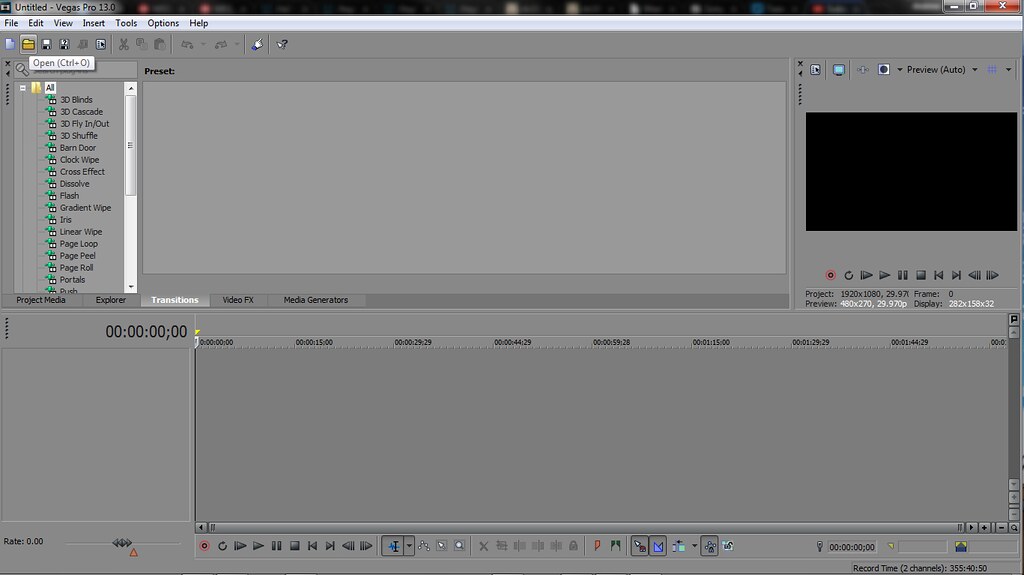
Step 5. Begin Editing

8
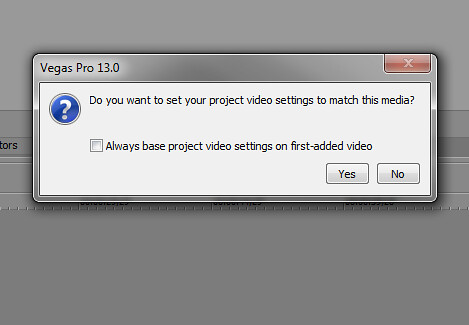
Once you open you file in Sony Vegas, you will be asked to set your project settings to match the media. You want to click Yes because it make the end game a whole lot easier for you, so make sure you don’t select No.


9


Now, you want to shorten your video to just the scene that you want to be replayed. Use the Split Tool once you find the where you want your clip to start and where you want it to end.
10


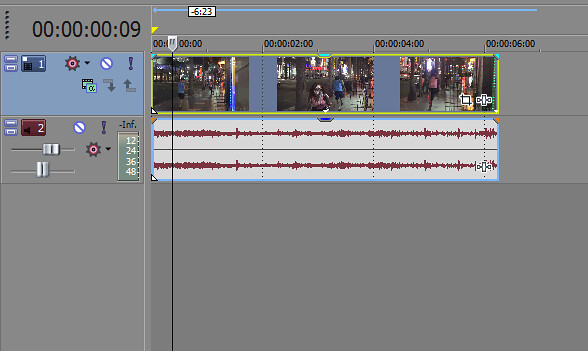
It should come out similar to the image of the Timeline above. Next, you want to want to delete what you aren’t going to use, so click on the sections that were Split from your clip and press the Delete or Back Space key.


11

Once you have successfully deleted everything besides the scene that has the clip you want to replay, you want to drag it to the beginning of the Timeline.
12

  You may want to use the Mouse Wheel or Zoom to get a closer look at the frames of your clip. Once you know which part of the scene you want to replay, you want to once again use the Split Tool to isolate the clip that you want to replay, but DO NOT delete anything this time.   13
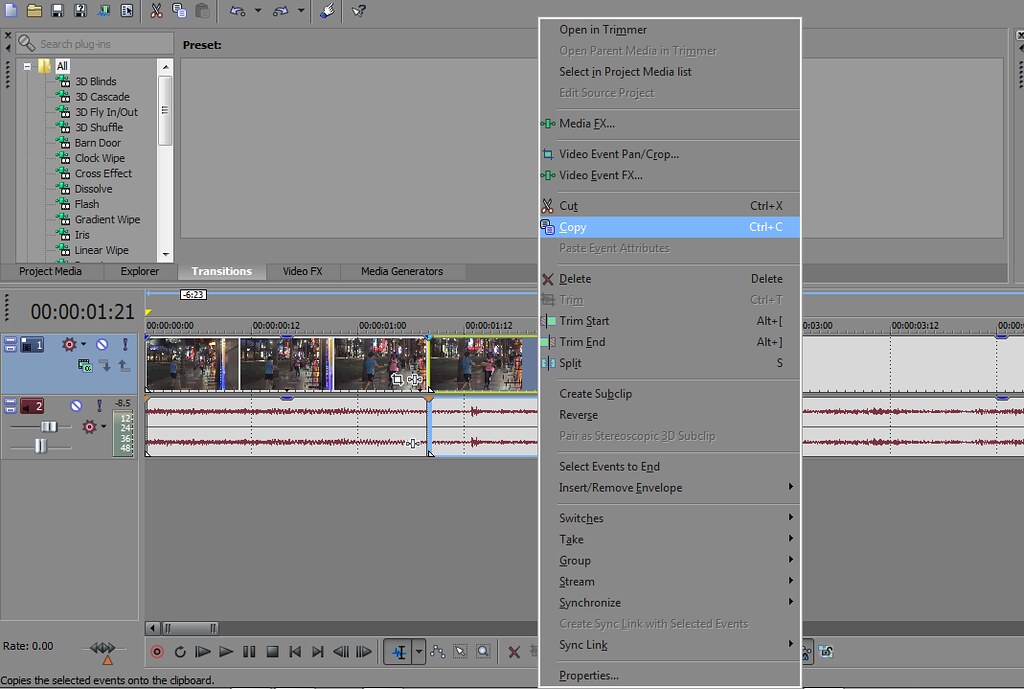
 

Select the isolated clip and either Right-Click and select Copy or just use CTRL and “C” keys to copy it and paste it at the end of the project.
14


Your project should look similar to the image above. Now here comes the best part.

Step 6. Replay Effect

    15    You want to hover over the very edge of the copied clip and hold the Control key. If you wait a little bit a box similar to the one shown in the image above will appear with the word “Time Stretch” shown. Now you want to click and drag as far as you can in order to stretch the video to give ti the slow motion replay-like effect. Now your video is finished! However, there is one last thing to do…  

Step 7. Render The Project 16
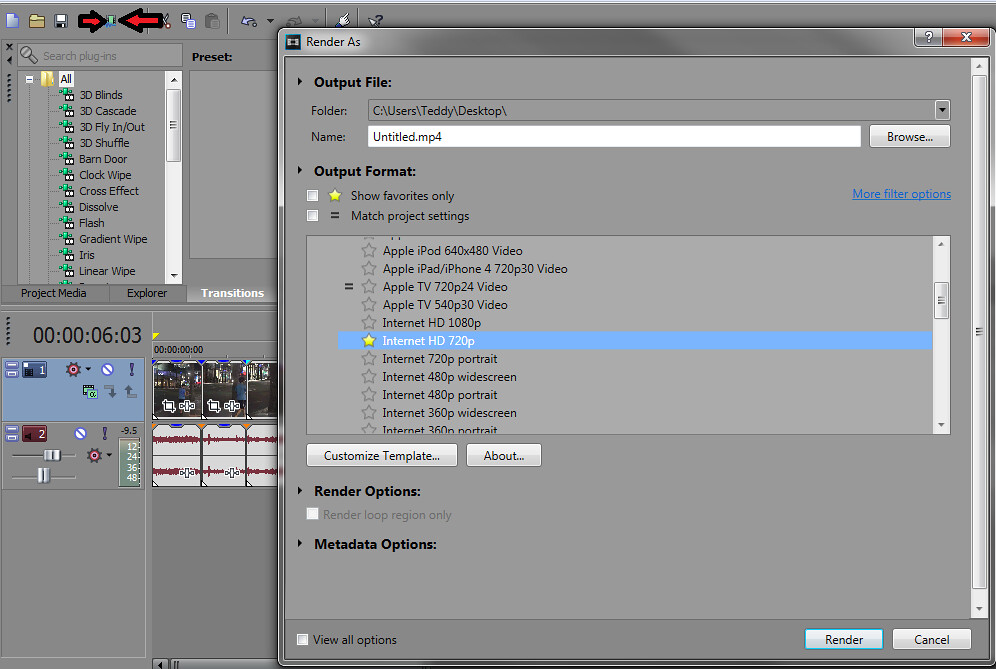
The final step is to render your video project. You want to click the “Render as” icon as shown between two red arrows in the image above. Once you do,  another window will appear with a large list of Output Formats. What you want to do is either select the Output with a “=” or just simply use Internet HD 720p or 1080p depending on the quality and resolution of the video you decided to use. Finally, you can click Render at the bottom of the window and wait patiently as the video exports for you to view and share with others online.

I hope this tutorial was able to help you figure out how to create your very own replay video! If you have any question feel free to ask by leaving me a comment. See you around.

Easy-peasy way of downloading YouTube vids

Okay, so, I don’t know if the rest of you took the time to try out the video download trick that I talked about in class. In case you didn’t, here’s a quick and easy tutorial to get you started. … Continue reading

That Number 2 In 3D for Prisoner106

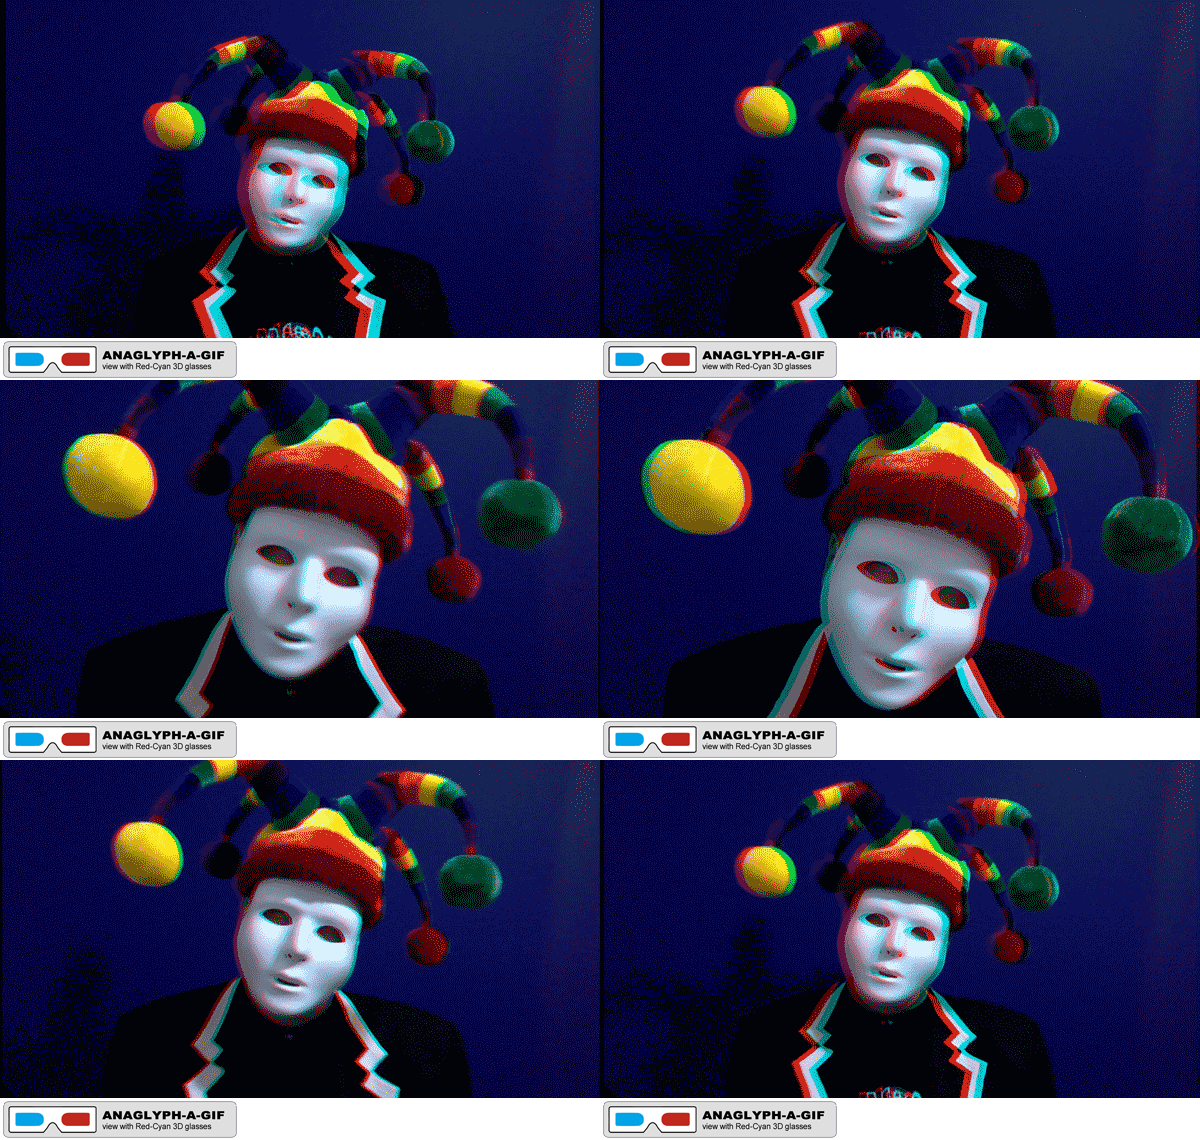
"Number 2 in 3D" Anaglyph-a-GIF by @aforgrave

“Number 2 in 3D” Anaglyph-a-GIF by @aforgrave

I was quite taken aback with the introductory video for the #Prisoner106 Week One: Assimilation Week. That getup of that Number 2 (@ds106Number2, on Twitter) was wearing and the odd behaviour Number 2 was displaying jumped right out of the screen and and gave me an immediate dose of that old #ds106 affliction of mine, GIF-eye-tis. Throw in a long absence from making 3D Anaglyphs (something I really got into last summer) and it was time to dust off the old 3D glasses and see if I could remember how I made things happen last year.

As it turns out, I started a series of Tutorials last summer for making Anaglyphs and Anaglyph-a-GIFs (I’m having to refer back to my terms from last summer — the badges are down a ways now in my sidebar)  but it seems I only got as far as the 2nd tutorial of 5. Something called end-of-summer (or August, judging by the date of the last Tutorial) must have gotten in the way. Fortunately, a short bit of experimentation had me back in the saddle and crafting a 3D Anaglyph-a-GIF in no time. The result is up above!

I’ve checked back and see that I was about to embark next on Part 3, which is the real key, the colour separation step.

  • Next: Step 3: Colour Filtering (link to follow)
  • Then: Step 4: Positioning the Layers to Simulate Depth (link to follow)
  • Then: Step 5: Extending the Technique to make an Anaglyph-a-GIF (link to follow)

Since Tutorial posts link separately into the Assignment Bank, I will leave off here and pick up with Part 3  in a subsequent post. I’ve already got some static frames captured from Number 2 to explain the process. Onward with the Learning!

I think this one qualifies for multiple assignments, which is good, as I understand from Number 2 that the electricity to my bungalow in The Village gets shut off if I don’t earn enough Credit Units throughout the week.

I’m tagging it for the following:

Can’t Get It Out Of My Head Tutorial

This is the detailed tutorial for the Can’t Get It Out Of My Head assignment. It’s a audio assignment worth 2 stars. Here are the steps:

Step 1: Download a free audio recording software like Audacity.

Step 2: Go on to YouTube and fin a song that has a nice melody that you can whistle and listen to it a couple of times.

Step 3: Listen to the song on YouTube while whistling it at the same time.

Step 4: Open your audio recording software and record yourself whistling the song while you listen to it on YouTube.

Step 5: Listen to your recording to make sure there is no background noise.

Step 6: If there is background noise, record it again and make sure your YouTube rack is low enough that you can here it but your microphone doesn’t pick it up.

Step 7: Export the recording as an mp3 track on your computer.

Step 8: Upload the mp3 to Soundcloud.

Step 9: Embed the mp3 in your blog post.

Flickr Favorite Team Collage Tutorial

This is the detailed tutorial on how to do the Flickr Favorite Team Collage. It’s a design assignment worth 2 stars. Here are the steps:

Step 1: Go to the search icon on either your web or phone Flickr app. Search your for your favorite teams’ logos.

Step 2: Save the images to your computer or phone.

Step 3: Download or find an online collage maker.

Step 4: Select the background that you want to have for your collage.

Step 5: Place the pictures that you chose and saved/downloaded on the background how you want them.

Step 6: Save the image as a whole.

Step 7: Upload the picture to Flickr.

Step 8: Blog your picture and your process about how you did it and what was going through your mind while doing it.