How to Photo Collage

There are several great ways to create a photo collage.

One great and free source I found for this is :

http://www.picmonkey.com

When the homepage for this website comes up there will be a “Create Collage” button on the left. Click that button and allow it to load.

Next, choose the format of your collage. For this Visual Assignment You will need to collage two pictures side by side. So, on the left side of the page click the icon with 3 boxes. The  ” Ducks in a Rom” format will have what you need. Click on “Ducks in a Row” and select the option with 2 rectangles (should be the first option).

Two boxes should now be on the main part of the page. Above these boxes click “upload” and upload the two pictures you’d like to collage.

After uploading you can drag the photos to the box you desire.

WAHLAHH!

DON’T FORGET TO SAVE!

Try this Visual Assignment

http://assignments.ds106.us/assignments/real-life-to-cartoon-collage/

I created a visual assignment today! You should all try it!

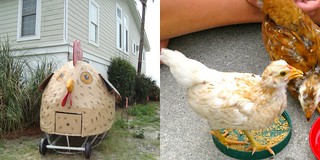
Chicken Collage

Over the summer I had chickens and for some reason thought that was super cool. I was so excited to collect my own eggs for breakfast in the morning. The real chickens in this photo are the one’s I had. I named the bright yellow one sunshine for obvious reasons ( haha that’s questionable). Sadly, she ended up being a he. Roosters are not fun early in the morning. So, I went to college and my mom gave them away. But, with chickens on my mind that summer, I couldn’t help but notice this strange contraption in someone’s yard. A family in South Carolina mad a chicken coop that  WAS a chicken.

I used several Tools to created this Collage. I used iphoto to upload, and edit my photos. Then I used http://www.picmonkey.com/ to create the collage. More details on the process to come in my tutorial on this assignment. So stay tuned!

Drawing A Cat

So as I was trying to figure out what other VisualAssignment to do for the week, I came across this one. It seemed quite simple and I thought I could use Pixlr again. Turns out, I was wrong. I couldn’t figure out how to use Pixlr to do this. I went back to the assignment page and looked for a tutorial. One of the tutorials used GIMP. I remembered I had downloaded GIMP for our gif project and decided to give it a try. It turned out to be really easy. I followed the procedure step by step and it worked perfectly! The only thing extra I added was adjusting the lightness/darkness of the picture. The original with out this step was really light and you could barely see the lines. The most difficult part of this project was finding a picture that looked good and didn’t have too much shading or too many lines. I didn’t have any particular picture in mind, so I just went through randomly trying pictures I had on my computer. The picture of my cat, Huckleberry, turned out to be the winner. You know what they always say, sixth time is the charm. He turned out pretty cute as a drawing too. I could never draw like this!

Flowers of the beach

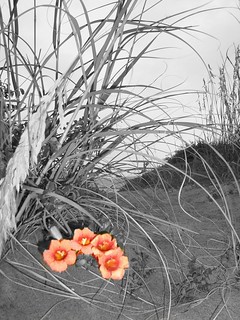
What beautiful flowers growing in the dry sand of the beach. I captured this picture on a stormy day in South Carolina. We were racing against a storm in attempt to see the lighthouse off shore. As thunder rolled in, I could not resist photographing the eerie atmosphere. As we walked down the tattered trail of sand and beach grass, this flower trickled into the path.

beach flower

I used a app called “photo splash smart” on my Mac for this picture. I actual wrote a tutorial for using this app http://livegraced.com/2012/09/photosplashing-for-macs/ .

Common Object, Uncommon Colors

I am big into color changing, so I was excited when I came across another assignment that involved taking ordinary things and giving them different colors. I randomly came across this assignment, so I didn’t have any idea of what object I wanted to do. I am also having a lazy day, so I didn’t really want to move far. I then realized that I till had my sunglasses on top of my head from when I wore them to class. Perfect! So I went ahead and took my picture with my phone and uploaded it onto my computer. I have become quite fond of Pixlr and decided to use that website again. I started trying to crop the back ground out and try some effects, but none really looked that exciting and changed the colors. I then started playing with hue and saturation, but again it didn’t satisfy me. I came across a “wand” type tool that highlighted shadow areas. I had no idea what it was/what it did. So I left one spot highlighted and used a paint brush tool and figured out that when the wand tool highlighted a spot, the brush tool would only paint in that spot too! It was exactly what I wanted. So I played around with these tools, the shadowing, along with a variety of colors until I came up with the perfect mix of all three.

^^Before the Color Changes

^^BAM, Color changes

PhotoSplashing For Mac’s

This is an easy and great way to photo splash your picture.

Go to your app store and search ” photo splash Smart”. This is a free app you can download to your computer.

Once the app has installed itself, double click the icon in your launchpad to open the app.

Click open file and select the picture form your files which you desire to photo splash.

Your photo will open as a black and white photo. A round, white, circle will appear as your cursor. Use this to click and drag over the portion of your image you’d like to bring the color back to.

Adjusting cursor size: If the area you’d like to color splash is small you can adjust the size of your white dot on the right side of the app’s screen.

Change the options on the right side or the screen form “Red” to “color” and the color will return to the selected portion of your photo.

Use the erase icon by clicking on it at the right of the screen then dragging your cursor and clicking the area you’d like to erase color from.

Walah!! you’ve successfully photo splashed!

Now save your work by clicking file, then export,  at the top of your screen. Save the photo as a JPEG  wherever you please on your computer.

Here is what mine looked like :

beach flower


The ghost of ME!

Is that a… GHOST?!” …No its just me! This is visual assignment 426 (3 stars). The instructions were as follows:

“Take a photo in which there is a ghost like subject by either using a long exposure or 2 different pictures in a photo editing software.”

I chose to use two separate photos. And for an even stranger effect, both photos are of myself.

These are the two photos I chose to use:

I used GIMP to edit my photos. I didn’t have to research any to complete this project, I think that means I am getting comfortable using GIMP (or maybe this was just an easy project) :)

This was a somewhat simple project (and lots of fun!) First I added the 2 photos as layers in GIMP. Then I “flipped” the worried faced photo. I made sure that the photo I wanted to turn into a ghost was on the top layer. Then I decreased the opacity of my top photo (the worried face). Next, I moved the photos so I was happy with the angle and my final product!


I know this is a little creepy, but for some reason I really like it! Once I saw the finished product, I thought it looked like my conscious was looking shocked and disapprovingly at the dumb face I was making. I really like how it looks like the ghost is starring right at that weird girl! (oh wait, that’s me)  I originally created this as the funny faced photo being the ghost, but for some reason I just did not like it as much as this version!

I know I’m strange, but I hope you found this somewhat entertaining at least! You can laugh at me, I completely deserve it!  :)


A Man and His Dog

So I was clicking the good old “random” button on the Week 5 assignments and came across, “Draw It.” I figured, “Hey, I used to use Photoshop in school all the time and I remember there being a filter to just change it! Too easy!” Well, turns out, GIMP does not have that feature.(Or at least I couldn’t find it) I wish I knew where my Photoshop CS2 CD is…even though it is majorly obsolete by now! But I used the tools that GIMP gives and from what I remembered, and a little prodding on GIMP Forums, I was able to create this:

Okay, so he isn’t actually MY dog, but I was watching him while my old suite-mate’s family came to visit him. (Odd how this was almost exactly a year ago!)

So of course I wanted to see how other people’s pictures turned out. And first on the list was Kiersten Pyrtle’s How to draw a horse! I also noticed that she had made a tutorial of what she did…after I did my own! SMH. Anyways, gotta love the fact that you can use different techniques to get a similar end result! I think I may post again with my own tutorial about how to create this because it was basic use of GIMP and anyone can do it!

4/10

I’m a Professional!

— Rob Skoczylas (@sgtsocks) September 26, 2012

Well here is one I couldn’t resist! This assignment is “Your very own Spubble“! As soon as I read it, I knew the exact picture I was going to use:

After some weekend training and PROPER use of equipment, us rescue folks like to have a little fun. What I’m wearing is a Stryker Speed-Sheet. We ordered a bunch to test them out. They are used to ease patient transfer from our stretchers to a hospital bed or such. It’s a one time use and well…after we used it in training, I decided to use it some more!

This was a quick create. Open photo in paint, click rectangular callout, change the colors of the callout, add some text, save! BUT remember to save it with a different name so you don’t lose your original files!

2/10

Overedit Yourself… Wow.

I look like an alien. But I overedited myself, I made my hair blonder, my eyes are originally blue, and I gave myself a tan.