Pinterest Peaks Interest

Storytelling within the Web

the idea of changing up an existing web page to tell a new story ” you will be intervening in the code and design of a website of your choice to tell a story. You are not to photoshop the design of the site, but rather intervene in the actual html and CSS of the site—though you can photoshop particular images on the site. Essentially you alter the content of a web page (content, images) to make it tell a new story.”

You can see my site here

This is part one to my final story:

My story starts with a girl, named Eliza, who is soon to graduate from college. She, like most other college girls, is looking at her Pinterest in hopes the answers to all her finals will magically be “pinned” :) . She is looking at the Travel section and searched Italy. She HAS to go! Part 2

I made this web remix by intervening the the code with the program X-Ray Goggles.

That’s why her hair is so big, it’s full of secrets.

This is design assignment 313, “Animated Movie Poster” It is worth 4 stars. The assignment reads:

“Pick a movie poster and animate it. You can see an awesome example and quick explanation by Michael Branson Smith here.

I decided to create an animated movie poster for Mean Girls to use in my final project!


In my poster. Cady (Lindsay Lohan) is sort of side glaring at the “plastics” telling each other secrets. I feel like this image depicts the story line extremely well. This group of girls is full of secrets, they aren’t true friends because none of them are really honest with one another. They are mean girls to those outside their group and in my opinion they are even meaner girls to those inside their circle. This is because they are SUPPOSED to actually be there for one another but aren’t.

I used Windows movie maker to edit the video clip down to about 2 seconds for my gif and then I opened it in GIMP over a Mean Girls poster to create my animated movie poster. DS106 has made me addicted to gifs

Original Media:

Karma Catchers!

This is web assignment 713, “Storytelling Within The Web.” It is worth 5 stars! The assignment reads:

“From the Spring 2011 ds106 class came the idea of changing up an existing web page to tell a new story ” you will be intervening in the code and design of a website of your choice to tell a story. You are not to photoshop the design of the site, but rather intervene in the actual html and CSS of the site—though you can photoshop particular images on the site. Essentially you alter the content of a web page (content, images) to make it tell a new story.

Originally we recommended doing this using the Firebug extension in the Firefox browser, which does work, but is unfortunately easy to lose your work. We currently recommend Mozilla Hackasaurus — install the X-Ray Googles in any browser and use it to re-cast the content of any web page.

When you blog it, include both a screen capture in your post, but you will also need to upload the web files (HTML and media files) to your own site so it can exist as a stand alone URL. (see our older Firebug Tutorial)

Consider using news sites, social media profiles, product pages, movie review pages etc. The simpler the design of the page, the easer it will be (think Craig’s List).”

(Website)

 I turned Amazons dream catcher earrings into Karma Catchers for bullies sold by “Stop Bullying Inc.”! I  plan to use this in my Final project as revenge against the mean girls! No one likes getting bullied, and this provides some type of peace of mind to those who are victims. Just wear these pretty earrings and karma will catch up to whoever bullies you! It’s time to give bullies a taste of their own medicine! (DISCLAIMER: These do not exist, this is a lie. Sorry not sorry.)

I used “x-ray goggles” to create this new Amazon product. This tool makes it extremely simple to alter a web page, I think it is extremely cool as well. You simply click on the tool then click on whichever element you wish to change. I see some major plotting and trickery in my future ;)

For this assignment, I changed the name of the original product where ever I saw it as well as the name of the real seller. Then I changed the description of the product to fit my new invention :)


Final Project: Jingle Jangle for Prez Obama

For the Jingle Jangle assignment,I created a jingle for President Obama as a super hero. The lyrics are “He’s runnin’ round the White House, quiet as a mouse, Stoppin’ crime, in his extra time, Michelle doesn’t know about this, but you bet stoppin’ sexism in on his list”.
Yeah I know. Good stuff, right?

Anywho, I recorded myself “singing” this and then I sang “It’s President Obama!” and changed the pitch on it and added an echo. Then, I downloaded this sound from free sound.

This is what I imagine President Obama sneaking around the White House to while he runs off to do his super hero job on the side.
In his fancy red cape.

[14/~15]

Assignment 2: Visual

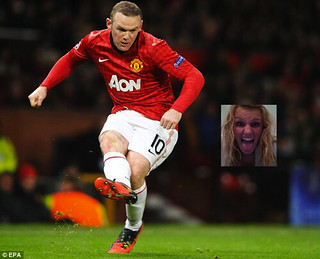
The second assignment that I decided to create for this week can be found under the Visual Assignments and is worth 1 star. I decided to name this assignment “Picture Me This…”  For this second assignment I decided to have people take any random picture and place themselves in the picture in a very random way. When completing this assignment I decided to take a picture of one of my favorite players from my favorite soccer team (Wayne Rooney from Manchester United). I got a picture off of google of him kicking a soccer ball. After getting this picture I thought I’d find a very ridiculous picture of myself and simply replace the soccer ball with my face. In order to do this I made the picture of my face a lot smaller (to fit over the soccer ball) then I simply went to the Paintbrush app on my Mac and placed my face over the soccer ball in the picture. I then, uploaded this new picture onto my flickr account and tagged it correctly and this is what I got …

Wayne Rooney kicking my face


Also make sure to check out my tutorial on this assignment!!

Assignments Created

Your Favorite Favorites

The first assignment I created for this week was called Your Favorite Favorites. This was an audio assignment that I created that required you to choose a few of your favorite songs (however many you choose is up to you) and you edit and combine them using separate parts of the song and try to create one fluid piece. This was an interesting experience because it was difficult to copy, paste, and delete portions of each song and try to keep them in order with what was what. I really liked the idea of people using some of their favorite songs and trying to create one song out of all of them. I hope that people like the assignment and try to complete it and hope they think it’s fun!

Something Is Wrong Here

The second assignment I created for this week I called Something Is Wrong Here. This was a visual assignment that I created. It required you to choose a scene from any season of your choosing and to incorporate another picture on top of that of something that would NEVER happen in that particular scene/season. For the example, I used a picture of a town in the mountains covered with lots and lots of snow and used a picture of three kids eating watermelon to put in the middle of the road. I liked the combination of this because whenever you think of winter, you would never think of watermelon.

Thank the Unicorns that Keep ds106 Humming

Last night we had an unfortunate outage at umwdomains, the hosting for ds106 students at the University of Mary Washington. With this being finals week, students working feverishly to finish projects and reflections, twitter was never so lit up with activity.

Let’s give some appreciation to people like Tim Owens who was working on this late at night or Zach Davis and Cast Iron Coding who keep the ds106 server from falling over. Like Jim Groom has done before in Behind Every EDUPUNK is a Miserable Sysadmin, it’s time to stop what you are doing, and give these folks some rainbow love.

(click to see the full size rainbow room)

Thus a new ds106 design assignment Rainbows And Unicorns In The Server Room:

Give some love and recognition for the folks behind the scenes that keep the web servers and internet tubes running- often the only time we contact our server admins is when something is wrong. Twitter fills up with “OMG I CANNOT FINISH MY #DS106 PROJECTS WHAT AM I GONNA DO?”

Make an animated GIF of a server room that includes both rainbows, unicorns, and a message of thanks. The cheesier the better. Bonus points for elves and pink ponies.

My own was constructed with a fair bit of layer play in Photoshop, starting with the base layer from this flickr image


cc licensed ( BY SD ) flickr photo shared by torkildr

I did screen shots of the ds106 site as well as those of two students, Nathan and Lauren‘s blogs that flash on the screens (the latter are pretty tiny, but there). This is done by using the ploygon selection on the screen area, and doing a Edit-> Paste Special -> Paste Into to insert the little screen shots. I use the Edit -> Transform -> Distort to change the shape of the screen shots to fit. I also covered two of the server names from the original with text (“ds106.us” and “umwdomains”), doing some rotate and shear on the text to make them fit.

I used the Make Frames from Layer menu item in the Photoshop animation window to make the layer individual frames I could play with the timing, and activate the screens to blink on and off. I had now a three frame animation sequence.

I got lucky in searching for the unicorn image to find an animated GIF in a discoussion forum. By opening this GIF in Photoshop, in the animation window I was able to copy three of the animation frames (one where the eye was closed), I could use “copy frames” to then go back to my creation and paste frames in, using te option to Paste Over- meaning it overlaid the frames on the 3 I had. To make the wink effective, I kept the unicorn’s eye frame open on all three, duplicated the third frame, and switched that layer to use the closed unicorn eye- by changing the timing I could make it quickly blink.

I found the perfect rainbow on Best Clipart – perfect cause it had little hearts but also because it was a PNG file with background transparent. I made that visible on the last frame.

For the text, to make it stand out, used the Layer Styles – Outer Glow to make the white haze behind, gradient overlay to add a rainbow, and Stroke to put black border around the lettes.

The beauty of working in layers is the small file size you get with the final GIF- the full size one (1024×681) is only 481k.

Okay, even if you do not do this assignment (and I think you should, anyone who has a web site), I ask my #ds106 students to at least write a blog post or send a tweet of thanks to @timmmmyboy and @zdavis

Mini MOOCs

(click for full size mini mooc)

Found among the coffee additives at HB’s, a restaurant in Pine, AZ, this little product that was created for the ds106 Re-brand ‘em Assignment:

The logo is an important part of a company. For this assignment, you are to choose a company and re-brand them. Take their logo and remix it, or start from scratch and make it your own piece of art. Need inspiration? Here’s a cool site (http://www.underconsideration.com/brandnew/) that blogs about recent changes in company logos, and posts both the new and old versions. It can really highlight what subtle changes can do to a logo.

Once MOOCs get tired of being so massive and unweildy, they will implode and emerge as “mini-moocs” This is the most important dairy product in 200 years.

I suggest grabbing a handful of them.

Help Take Down EMRE 5807! Tutorial Example

This post will go through a nice little tutorial for my created EMRE 5807 assignment.

This first step in my creation process was to track down a Kim Droom image. Since I didn’t think any of these existed, I did a google search and it brought me to a class video from a Spring 2012 section taught by Jim Groom (no, the similarity in names are not a coincidence lol). Once I had this video up I wanted to freeze frame Kim to get him looking the way I wanted. Below is what my screen looked like when I did this.
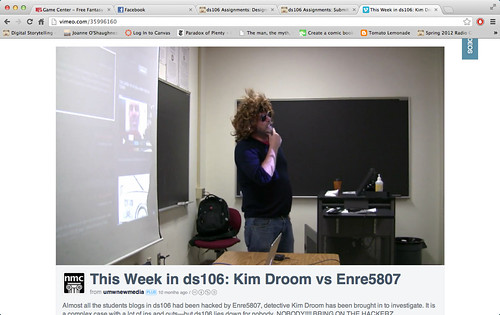
Kim Droom

So as you can see, I had Kim Droom just how I wanted him here, so my next step was to take a screenshot with the program Jimg, and save the image to my desktop. I took the screenshot by simultaneously clicking Command-Shift-1, after which I clicked on the screen to lock in the image, changed the name of the file and clicked on “Save”. At this point a box will pop up asking you where to save the file to. I chose to save it to my desktop.

My next step was to convert the image to a .jpg (or JPEG) file. I simply just clicked on the file name until I could change the text from .png to .jpg. I then imported the photo into iPhoto.
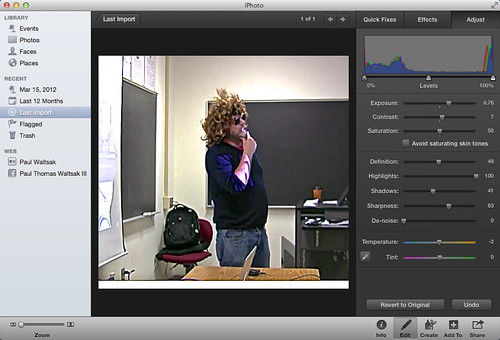
Kim Droom Editing
While in iPhoto I clicked on the “Edit” button at the bottom, and started playing around with some different things, such as the Sharpness, Definition, Highlights, and Exposure. There is obviously no “end all, be all” way to manipulate an image, it is basically depending on what you are going for. I didn’t want to make my resulting Droom image too extreme, or too boring, so I choose to make him look a little sharper, along with highlighting some of his features, like the crazy hair and awesome aviator shades.
After I did these edits, I decided to crop the image down to get it more zeroed in on Droom. You can do this by going to “Quick Fixes” and then clicking on “Crop”. From there it is pretty self-explanatory and easy to play around with. my resulting crop looked like this:
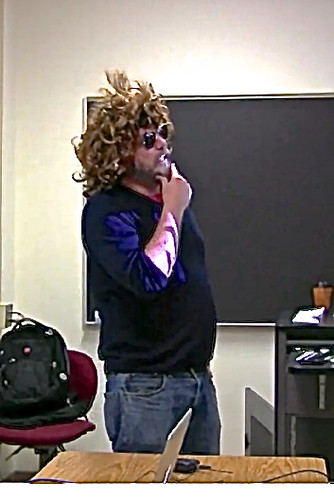
Kim Droom

Once I had my image all cropped and how I wanted it, I imported it into GIMP, or GNU Image Manipulation Program, which can be found here. It’s not that GIMP is a terrible program to use, it just makes some tasks more complicated, and obviously it can’t do everything Photoshop can do, so there are limitations. However, for an assignment like this, it serves its purpose, so not TOO many complaints ha! Once I was in GIMP I selected the Scissors Tool, which helped me cut out Kim’s attractive figure.
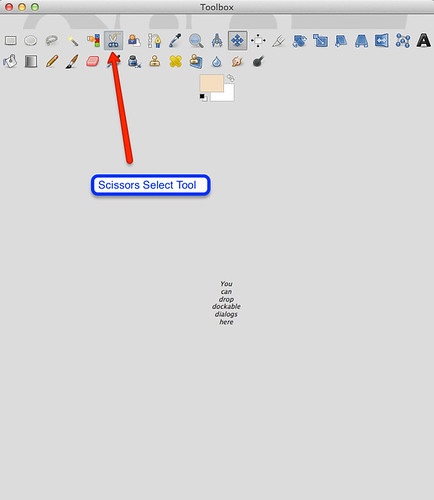
Gimp Tool Select

Once I had Droom selected, I clicked on the image and the dashed lines flickered around his body. I then right-clicked and selected “Edit” and then “Cut”. Here is what my screen looked like afterwards:
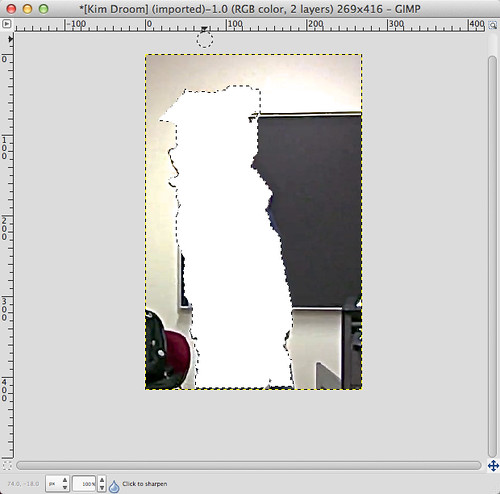
Droom selected and cut

Next I wanted to paste Kim Droom into a new layer so I could edit him more finely:
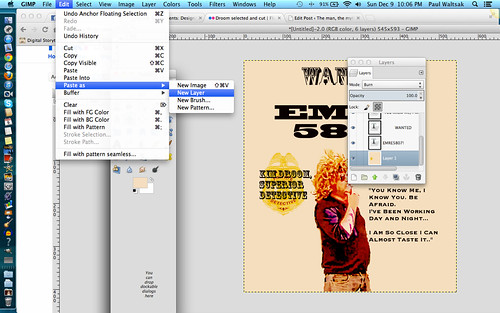
Gimp new layer

Next I used the Zoom tool, followed by the Eraser tool to get it looking more clean, which is what you see here:
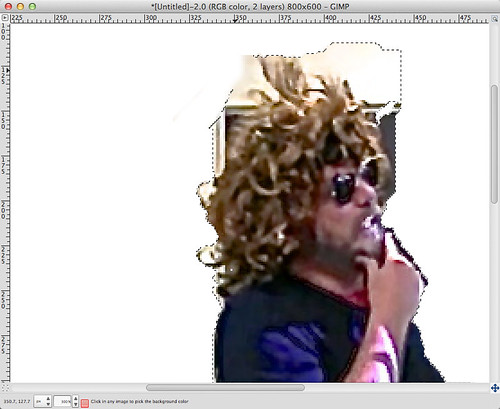
Kim Droom eraser

So now that I had Droom looking all sexy and clean, my next step was to make a background copy of this layer with Kim Droom, so I could rename the other layer, “Layer 1″. This Layer 1 would be where I would set the background color that you see in my example. In the image below, I also show some other tools I used in the design, such as the “TextEdit” tool, and the “Mode” tool, which I used to create the cool effect that Kim Droom’s image has.
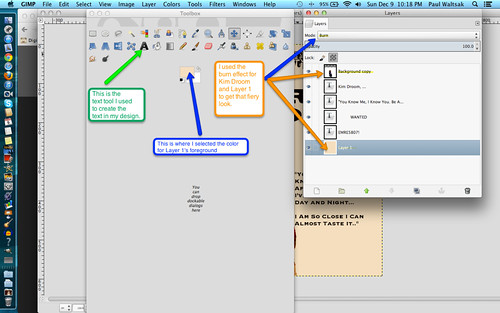
Layers Explanation

Once I had all this cool stuff sorted out on my poster, I wanted to add a detective’s badge image underlying the Kim Droom text on the left hand side. To do this I dragged the image of the badge that I got off of Google into the GIMP icon, which then opened it up in a new layer. To cut it out, I used the Scissors Select tool that I highlighted earlier in the post;
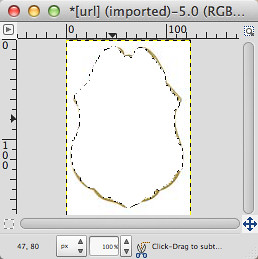
Badge 1
..and then followed the same “Edit, Cut–> Paste Into…” and then Selected Layer 1 to paste it into.
I also selected the “Burn” effect from the scroll down menu “Mode”..
Mode Badge
This gave it a cool look among the other design elements of the poster. To move the badge over to underneath the selected Kim Droom Text, I simply chose the “Move” tool and centered it. This image illustrates this.
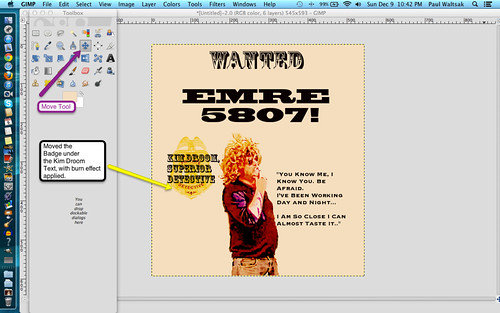
Final Tutorial Image

So, this was my overall process, and I hope that I laid it out clearly enough, which I feel that I did. If you have any further questions, don’t hesitate to ask! Enjoy, and happy blogging!

Creation for a Community of Creators: Kim Droom and EmRe 5807

My first created assignment can be found here!

The idea for this assignment came from an occurrence at the beginning of my Spring 2012 semester of DS106 with Jim Groom. One day, I was sitting in Blackstone, about to do some work for DS106. I pull open my blog and see an overbearing black screen with color text, mixed with caps and lowercase. The most distinguishable feature of the screen was the name EmRE 5807, the hacker. many people in our section got hit by this guy, and we were all equally freaked out.
The next class meeting, Jim Groom comes in with this ridiculous wig, sunglasses, and a cup of coffee. He introduced himself as Detective Kim Droom. The video for this class can be seen here. It was a great class to just laugh a lot at the situation, which was overall very frustrating. So that’s the backstory for Kim Droom and EmRe5807, who inspired this assignment.

Here is my own example of this assignment:
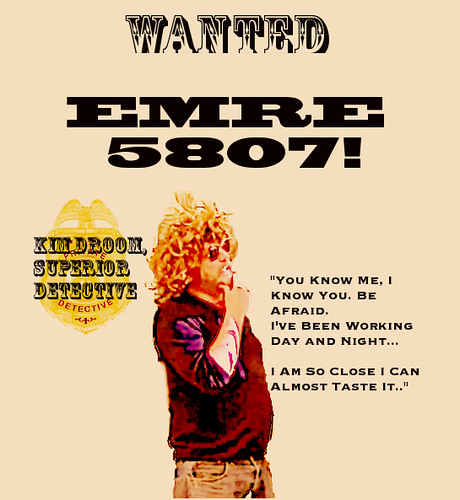
Kim Droom: EMRE WantedPoster

As you can see, Kim is a pretty intimidating dude, one which I would not want to have coming after me.
The idea here: I thought that in creating this assignment, it would give people a chance to be creative with their design skills, whether it be in the form of a wanted poster or some type of announcement, whatever. I had a good time with the assignment, and tried to include everything that would look intimidating and that seemed necessary to meet the needs of a wanted poster. For example, bold fonts, threatening statements,etc. I took an image of Kim Droom from the recorded video of a class session. I also added a cool “Burn” effect to Kim Droom to make him look brighter and sort of on fire, so to speak. I felt that this would make him more intimidating and alarming for EMRE. I was working with GIMP, which can be quite challenging at times depending on what you are trying to do, so I will have a tutorial for how I made this assignment. Anyways, hope you enjoy!