Windy Audio Alert!

For my first Audio Assignment, I clicked the button “try a random one”. I wanted to see what it came up with because trying to pick one out in the whole bank is hard!! {there are wayy too many good ones and I couldn’t choose!} It came up with the assignment, to imitate some kind of weather.

{Play it and close your eyes imagining that you are on the show Winnie the Pooh - for some reason, it was always windy in the 100 acre woods!}

At first, I wanted to do lightenting. I tried it, and it didn’t work well. It just sounded like heavy winds…so I decided to imitate wind. I tried to make it sound as real as possible but you can be the judge of that! :) In radio lingo, when people create their own sounds from theirself and what they have around them, it is called foley sound. I have always wanted to do this so when I got randomly assigned to thi assignment in the DS 106 Assignment Bank, I was happy!

Because I have the SoundCloud app on my phone, I just recorded and uploaded my sound from there. It was actually very easy. I would definitely reccommend getting the app if you have an iPhone or any other device that you can get apps with!

Bump Bump Bump[er] it up

After gaining several grey hairs last night from this assignment, I have officially made my first DS106 Radio Bumper!

This week is all about audio storytelling and one of our assignments was to create a Radio Bumper. It was suggested that I download Audacity to create the bumper and to install the plug in LAME that converts Audacity files into MP3 files. Both pieces of software are free.

After getting all of the softeware installed, which took no time at all. I needed to pick out a song or sound for my bumper, as well as what I would be saying. I looked back at previous students’ bumpers, but there were only a few examples. Since this was my first time using the program I also watched this tutorial about layer sounds in Audacity by Cogdog.

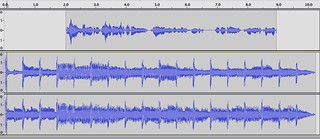
Once I figured out what I wanted to say I recorded myself. I ended up changing what I said a couple of times. For my music I choose “Between the Raindrops” by Lifehouse and Natasha Bedingfield. I used the first 9 seconds of the song and then repeated a segment of it to make it a little over 10 seconds. The hardest part about this was to try to get the music matched up so it didn’t sound weird. It’s still not perfect, but I don’t believe its super noticeable. I also pushed my voices to the 2 second mark so that there would be a music intro. My voices end a little before 9 seconds, so the bumper ends with the music and fades out.

For effects, I amplified my voice line. Though I feel that the beginning is much louder than the rest of the clip. I also faded the sound out at the end so it wouldn’t be an abrupt stop.

Radio Bumper in Audacity

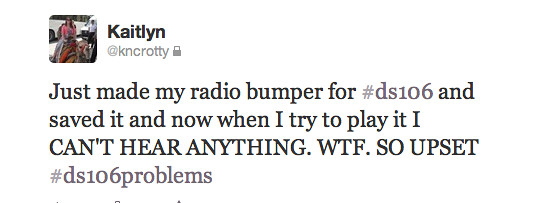
I then went to save everything and then went to check my files to make sure it had saved correctly. (Sidenote: At this point I had been working on the project for almost 1 1/2 hours because I had to re-record my voice a couple of times and play around with the music.) So when I went to pick on the file and P!nk started playing I freaked out! I then went back to Audacity and no sound would come out of my clip. Then all the lines went flat. It was like my whole project died (it flat lined, get it! haha). I literally flipped out, clearly.

twitter rant

After tweeting that, I went back into Audacity and the project resurrected itself. All the little lines were back up and down, not a flat line! Horray!

twitter rant over

I then re-saved it (the same way as the first time) and went to my files to check it out again. And it played without any problems! From there I uploaded it to SoundCloud. Plugged in the necessary info and called it a night!

So here is my very first DS106 radio bumper!

[Updated] Sound Effect Story

This was the most fun I’ve had doing something in this class so far and I have no idea why.

The explosions need a little work.

After some comments, I went back in to make another story.  I liked the old one, but it was clear to me that my message was not coming across clearly.

Having said that, I took in the advice and created a new story.  Here it is:

I started off with the background–just some wind blowing through trees.  Then I added a baby laughing, baby saying dada, a fart, sniffing, a moan, a choking sound, followed up with the sound of a drop; all courtesy of Sound Dogs.  Did all the work in Audacity, just layered things all up with some cutting and pasting.

Here thar be monsters and media madness

Alright, to start things off, welcome to my summary of my second week of DS106, and the final week of DS bootcamp. Can’t say I’m sorry to say goodbye, as we head off into the real deal :)

I’ve made an email address for this blog, so if you have questions or comments or pictures of cats, send them to [email protected] please.

Check out the other class blogs; I have, and they’re really cool. PS, mine is totally listed there–score, I did something right!

As you can see, I changed the theme of the blog to something that I really like–I’ve used this theme before, on a different blog that I used for a creative writing class. If you go there, you can still read some of the (terrible) stuff I wrote.   I’m a huge fan of the theme, because it mixes just the right amount of whimsy, fantasy, and monstrousness, and hey, that’s exactly what a Chimaera is–a mishmash monster. Of media! As you can tell by my username, darlingchaos, I’m a fan of the ecclectic and strange, the creative, crazy, and chaotic. So brace yourself.

Under the new skin, I’ve got a happy new plugin whirring away. A wild Akismet approaches! It is extremely effective against spam! I seriously hate spam, it’s the worst ever and should die in a fire. For some WEIRD reason, apparently I had some random plugin called “Hello Dolly” running on my wordpress, which did nothing but display random song lyrics. So I banished that. Didn’t have any trouble with anything, because I’ve done this before for other classes, and it felt like diving back into familiar waters, even if it’s been a while. I’ll warm back up to it eventually, but for now I’m happy to just paddle around and make sure all my bases are covered and that everything is operating as it ought to. Soon, I’m sure i’ll be overdoing it and spamming you all with my creative thought-vomit. Or something. For right now, I’m happy making sure that my blog reflects my digital identity, and I feel like that I’ve achieved that pretty well. Right now I want the blog to be a place to house my assignments, not just for the sake of the class but so that I can be more experienced with this kind of platform-building and organizing, so I can make and display a portfolio of cool stuff to future grad schools/job interviews/aliens from Mars. I dunno. I’m excited to further customise and utilise the space.

If you didn’t notice, the “home” site to this sub-site is now colourful and no longer has a bus on it. Whee! Customising it was easy–install WordPress and a happy little theme. Nothing to do with it right now, apparently we’re just placeholding, so it feels a little stark and excessive to have the ds106 site as well as the home site–but I know we’ll flesh it out later.

This week we did two daily creates and I sort of feel like I took the lazy approach, doing two writing assignments, but hey it was fun and I had a horrible, busy, feel-bad-y week so it was a bit nice to take it easy. Anyways, writing is something I ENJOY and the prompts were strange and weird and wonderful, things I never would have thought of. I actually went back and read every single daily create prompt since class began, and I’m so happy that they’re all unique and inspiring. I kind of want to submit a few assignments for review, just for fun.

Here are the two things I did–go forth and read! That’s at the actual daily create website. I’ve archived the full text of those daily creates on my own site HERE and HERE.

Anyways, as far as process/equipment… well, I just wrote, didn’t do a video or take any pictures, so all I used was my brain, my hands, and about five minutes on my macbook. Honestly, I just do the first thing that comes to mind, so it’s not even like I have a fun brainstorming process to describe.

HA! I MADE A GIF. For the first time in my life! I’ve been wanting to make gifs for like, MY ENTIRE LIFE (at least as long as I’ve been on the internet) but never bothered to do it, or find out how to do it. Now that I know how easy it is, I’m terrified that my life will become possessed by gifs, because gifs are–I swear to god–how the internet expresses FEEEEEEEEEEEELS. And I have so many feels. ALL the feels. My amount of feels is inversely correlated with my ability to can, of which I have DELIGHTFULLY LITTLE .

sZ9wAR

The process was pulling up a youtube clip of Tangled, one of the greatest movies Of. All. Time, taking a couple of screen shots with my mac (Command + Shift +4) and then using the online gif-maker at makeagif.com (you can’t make that up. It really is that easy). It was essentially a three step process to take the pictures, upload them, and then click “make it!” and boom. Gif. The end. Prooooooobably some kind of copyright infringement but hey, who cares, we now have a gif of a horse and a princess playing tug of war with Flynn Ryder. And that’s worth the litigation.

Overall week two was pretty easy and fun. I’m really digging it. Bootcamp was terrifying, but I made it through thanks to my profs and support from fellow classmates and other members of the teaching-ranks. I’m looking forward to biting off more than I can chew, and then chewing it. And then waxing poetical about it online.

Oh, I do have one question–why is it that we’re embedding the “assignment” of making a gif in our weekly summary, and not making an individual post for it, and then tagging that post with visualassignment, visual assignment 2—didn’t we make a category for Visual Assignments? Am I just confused? I went ahead and placed this post in both categories, “Weekly Summaries” and “Assignments, Visual” but was just wondering if I should have made a separate post for the gif and included a link to THAT post in THIS post. Bwah, confusement.

It’s been a .GIFeriffic Kinda Week

This week brought .GIF’s, tears, and laughs.  The tears and laughs were brought on by watching awful and some amazing movie scenes.  It is hilarious how BAD some movies actually are!

Seriously, Gigli???  Max and Me???  Glitter???  Worst of the worst really.  That said I decided to NOT do a .GIF of any of those.  Period.

The assignment:

Say It Like the Peanut Butter

“Make an animated gif from your favorite/least favorite movie capturing the essence of a key scene. Make sure the movement is minimal but essential.”

I made 4 .GIF”s this week.  Some were more successful than others.  You can see them HERE and HERE.  I’m gonna share my 2 favorites right here.

I was a little concerned at the beginning of this week.  I watched some tutorials, read some articles, and took a deep breath.  After figuring out how to use Photoshop to import the videos I decided to use- I got down to business.  Some of the scenes DID NOT WORK.  Some of the scenes worked well.  Some of the scenes would have worked if I was more proficient with Photoshop.  (that will come with more practice and work.)

I was totally excited to be building these and hope like them.

The first .GIF is from Gone With the Wind.  It is the scene where Scarlett and Rhett’s daughter, Bonnie dies.

bonnedies_gif


Now this second one isn’t minimal at all.  BUT!  I love it.  It is the scene from 200 Cigarettes where the cabbie is giving Cindy a life lesson.

Getting My .GIF On | Part 2

Both of these were created with PwnYouTube, Photoshop CS6, and lots of patience.

The short and dirty of it:

1. Grab video from YouTube (PwnYouTube),

2. Import in frames to Photoshop CS6,

3.  Edit down to as few frames as possible, I was shooting for between 3 and 6,

4.  Set the frame times,

5. Close your eyes, cross  your fingers, and hope for the best,

6.  Save for the web (32 colors),

7.  Post.

_________________________________________________________________________

Okay, now for my daily Creates!  These are really fun.  Next week I want to do more than just two, I loved all of the ideas this week, but I chose to do Got milk? Another favorite breakfast beverage? Make a picture. Make it art.

Favorite Breakfast Beverage

and Describe the sky in a single sentence without using any color words.

sky_tdc

(This is a cropped screenshot of my submission.)

______________________________________________________________________________________

Building the site has gone pretty well.  The one snag I’ve hit is part of the template isn’t properly supported in Firefox.  All of the posts are supposed to have a circle on the front page, but in Firefox the posts with pictures that are the featured image (no way to get rid of this) the circle doesn’t appear unless you hover above it.  It just looks like a blank space unless the mouse is over it.  Annoying.  I am still trying to figure out how to change this…in the CSS?…because I have seen this template in a few other places and it looks perfect.  I am working on this piece of the puzzle.

I really think the site looks like ME.  Style-wise.  Simple, clean and fun at the same time.  LOVE.

I have made a welcome site, the header on the right connects it to this site.

I am going to start putting my daily creates in one post a week I think, I need to get them organized in some fashion or another.

______________________________________________________________________________________

Time for me to get down to business.


Let the Gif[ing] begin

I’m going to be honest from the start and say that I had no idea what a gif was. Well, after googling it, I realized what it was, but I didn’t realize that’s what those things were called.

Am I confusing anyone out there? Well just hold on and I’ll explain more about these gifs in a minute.

So this week in ds106 we have our first official digital storytelling assignment, “Say it like the Peanut Butter.” Say What? I’m still not sure how the title of the assignment goes with the whole gif thing… but I digress.

Anywho, so we were to take a scene from our favorite or least favorite movie(s) and create these animated gifs. The first step for me was to download Gimp, and MPEG Streamclip. I also downloaded fastest youtube downloader, but found it to not work as quickly as I wanted/needed it to, so instead I downloaded my Youtube videos with KeepVid.

Next up was to decide on which movie(s) to make my gif out of. I decided on Pitch Perfect. I knew that I wanted to use Fat Amy’s “horizontal running” and found this youtube video.

Honestly I’m not thrilled with how this Gif turned out, but since I’d never done it before, I tried not to stress to much over it.


Pitch Perfect Horizontal Running fat amy11


Next I decided to give The Lion King a chance and see what I could do with that. Sidenote: I am obsessed with the broadway version of The Lion King! I’ve seen it three times (2 times off-broadway) and seriously I could watch it a million times more. So I chose this video, which focuses on the famous “Hakuna Matata” song.

If you all remember, Pumba is a little “smelly” so here he is at the watering hole.

Hakuna Matata(English) 01 I’m going to work on some more because they are really fun to make. I had some slight difficulties, but by watching tutorials and using the ds106 handbook I feel like I was successful in this first assignment.

I do want to learn how to add wording into the gifs, so that will be the next task!

Gimli

gimliDon’t toss the dwarf

Week 2 of Boot Camp Summary

Who has two thumbs and made it through digital storytelling boot camp? THIS GIRL!!!! Oh yeah!!!.. Ok, that’s enough.

This week, I learned a lot about Word Press and blogging. I would be lying if I said that it was all easy. I set up my very own email through word press – which is very cool. If you would like to email me, you can  – – [email protected] {when you email me there it forwards to my gmail account; and yes, it works!}. My blog is listed with all of the other class blogs. That’s me right there, lucky number 13!

blog list

Also, this week, I got to customize my blog. Boy oh boy did I have fun with this. I think I spent more time on deciding between the different blog layouts and colors than I did any other homework assignment this week {shhhh! don’t tell anyone!} Customizing my blog was very easy. All you had to do was install and activate the theme of your choice. I did this about 52 times. So believe me, it doesn’t take long and was very simple. I love everything about the theme I chose. I love the colors, font, header, everything!

I also got to do this exact same thing for my welcome site. I created that by installing another Word Press. On that blog, I uploaded my own background and header images. I did this because I didn’t want to use the same theme as I did for this blog and no other themes really appealed to me. From my welcome site, you can get to this blog by clicking the ‘DS 106 Blog’ Menu. It took me a while to figure out how to link the 2 sites, I found a tutorial video on YouTube. You can watch it {here.} I hope to build more on this site later on this semester. Right now this site just has a link to my DS blog and the about me page, which is also on my DS blog. I would like to actually start blogging on that site and still have a link to my digital storytelling site. I found out that I like to post blogs and I think that would be relaxing and enjoyable.

I installed 3 plugins; Akismet, Jetpack, and Awesome Flickr Gallery. I browsed through the other plugins and got overwhelmed because there were so many!! Installing these 3 plugins was very easy, the only one that took a little time was Akismet just because you need a key code. BUT, that is worth it because that plugin catches spam! Installing widgets is also another task we had to complete this week. You can do this right on your dashboard through Appearance -> Widgets. It’s very simple to drag what widget you want over and click save!!

This week’s Daily Creates (DC) were very fun!!!!! I had so much fun creating them :) I am looking forward to all of the other DC this semester. I blogged about the DC that I chose to do for this week. You can read about them and see them {here!} The DCs that I chose didn’t take long at all, although maybe that was because I knew exactly what to do the moment I read the prompts.

OK- here it goes. The moment you have all been waiting for………………………………………my animated GIF:

lionking

The assignment was Say it like the peanut butter {to create an animated GIF from your favorite, or least favorite movie}. Well I have two favorite movies: The Hangover {which I already used for one of my DCs} and The Lion King. So, I chose to do The Lion King because I wanted to spice my assignments up and not show favoritism. This GIF is when Simba and Nala are singing “I Can’t Wait to be King”. I chose this specific clip because it looks like those lion cubs are playing peek-a-boo, and I just couldn’t resist. I know you know this song, it’s ok – you can sing it to yourself….

Creating this GIF was the hardest thing I have had to do in this class so far. There was one point when I thought “I’m not going to make it through boot camp”. Well, I did {so take THAT ds boot camp!!!!!}. I started by downloading the Fastest Youtube downloader, because that’s where I found the video. Then I downloaded the MPEG Streamclip. Both downloads were fairly easy and free {and who doesn’t like free stuff?!}. I downloaded my clip and thought everything was going as smooth as can be when suddenly, I ran into a problem. I DIDN’T HAVE QUICKTIME. So I thouht that would be another easy download…wrong. It was very annoying stressful. I had to delete my iTunes even and start fresh. That’s when it worked. I was so happy when I got it to work, that I watched it over and over and was happy. Now, since I have been writing this post and the clip is embeded into my post, I have seen it out of the corner of my eye play roughly a thousand times. Still happy because it took a lot of time to create and I am on proud bug.

Now that I am a graduate of DS boot camp {wahooo}, I can go on to bigger and better things {specifically, week 3 and on}. Overall week 2, and boot camp as a whole, was challenging but I never gave up! During this week, I figured out how to do things on my own. When I needed help, I watched many tutorials and read many how-to directions. Although boot camp was challenging, it was also rewarding because I see the finished product immediately.

Again, I will say: TAKE THAT BOOT CAMP!!! See you later alligators! :)


bibbidi bobbidi gif?

Cinderella's makeover inspired me to re-vamp my website!

Cinderella’s makeover inspired me to re-vamp my website!

Well here it is in all of it’s glory! A GIF done by yours truly. This weeks assignment to create a GIF from your favorite movie proved to me more of a challenge than I thought. This week I was inspired by the magical aspects of Disney movies, because every princess needs their fairy godmother. There is no doubt about it that my favorite Disney princess is Cinderella (don’t get me started on Snow White because she is the worst) so I figured I would do a GIF from the classic Cinderella. After spending about 2 hours longer than I should have on redecorating this blog (it’s gorgeous isn’t it?), I was inspired to do the scene where Cinderella gets transformed before going to the ball.

How did I do this? With lots of cursing and in my opinion some magic of my own. I lost the battle between my computer and downloading MPEG Streamclip. Whenever I tried to download it, my computer would open it in a zip file, which caused Internet Explorer to happen, and for some reason when Internet Explorer is opened on my computer it is an infinite loop of windows being open and I have to turn off my computer to make the madness stop (much to my father’s dismay). So, as per the suggestion of my temporary fairy godfather, I came across the program iLivid and did some exploring at the ball. The video was much longer than the clip I desired but could not seem to find a way to shorten it, but I did find a way to loop it. From there I very tediously clicked the frame by frame and took a screenshot of every frame within the loop. It was only 4 seconds worth of frames, so I may be being a bit dramatic (but what princess isn’t?). Once I had all the frames saved, it was easy as pie! Going into GIMP I opened all of my frames as layers and hit filters -> playback. Looks like the ds106 handbook will certainly be another magical figure in my fairy tale to be.

GIFs? I’M GONNA WRECK IT!

So I went a bit overboard on the gif ship.

For Week #2′s assignment, I had to create a gif that captured the essence of a key scene from my favorite movie.

AHH FAVORITE MOVIE?!

That’s such a monumental decision I’d have to make. What if I pick the WRONG ONE?!

After that moment of crisis, I decided on Wreck-It Ralph (2012). Since his movie is the theme of my building right now (I’m a Resident Assistant), I figured he’d be perfect.
So this is my first gif I’ve ever created and it’s from this trailer here. I used Fastest YouTube Downloader to download the video, MPEG Streamclip 1.2 to cut the video and create an image sequence, and finally GIMP to put it all together and create a gif.

SO PROUD! Not only is it my first gif, but it also has a seamless repeating pattern!

I wanted to do more, though.

While I like this one, it’s animated/based on a video game which uses far fewer frames than a real-life movie.

So I challenged myself to go one step further. The next few gifs are what I came up with using the same programs. These are all from Watchmen (2009) and this trailer in particular. As you can tell, I started to play with the scale and size of each file.

I loved the subtlety of this one. You barely notice it’s even moving. 


This scene is just asking to become a gif. 


I originally picked this scene hoping that it would be one of those endless/seamless ones, but I still liked the way it turned out.


But then I wanted to add words…

So I researched how to do it and found that Adobe Photoshop CS6 was the way to go.

I then used the Fastest YouTube Downloader again to fetch this trailer for The Hobbit (2012).

This was by far the hardest thing yet.

I couldn’t figure out how to make the text flash between layers. After many failures and a little break from the computer, I found that by clicking on a certain frame in the Timeline panel, I could then change the visibility of the text layer and it would only affect that particular layer. If you are unfamiliar with layering in CS6, the text layer must be above the layer for it to show up on the particular frame/layer you want it to.

But then I ran into another problem. The text layer would show up, but it wouldn’t have the blending effects (the white outline). I’m not sure if I fixed this in the “right” way, but I just duplicated the text layer so it would go above each layer. Very time consuming. Later, I will look up on how to do this without wasting 5 minutes just duplicating layers, and I’ll post how I figured it out.


I’m not sure I like static text as much, but since I’ve seen this gif so many times on various sites, I wanted to try to recreate it. I’ll always take a challenge!


And as a disclaimer, I think all scenes capture the essence of a scene. But if I must select one for THIS particular assignment since it also said for the movement to be minimal, I would pick this subtle Watchmen one.