Paige the psych student life in 5 gifs

(Heads up: apparently I have ugly hands and can’t make a bed.)

Anyways, this isn’t about me, this is about Paige the psych-major-turned-RN. She is my main character for my final project and as a RN these are her duties: laundry, making bed, doling out medication, making meals, and bathing her patient. Not in that order.

So first you need to record on your phone (or other camera) whatever you want to capture.

Then you need to upload your recording onto Youtube.

unnamed

Once it is on Youtube, you can get the link and paste in into the Browse box on GIPHY.

p111

Once you put the link into the Browse, it will automatically load the video.

p222

After it loads, you can make the loop as long or as short as you want, as well as change the start time.

p333

Then when you are finished editing, you can create your Gif!

p4445

When it is finished loading, you can right click and save as!

p444

A sneak peek into Paige’s life!

giffgipgiphypoo


giphygifgiphy

To Inspire Some Hope

For the visual segment of my final project, I was inspired by this assignment to remix President Obama’s famous campaign photo. His says “Hope” and mine says “Identity” because my story deals heavily with issues of identity. I also wanted to do a mixture of the American and Panamanian flag as my background, as those are the two identities in question, instead of the plain blue background in the Obama poster.

Barack_Obama_Hope_poster

I remember when the Obama poster came out, it was such a momentous moment in history. Not only because he was going to be the first black president but also he used the same illustrator for Obey. It was the first time a president was actually appealing to younger demographics and voters by creating media and supporting artists that created content for the youth. I thought it was a great move and it created this iconic poster.

ameriflagprint.gif.html

Though mine is obviously different, I think it gives the same vibe as the Obama poster it was inspired by. Anyways, I created this poster using GIMP. I first took the image I wanted of myself and cut just my head and shoulders from the photo.

gimp

I cut it out and save it. Next, I take two photos I found on the internet of the Panama flag and the American flag. I insert one at a time, first the Panama flag…

panama

Then using the Move tool, I move it to the side and do the same with the American flag. This makes it one half American flag and one half Panamanian flag.

flags

Then when I have the image of the flags together, I insert the photo of my head and shoulders. I add font to the bottom saying “Identity” in the font Arial Black, Heavy. Next I use the Mode toolbar to alter the Color of my head/shoulder layer and set it to red.

plez

This assignment really added to my storyline because I wanted it to have a personal element to it and I instantly thought of the Obama poster and it happened to work well with my idea.

ecMopekcn

Can You See What I See Tutorial

The full assignmentĀ is linked andĀ is listed in its entiretyĀ below:

Find or take a photo of an eye. Take another image of whatever you want, and overlay the image onto the eye. Make the image in the eye smaller so that it looks like a reflection in the person’s eye. Turning down the opacity of the image in the eye helps give a reflection sort of look. Let us see what the person in the photo is seeing through their eyes.

This assignment is worth 3 stars.

The first step of creating this assignment was to find a picture of an eye and find a picture of the subject to place inside the eye. For my project, a picture from UMW’s campus was my subject. The picture I used is a picture of Monroe. Both images were found on google.

Credit for photo of the eye can be foundĀ here.Ā 

Credit for the photo of UMW can be foundĀ here.Ā 

I then uploaded the picture of the eye ontoĀ Canva.comĀ and clicked create a new design.

Screen Shot 2016-07-19 at 3.46.52 PM

Screen Shot 2016-07-19 at 3.49.14 PM

I cropped the image of the eye to focus more on the pupil and not the whole eyelid. When scanning over the image, a tool bar pops up and you are able to click crop.

Screen Shot 2016-07-19 at 3.50.19 PM

I opened the elements tab to search for a shape to put over the eye. I picked one that allowed me to place another picture inside of the shape. I chose a circle to fit directly into the pupil.

Screen Shot 2016-07-19 at 3.53.46 PM

I stretched the size of the shape to cover the majority of the pupil.

Screen Shot 2016-07-19 at 3.55.42 PM

I dragged the image I chose into the shape. I resized the image to make the building in the center a larger portion of the picture in the eye.

Screen Shot 2016-07-19 at 3.57.18 PM

By clicking the arrow in the right corner of the tool bar that appears, I then clicked transparency. I moved the level to make the image of the building fade into the eye. I was not fully pleased with the edges of the picture inside the eye so I uploaded it toĀ Pixlr.com.

Screen Shot 2016-07-19 at 3.59.05 PM

I used the blur tool in the left toolbar menu to blur the edges of the eye. This did not fully blend the edges. I then used the spot healer tool to further blur the edges of the eye.

Screen Shot 2016-07-19 at 4.06.36 PM

I used the sharpen tool to enhance the image of the building behind the eye. There was a spot in the eye with a big white spot reflecting in the middle. I used the color picker tool to grab the color next to the area and then the bush tool to go over the spot. I had to turn the opacity down to about 50% to lightly cover the area and not change it completely.

eye finished

I saved it from Pixlr and here is my final product!

INTE 5340: Week Seven

Daily Create

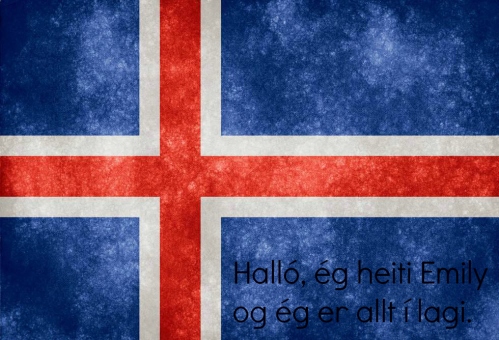
TDC 1651: Introduce Yourself in a Language You Do Not Speak. Dedicated to my upcoming trip to Iceland, I present to you my introduction in native Icelandic.

iceland-flag-wallpaper.jpg

DS106 Visual: SimplicitƩ

IMG_1815.jpg
Welcome to my third and final DS106 visual assignment, Back to Basics.

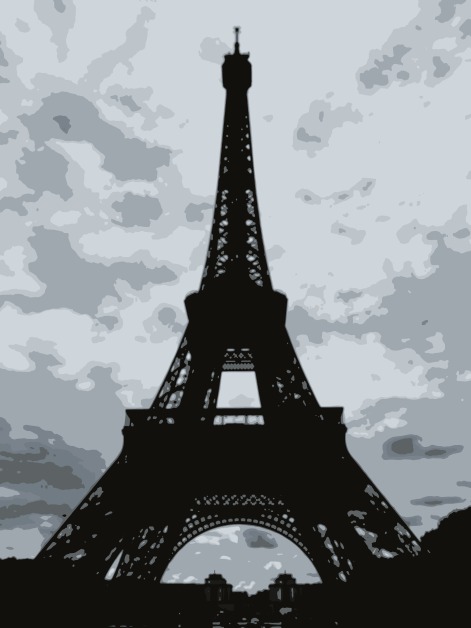
ā€œChoose a photo of anything that you want to make a stencil out of using Photoshop or some other editing software. Using your software, remove the color and make the image appear to be a stencil instead of an actual photo. Take notice of how this changes the focus of the image.ā€

The ProcessĀ 

Step 1: Go to Paris.

Step 2: Go to Eiffel Tower.

Step 3: Take picture of Eiffel Tower.

Step 4: Edit picture of Eiffel Tower using PicMonkey. Today, I used a posterize effect, bringing the colors of my image down to just eight shades of grey (not a far cry from fifty, now, is it?!!?!) and quite a lot less detail than the original.

The Story

So you’ve probably heard it from everyone who has visited the city, now including myself. Paris is really, really gross. But the architecture is stunning, and somehow, this watercolor-style rendition of the Eiffel Tower reminds me of an older, simpler Paris. Actually, I’ve heard that Paris has always been gross, but whatever, it doesn’t look like it here. You can’t see any of the trash on the lawn, or smell the sewage from the street, or hear the famous French sirens as they change pitch with the Doppler effect. No, this picture in greyscale looks almost like a newspaper, or like those paperback books I used to read all the time as a kid before the famous Kindle for iPad app came out. And you have to admit, those books are like the rain—you won’t find a person who doesn’t like the smell of them. Now if only Paris could smell like that too!

Ā© Emily Joan Wu

Teacher Candidate | Math
University of Colorado Denver
INTE 5340 | Summer 2016


You Probably Can’t Scan This At The Supermarket

I created my own assignment! It is the Movie Bar Code assignment in the visual section of the DS106 Assignment bank. I just wanted to make a quick tutorial because I know it seems a little daunting at first but it is really not hard when you get down to it. I’ve made one myself of a french animated film called Fantastic Planet for another class and it took me no more than 30 minutes to complete.

thumb-1

So for my example, I chose the old German silent movie The Cabinet of Dr.Ā CalgaryĀ which I downloaded from YouTube. I suggest you don’t use a movie that has subtitles because it might create a white line near the bottom of the bar code, but the choice is still yours. I downloaded my video using KeepVid.

first

Next create a folder on your desktop where you can put all the image frames. Import your video/movie into Streamclip.

second

Next click File from the toolbar at the top and select Export to Other Formats.Ā 

third

A window should pop up and at the top you should select Image Sequence for the format. Go down to the Frame Rate and enter .2. Select 480×360 for Frame Size. Click OK at the bottom but be sure that you select your file for the image files’ location.

fourth

It should start generating and look like the picture above. The image files should start popping up in your folder.

fifth

Next step, go to Professor Zach Whalen’s image generatorĀ and under Step 1, choose the option “Select a folder of image files”. As it outlines, you need to be on a Chrome browser.Ā Select your file and all of the images within them (there should be a lot).

sixth

Under Step 2, leave the Canvas Width and Height as it is, but feel free to use the Smoothing tool. It makes the bar code less choppy looking. I selected the 10 option or “a bit more”. Now hit Apply Settings. Watch your image get generated in real time and then, when it is finished, either save the file or drag it over to your desktop. Voila! Your own movie bar code!

Creating Instant Replay with Windows Movie Maker

4 Stars Assignment

Click here for assignment webpage

YouTube video where the clip has been taken from:

I love pets. Back home I have got a dog and a cat. Yes, both of them live under the same roof in peace and harmony :). I have been looking at the video assignments to select one that I would love to try. I looked at the instant replay assignment and I thought why not make an instant replay of a clip from one of the dog shows that I already have on my computer hard disk. So I selected this clip from the Freestyle Flying Disc Winner – 2016 PurinaĀ® Pro PlanĀ® Incredible Dog ChallengeĀ® Eastern Regionals video. I usually watch video by Dog Challenge Eastern Regional. All the dogs and their owners are really amazing. They give it their best shot. There has to be a winner of course but I consider most of them winners as the winning point margin is not that much greater. Ā I really like the dog moving backwards towards his owner, therefore I made an instant replay of that specific part of the video. In the following, I have discussed the different steps that I took to make the video instant replay with Windows Movie Maker.

Here is the video clip with an instant replay:

Step 1

1

I opened the Windows Movie Maker and saved the project to my hard disk.

Step 2

2

I added the video clip by clicking the ā€œAdd video and photoā€ button.

Step 3

3

I was going to make an action replay of the video part starting at 11th second on the video timeline. Therefore I clicked on that part on the video timeline and then right clicked in the video to split the video at 11th second.

Step 4

4

I clicked on the video part I wanted to make an action replay of and then from the ā€œVideo tabā€ reduced the speed to 0.5 of the original speed.

Step 5

5

I downloaded a music clip from Free Music Archive and added it to my project. There are many audio effects that can be added to the video from the “Audio tab”. I added a slow fade out audio effect to make the audio smoother.

Step 6

6

I added a title slide to the video from ā€œTitleā€ on the ā€œHome tabā€.

Step 7

7

I added Credit slides to the end of the video from ā€œCreditsā€ on the ā€œHome tabā€. I added different credits as can be seen at the end of the video.

A guide on opening and closing credits is available here on BBC Website

Step 8

8

I saved the prepared video for YouTube from the ā€œFileā€ drop down menu. Video can be saved with different formats depending on what you need it for.

The post Creating Instant Replay with Windows Movie Maker appeared first on TaractarOnline.

This Is Awkward…

I wanted to switch thisĀ assignmentĀ up. It called for a mashup of clips from a period piece, so I decided to do a mashup up of a modern piece of film instead. The movies I used clips from were Mean Girls, The Vow, and Dear John, all of which have the actresses Rachel McAdams and Amanda Seyfried in them. I decided it would be funny to mash it all up to create a dramatic love triangle scenario between their characters and the steamy dreamboat: Channing Tatum.

78b5247d312fbedeeb5ff11071028630

I was inspired from this meme I saw on Tumblr once. If you’ve ever seen Mean Girls, you will get this hilarious reference to Gretchen Weiners. I think it is so weird that they used Channing Tatum in two romantic dramas (or chick-flicks, if you will) back-to-back like this. If I remember correctly, they came out not too far from each other. They’re both super mushy, cry-your-eyes out movies but they used two girls who famously played together in Mean Girls. Were we not supposed to notice?

How I made this video was pretty easy peasy. I downloaded clips from YouTube using KeepVid. I found the segments of all of the movies from trailers and other compilation videos on YouTube.

Screen Shot 2016-07-12 at 6.38.48 PM

Then I imported the clips onto my iMovie application. I cut out the clips I wanted and inserted them in the perfect spots. I edited text over the segments using the title slide feature. The sound effect I used was called “Record Player Scratching”. It’s one of the generic sound effects that come with the program. The music I added was Bad Blood by Taylor Swift but I reduced the pitch to avoid any copyright issues on YouTube. I did that by selecting the song in the editing bay and manipulating the audio effect option.

Screen Shot 2016-07-12 at 6.39.19 PM

I wish I had the physical copies of The Vow and Dear John because then I would have more access to specific scenes I may have wanted to include, but I had to work with what YouTube had. I think for those constraints I did well in this assignment. Hopefully, I conveyed the joke of the situation that the meme above had got me thinking about. Even if you’re Regina George and Karen Smith, you shouldn’t have to share your boyfriend with your best friend!

Assignment Rating:

four-star-review

INTE 5340: Week Five

DS106 Mashup: Gears of Mario

ge01-gears-of-war-cover_copy (1)
Welcome to my DS106 mashup assignment, Video Game Cover Mashup.

“Take two existing video game covers and mash them up so that both can be identified but in a different style. Try to be creative in the title and artistic design.”

The Process

Wouldn’t this be an awesome game to play?! I know that this week’s DS106 assignment was supposed to explore our chosen theme, and video games are hardly related to photography, but I did have to manipulate photos! So in my opinion, it counts! First, I downloaded a picture of the Gear of War cover, featuring Marcus Fenix in the foreground, with Ben Carmine and Dom Santiago in the background. Using the retouch tool in the Photos app on my Macbook, I photoshopped them out, along with the ā€œWarā€ in the title. Then, I looked up some pictures of the Super Mario logo, along with Mario and Bowser, and overlaid them onto the new cover using PicMonkey! It didn’t take too long at all, and I was able to accomplish it without anything too fancy.

The Story

Super Mario 64 was my favorite video game as a child, and still totally my favorite now that I bought another Nintendo 64 after my parents so graciously ā€œdonatedā€ my old one because I’d gotten ā€œtoo oldā€ or something. Anyway, Gears of War was also my favorite video game series as I got older and into high school and college, and both my Nintendo 64 and old-school XBOX 360 are sitting in my basement, ready to be played as soon as I’m done blogging about this. I haven’t been able to touch them for almost a year because I’ve either been out of town or too busy. Or too cold. Mostly that. Basements are chilly!

Anyway, I like video games, especially the simpler ones like Super Mario and Gears of War because they keep me thinking on my feet and help me adapt to lots of situations. I’ve always found that if I play video games regularly for a while, I get a little bit more street smart. Sometimes I’m prone to overthinking because I have too much of the book smart and not enough of the street smart, and then I just shut down because I never know what to do and it’s super not cool. Video games get a lot of flak from society because they’re supposedly bad for you, but recent studies have shownĀ that they can actually be really beneficial for your cognitive development. Basically, they can help you improve your spatial perception, visual skills, hand-eye coordination, reaction time, ability to overcome challenges, and overall brain growth. Hear that, fellow gamers? Video games are good for you! No need to tell me twice. See you all later! I’ll be busy swinging Bowser by his tail and taking out Locusts with my chainsaw bayonet.

Ā© Emily Joan Wu

Teacher Candidate | Math
University of Colorado Denver
INTE 5340 | Summer 2016

Your very own spubble

with chat bubble

Assignment details at:

http://assignments.ds106.us/assignments/your-very-own-spubble/

This is photo of me from one my travels. I am not that much of a travelling person and do not enjoy travelling a lot. But in this photo you can see that I am happy and enjoying. Actually I met one of my childhood friend after a long time in Mauritius unexpectedly. I had a great time and believe it was kind of my lucky day. My body language is one of a person who is the happiest person in the whole world. I would love to see more friends unexpectedly on my future travels, if any.

The post Your very own spubble appeared first on TaractarOnline.

Gaga on heaven’s gate

Gaga on heavens gate

Assignment details available at:

http://assignments.ds106.us/assignments/pop-star-out-of-place/

Lady Gaga is one of the best and fascinating pop star of the present times. She has been has come up with unique song videos. These videos provide the lyrics a unique meaning which are really different than the literal meaning in my opinion. I designed this image with Photoshop. I was searching Lady Gaga’s photos and came across her picture as an angel. I thought that angels need to be in heaven and this is where I decided that I will use the heaven’s gate as her ultimate destination. So I used the heaven’s gate as a background and then used the magic want feature of Photoshop to crop out Lady Gaga angel photo from a stage performance and put it on the heaven’s gate. I hope you like it.

The post Gaga on heaven’s gate appeared first on TaractarOnline.