For this visual assignment I’ve taken an up close picture of an item. My task for you who is reading this is to leave you answer in the comments. Once someone gets it right I’ll update this post and let the rest of you know.

What could it be?!


For this visual assignment I’ve taken an up close picture of an item. My task for you who is reading this is to leave you answer in the comments. Once someone gets it right I’ll update this post and let the rest of you know.
What could it be?!
The first year of college was quite the experience. It was such a different type of environment that my friends and I were open to almost any idea. It was around the time of our first college midterms, my friends and I were starting to feel the pressure and stress that so many college students talk about. Naturally, we thought with all that studying comes some well deserved study breaks. The only problem was what could we possibly do in Fred.? As freshmen we weren’t allowed to have cars, so we couldn’t go anywhere, but we didn’t want to stay on campus either because it was a ‘cabin fever’ type of situation. After assessing the situation we all decided to Uber to the river and take pictures. This adventure was not supposed to be a photoshoot, but it certainly became one.
Reminising on this experience, as a broke college kid it probably wasn’t the brightest idea to waste seven dollars on an Uber to the river… in the middle of winter. Furthermore, the pictures we took were ridiculous, but the people made it worthwhile.

The production of this photos add-ons involved this website. Below are instructions on how to recreate the text bubbles in the image above.
Step1:Go to the Aviary website and click on ‘edit your photo’

Step 2: Drag your photo into the box

Step 3: Select the icon that says ‘stickers’ on the header
Step 4: Click on the signature option

Step 5; Select any of the four bubbles

Step 6: Once you have resized it and have the sticker where you want it click ‘apply’. Be sure to select ‘apply’ or the bubble will be deleted
Step 7: Go back to the header and scroll over once. Select the ‘text’ icon
Step 8: Once you have the perfect caption make sure to resize the text and place it inside the bubble. After that select ‘apply’.
Step 9: Once you’ve finished, hit ‘save’.

Step 10: After you save your image Aviary will give you the option to download the photo

Link to assignment is tagged above in ‘Visual Assignment #5’
For my final visual assignment I chose Switch Up The Mood, worth 2 stars.
Change the mood or tone of a photograph by altering the contrast, brightness, hue, saturation, exposure, etc. You do not have to change all of those things about the photo, but you can if you would like to. Experiment. Don’t be afraid to take it to the extremes, and don’t be afraid to be subtle.
This assignment jumped out to me again because of the featured picture. I also want to work more in GIMP to try to familiarize myself with the software. I expect to be using GIMP to alter images for daily creates in the future so I chose this as another chance to practice.
I like to edit pictures for Instagram as well, and can spend upwards of an hour editing just one picture. I thought this would be a nice assignment to end the week on, because editing photos is relaxing to me. It has also always intrigued me how with simple color changes in a photo how it changes the whole feel of it. I guess put simply, it switches up the mood.
The Original Photo

The Mood Switch

I chose a picture with a neutral mood to it because I wanted to see how different I could make it, and I feel like making a picture of people smiling a different mood is more difficult. In this straight-faced picture I was happy, but my goal was to make the picture seem sad.
I started by importing my photo to GIMP. I first manipulated the color balance of the photo. I chose Colors > Color Balance and proceeded to adjust each color level. I did this for the Midtones and Highights sections. The main effect from this was removing the warmth from my skin, therefore making me seem less happy.

Next, I decreased the Brightness and increased the Contrast to make the overall appearance darker and less lively. Click on Colors > Brightness-Contrast and adjust the slider accordingly.

Finally, go to Colors > Desaturate. I chose the Average option because it gave me my desired “sad” effect.

Then Save your image, and you’re done!
I feel like the mood switches from a photo that emanates warmth and happiness to one that makes you wonder if the subject in the photo is alright.
Take a close up picture of something as see if people can guess what it is. Try doing the skin or outside of something that would make it hard for someone to guess!
The That’s Not What I Expected visual assignment (3 stars) grabbed my attention because of the cover photo it used in the description. I love photos where an ordinary object looks completely different because of an angle or how close or far away it is.

Although my photo isn’t the best quality (my iPhone can only do so much) I have never looked that closely at *SPOILERS AHEAD* whole black pepper kernels. I thought that even though it’s rather obvious what the picture is, it is still a new perspective so I stuck with this. Another part of this assignment is to have classmates guess what the photo is. I decided to post on my twitter asking people to respond, and I included the assignment tag and ds106. When people have responded to my tweet I will update this post linking to responses.
While there aren’t really any difficult instructions here is what I did:
While taking this picture I was searching my kitchen high and low for something unique that I could also get close to with my phone and have it still be in focus. All the while, my mom is taking a nap in the next room, so I had to be very quiet. I cannot say how many fruits, vegetables, and herbs I picked up and brought close to my lens testing to see if they would focus. None of them focused. I then tried to take an up close picture of a lit candle. Alas, I couldn’t get close enough to the flame for it to be a mystery without burning myself or my phone.
I was about to settle for an onion, when my eyes happened upon the pepper grinder. I thought “perfect!” and proceeded to to empty the whole kernels onto a paper towel. Mind you, my mom is still sleeping (she works very hard and deserves a nap every once in a while so I am trying to be quiet). After taking the picture I then had to return the pepper to its place. This was the hardest part of this assignment.
I am a very clumsy girl. Very. As I was shaping the paper towel into a funnel to expertly guide the pepper back into the grinder, I dropped them. Every last kernel scattered across the counter. I gasped. MOM! Don’t wake up! (Of course she didn’t wake up it was just a few pepper kernels) but to me, in our silent house, it sounded like several bombs had just gone off.
For my second visual assignment I chose Can You See What I See, worth 3.5 stars. I followed one of the tutorials already posted on the ds106 site. I used all the steps for canva.com, then I used GIMP instead of photoshop for the rest of the process.
I knew when I saw this assignment that I wanted to do it because I knew I had this picture of my eye that was perfect for the job, and I’m not too advanced with photo manipulation yet, so this seemed like a good project to get my feet wet.
Over winter break 2016 I visited the beautiful city of Savannah, Georgia. While my younger sister complained the whole time we were there (and mind you, we were there for her soccer tournament) I had a wonderful time and took so many pictures of the gorgeous scenery and buildings. We walked around town, took a trolley tour, did a ghost walk, met Forrest Gump, and marveled at the old buildings. One of my favorites was the oldest Reform Synagogue (in North America? The east coast? Savannah? I can’t remember which one). It was a very tall building with stately arches and big, heavy doors. It resembled one of the many churches around, save for a Star of David instead of a cross on it’s highest point.
I chose this photo to be the reflection in my eye because it really was the reflection there once, and it was awe inspiring to stand under. I wanted to replicate how I felt in that moment, standing under part of my history, in this picture.
After following the instructions for canva.com, open the image in GIMP. Then use the smudge tool to soften the edges of the image within the eye and swipe the cursor around to blend the two layers together.

The top of the image inside the eye overlapped my top eyelid, so I then used the dodge/burn tool and clicked a few times (not swiping like when using the smudge tool) over where the image overlaps the eyelid.

The dodge/burn tool made my eyelid lighter than I had anticipated, so I then used the smudge tool again and swiped over the lighter area to blend it with the rest of the eyelid.
Here are the two separate images that were used to create this assignment


Unblended Version

Final Version

I got my first spam comment from a porn blog today, y’all. I was holding off on making a spubble because I just didn’t know what I would caption, but holy moly, this was nasty. The bot wasn’t even trying to hide it. It literally had “pornblog” in the URL. I got online and saw that Akismet had blocked its first spam comment and I thought, “oh, I’ll check to see what it is, maybe it’s a real person’s comment that got blocked for some reason!” Nope.
My spubble is gonna be under the continue reading link, because the picture is extremely goofy looking.
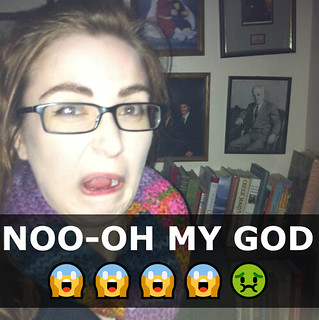
There are many pictures of me looking disgusted, since I’m a generally grumpy person, but this one from 2015 was the only one that could really get the job done. It’s not a particularly good picture for sure. The flash is on but there was something in front of the light, so it looks hazy. I’m in front of a bunch of family pictures and for some reason I’m wearing a winter coat and scarf indoors. I also just look weird as heck. But you know what’s also weird? Getting a freaking link to a porn blog on my post about pixel art. Come on, man. Bot. Botman! The spubble was 100% made in response to seeing the blocked spam comment. There are NSFW bots that follow me on other social media (I have no idea why or how) but this one really got to me, I guess since this is school-related. It’s like two worlds have collided and one of those worlds is really, really weird.
As for the Spubble itself, I went for more of a Snapchat-style caption with the translucent line for the text. So it’s less of a Spubble and more of a… Spline. A spine. I did crop the original photo, but only to take out some baby pictures of myself on the wall. There’s more than enough of my mug in this picture.
As with most of the stuff I’ve made so far, I did this in paint.net. My first step (as always, since I’m prone to mistakes) was to add a new layer to put the snapchat-esque text onto.
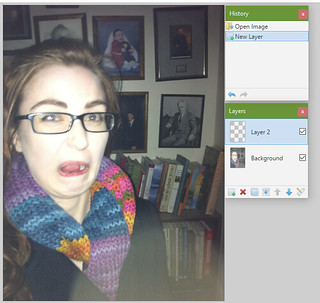
I’m very sorry that you had to see that face again. The next step was adding the translucent black line (which would go into Layer 2, the selected layer).
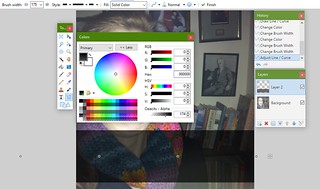
In the history box you can see that I’ve cropped the photo to its current resolution, then got started on the line. I also covered my dumb face with the color window! Nice!!! For the line, I set the opacity (in the color window, the very bottom right level) to 174. The number was pretty arbitrary, I just wanted something that was dark enough to frame some text but translucent enough to still show the photo beneath it. I knew wanted to make two lines of large text, so I made the line pretty big (175px brush width). Next is the text!
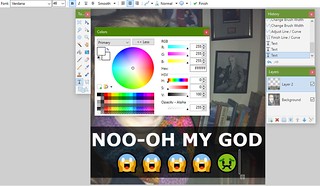
This was just plain old 46pt Verdana, bold, centered. The emojis I thought lent to the Snapchat feel.
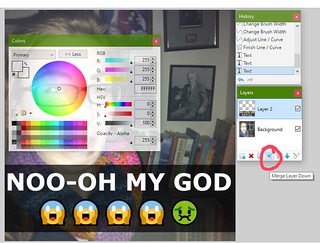
After that I just merged the two layers and saved. The bot is still out there botting, but at least I got to react in a way that was meaningful to me and hopefully a little bit funny.
Looking back on it now I wonder if going so intensely in the Snapchat direction was a good creative choice – I DEFINITELY hope nobody ever uses this picture for anything ever, but this format isn’t as widely understood or beloved as your classic lolcat “top text/bottom text.” Is it relatable, or does it still seem too much like something you’d only send your best friend when they tell you they stepped in dog poop?
Summer is the best season to fulfill bucket lists because many individuals travel and have more free time on their hands. My bucket list is extremely long, but here are a few of the things I want to do throughout my life…

When creating this assignment I used the website BeFunky. I created my own layout on BeFunky and proceeded to upload my images. The most difficult part was making sure each picture was equally visible by making sure that the layout was correct.
Link to assignment tagged in ‘Visual Assignment #4’
A bedroom can tell a lot about a person and since this is introduction week I thought this would be a great assignment to do. Below is a collage of my room, but since most of the pictures are small I’ll point out key items that I think contribute to the aesthetic of my bedroom…

My room is maily comprised of boho accessories for example I have multiple tapestries (top picture), an indian elephant statue with a buddha head beneath it (first picture on the left), a Himalayan salt lamp (third picture from the left), and lanterns. Another subtle ‘theme’ in the room is all the pictures and art I bought or took when I went to France. I designed my room this way because I just love the bohemian vibe. The colors that are used in the mandalas add pizzazz to the room, especially since the wall color is white. It just makes the room cozier and I wouldn’t change anything to it.
In regards to the production of the collage I used my phone camera to take the photos and I used the website BeFunky to make the collage. It was relatively user friendly and most of their collage layouts were free. The only negative about BeFunky is that the collage makes your pictures too small and you don’t want to blow up the picture because it can pixalate it, making it blurrier.
Grab a picture of yourself in which your body language, actions, gestures, etc. suggest one thing and then play off that using a speech bubble.
I had a photoshoot before I graduated high school, as many teens do. I decided to invite my best friends along because they were such a huge part of my high school experience it would seem wrong to commemorate high school without them included. I knew I would want to choose one of these pictures because they were good quality and we all looked really happy in them, so I thought it would be funny to make captions that made us seem not-so-happy.
We took the photos in Clifton, Va, which is a cute little rustic town not far from where I live. We had hired an up and coming photographer because 1- a friend had recommended her to us, and 2- her prices were low. When we got to Clifton it was a beautiful spring evening, so there was more than one photoshoot going on in town (think three different groups all trying to get the shot in front of one specific church door). So we had to wait. In the meantime we took pictures on the train tracks that run through town and after about half an hour, it still wasn’t our turn in front of the door (don’t worry we eventually got there and it’s a great door so it was worth the wait). The photographer had a few other ideas, one of which was to lay in the grass and take aerial shots. My friends and I all piled up and she directed us where to put our heads and all our overlapping limbs. I’m not going to lie; this picture was not fun to take.
They were all complaining and I was fed up because it was a privilege that they could be a part of my senior photos. I don’t mind smiling for the camera, but the rest of them aren’t as camera comfortable as I am, which made the situation worse. We were also all wearing white (except Lauren), which was a coincidence Lauren wasn’t too happy about, which made laying on the grass an even less pleasant experience. All in all, the pictures turned out great, but it was a real test of our friendships.
I used this website in order to create my “spubble.” It was very straightforward.
Step 1: Select your pictures and upload it

Step 2: Click the stickers button on the top menu 
Step 3: Select the signature collection

Step 4: Add thought bubbles to the photo. Resize and move them by using the arrows in the bottom right corner of the image while it is selected. Make sure to click apply after every change that is made!
Step 5: Click the back button to return to the main menu. Toggle to the right and click on text.

Step 6: Add text, just type in the box. Resize and move the text box just like images were moved! Choose a font and color that works for the photo, then move the text over the thought bubbles. Don’t forget to click apply!

Step 7: The apply button will turn to save after it has been clicked. Choose save and then download the picture. That’s it!
Here are the before and after pictures


You can find the original post and instructions here.
Game of Thrones is a show loved by many, including myself. With Game of Thrones season 7 coming out soon what better way to prepare myself than doing this assignment and creating my own house. The house I made was House Android. I decided to go with this idea because my family and I are team android, but everyone else I know usually is team Apple. When apple users tell me I should switch and get an iPhone I say no just because I’ve had an Android from the very beginning, so it would be hard to switch. However, when I ask Apple users why they don’t switch over some say it’s because everyone has an iPhone. This work is not about what company is better, but to serve as a reminder that it is okay to be different.

The house has an alien because the logo for Android is a little alien robot. Also because the phone logo that was available did not look like an Android. I created this assignment by using the HBO website. This site offers different differnt icons, backgrounds, and color schemes to make your personal crest. The hardest part of this assignment was choosing the idea.