Week 2 of Boot Camp Summary

Who has two thumbs and made it through digital storytelling boot camp? THIS GIRL!!!! Oh yeah!!!.. Ok, that’s enough.

This week, I learned a lot about Word Press and blogging. I would be lying if I said that it was all easy. I set up my very own email through word press – which is very cool. If you would like to email me, you can  – – [email protected] {when you email me there it forwards to my gmail account; and yes, it works!}. My blog is listed with all of the other class blogs. That’s me right there, lucky number 13!

blog list

Also, this week, I got to customize my blog. Boy oh boy did I have fun with this. I think I spent more time on deciding between the different blog layouts and colors than I did any other homework assignment this week {shhhh! don’t tell anyone!} Customizing my blog was very easy. All you had to do was install and activate the theme of your choice. I did this about 52 times. So believe me, it doesn’t take long and was very simple. I love everything about the theme I chose. I love the colors, font, header, everything!

I also got to do this exact same thing for my welcome site. I created that by installing another Word Press. On that blog, I uploaded my own background and header images. I did this because I didn’t want to use the same theme as I did for this blog and no other themes really appealed to me. From my welcome site, you can get to this blog by clicking the ‘DS 106 Blog’ Menu. It took me a while to figure out how to link the 2 sites, I found a tutorial video on YouTube. You can watch it {here.} I hope to build more on this site later on this semester. Right now this site just has a link to my DS blog and the about me page, which is also on my DS blog. I would like to actually start blogging on that site and still have a link to my digital storytelling site. I found out that I like to post blogs and I think that would be relaxing and enjoyable.

I installed 3 plugins; Akismet, Jetpack, and Awesome Flickr Gallery. I browsed through the other plugins and got overwhelmed because there were so many!! Installing these 3 plugins was very easy, the only one that took a little time was Akismet just because you need a key code. BUT, that is worth it because that plugin catches spam! Installing widgets is also another task we had to complete this week. You can do this right on your dashboard through Appearance -> Widgets. It’s very simple to drag what widget you want over and click save!!

This week’s Daily Creates (DC) were very fun!!!!! I had so much fun creating them :) I am looking forward to all of the other DC this semester. I blogged about the DC that I chose to do for this week. You can read about them and see them {here!} The DCs that I chose didn’t take long at all, although maybe that was because I knew exactly what to do the moment I read the prompts.

OK- here it goes. The moment you have all been waiting for………………………………………my animated GIF:

lionking

The assignment was Say it like the peanut butter {to create an animated GIF from your favorite, or least favorite movie}. Well I have two favorite movies: The Hangover {which I already used for one of my DCs} and The Lion King. So, I chose to do The Lion King because I wanted to spice my assignments up and not show favoritism. This GIF is when Simba and Nala are singing “I Can’t Wait to be King”. I chose this specific clip because it looks like those lion cubs are playing peek-a-boo, and I just couldn’t resist. I know you know this song, it’s ok – you can sing it to yourself….

Creating this GIF was the hardest thing I have had to do in this class so far. There was one point when I thought “I’m not going to make it through boot camp”. Well, I did {so take THAT ds boot camp!!!!!}. I started by downloading the Fastest Youtube downloader, because that’s where I found the video. Then I downloaded the MPEG Streamclip. Both downloads were fairly easy and free {and who doesn’t like free stuff?!}. I downloaded my clip and thought everything was going as smooth as can be when suddenly, I ran into a problem. I DIDN’T HAVE QUICKTIME. So I thouht that would be another easy download…wrong. It was very annoying stressful. I had to delete my iTunes even and start fresh. That’s when it worked. I was so happy when I got it to work, that I watched it over and over and was happy. Now, since I have been writing this post and the clip is embeded into my post, I have seen it out of the corner of my eye play roughly a thousand times. Still happy because it took a lot of time to create and I am on proud bug.

Now that I am a graduate of DS boot camp {wahooo}, I can go on to bigger and better things {specifically, week 3 and on}. Overall week 2, and boot camp as a whole, was challenging but I never gave up! During this week, I figured out how to do things on my own. When I needed help, I watched many tutorials and read many how-to directions. Although boot camp was challenging, it was also rewarding because I see the finished product immediately.

Again, I will say: TAKE THAT BOOT CAMP!!! See you later alligators! :)


bibbidi bobbidi gif?

Cinderella's makeover inspired me to re-vamp my website!

Cinderella’s makeover inspired me to re-vamp my website!

Well here it is in all of it’s glory! A GIF done by yours truly. This weeks assignment to create a GIF from your favorite movie proved to me more of a challenge than I thought. This week I was inspired by the magical aspects of Disney movies, because every princess needs their fairy godmother. There is no doubt about it that my favorite Disney princess is Cinderella (don’t get me started on Snow White because she is the worst) so I figured I would do a GIF from the classic Cinderella. After spending about 2 hours longer than I should have on redecorating this blog (it’s gorgeous isn’t it?), I was inspired to do the scene where Cinderella gets transformed before going to the ball.

How did I do this? With lots of cursing and in my opinion some magic of my own. I lost the battle between my computer and downloading MPEG Streamclip. Whenever I tried to download it, my computer would open it in a zip file, which caused Internet Explorer to happen, and for some reason when Internet Explorer is opened on my computer it is an infinite loop of windows being open and I have to turn off my computer to make the madness stop (much to my father’s dismay). So, as per the suggestion of my temporary fairy godfather, I came across the program iLivid and did some exploring at the ball. The video was much longer than the clip I desired but could not seem to find a way to shorten it, but I did find a way to loop it. From there I very tediously clicked the frame by frame and took a screenshot of every frame within the loop. It was only 4 seconds worth of frames, so I may be being a bit dramatic (but what princess isn’t?). Once I had all the frames saved, it was easy as pie! Going into GIMP I opened all of my frames as layers and hit filters -> playback. Looks like the ds106 handbook will certainly be another magical figure in my fairy tale to be.

GIFs? I’M GONNA WRECK IT!

So I went a bit overboard on the gif ship.

For Week #2′s assignment, I had to create a gif that captured the essence of a key scene from my favorite movie.

AHH FAVORITE MOVIE?!

That’s such a monumental decision I’d have to make. What if I pick the WRONG ONE?!

After that moment of crisis, I decided on Wreck-It Ralph (2012). Since his movie is the theme of my building right now (I’m a Resident Assistant), I figured he’d be perfect.
So this is my first gif I’ve ever created and it’s from this trailer here. I used Fastest YouTube Downloader to download the video, MPEG Streamclip 1.2 to cut the video and create an image sequence, and finally GIMP to put it all together and create a gif.

SO PROUD! Not only is it my first gif, but it also has a seamless repeating pattern!

I wanted to do more, though.

While I like this one, it’s animated/based on a video game which uses far fewer frames than a real-life movie.

So I challenged myself to go one step further. The next few gifs are what I came up with using the same programs. These are all from Watchmen (2009) and this trailer in particular. As you can tell, I started to play with the scale and size of each file.

I loved the subtlety of this one. You barely notice it’s even moving. 


This scene is just asking to become a gif. 


I originally picked this scene hoping that it would be one of those endless/seamless ones, but I still liked the way it turned out.


But then I wanted to add words…

So I researched how to do it and found that Adobe Photoshop CS6 was the way to go.

I then used the Fastest YouTube Downloader again to fetch this trailer for The Hobbit (2012).

This was by far the hardest thing yet.

I couldn’t figure out how to make the text flash between layers. After many failures and a little break from the computer, I found that by clicking on a certain frame in the Timeline panel, I could then change the visibility of the text layer and it would only affect that particular layer. If you are unfamiliar with layering in CS6, the text layer must be above the layer for it to show up on the particular frame/layer you want it to.

But then I ran into another problem. The text layer would show up, but it wouldn’t have the blending effects (the white outline). I’m not sure if I fixed this in the “right” way, but I just duplicated the text layer so it would go above each layer. Very time consuming. Later, I will look up on how to do this without wasting 5 minutes just duplicating layers, and I’ll post how I figured it out.


I’m not sure I like static text as much, but since I’ve seen this gif so many times on various sites, I wanted to try to recreate it. I’ll always take a challenge!


And as a disclaimer, I think all scenes capture the essence of a scene. But if I must select one for THIS particular assignment since it also said for the movement to be minimal, I would pick this subtle Watchmen one.

Inglourious Basterds

Inglorious Basterds

This clip is from the amazing movie, Inglourious Basterds. Although not entirely historically correct (;)), I still love it! I created this GIF from a video I downloaded from YouTube. I then used MPEG Streamclip to trim the scene I wanted to use and exported it. After downloading GIMP, I opened the layers and adjusted the settings. I decided I wanted to add text to my GIF, so I googled how, and after a really, really, REALLY long time, I finally figured it out. It took several tries, but I’m glad I stuck with it. I had to make certain layers invisible, then add the text, and merge the layers back together. Sounds easy right? Well, now it is! I finally exported the final GIF to my computer and it works! Luckily I didn’t have any problems with adjusting the size this time!

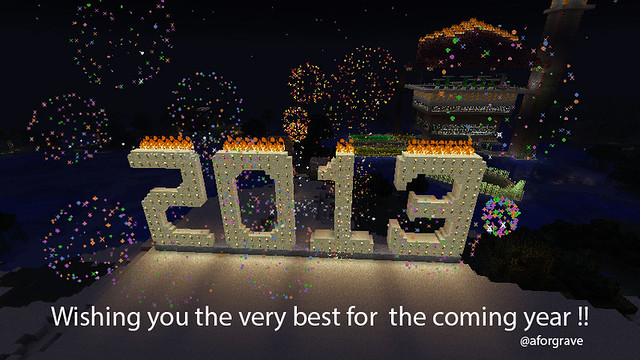
Wishing You the Best for 2013 !!

3_TheBigFireworkShow_640at256

Wishing you the very best for the coming year!!

This animated GIF is made from a series of screen captures from MineCraft, where the sign for 2013 was built during the last two hours of 2012. Rather than using Lego this year (I’ve kept my previous builds for 2010, 2011, 2012 — I’m running out of blocks) this sign was built from hand-crafted sandstone blocks, and decorated with torches and hewn nether rack. Unlike the 3 previous years, where the signs where smaller than me, in this instance (relatively speaking) the sign is several times my height in the Minecraft world. Ladders, climbing, jumping, falling, … and eventually, flying were involved.

Many thanks to EDU Gamer MineCrafters extraordinaire @liamodonnell, @melaniemcbride and @jasonnolan for the wonderful New Years’ fireworks that added so much to the lighting of the 2013 sign. You EDU Gamers truly rock!

A number of different images of the in-world fireworks from various screen captures were composited onto the existing ones so that the final image (with added message) could reflect the true excitement of the transition to the New Year.

A video version of the animated GIF is posted on Flickr. It’s not as sharp as the GIF, despite being a much larger file.

And so, again, my very best wishes for 2013. Be creative, innovative, positive, strong, purposeful, focused, playful, humourous, happy, collaborative, energetic, insightful, wonderful, sharing and caring … and any other fine adjectives that strike your fancy!!

The year has begun!

Meme Wars

Living it up in modern day style, as part of my Final Project, Spongebob and Patrick will spend part of the Best Day Ever in a meme war.  To do this, I’m using the Caption That assignment.  To be perfectly honest, though, I felt the assignment was too easy for two stars (either that or I’m getting better at this…and we know *that* can’t be), so, I decided to make a bunch of them. :)

The entirety of my story will be tied together through a Fakebook I’m creating, or at least that’s the idea.  I admit to being a bit nervous about my grand plan now, since as of last night it wouldn’t let me into the page I had created using the link they gave me to do so.  So I may be re-making it today, although this makes me nervous as to whether it will be accessible for others to see once I’ve completed it.  I’m not sure what else to do but to cross my fingers, however, and maybe take a bunch of screen shots of the work I complete on it.  It’d be a shame if none of the links are able to be clicked on, though, as the whole idea was to tell the whole story and embed *all* of the  media I’ve created onto this Fakebook, woven into the conversation to help build the story…the way a Facebook stalker would view it. :)   But, if it doesn’t work, at least all the media will still be accessible through my blog – I’ll link to the Fakebook page as well as each of my own blog posts containing the original media I created for it.  Here’s hoping that’s enough.

But I digress.  Back to Caption That.

To get themselves pumped up for The Best Day Ever, Spongebob and Patrick begin posting memes back and forth.  To do this, I found a few images on Google and right-clicked to select Save Image As.  I saved them into my Caption That Assignment Folder, and then went to GIMP.   Once there, I resized the images if necessary, and selected the text tool and changed the font and size.  I settled on Segoe Print Bold, 18 for some of the memes, 14 for the last.  I selected the text boxes once the text was entered and selected the align tool and played with those settings to see what I liked best for each meme.

Finally, I saved a workable copy (as a .xcf), just in case I needed to get back to it in GIMP, and then exported each file as a .png.  Here you go!

Best Day Ever Meme 1 Best Day Ever Meme 2 Best Day Ever Meme 3 Spongebob and Patrick Meme 4

The conversation will make it funnier.  I think.  …I hope.  At least in my head it did.  :P

Impressionate It How

http://assignments.ds106.us/assignments/impressionate-it/

Take a painting, drawing, ceramic or sculpture from history and change the style of it. For example, take a painting from modern day artists and turn it into an Impressionist painting like that of Claude Monet. Or you could take a Grecian urn and change the images on it to make it a scene about people going to a Victorian ball.

I want something like Sunflowers by Claude Monet, Impressionist.

Monet

And turn something like:

KW

Kehinde Wiley, Naturalist.
Napoleon Leading the Army Over the Alps, 2005
…into this:

KW imp

Open up a photo-editing program like GIMP and File -> Open an image.  Play with effects under filter.  For a challenge blur a lot with your individual brush strokes and play with the different hardnesses and opacities of the blurring brush.  Don’t forget about changing the hue and saturation to match that of the colors of the impressionistic flair where the changing light was shown, a new vantage point, everyday subjects, etc.

For something like replacing a Grecian urn image into an image of the present you could create your own in a simple program like paint and then copy the image into GIMP.  Using the selection tool you could draw a line on your new creation and cut and copy it onto a new urn.  Using distorting tools match the curvature of the urn.


Hit It! Tutorial

To begin this assignment you must first choose a image that you think will be situable for this assignment. Make sure that image is saved on your computer.Remember that if you choose to use an image off the internet make sure that it has no text already on it! Here is the link to the website that I got my photo off of:

FunnyPhotos

Next, find a website or a program that will allow you to add text to your photo. I used this website for my example. (It is free and you do not have to download or even register to it!):

PicMonkey

Add the funny phrase into the photo using the tool. Make sure that the font size and color are appropriate for your image, otherwise anyone who views the picture will not be able to see the text! Save the new image to your laptop or computer and upload it to Flickr.

Viola and you are done!

Here is the link to the example that I did;

HitIt

Newsweek Provokes Need

Mocking Up A Newsweek Cover

“Make up a Newsweek cover. You may design this in such a way as to satirize the topic, or Newsweek, or both.
You must select a powerful image and a pithy title.”

Here is my cover
 This is part two of my final story. Part 1

Eliza really wants to go to Italy, but how will she pay for an extravagant trip right out of college. Her parents have been pressuring her about applying for jobs and finding an edge to be noticed above her peers, what could make them think wasting a few weeks in Italy would be worth their money.. a Newsweek cover story perhaps? Eliza just happens to come across this Newsweek issue to convince her parents this trip is what she NEEDS. Part 3

I made this by opening a picture of Pisa and the Newsweek Logo in Word, setting Pisa to background and Newsweek to foreground, then typing my witty title.

When Unicorns Explode Tutorial

Our Masterpieces

In order to complete this assignment and earn the star it says it’s worth, there are three options.

1)  Make or take a picture that is a part of a story of something meaningful to you.  Write up the full story, in the manner that I have done on this post, and include your photo as a supporting piece to your story to help put us there. :)   Of course, the photo should be as COLORFUL as possible, whatever that means to you.

2)  In lieu of a story of words, embellish your photo in another way that takes the color to the extreme and brings smiles to your audience, so that it tells a kind of story all on its own.  This can be through any of your favorite editing programs such as Aviary, Photoshop, Cornify (thanks, Michael, for finding this awesome gem), Instagram, GIMP, Paint, or paint.netAbbey‘s submission is an awesome example of this option.

3)  This assignment can also be satisfied through creative presentation of your photo, in such a way that it creates a story in and of itself through its presentation alone, such as in this epic submission.

So, use the picture to tell a story, one way or another, either by giving the background of the picture with words, in great detail, or with fantastic editing, or by creative incorporation into your blog through a clever concept or perspective on the assignment.

It’s that simple!  The work behind this assignment is in the brainstorming of the story behind the photo and how to incorporate it.  Have fun!