Splish Splash Color Bath

One of my visual assignments this week was to add a “splash” of color to a black and white picture. This is something I have always wanted to learn how to do and it only took Ds10-Awesome to motivate me to learn. The first one I did was a forgotten barn that needed a little color love.
barnsplash

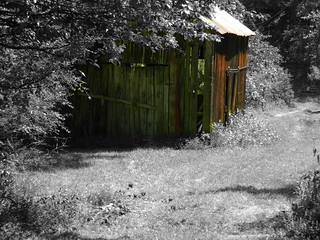
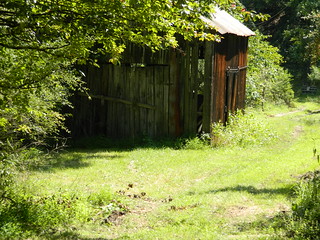
I thought it turned out okay. It was hard to navigate around the foliage. This is the original:
DSCN0102

After I saw how easy it was to do this, I decided to give it another go. I think this KitchenAid splash turned out better.
kitchenaidsplash

I love how it bursts with the red. I guess that is the whole idea huh?
Here is the original shot: DSCN0203

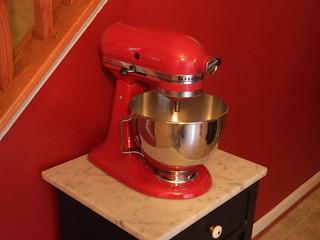
If you want to do this, its very easy. Go get Gimp photo editing software… just google it. Once you have it up and running, open a photo, and duplicate the layer by clicking on layer-> duplicate layer.
Once you have 2 layers up, desaturate the top layer by clicking on colors -> desaturate. Next click on layer and then choose Mask and Add Layer. You will want the mask to be White (full opacity). Now on to the fun stuff… paint over the object you want to be colored with the paintbrush. You will want to paint over the object with black being your foreground color. Voila! Color Splash.
If you have any difficulty, notify me in the comments and I will try to assist you.

Modern Mrs Me


This visual assignment is ‘Art Comes to Life.’  The assignment is to recreate a famous painting in a real-life photo, and represents three out of my 10 stars this week.

To try to capture the essence of the Mona Lisa, I did some research on what was so special about the painting, anyway.  I found out that DaVinci was the first to begin doing portraits from the waist up, hands folded in the lap, more intimate view.  He was also the first to give a slight blur to the background, to draw focus toward the portrait of the person itself.  He is also praised for how realistic the painting of Mona, or Mrs. Lisa is.

So I decided to try to wear modern garb, while still dark, try to capture the general setting (my poor husband must have photographed me in front of about 5 different bodies of water), and use Instagram to pale the colors and blur the background a bit – abilities on the iPhone camera are impressive for a phone, but still very limited.  Here’s what I came up with in the end.

Modern Mrs Me

I most definitely did NOT get the dark aspect of the shot.  Like at all.  Nothing here is dark enough, not even my black shirt.  But what about the expression.  Ambiguous enough, you think?

This was really difficult. Please share with me and tell me what you think I could have done to make this work better.  I think I was too focused on finding a body of water to shoot in front of (which is behind me in this shot, but not visible as it turned out in what we thought was the best shot).  I’m just not sure how to pull this one off better.  Let me know what you think! It was a lot of fun trying, anyway – I hope I at least kind of caught the spirit of the work. :)

Technical Difficulties

To honor all the many failures DS106 is going to have technologically, I created a simple display picture to be used next time the site goes down. I remember my grandfather getting angrier and angrier as his vintage TV went on and off during a soccer game …SO this one is for papa!!

SHIT HAPPENS ¯\_(?)_/¯

How I created this picture: I first got a DS106 picture I can use for this assignment from online. Then, I took that picture and edited it on picasa, a software I’ve used for all my images in these assignments. After I was done editing and playing around with lighting, I uploaded the picture to PhotoFunia onto a vintage TV set and made this image.

Find Yourself!

Here is my next Visual Assignment called Find Yourself!

Assignment: For this assignment we had to find our name in the environment around us. We could either use something that had our first name, parts of our first name, or even the individual letters that make up our name in the environment around us.

Process: I decided to use a picture I took when I went to Paris. I took this photo when my tour group was walking through a mall and my teacher recommended that I should snap a picture of it. I love all the different reflections in this the photo and the constrat of colors!

Find Yourself!

AJ William’s Buddy Photo

FUN TIMES WITH MY BOB!!!

For this 2 star assignment, I had to find a little figurine or a stuffed animal that I can carry around with me. Then I had to use that “buddy” and take photos to document where you have gone together. It’s football season so OFCOURSE i’m going to be enjoying the wonderful football games with my “buddy”. I chose my roommates Eagles pillow pet to be my stuffed animal…then my buddy Bob..(yes I named him)…and I grabbed something to drink…just happens to be a REDSKINS bud light beer…(YES, i’m a redskins fan) …and we were both watching the Giants game. As messed up as this sounds, this is exactly how my household is. We scream..we fight…we cry during football season because we all support different teams and they happen to be in the same division. 0_O

 How I created this Image: I took the picture with my phone then uploaded it straight to the Picasa Software. I then cropped out the unnecessary background extras and softened the image because it was too bright. I then played with the brightness and contrast and got this final image.

Because Unicorns Make Everything Better

Come on.  Tell me you’ve never wished you had your very own unicorn.  Just try.

You’d be lying, right?  And if yo’ mama raised you right, you can’t tell a lie, right? Right.

In case you’re just tuning in here, Saturday of this week was my Sissy’s birthday.  Around these parts, that’s *kinda* a big deal.  Like a national holiday. (duh)  What does my Sissy want?  A unicorn.

So do I deliver?

Duh.

So, in honor of my Sissy’s birthday, our unicorn friend accompanied us on our family outings today.  So our buddy Unicorn accompanied me while doing two other assignments (Art Comes To Life, and Return to the Scene of the Crime), then went on a hike with us and hit lots of fun points along the C.F. Phelps Wildlife Reserve trail, and then went to Moo-Thru with us (where he tried to steal my mint chocolate chip sundae, but FAILED).  But don’t worry, he had plenty of fun with us today, and is quite a happy unicorn. <3

Enjoy, and happy birthday, Sissy. <3  I love you with all my heart.


(and for the boring stuff)

This is the Buddy Photo Visual Assignment, which represents 2 out of my 10 stars for this week.

I uploaded all of my photos to Flickr into a Buddy Photo set that I created just for this project.  I then went to the Set page, and clicked on Slideshow.  From there, I clicked on Share in the top right corner, and copied the embed code, and pasted it into the HTML tab on my WordPress Dashboard. :)   Easy-peasy-lemon-squeezy!  And fun and oh-so-worth it. :)

Tutorial For King of the Meltdowns

This is a basic tutorial to complete this Visual Assignment. I went to Google and found a picture of an Olympian Swim Athlete. But it can be of a your favorite celebrity, president, role model, etc. Then also go to google to find a quote that either that person has said themselves or that someone else has said about that person you have chose. Then I used a website called picmonkey to help me edit the photo and put the quote in. After that I uploaded it to flickr and added the tags. Remember the PICTURE MUST MATCH THE QUOTE!!! This is my example of King of the Meltdowns.

Turtorial for Splash Color Effect

This tutorial will only benefit those that have Photoshop, or something similar to this program. I actually searched on Youtube for a video that could demonstrate for me how to apply color onto a black and white photo, to make one object stick out. This video helped me out. Its very simple. Once I conducted what the video told me to do. I saved that copy and added it onto my twitter where I tagged the VisualAssignments tags. This is a really fun process and a great way to make pictures stand out.

Some examples are :

Bartender

Eye


Warhol Something

Andy Warhol was an iconic pop art mastermind….This week I tried to be one too! I took a photograph of myself and created a piece of pop art. This assignment was worth 2 stars.


I chose to do two different type of pictures because of what andy warhol said …”In the future everyone will be famous for 15 minutes.” I love the idea of people actually coming to a show to see some Warhol art and instead of him focusing on famous people, he would be focusing on ordinary civilians like me. Dreams do come true after all!! 

How I Created The Image: I took a picture of myself via windows phone. I then downloaded this image to the picasa software where I adjusted the contrast and brightness. After I was done with that, I chose to use PhotoFunia to create a warhol Pop art….This literally took me about 10 min to do and I LOVED IT.

Normal To Extraordinary

Normal To Extraordinary


For my first visual assignment I chose to do a 3 Star assignment. I chose my sisters as my person and changed her normal pictures into  something extraordinary (Hopefully). I love the movie Funny Face by the fabulous Audrey Hepburn. It’s the story of how a simple store girl became this fabulous model for the handsome photographer Dick Avery. This movie is similar to what the assignment asks us to do…take something normal as a simple picture and turn it into this amazing thing just like how Avery took Audrey Hepburn from normal to extraordinary.

  How I Created This Picture:  

Took an ordinary picture of my sister (2 diff pictures), used the software Picasa to adjust the lighting and contrast for both pictures. Then I used Gimp to edit any writings and blur any areas I didn’t want to include in my picture. Finally, I used another software online, PhotoFunia to transform her pictures into a gallery.