Zombified

As I was searching through the Design Assignment Repository,  I cam across one that looked a bit gruesome. It’s not my normal taste, but in honor of the upcoming Halloween celebrations I decided to do it. You take a picture, then zombify yourself. I looked at some of the examples and wasn’t thrilled with it but decided to venture out of my comfort zone. It looked pretty simple. It had a website that you went on and made the whole process pretty simple. I had you trace the outline of your face, then you went through different parts and added them to your face.

The picture I chose was one that was meant to be ironic. I am in Hawaii enjoying a strawberry daquiri. I don’t think that’s something zombies do frequently. I tried many of the extras on the website, but finally came up with this combination that I think fit the setting. The website also had a place where you could play with color and contrast so I decided to change the coloring a bit to give it more of a creepy feel. ‘

^^Alive me

^^Dead me

Zombify Yourself

The design assignment was to Zombify yourself at the website http://creative.avatarlabs.com/zombieland/zombify/ It was not difficult at all. All the options are right there you just drag it onto the picture and adjust the size.

Santiago Sueiro on Bath Salts..

Did a design assignment which was to basically take a normal photo of a friend and make it an imagery of horror. I chose to do a picture of my roommate that i already had on my computer and put a horrific spin on it.

This photo was not hard to make with the help from photofunia.com. All you really have to do is upload the photo and the website takes care of the rest. Here are some more options they had:

Life Amongst the Corgis


This would be the cover of my autobiography, fer sure. The original picture if from this site.

I tried changing the saturation and making it look cool, but it just wasn’t looking good with the color of the corgis and such. I don’t have any corgis yet, but I plan on having a corgi corral in my back yard. It is going to happen.

Anywho, to do this I took the picture and opened it in GIMP. I messed around with the rotation of the picture by going to Image>Transform>Rotate until it ended up like this. Then I came up with my lovely title and made it purple, of course and stuck my name on the bottom, in another lovely shade of purple and called it a two star day.

And Queen Amber Said…

This is my lovely tapestry for this digital assignment. I’m gunna be frank, the only reason I choose this is because I’m stressed and it seemed “childish” and destressing and easy.

And it was.

In this lovely tapestry, we have Queen Amber (upper left) instructing that all of the children leave and live in a hut (middle) or row her boats (bottom right) and fetch her more corgis (bottom left). Yes, in my mind that lamb/goat is a corgi.

For those of you who don’t already know, I dislike children. They annoy me and they always have sticky fingers and snotty noses.


Math Tutors Meme

OH WOW! I really really am enjoying [design] WEEK of DS106!! … ALREADY! haha

After completing Today’s DailyCreate, I was inspired to get a little more work done here in the first part of the week.. Check it out… A MATH TUTOR MEME!! :D Oh my goodness this [design] assignment was super fun AND super easy! And this What People Think I Do counts for 3/15 stars for my [design] week criteria!

Because I had such an easy time with this [design] assignment, I thought I’d turn this post into a tutorial for DS106 credit also! (:

[design] assignment. First you start off by going to this website. You then proceed by choosing a topic/title. I chose to do Math tutors because well I am one :P haha BUT honestly the crazier the topic the FUNNIER the Meme! I then picked what  “phrases”  I wanted to incorporate. I chose the following: what society thinks I do, what my professors think I do, what my parents think I do, what my friends think I do, what i think I do, and what I actually do. Then came time to collect photos from my computer and friends photos to match up clever images to each one of the sayings. The masterpiece comes out when you push generate image at the bottom! and TA DA! You have your beautiful DS106 [design] assignment. (As shown below)

Math Tutors Meme! (:

Designing for the Radio

I’m excited to start off this week with an assignment that is using our radio shows, but is visual. It seems kind of ironic to me. Our group radio show is going to be about a family road trip. For some reason this is pretty much the exact picture that popped into my head when I read the assignment for designing your own t-shirt/poster/bumper. I am very satisfied that I could pull this off with little effort. I haven’t used clip art since middle school, but remembered there were a lot of cartoon-like pictures. I decided to travel to my past days and start looking through them. To my amazement, they have added so many more pictures! I think I did this process in a way that has a few pointless steps that I’m sure I could have skipped, but what is done is done. I first started off in Microsoft power point. I knew I could maneuver the pictures around, it had clip art, and I could add text pretty easily. However, I wanted to change the coloring on the pictures. They just didn’t match. So I decided to take a screen shot of the one slide I had my pictures arranged on and uploaded to Pixlr. It took me a bit to get the colors straightened out but came up with a basic idea. I didn’t want it to be too extreme.

The pictures I chose were quite simple. I wanted a radio tower to symbolize ds106 radio and a car and road to symbolize our road trip radio show.

Splash that color- 2 Stars

http://assignments.ds106.us/assignments/splash-the-color/
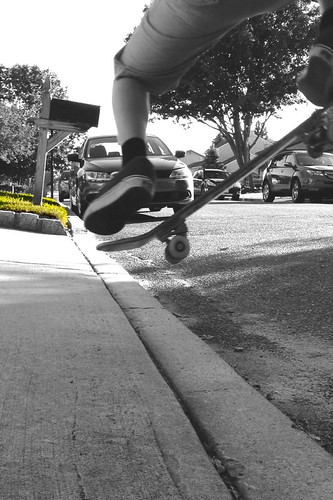
splashofcolor-skateboarding

I always have fun with these Splash of Color assignments. It is so cool to take a photo that is in black and white, and add a burst of color to it. Your eyes just zone in on the color when you look at it, which is pretty powerful. I got help from this website on how to bring out the color after making the photo black and white! Here it is:  http://www.picturecorrect.com/tips/color-areas-black-white-photos/

It was pretty much a matter of using the channel mixer layer in Photoshop CS6 and then using the brush tool to color in the part that you wanted to appear colorful. It was pretty easy when following the tutorial, so I definitely always recommend using others to help your work, because it is super helpful and beneficial. Hope you all enjoy my work! Comment, critique, whatever! Make art damnit!


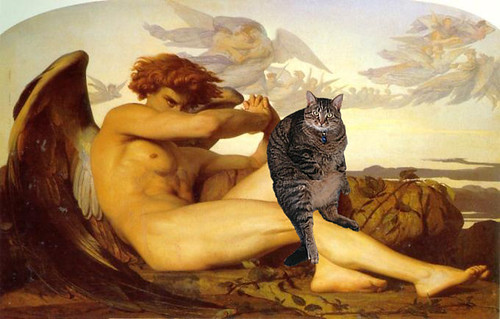
“Fat Cats Make Art Better” Alexandre Cabanel’s “Fallen Angel”- 2 Stars

Alexandre Cabanel - Fallen Angel

Ohhh those Fat Cats. They are something else. Funny, adorable, obese… Anyways, I decided to throw my hand in at trying this assignment. I started by uploading both photos into photoshop: 1) the Alexandre Cabanel work of art, 2) the fat cat picture.
I left the piece of art as it was, and went right to the fat cat picture. I went to the lasso tool and selected the magnetic lasso. After I did this, I went around the fat cat and outlined him as carefully as I cut. I then copied and then cut him out of the picture. After doing this step I went ahead and pasted him into the art piece. After realizing that he was WAY too big for the painting (not trying to be funny), I went back and reduced the image size in the original fat cat photo and did this until I was happy. After this I experimented with arbitrary rotation of the cat so that he would look good on the man’s knee in the painting. Basically this was all I did.
My motivation in doing this was to show that I was not afraid to try something that I was not exactly “comfortable” with. So I went ahead and found a tutorial that showed me how to cut figures out of a photo:

… and I used this to help me extract the cat from the photo.
I suggest that people comment on this or my other work, I’d really appreciate it DS106! Thanks!

Make your own meme: 2 Stars

Kicking Thyself- 2 Stars

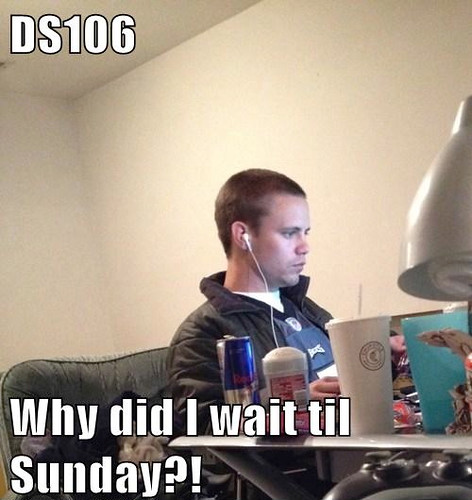
Caught my buddy Daniel Zimmerman off guard here. His blog is linked here: http://danielzimmerman.net .

I love to joke around with him, known him for a while. Sometimes he takes it better than other times :p. Anyways, I used the site cheezburger.com to make this meme. I took the photo with my iPhone 4s. Figured I would snap a photo and make a funny meme. By the way, he said he would disown me for this one; oh jeez :/