Out Of This World

GMYZ3950

The task for this visual assignment was to place a picture inside of a picture of an eye so that it looks like a reflection.

I must say after about 20 mins of failure, I did a pretty good job ! This is a photo of my eye… inside of my eye is a photo of me dressed as an alien for Halloween. Pretty cool huh? When I came across this visual assignment I automatically thought it was pretty cool. Instantly I knew which picture I would use. ALIENS! Don’t be limited to what’s in front of you, look above and beyond ? This concept was fun for me because I have always found photos of eyes to be fascinating. Mine are brown and not all that fascinating but this little visual gave me a boost !

Making this work wasn’t the easiest thing. As I previously mentioned, it took me about 20 minutes to figure out how to make this work. I used picmonkey.com again for this visual ( there’s just so much you can do on there). I started out by first cropping a picture of my eye. I went through about 3 different “alien pictures” before I finally made it happen. I had to first, pick the darkest of the 3 pictures and then I also had to crop the alien picture to get rid of the background and light spots. I then used the overlay option on picmonkey… played with the lighting effects  a little bit and BAM ! I HAVE AN ALIEN REFLECTION! Hope you all enjoy this picture as much as I do. Definitely recommend this visual assignment.

http://assignments.ds106.us/assignments/can-you-see-what-i-see/

I Have One Crazy Family !

PicMonkey Collage

As soon as I saw the visual assignment on The Brady Bunch, I KNEW I had to share with you guys my CRAZY BUNCH! My family means the world to me. Like The Brady Bunch, I have a huge family. Each and everyone of them has a crazy/ funny personality. I figured I’d pick a few pictures portraying the crazy side of my family. To make this collage I used picmonkey.com, all of the steps were super simple to follow and I love how it turned out! All you have to do is select the type of collage you want to make, then simply upload the pics right off of your computer. Once finished, it allows you to save the collage right back on to your computer. The best part… it’s completely FREE and you don’t have to sign up ! 

http://assignments.ds106.us/assignments/were-the-real-life-brady-bunch/

Social Media Is NOT My Thing…

JIIO8915

The idea behind this Visual Assignment was to play off of a picture in which your body language suggest one thing by using a speech bubble.

As I mentioned in my “About Me”, the last time I used twitter was in 10th grade. With high school comes a lot of drama. I don’t like drama, which is why I tend to opt out of social media sites. This time on the other hand is different. As much as I was dreading having to sign up for multiple sites (for example: Twitter), I am actually kind of excited about this. This picture might look like disappointment but I was actually laughing in this. I find it funny that although I did not want a twitter, I am somewhat eager about it. This class has so may interactive projects so it’s cool to get a chance to see what other’s are creating. Inserting this bubble text was pretty simple also. I pulled up the “Preview” app on my Mac and simply inserted a thought bubble. I then edited the bubble and  WAHHH-LAHHH now we have a Spubble !

http://assignments.ds106.us/assignments/your-very-own-spubble/

Splashing Color Raid

After gathering evidence about the suspect, Buck had his gun ready as he entered the residence of Crazy Joe Shooter, expecting a full blown shootout. But it never came. Crazy Joe wasn’t there like Buck thought he would be, and the place looked like no one had been living there for weeks. The only thing he noticed that was out of place in this dirty house was a clean letter that had been opened. Buck thought this might be a clue to Crazy Joe’s whereabouts, so he picked up the letter and investigated further.

British lord of the ringtones.

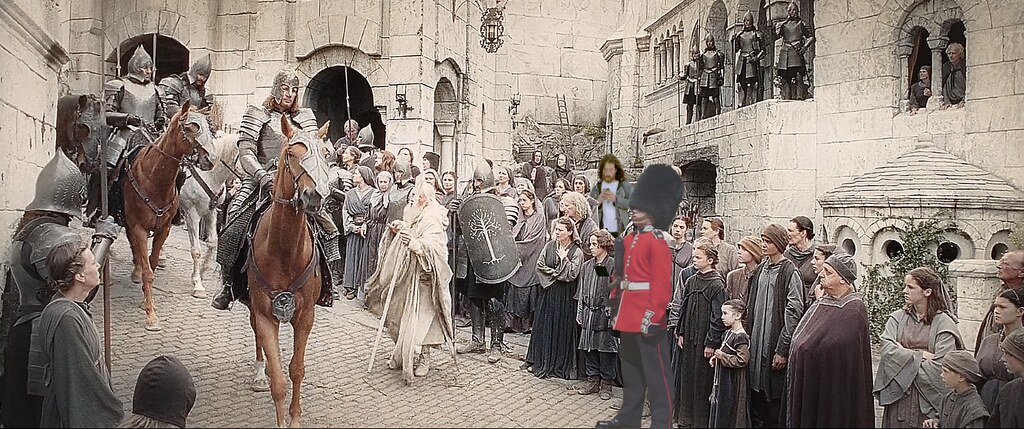
Maybe they grabbed the wrong costumes?  For the photo for this assignment, I put a couple of odd balls in a scene where they do not belong. They look like naturals though, I don’t even think they noticed.  The assignment was to put something in a movie scene that was totally out of place. I have been waiting all semester to use something from LOTR, so I knew now I have my chance. I just grabbed a couple other random photos of people, watched Return of the King in 8x till I found a good scene, and put them in to the scene.  I lightened them and did a few other things to make them blend. I didn’t realize how wide a suit of armor makes a guard till I tried to cover him with a guard wearing just clothes.

Teach Me How to Dougie

Tutorial for Cropped Signs

I didn’t exactly do this assignment, but I did a remix for it. So I’m going to walk you through everything it took me to do the remix (which was adding a mustache to my final product), but if you do not need the remix, you may take away the last step.

I used BeFunky to create this assignment. They have tools from photo editing with photoshop-esque tools, filters, and other tools. They also have a collage feature where you can combine multiple pictures, and add edits at the end. For this project, I used the photoshop tools. Below, I have listed the steps I took to complete this project.

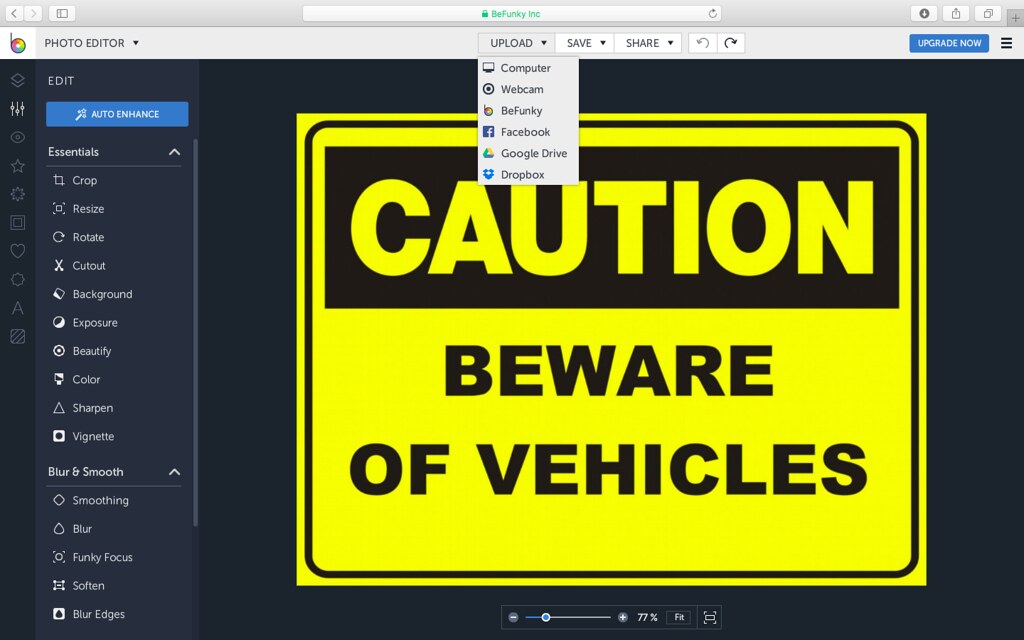
  1. First, I started by uploading my picture to BeFunky.

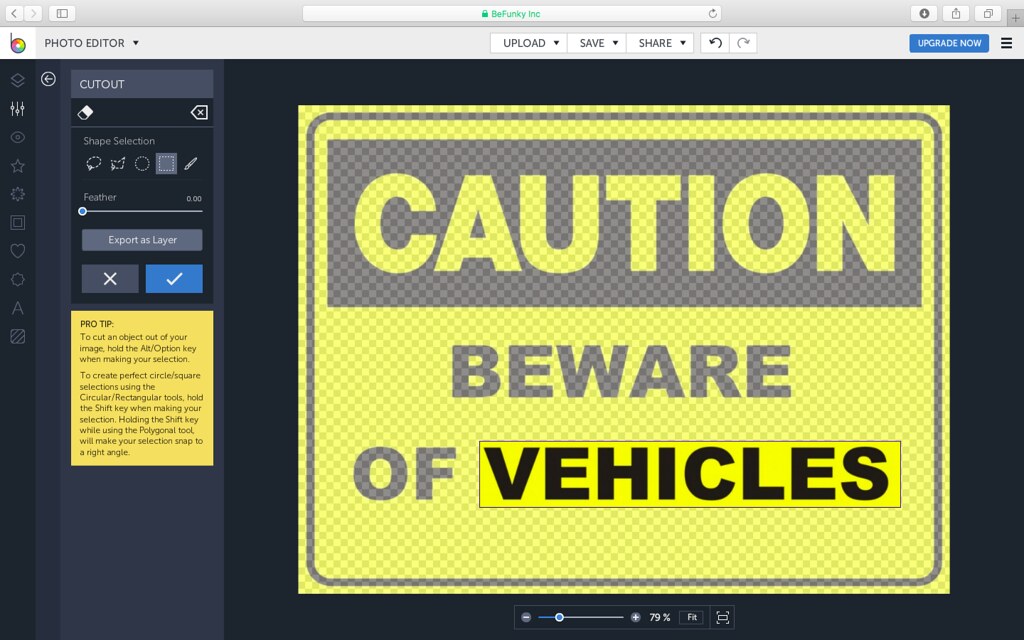
Screen Shot 2016-04-08 at 1.53.43 PM2. In order to edit the word that you want to remove, select the cutout option. Use whatever tool you want to, I used the square tool, and select the area that you want to remove. Once you have it selected, click on “Export as Layer”. This will allow you to edit the word separately from the rest of the picture.

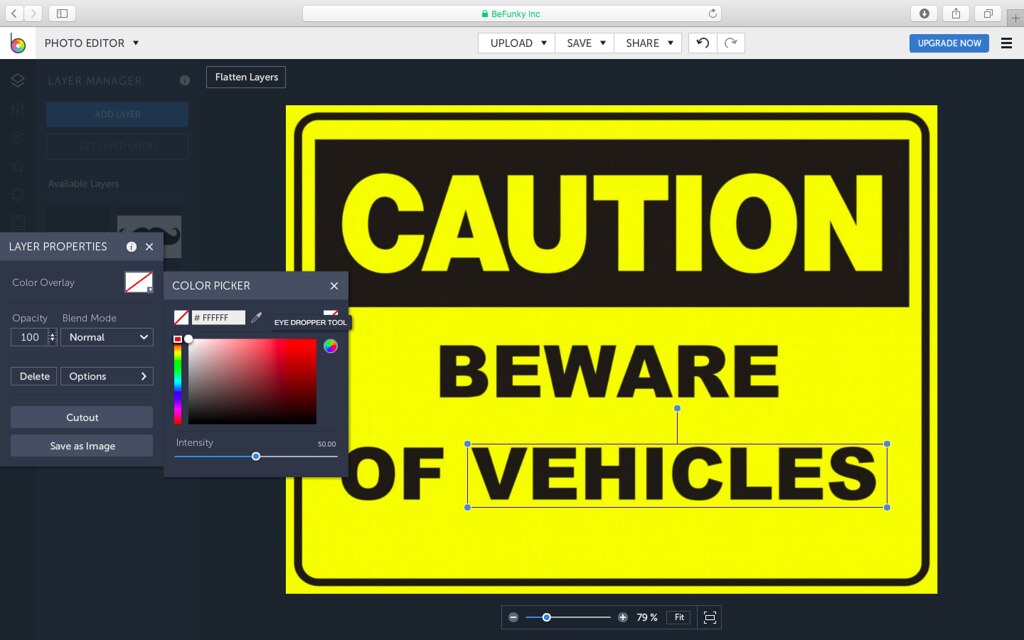
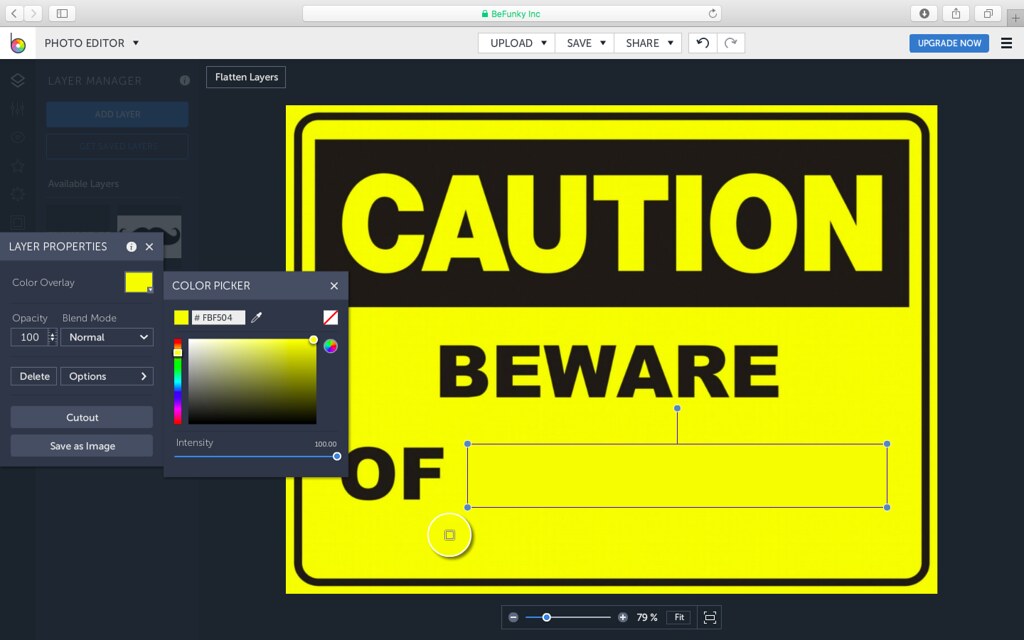
Screen Shot 2016-04-08 at 1.54.10 PM3. Now, you can go to the “Layer Manager” page, and select the layer you want to edit. You should use the color picker in order to make the layer one solid color, making it look like it doesn’t even exist. With the color picker, select the color you want to make the layer by clicking on the eye dropper tool, then clicking on the existing color in the image.

Screen Shot 2016-04-08 at 1.55.08 PM

4. Once you have selected the color, in my case yellow, make the intensity 100% so that the word will disappear into the background.
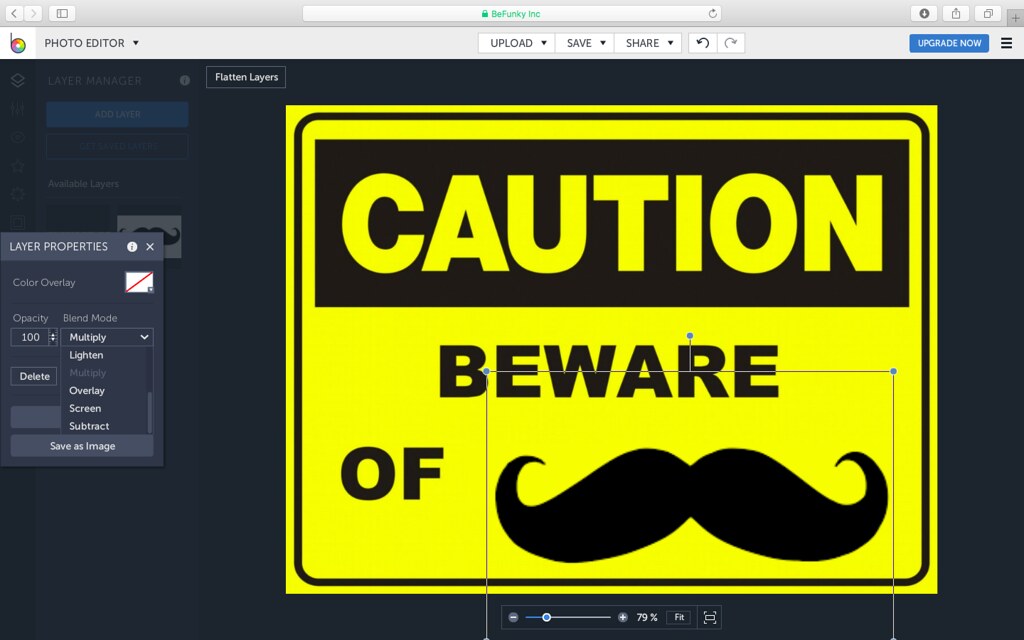
Screen Shot 2016-04-08 at 1.55.33 PM5. If you are not going to add anything to the sign, you may skip past this step. Otherwise, keep on reading! I uploaded the mustache where it says “Add Layer”. I put the mustache on top of the image, and it had a white background. In order to get rid of this, I went to “Blend Mode”, and I selected “Multiply”. This makes the white background a transparent background. Now, adjust your image to the size and placement you want, and voila! One additional step you may take is to click the “Flatten Layers” button to make them one cohesive picture.  However, if you save the image to your computer at this step, that will not make a difference.
Screen Shot 2016-04-08 at 1.56.34 PM6. Lastly, you need to save the image onto your computer by clicking on the save button, and following the instructions to save it to your computer! 


I hope this tutorial has proved useful.  You can comment below if you have any additional questions about how to use BeFunky or do this assignment!

Splash the Color Tutorial

We had to do one assignment this week where we create a tutorial for future DS106 students. I selected to do a tutorial for Splash the Color assignment. I did this assignment earlier on in the semester and it was one of my favorite assignments to do (you can find my post here). Here goes my tutorial.

Step 1: Go to Google and save and image that you want to color splash. Here is the image I selected.

little-girl-with-balloons

Step 2: Go to Fotor which is a photo editing program. Click “get started”

Screen Shot 2016-04-04 at 7.34.32 PM

Step 3: Go to open and select computer.

Screen Shot 2016-04-04 at 7.34.56 PM

Step 4: Select the file you with to upload.

Screen Shot 2016-04-04 at 7.35.05 PM

Step 5: Once your picture is uploaded, look at the sidebar on the left and select “color splash”

Screen Shot 2016-04-04 at 7.35.37 PM

Step 6:  Select the first program (the rose picture) which then turns the image black and white.

Screen Shot 2016-04-04 at 7.35.50 PM

Step 7: You can adjust the brush side on the sidebar by dragging the circle left to make bigger and right to make it small. The brush is what turns part of the image back to color. Hold down on left click while dragging to make something in color. If you mess up, use the eraser which turns it back to black and white.

Screen Shot 2016-04-04 at 7.36.08 PM

Step 8: Once you are satisfied, select “apply”

Screen Shot 2016-04-04 at 7.36.56 PM

Step 9:  In order to save the image click the little square which is the second to last icon on the bar that you originally used to open the image. Select save to computer and you are done!

Screen Shot 2016-04-04 at 7.37.19 PM

Here is my final image!

little-girl-with-balloons edit

In the eye of Agnus

IMG_3276

Tonight I went to watch my good friend Danny Keys, who is a pianist at Tumbleweed Saloon.  When Danny plays the piano it’s like magic, his music is beautiful and I am so glad I got to see him play tonight!

For this assignment, we had to create an image of an eye with a reflection of something. In order to involve our characters, I decided to do the eye of Agnus and the reflection of Danny playing the piano at the saloon. This assignment was fairly easy to create because of using the app fotobom. I like the way it  turned out because it looks pretty cool, especially in the black in white. This assignment was worth 4 stars!

Visiting Bonnie Sue

IMG_3273

Today I decided to go visit Bonnie Sue at the school and bring her by some lunch! I rode my horse into town because it was a beautiful day. All the kids at the school got a kick out of petting my horse and getting to see him.

For this assignment, we had to create an image that depicted our pet at school. I twisted the assignment a little to involve characters by having Agnus bring her pet horse to Bonnie Sue’s school where she teaches. This assignment was fun to create, and I used the app call fotobom which made photoshopping super easy and fast. This assignment was worth 4 total stars.

Ridin’ off into the sunset

Assignment: Bucket List 3.5 stars

Assignment Description: So… Everyone should have a bucket list. What’s on yours? For this assignment you should create a collage with AT LEAST four pictures of four different things you have on your bucket list. Add text to your picture of what or where it is. Then briefly tell us why it is on your bucket list. A good site to use for creating your collage would be Be Funky.

Joint bucket list of Merrell Shale and Dr. Wisdom

bucket list

Last chance: This is the ULTIMATE western bucket list. I combined what I thought both Merrell Shale and Dr. Wisdom would love. By the end of their lifetime, they need to ride at a rodeo, find a buffalo and wrestle him, travel across the west, and eat the spiciest barbeque that they can find!!

Making the List: I used my favorite photo editing site, Be Funky to put together this collage. I used pictures off the internet to put together the collage. Then I used the text editor to add a caption to each one. Finally, I saved it to my computer and put it into the post.