“Love at First Shot”

The Work Itself

This is a required visual assignment. It is difficulty public rating is three stars. The instructions are to “take/find a picture of a couple who are obviously in love. Use the picture to tell a story. Give the story some background and maybe even create a dialogue between the two or tell the story from each point of view. Just give it some detail and create a background to your photo! It can be a true story or a completely made up one, just have fun with it!” I used an original and edited image. The original image I took from google.

original
original
edited
edited


The Story Behind The Story

Love does not have a singular meaning or definition. Love can mean romance, protection, comfort, etc. Today’s culture perceives love as merely sexual and sometimes shallow. However I believe love is eternal and is just as much friendship as it is a significant relationship. This elderly couple have been married for 50 years. Every morning they take a walk around the neighborhood. Today is their 50th anniversary of their marriage. To celebrate they invited family and friends over for lunch and dinner. However they wanted the morning to themselves so they can walk. While they walk they do not talk to each other, they simply observe the world around them and hold each other tight. I am thankful that I have wonderful parents and a wonderful loving family. I chose this picture because my parents like to take walks together so it made me think of their relationship and how special it is. To me this elderly couple is the perfect representation of love. Love is not flashy or glamorous, the simplicity of love is special.

The Process, Narrated

I got this image from google. I kept the original as is, but I edited the same image through PIXLR Express. I changed the color hue and created a border to sharpen the elderly couple. I also enhanced the quality of image in terms of pixels. The four pictures on the side are from google images. I pasted them into the edited image and cropped them to fit inside the border. The small pictures are of a family and a younger couple who I pretend are the same people as the elderly couple. This illustrates the cycle of life and how long they have been together, they were young and then had kids and now are grandparents.


Apophenia “Recycling Bin”

The Work Itself: This visual assignment asked to take a picture of an object and create as many augmented versions of it as possible. My object is a recycling bin in the convergence center. I chose this object because since it has a lid on top, it makes sense that fictional objects could be emerging out of it. I used clip art for two augmented photos and then drew two other augmented photos. Here are my separate flickr links to the three augmented pictures of a recycling bin.

Links: original recycle binflowersmonsteralienfire can man
Telling the Story Behind the Story: A recycling bin may not be as it appears. Who knows what could be living down there. With all the stuff that is thrown inside, the bin takes a life of its own. The bin is a supernatural object that miraculously can grow flowers, or even monsters. This fact is not revealed to the public, because the government is studying it and is afraid it could be related to aliens.
Narrating the Process: I took the original picture of the recycling bin with my iPhone. For the augmented versions, I used Pixlr Editor. I pasted the recycle bin as the first layer and then pasted my google images such as the monster for example as a second layer. I used the tools to position the objects as I saw they best fit. For the flower augmented version, I drew the flowers using the brush and sketch tools. For the alien or human recycle bin photo and fire can man photo I had to do the most edits.

I went to new layer and choose the drawing tool and selected the circle. I created two circles for eyes and used the Paint Bucket tool and choose white as the color and poured white into the circles for the eyes.
Next, I created another layer and chose the drawing tool and selected the circle. I created two circles for the pupils and used the paint bucket tool and choose black as the color and poured white into the circles for the eyes.
 I then created a mouth. I created a circle for the mouth and used the paint bucket tool and grey as the color and poured grey into the circles for the open mouth. I created another layer, I used the brush tool and created a tongue and used the paint tool to pour in red. I input another layer, I used the brush tool again and changed the filter to the 85 star and used black for the eyebrows. Finally my last layer, I used the drawing tool to make a circle and the brush tool for the sides of a bow tie and used the paint bucket to pour in purple.


Thirty-five Cents, and Some Imagination

For the mandatory visual assignment this week, Apophenia, we had to look transform a picture of a regular object into what we could imagine it being. This was hard for me, because, despite having an over-active imagination when it comes to seeing every shadow as a possible intruder, I found it difficult to imagine everyday objects as anything interesting.

So, I went with kind of a boring thing. I took these two coins, which were sitting like this on my coffee table

apoorig

And I thought…huh…that kind of looks like one of those old-timey bicycles. Like the one Captain Kirk rides in Princess Diaries 2, a movie I unabashedly watch. So, I turned it into this:

apo1

Then I thought…well…if I put them closer together, I can make

apo2

A snowman!

And just a liiiittle bit closer…

apo3

apo4

To get some really cool body shapes.

It’ll be hard looking at coins after this assignment.

Process:

Same old. Take a picture on my phone, open in GIMP, and then for the last 3 I just drew over it with the paintbrush tool.

For the bicycle one, I went and found a simple picture of one of those bicycles, and then used the scale, rotate, and perspective tool to get everything to fit together. That’s all there is to it!

A Splash of Magic

Splash of Magic

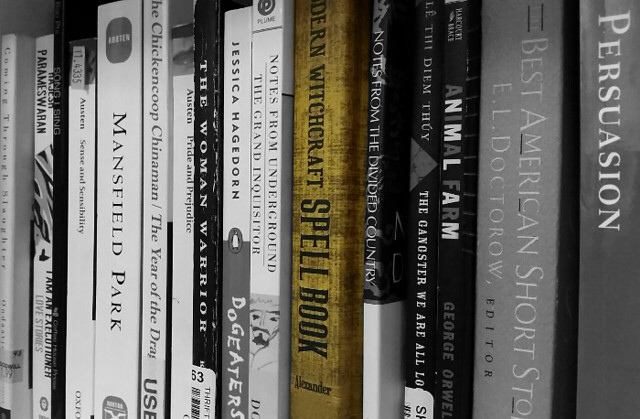
My bookshelf for this semester is just filled with so many books, some aren’t even pictured here! But there’s one book that’s just for me. Something that’s just for fun, that I know I can relax and enjoy and not have to worry about analyzing and papers. Just a little bit of magic to brighten my day.

This was for the Splash the Color assignment (3.5 stars)! In this assignment, we had to take a picture and isolate a single object to retain its color, and the rest of the photo had to be in black and white. I love this type of photography, because depending on what’s highlighted, it could have so many different meanings.

For this picture in particular, I wanted to highlight my spellbook amongst all the books I have to read for this semester. I figured since it’s the only book I’ve gotten to read in my spare time, and its subject is so vastly different than what I’m studying this semester, it would be perfect!

Process:

For this, I used GIMP, because it’s the best and I don’t have anything else downloaded. And I know how to work it mostly. So, for this, you have to open the image in GIMP

stp1

Then, you take this tool and this mode:

stp2

This is the “fuzzy selection” tool, with the “add to current selection” mode. Basically, you click the area you want to select (drag it to select more or less), and then with this mode on, you can just keep clicking away to complete your selection.

Of course, if your object is like mine and doesn’t select easy, you’ll eventually move on to:

stp3

The lasso tool with the add mode! This allows you to freehand an area to select. Draw around the little bits that you just couldn’t get before with the wand. This step is a little tricky if you have an unsteady hand, and that’s okay, because that’s what the next step is for.

stp4

Still on the lasso, select the “subtract from selection” mode. This is the opposite of the add-to mode (of course), and allows you to draw around areas you don’t want to include. You’ll probably jump between this mode and the other mode a lot, until you have exactly what you want.

You can also use the other selection tools (just make sure to set the right mode), or the first tool on the second row of tools, which selects every instance of a color throughout the image. So if I clicked on the red “A” in Animal Farm, it would also pick all the rest of the red in the picture.

Next comes the actual fun part.

stp5

Go to the toolbar and hit select, and then invert. This takes the area you selected, and then selects everything around it instead. Then

stp6

Go to Colors and Desaturate, play around and see which option suits your needs, and you’re done! A bit time-consuming, but with a great result!

Unite Two Assignment: GIFfight

Assignment

z4pw-n

This is by no means a masterpiece, but it’s simple and straightforward. I’ll be honest, I feel like I understand how to make GIFs and had done so before this unit so I wasn’t as patient as I probably should have been. I’m probably trying to run before I’ve learned how to walk, #DS106 Gods please forgive me ?. I did learn however to make stop motion GIFs today which was pretty exciting. I look the latest image on GIFfight and was inspired by this fancy entry.

Unit Two Assignment: Say It Like Peanut Butter

How_to_be_Fabulous_Party_Monster

Directions: “Make an animated gif from your favorite/least favorite movie capturing the essence of a key scene. Make sure the movement is minimal but essential.”

10 years ago I had a mild obsession with the movie “Party Monster.” In this scene the main character, Michael Alig (Macaulay Culkin) is a newbie in New York and James St. James (Seth Green) has just taken him under his wing and is teaching him how to make a memorable entrance at a party. The movie chronicles the fabulous yet incredibly tragic rise to notoriety of Club Kid Michael Alig. The movie is anything but inspirational yet as a young impressionable 20 year old I took the advice in this scene to heart and it certainly dictated how I worked the crowd at events through most of my 20s. Oh memories, haha.

______________

Being self critical in regards to the assignment specifically, I don’t know if the movement in this gif qualifies as “minimal but essential.” Fluttering hands are hard to boil down to one specific move. ?

My Buddy Benjamin

My Buddy Benjamin

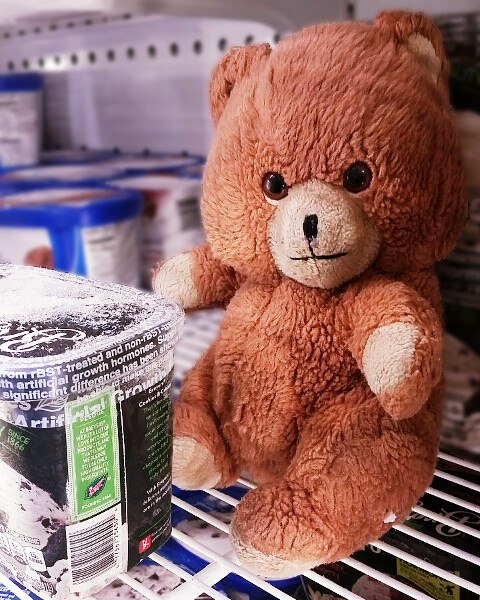
My teddy bear Benjamin (née Sebastian) is over thirty years old. My mom got him when she was younger, and then she handed him down to me when I was born. Happily, I haven’t lost him, and I can’t wait to give him to my future child. But, in the meantime, he’s still mine, and that meant I could take him on an adventure for the Buddy Photo Assignment (2 stars)!

Today I took him to Giant. Not that exciting. We went to go get some powdered sugar (for my failed latte mug cake attempt) but we inevitably got distracted by the ice cream. It’s just so tempting–our sweet tooths can’t handle it!

I’m sure it’s incredibly unsafe/unsanitary/downright crazy to put your old stuffed animal in a public ice cream freezer. Nobody saw us, except maybe some cameras…and my roommate… but even if they had, could they really throw out a couple of cuties like me and Benjamin?

Process:

Well…hm….to do a process for this seems so odd, really. The main part was just carrying my teddy bear across campus, putting him in a giant freezer, and taking the picture with my phone.

Okay, I mean, angling and paying attention to the lighting (which, to my surprise, is not that great as I originally thought it would be) is also important.

Most of the work came from the editing. And…most of that work was just me fiddling around in GIMP. I just fiddled with the “curves”, saturation, contrast, brightness, hues, etc for a long time. Then I selected everything except Benjamin, the ice cream, and the foreground rack, and used Gaussian blur on everything else until it looked good.

I do everything willy-nilly when it comes to editing photos in GIMP. It’s just playing around with sliders and colors until I come to a satisfactory end. If you plan on using GIMP, I’d recommend also just….fiddling with things. Choose different options, play around with stuff, have fun.

Here Kitty, Kitty 7/22/15

IMG_1150

The Work Itself

The assignment is titled “Here Kitty, Kitty”. Instructions are to Combine two or more animals together to make it an unusual type of animal and place it in it’s natural habitat. I combined a butterfly and polar bear. This animal is called a “Bearfly”.

Telling the Story Behind the Story

I chose this assignment because it seemed the most intriguing. I like animals (who doesn’t?) and it is a cool idea to combine two animals to create a fictional animal. A butterfly and polar bear would never mate naturally of course, but given modern society and advancements in science nothing is impossible. This animal is named a Bearfly, it lives in the Artic regions. Its physical attributes combine elements from a butterfly and polar bear. The most exciting characteristic is that it can fly. There is no reason I chose these two animals. I just thought it would be a funny combination, and one that no one would be able to imagine.

Narrating the Process

To create this image, I used Pixlr, similar to adobe Photoshop. I googled an image of a butterfly and a polar bear. I created two layers within the Pixlr workshop. I positioned the polar bear in the background layer, then edited the butterfly in the front layer. I erased the background of the body of the butterfly and left only the wings. After it was completed, I saved the image, downloaded it to my desktop, and then uploaded it to my flickr.

Pentagon Color Changer 9/22/15

WWIII

pentagon tdc
edited picture

The Work Itself

This visual assignment was created previously by a student. I had to take any picture and change the color hue of the picture to completely change its appearance, then post it on flickr to show the world! This is a google image of the U.S. Pentagon that I edited using Pixlr Express. I chose to edit this image in this particular way because 9/11 recently passed and as a tribute to those who passed away in the attacks I wanted show respect that it will never be forgotten.  I also wanted to show that a terrorist attack can happen at any time, so we must be grateful for those who protect us.

Telling the Story Behind the Story

This photo is taken from World War III. The US has been attacked by North Korea. On the morning of 9/11/2043 it was a typical day for American citizens. However at 12 pm eastern time, the capital building was bombed by nuclear weapons. The sky turned red and black from the radiation. Across the country, cities were being bombed and destroyed. America is in turmoil, a hero must rise up and save this country before it is gone.

Narrating the Process

Once I found an image of the pentagon I uploaded it to Pixlr Express. In Pixlr express I edited the color hue and borders of the image. I used a unicolor effect, called “chloe”. To edit the borders of the image, I selected the “colorfiv” option under the category “ink”. After I finished editing I saved it and uploaded it to my flickr.


My Daily Essentials

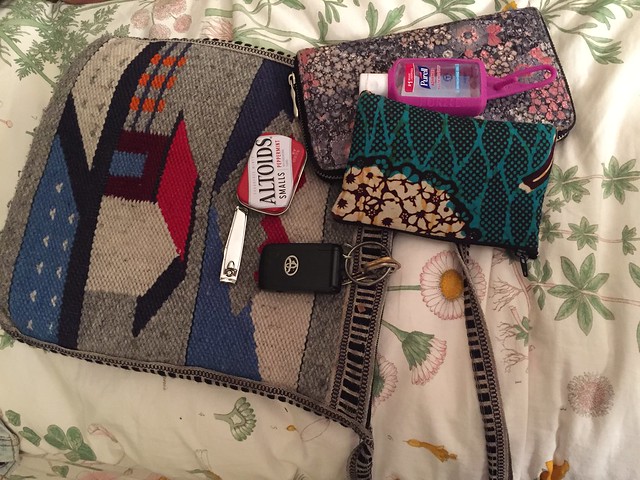
This photo of my purse shows all the most important items I carry around with me each day. The biggest item is my wallet which carries almost all the most important stuff like my license, my school ID, my debit card and any cash I’m carrying around. The next biggest thing is my little bag that I keep lip stuff and bobbi pins and any other little things I may need. Next are my car keys which are essential for my job and any other activities I plan on doing outside of school. Finally is a little tin of mints and my nail clippers so that I always have nice breath and can get rid of hang nails when I need to!!
Untitled