Visual Assignment: Chimeratic Composition

For this assignment, I wanted to use some pictures I already had. I started going through the many vacation pictures we have. I was looking for photos that offered some “space”over which to layer other images. I took a photo from our trip to England of the Roman Baths in Bath, England and combined it with a picture of my husband rowing a boat which is actually from another trip, this time to France (where else to row a boat but France, right? Très romantique!)

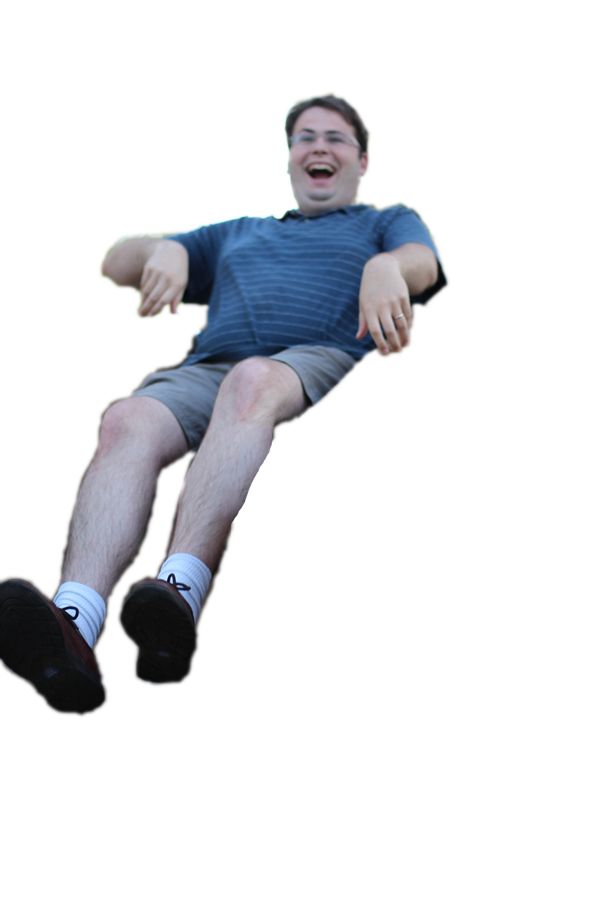
I chose the rowboat image because he would still be in a body of water, just one that is smaller than a neighborhood swimming pool. I added the parrot because it seemed having a bird on your shoulder would be something you could do on a boat (I guess I was thinking pirate…). The pirate is NOT from a past vacation, but rather a google image search of “parrot on shoulder”. I knew I needed a parrot on a left shoulder and was able to find one.   Here are the three unadulterated images:

126 111parrots

For this, I stuck with Pixlr and used the layering and eraser tool quite a bit. I used the baths as my background layer.

Then I selected “open image as layer” for the picture of my husband and layered it over the background.

layerI then employed the eraser function and made my brush REALLY big to erase the entire rowboat picture except for my hubby.

Next, the parrot. I initially slapped that photo on top, unedited, but it was too messy to erase. So I saved it as an image, then used the crop and eraser tools to get the image down to just the parrot with a white background.

parrotsedited 
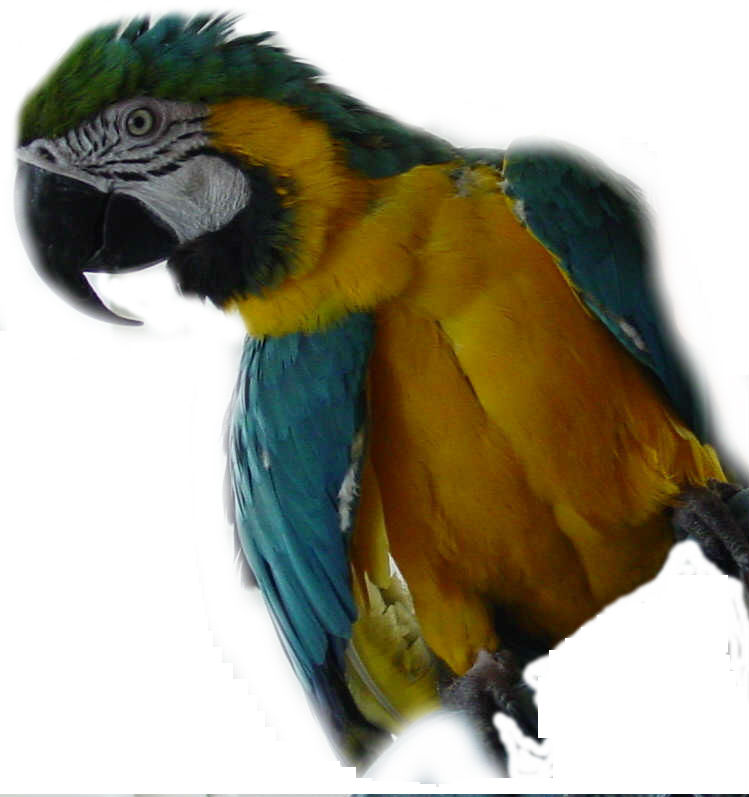
From there, I repeated the “open image as layer”, placed the parrot on hubby’s shoulder and erased the parrot background.

compositeI’m sure there is some kind of cut tool that would have let me cut away swaths of layer instead of erase, but I was on a roll with the eraser from my first assignment and figured if it’s working for now, why stop? Next time I work with layers like this, I’ll do my research to do it the “right” way if there is one.

As for the result?  I’d say this is some pretty cheesy photo editing.  As a positive, I did become much more comfortable with Pixlr, get more practice with layers and got to put my imagination (and old vacation pics) to good use in this assignment.  The size of both the parrot and my husband is so large as to make them almost monster-like in their proportions to the bath and the other people in the shot.  I also gave both my husband and the parrot a bit of a haircut in the process of layering them in.  I would probably look into resizing the images in the top two layers to make them more proportional.

Visual Assignment: Highlighting Color

Because I like to live dangerously, I chose the very first assignment at the top of the list: Splash the Color.  I don’t know if there was an “inspiration” for this per se–my thinking was more more “how am I going to get this done?”  I remembered the name Pixlr from the opening video for this week, so off I went to their page. I also reviewed the pages of others who had done this assignment.  I wanted to use a photo I already had–I was a bit tired of skulking around my house and yard for subjects.  I also wanted to use a photo that had fairly defined shapes since I was anticipating it would be difficult to color something intricate.  So I ended up with my recent masterpiece “Apple on Rug”.  004 decoloredI got very lucky with this assignment, because under one of the first help topics on Pixlr’s help page was “Selective Coloring”.  Jackpot!  I simply followed the tutorial and voila.  The steps involve creating a duplicate layer, desaturating the color out of the top layer, and then “erasing” the top layer so the color of the apple shines through.  The video we watched on layers earlier in the week definitely helped here as I immediately understood what the tutorial was asking me to do.

It was a bit tedious as the eraser size was very small and it wasn’t until I was finished that I saw I could change the eraser size:

brush size 2I had been using “50″ and it was slow going.   So I tried it again with a larger brush size and it look me about 3 minutes:

Sherlock Holmes Pub, Westminster London

Sherlock Holmes Pub, Westminster London

A Whole New World – Race Track Warehouse

The thoughts behind this assignment makes a lot of sense; How would you see, reside, and interact in a world that is proportionately out of scale from your perspective? I like how they used the movie, “Honey I Shrunk the kids” as an example. Whether you are abnormally large or small for an environment, a series of challenges and advantage will present itself. For my attempt at this assignment, I placed race go-karts into a large warehouse. The drivers are now able to use the warehouse as a raceway where in reality, they would have no where to go!

Race Track Warehouse

Visual Assignment – Chimeratic Composition

One of the assignments I chose to complete was the one called “Chimeratic Composition.” I chose this because I thought it would be fun to see what I can come up with, but also because I wanted to try a new photo editing software. The assignment itself is so open-ended that it really allows you to be creative and create a story from scratch. I particularly like how the assignment asks for the end result to be something that wouldn’t be possible in real life. This fiction aspect truly allows for the story behind the pictures to take on a variety of shapes and spines, completely dependent on the person viewing the picture. The assignment asks to take three images and combine them into one, here is my result titled, “Santa Saves Car Meet.”

Santa Saves Car Meet

In order to create this, I used the online free photo editing software, Pixlr. I also went online to get some help with Pixlr, so I browsed youtube and found this video which got me started.

The picture above is composed of the following three images..

agile Dino Micheal Pless, dressed in a Santa wetsui

A Whole New World for Slide Guy

A Whole New World for the DS106 Slide Guy

With this manipulated photo image I am able to complete two DS106 visual assignments for the price of one. Giving me a final count of 12 stars when all is said and done for week 5 of the DS106 headless 13 open-online session.

  • Slide Guy for Visual Assignment 595 (2 stars) where we insert a png image of the “Slide Guy” into a photo.
  • A Whole New World for Visual Assignment 419 (2 stars) in which we are to take a picture of a subject (grandparents, pet, yourself) and put it into a totally different background in which they appear abnormally too small or too large.
BVQi7L9CQAANZEt

DS106 is so open even the insect world is joining in.

Just fun during visual storytelling week I decided to illustrate how open DS106 could be.  As shown here, even the insect world is joining in. The photo was easy to make.  There are a total of three layers: The original background image, a transparent PNG image of the DS106 logo, and a magic lassoed image of the grasshoppers leg that is placed over the the DS106.


SlideGuy

DS106 Slide Guy

To add the slide guy enjoying his ride, I simply made another layer, sized him appropriately so that his posterior would look like a more “natural” fit as he slid down the blade of grass, and placed him at the top of the stack.

Haunted Swing Set

This weekend I took a backyard photo safari.  As I assembled the images a story of my past life as a wife and mother of two young daughters revealed itself.  For DS106 Visual Assignment 426, Is that a ….GHOST! I decided to use one of the photos of an abandoned swing set to produce a new image of my daughters haunting their old playground equipment.

AmberJenny_Ghosts

Little Halloween Ghosts

This was easy to make now that I have more experience with my photo editing software, Adobe Photoshop Elements 12.  Using an old family photo I had taken proudly showing off their Halloween costumes, I used the magic lasso tool to select what I didn’t want and deleted it from the scene. I copied the ghosts only picture as a new layer into the swing set photo.  I sized the girls appropriately for their ages in relationship to the size of the swing set.  Then reduced the opacity of the little ghosts down to 60%. New picture and assignment complete. 3 Stars for me.


Playing with a Stapler

My desk is full of everyday objects. Including a red stapler. It is a Stanley stapler, not Swingline, but I could easily pretend to be Milton with it.

ImageSo for the Common Everyday Object assignment, I decided to celebrate my red stapler with a photoshopping extravaganza.

Image

This first one is actually a very simple effect in Photoshop. In the Adjustments panel (in GIMP this is the Color menu) I went to Curves. The tool initially gives you a single RGB graph with a lone gray line, but you can select Red, Green or Blue. There are also pre-built “curves” that will automatically change the image such as creating a color negative. I played with the four different curves, sliding the line up and down at various points along the graph until I found a combination that was interesting. It’s a simple technique (and gets a lot more fiddly when you are trying to actually blend something in with another image), but for this assignment I decided to just go with a fun semi-neon effect.


ImageFor this second one, I decided to transform the image to a single color. There are a number of ways you can do this, but the easiest is to 1) select Black & White or under Hue/Saturation desaturate the photo. 2) Go to Channel Mixer and play with the Red, Green, Blue, and Constant channels. Slide them around until you find a combination you like. To achieve the above effect, in the Red Channel I set Red to -32%, Green to +102%, Blue to +135%, and Constant to +62%.

Image

This third one is just a simple Filter. From the Artistic Filters I played around with a few, but finally settled on Cutout. It creates an interesting stippling effect for the surface of my desk.

Image

For the last one I decided to go with an underwater effect. First I went with a Distort Filter called Ripple. Then I overlayed a copy of the original at 40% Opacity with an Artistic Filter called Sponge. This created distortions of the stapler image similar to those you see when looking at something lying on the bottom of a swimming pool or a clear body of water. Then I added a Photo Filter called Underwater to add a greenish blue tint to the image with a 47% Density. The density is yet another slider that you can play around with until you get the particular desired hue. Finally, I wanted to add the ripples of the water’s surface, so I overlayed an image of the ocean’s surface with 32% Fill. I didn’t like having it on top, so I moved it to be below the underwater filter, and finally had the effect I was going for.

LOLz with Shakespeare

In searching through lists of quotes from Shakespeare, it’s surprising what lines you can find that perfectly fit amusing pictures of cats you found on the internet. In this edition of Shakespearean LOLcats, we have some particularly apropos ones.

What'sDoneCan'tBeUndonehereismyyjourneysendhereismybuttoutdamnspot(Okay, this last one was planned.)

It’s A Photoblitz!

Yesterday I decided to tackle the Photoblitzing assignment for this week. The warning that you should go somewhere with the potential for a diverse range of subjects is really important to completing this. The larger the location, the better. Your house might work, but your apartment probably won’t. The office suite I work in would never have been a good choice, but just outside the building was perfect. So I spent 14 minutes traipsing around the grounds of Wellesley College outside of Clapp Library to complete my photoblitz. I’ve created a slideshow of all of the pictures I took to give a sense of how many you have to take to get a few good ones (unless you are a natural at photography, in which case I am supremely jealous). Discussion of the best ones follows.

Click to view slideshow.

The first photo I want to highlight happened by chance. I went over to a fountain/artificial pond next to the library to take pictures of the supremely ugly fountain, but found that there was this one patch of light peaking through the trees overhead that created a light flare on the surface of the water. The light flickered in an unpredictable way. It took several tries, but I managed to get a picture of it at its largest size, creating an interesting effect:

IMG_0977

Make an ordinary object look more interesting, almost supernatural.

In looking at the picture, the sci-fi/fantasy fan in me wants to think there is something below the water – a glowing, magical orb, the phospholuminescent eggs of some alien species, a spirit – even though I know it is just a light flare.

I spent a lot of time chasing after interesting shadows. One of the things I found both interesting and frustrating about my shooting location was the fact that there were trees casting shadows everywhere. They formed interesting patterns, but also made the lighting less-than-ideal for a lot of shots. In this particular shot, I managed to get the angle right so that the shadows dominate the image so much that the the area not in shadow is completely washed out thanks to my camera’s autofocus. If you look through the entire collection of photoblitz pictures, there is another with just a tiny bit more of the area not in shadow and you can fully see it because of the camera’s automatic adjustment to the lighting. This one I like because it creates a sort of world’s-edge effect, as though everything drops off after the shadow ends.

IMG_0968

Take a photo of an interesting shadow.

One of the trees in the area where I was shooting is a popular picnic spot for students, as it has a great view of the lake. The tree is covered with aging carvings, many of them lovers’ hearts and initials. This particular one I liked because it has been so distorted with time you can’t actually make out the initials, though the heart is still recognizable. Extrapolate whatever trite metaphor about love you like.

Take a photo that expresses a human emotion

Take a photo that expresses a human emotion

This next one happened purely by accident – it was a walking-around-holding-my-phone-in-camera-mode-with-the-thumb-dangerously-close-to-the-button photo that happened to turn out looking great. It looks like it could be one of those weird distortions Mac OS’s Photo Booth has, or possibly a painting as the lines look almost like brush strokes.

Make a photo that is abstract, that would make someone ask, “Is that a photograph?”

Make a photo that is abstract, that would make someone ask, “Is that a photograph?”

Sometimes the accidental photos turn out to be some of the best ones you take. :)

This last one I like to think is my most creative interpretation of the photoblitz requirements. The entrance to the library is guarded by a pair of statues, one armless, the other with a finger pointing to the sky. I believe they represent the two aspects of Minerva, war and wisdom. So I took a picture of Minerva’s hand pointing upward to symbolize knowledge, or perhaps because she’s just had the perfect idea for how to conclude her term paper:

Take a photo of someone else’s hand (or paw)

Take a photo of someone else’s hand (or paw)

It’s Finally Visual Week!

I am one of the volunteer cheerleaders for visual week (aka Telling Stories in Photos)  for Headless DS106. Alan said that we don’t need pom poms to be cheerleaders:

EmilyCheerleaderBut I went ahead and made an animated gif of me as a cheerleader anyway. This is my third semester participating in DS106 – back in Fall 2012 and Spring 2013 I was an open participant. If you are looking for ideas for how to tackle visual assignments, you can check out my Visual Assignments tag or anything under (Digital) Story Time since there are also relevant daily creates there. I have a dearth of tutorials on this subject, so that is one of the things I will be working on this week as I cheer all of you along!

To get the ball rolling, I thought I would start out the week by completing the one strongly recommended and super easy assignment of creating a Post “Secret”.

photoNot really a secret except to those who don’t know that I write fiction, but certainly fits the bill for “biggest dream in life.”

So, on to visual week! Happy photographing and photoshopping!