Seaside Haunts

I LOVE long exposure shots…especially water. And when you isolate just the water I think it gives the photo an ethereal feel. Take this image for the ds106 assignment Splash the Color.

Seaside Haunts

I think the color of the water and the ghosting of the waves rolling in and out leaves a surreal impression of the bay. And could that blue color be any more awesome? Being the horror movie fanatic I am, I can just imagine what sort of creature is rising from the depths….

This photo was a long exposure (2 seconds) and a 27mm focal length (on my 16-35mm f/2.8 lens). I also used a neutral density filter to cut down the light since the shutter would be open so long I didn’t want to overexpose the photo too badly. I’m quite happy with how this turned out.

Graphic Gift, featuring our lady friend from the Invaders.

Instead of staring at a horrifying extra terrestrial in total fear and anguish, our friend is now gazing upon at the new technology of refrigeration with amazement. graphicgift

“This is just the Bee’s Knee’s, Mrs. Jones! Why, is that an icebox in there?”

“And how, Susie! Also, PENICILLIN.”

This was really easy to make after I erased the background footage and added a layer mask in gimp.

Link to Original Assignment

Hitchin’ A Ride

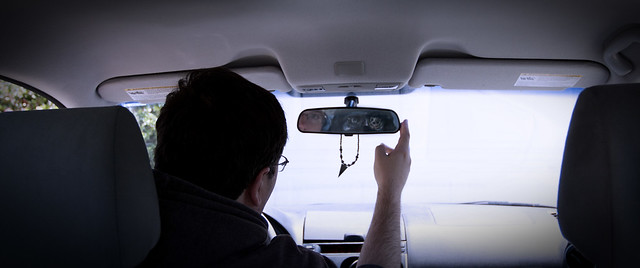
I usually don’t stop to pick up hitch hikers…but I didn’t have a choice today. Death was waiting in my car.

hitchhiker
This is another ds106 visual assignment Is that a…ghost?! What I find interesting about this photo is that it looks like YOU are the ghost looking at your reflection in the rear view mirror while scaring the crap out of me…(forgive the bad acting. I’m a behind the camera guy). I got the idea from the Twilight Zone episode “The Hitch Hiker”.

The ghost image is from a movie I worked on as a Visual Effects compositor Ghostmaker (2011). Its the reaper that chases the main characters throughout the movie.

Blowing up the Micro World

I came across the Hangin With Hockney assignment for ds106. I immediately thought, wouldn’t it be cool to take a series of macro photographs of an object and assemble them into a normal size photo…well. That proved more difficult that I expect. Working in macro land the depth of field varies greatly if you lean in or out slightly. But over all I’m pretty happy with how they turned out. I think they could definitely be better and I’m really into this process so I think I’ll be trying this on a regular basis.

Basically you take a series of photos of a scene and assemble them together into a ginormous photo using something like photoshop or gimp. I took some photos of some plants we have in our backyard. I’d name the plants if I knew what they are.

Yellow

In this one, I like the colors but there’s definitely a struggle with the depth of field.

Green

Here I think the depth of field was more consistent.

This was a lot of fun and highly recommended.

What a little color can do…

Flower


I just realized my sums for my stars were off so here is my last visual design assignment of the week.  I actually enjoyed taking this photo more than editing it. I got to play with my macro lens, which I don’t get to use much. I didn’t expect that much detail to show up but I’m not complaining. This is also one of those that isn’t hard for me, but could be annoying daunting for someone who isn’t used to it. In a perfect world you use a tool to select the flower and promote to it’s own layer, and change the first layer to black and white. However I have yet to find a program that chooses exactly what the user wants every time. Lots of time zoomed in at 500% scrolling to make sure the pixels selected flow properly so it doesn’t look out of place. I find it fun, so I guess that’s all that matters here.

Splish Splash

Musician at Work

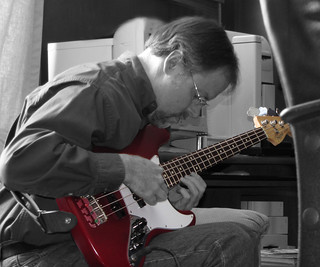
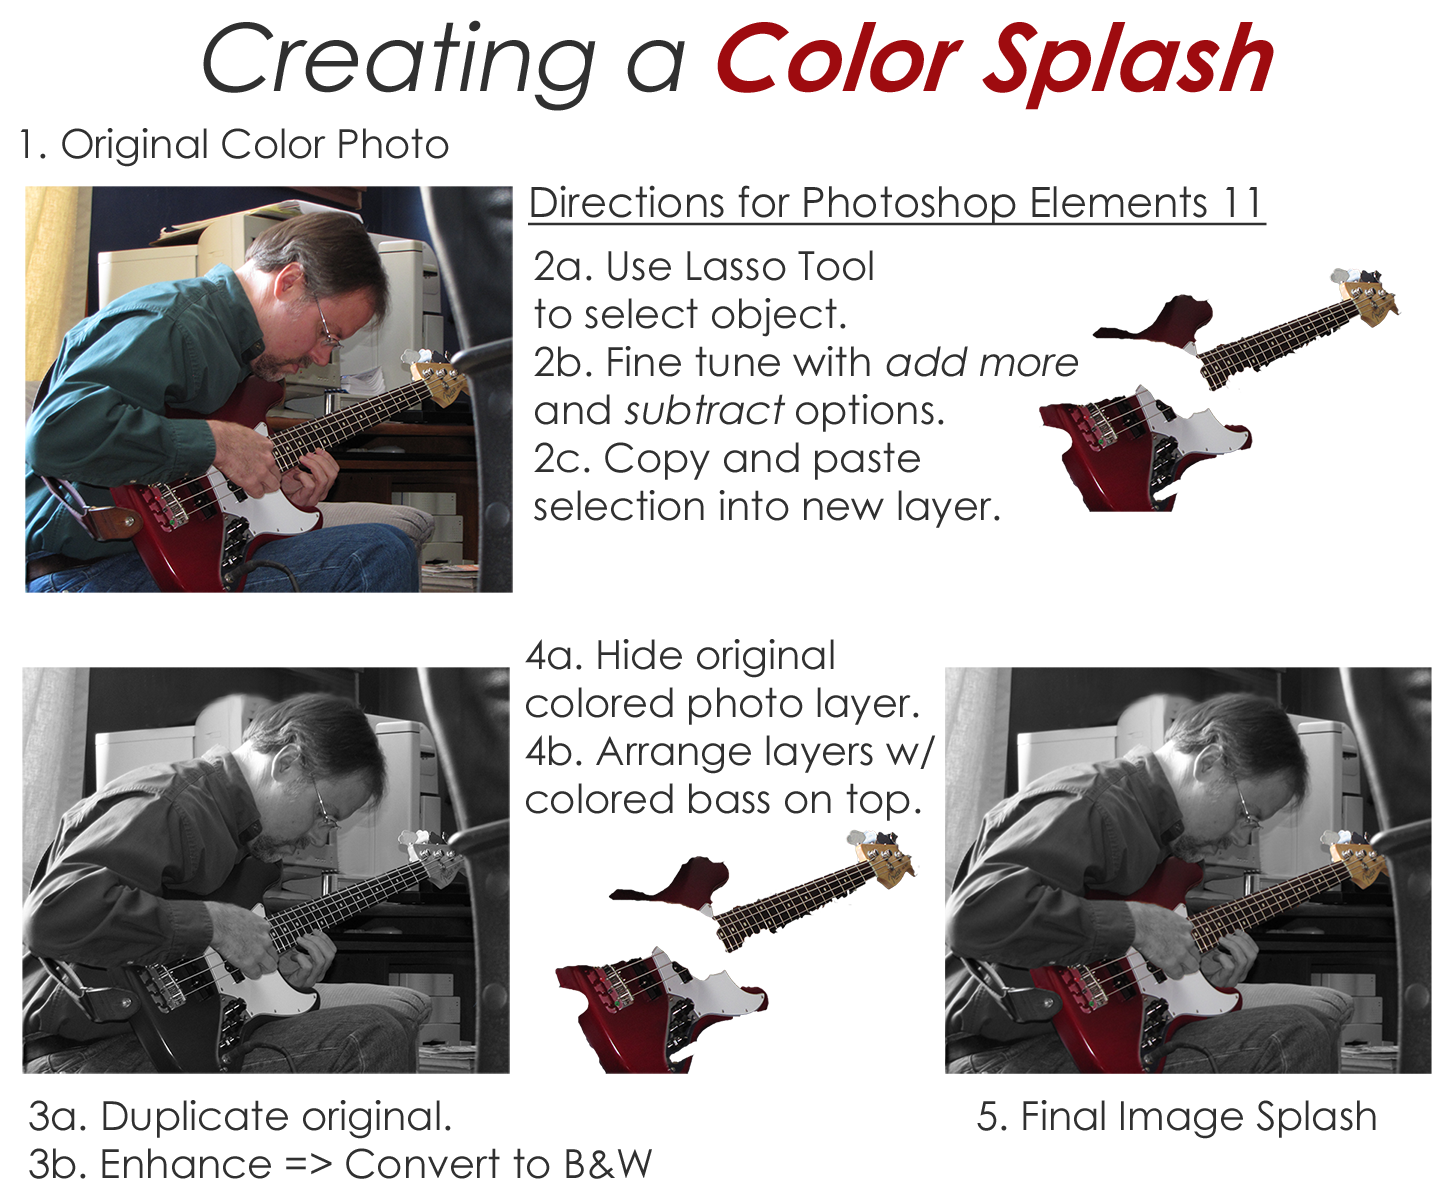
DS106 Visual Assignment 340 asked me to emphasize details- remove all color from a photo, and then restore the original color to a single object. Here’s one of my favorite examples from a project I did a few years back along with a printable 1-page directions handout.

My partner is a singer/songwriter who also plays bass and guitar. He’s been a great sport letting me experiment with new digital story telling tools over the last couple of years.  One day while in the recording studio laying down new tracks for his latest CD, he agreed to let me take photos of him in action. The original color image I use in this example is nice enough. It tells a story of a musician hard at work in the studio. But I wanted something that would really grab your attention.  I decided to highlight the bass by leaving it in living color and tone done the rest of the photo by making it black & white.  This was especially powerful when you see his black & white hands holding the colored bass. Talk about a SPLASH.

The trickiest part to accomplishing this effect using Photoshop Elements 11 is the use of the Lasso Tool.  You can pretty easily select the bulk of the object you want to leave in color- or make it a B&W object for another perspective. The hard part to making this look nice is the fine tuning you need to do while using the Lasso Tool.  I had to zoom in very close and use the add more and subtract options alternately to select only what I wanted. You then copy and paste the selection into a new layer.  As long as you don’t move any of the images in the individual layers themselves they will all align properly.

ColorSplashDemo_8X11


ManyMe In Spring

ManyMe Spring

I was cruising the DS106 visual assignment choices for something that looked fun and challenging – yet would only take a couple of hours to complete. The MULTIPLY YOURSELF assignment (Take two or more photos of yourself in the same location and combine them into one photo.) really jumped out at me.  And it was worth 5 stars!

The project unfolded in three phases.

Phase I woke me up in the middle of the night, my mind wouldn’t rest as it started planning how to set-up the shots so that the photo editing phase would be easier to handle.  I initially contemplated enlisting the aid of my partner or daughter to snap the shots, but then decided to take on the challenge of doing this all by myself from start to finish.  I decided to use my FlipVideo camera on a tripod to take video footage of me in different places in the frame. Then I’d capture still images on my Mac with Adobe Premiere Elements 11 and meld the images together in Photoshop Elements 11.

Phase II was all about setting up the location, shots and shooting the video clips.  I tested a few different scenarios before I had something I thought would work.  I added interest and personality to the mix by wearing something a little different in each shot.  (As an aside, just in case I wanted to use the video later to make a “live” version of the photo, I made sure that I entered the shots from different places in the frame so that I wouldn’t cross over into another shot when I melded them together.) The weather outside cooperated by not being too windy, the overcast morning meant I didn’t have any shadows, but I still needed to work quickly as it looked like rain was on its way.

Phase III was spent putting it all together.  I downloaded the video clips into Premiere Elements 11 for the Mac and selected several still images from each of the three “Rochelles”.  I was a little dismayed that the resolution of the images wasn’t all that great.  My decision to do this assignment without a helper or the need for a timed shot delay function was now suspect. I would have had higher resolution images if I’d used my regular digital camera on the tripod instead of capturing the stills from the FilpVideo. Alas, as I’ve found so many times before, creativity abounds when I’m seemingly “stuck” and need to find another way out. Not wanting to set everything up again, I moved forward with the “sub-optimal” material I had before me. I trusted everything would work out. Besides, I’m one of the online outside participants of the course, and there’s no real grade at stake here. ;-)

I diligently went to work cropping and blending my three images into one.  It was fairly easy except that the center pose lighting was slightly lighter than the two outside images.  Why??  I haven’t a clue. I shot the entire video in one 4 min session and the lighting matches at both ends.  Maybe the clouds thinned a little or something half-way through?? Who knows…. To fix this I used Enhance=>Adjust Lighting=>Brightness and Contrast on each of the 3 poses until they matched as best I could get.  While playing around I chanced upon a combination of adjustments that slightly blurred the photo even more and suddenly it looked great.  As usual I don’t exactly remember what I did to make it happen… it was “Magic”. Finally, I wanted to give the photo a border of some kind.  I like to play with all of the dials and sliders to see what shows up. EUREKA! The combination of Edit Layer Style=>Glow Inner=> Yellow was perfect.

I now have a beautiful feathered yellow glow surrounding my ManyMe photo that matches the yellow jacket I am wearing. Yippee!

The invaders GIF

I made a GIF to represent the Twilight zone episode the Invaders. In this episode, the invaders are little action figures but actually turn out to be the US, and the person ends up being a giant! Threw a little twist in things, huh?!

Here is a little animated GIF I made to represent the “giant’s” adventure in this episode. She cant even open her door and bam they attack!

http://imgflip.com/i/1o4yy

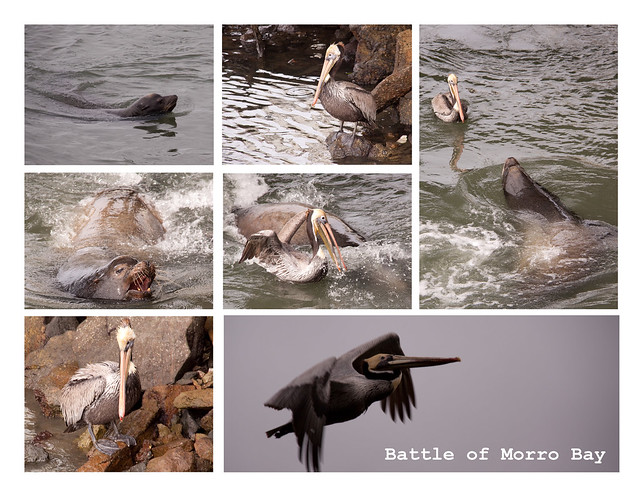
Battle of Morro Bay!

On a photo trip to Morro Bay, California I encountered a seal and a pelican duking it out for domination of the bay. The One Shot assignment for ds106 fits this perfectly. Unfortunately I couldn’t capture the moment in one photo but a few shots created a compelling collage.

Take a single photograph. Chop it up comic book style to create tension and narrative. Checkout this image for an example*. *It may, or may not, be one image- the concept is still sound.

Battle of Morro Bay

I think the images tell a story. The first and second photos create a sense of tension with the two animals staring each other down. The third image sets up the encounter and the escalating aggression of the seal. The seal successfully scared off the pelican who retreated to the shore and eventually took off.

Assembling the collage was a simple photoshop project. A lot of copy-paste-resize steps.

Shaded in my bucket hat

IMG_0354


I found an awesome app for this assignment called Cut Me In.  Its free on the app store and there’s a pretty big variety of places to put yourself in.  Decided to crop myself into Madagascar to chill with some lemurs.

Here is a link to the assignment.

Difficulty: 3 1/2 stars