Dream Room

For this assignment I decided to take to Pinterest and design my very own room! Now in the description for the assignment it says to make it as out of the box as you want, I like to say mine is out of the box chic! I’d love to have books and indoor plants everywhere and a wonderful, cozy lofted bed! Nothing like what the Westerners would sleep in. However I did add a few western accents such as pillows and cacti into the room. And who knows, maybe my large walk-n library will have Western classics in it. Check it out!

Dream Room


Assignment Bank #3

I decided to do the create your own room assignment because…who wouldn’t want to have the room of their dreams?! Heres to everything I wish my room could be if I had the money.

https://www.pinterest.com/mrivasbe/dream-room/


I picked those rooms out cause they looked really cozy, and the bed is what makes it or breaks it for me. If my bed is not comfortable or doesn’t look like it, then i can’t sleep there. But every other decoration is basically with a map, cause that is what I normally have in my room. I liked the idea of the dresser with the writing on what is in it, because that is really organized and would help a lot when you’re trying to get ready. I chose that bathtub, because lets be honest who wouldn’t like to have that view when they are taking a relaxing bath.

Google History Maps Story- Tutorial

Here is my tutorial on how to complete the assignment Google History Maps Story:

  1. Go to Google Maps. The page should look like this: Screenshot 2015-12-08 at 1.51.28 PM - Edited
  2. Go to MenuMy Maps–Create MapScreenshot 2015-12-08 at 1.52.57 PM - Edited
  3. At this point, you can title your map what you please and give it a description.
  4. Add locations to your map, documenting the life of the person you’ve chosen.
    • Search for the specific location in the search bar (e.g. “Frankfurt, Germany”). Screenshot 2015-12-08 at 1.54.38 PM - Edited
    • After finding location, click Add to map.
    • Edit the title and description of the location, as well as the icon/symbol and color to desired setting. Screenshot 2015-12-08 at 1.56.23 PM - Edited
    • Repeat step 4 until all desired locations are on the map.
  5. Add lines to your map, connecting all of the locations.
    • Under the search bar, click on the symbol that looks like 3 dots connected by a line. Screenshot 2015-12-08 at 1.58.37 PM - Edited
    • Start with the cursor on the first location in the timeline, and drag the line to the second location.
    • Press Enter on your keyboard. You will then be given the option to customize the appearance of the line as well as it’s title and description. Screenshot 2015-12-08 at 2.00.26 PM - Edited
    • Repeat step 5 until all desired lines are on the map.
  6. Drag your set locations and lines to the desired order via the left bar on the side. Screenshot 2015-12-08 at 2.01.52 PM - Edited
  7. Your map automatically saves, so at this point you’re done! Congratulations on creating your own Google Map!

Please Hire Me?

Character Resume: Using either Microsoft Word, creating your own webpage, or using a website like LinkedIn, create a “fake” resume for a fictional person or character of your choice. Add detailed descriptions and make the resume relevant to the character. Resume must include a profile, work history, education, and skills. Locations, job positions, and companies can be made up! Use your creativity! (3.5 stars).

This is a tutorial on how to create a resume using Microsoft Word.

This assignment required me to make a resume for a fictional character,  so I will be showing you all the resume of Katniss Everdeen, from The Hunger Games!

First, I used the application, Microsoft Word, which I already have on my computer. It is a little “W” on my Mac dock.

First, a template-choosing screen comes up called the “Word Document Gallery”. This has a list of templates you can use within the Word document. On the left hand side, you can see there are many things to choose from. There are Calendars, Letters, Fliers, and much more!

I chose the button Resume, in order to create a Resume through Word today.

Screen Shot 2015-12-02 at 3.01.18 PM

Beneath the Resume Category, there are a couple styles to choose from. I stuck with the first option called “Blocks Resume” which is a very simple layout, but it has a little blocks detail that gives it some life, in my opinion.

Of course, you can choose whichever layout you prefer!

To customize it further, you are able to choose a color scheme and fonts. Since I was creating a resume for Katniss Everdeen, I decided to go with an earthy tone color scheme called Inspiration. I stuck with the original fonts of this template.

Screen Shot 2015-12-02 at 3.23.06 PM

Afterwards, I clicked “Choose” at the very right corner. Let’s begin with our resume!

Screen Shot 2015-12-02 at 3.28.59 PM

As you can see, the template already put my name at the top. This is because normally, I would creating a resume for myself to be submitting, but since I am making a fictional one, I change it to Katniss Everdeen.

This is normally easy, but we are dealing with a Word header. This is a property of the template that makes it seem very professional. In order to change anything in this section, you must double click it and close the header once you are finished.

Screen Shot 2015-12-02 at 3.56.03 PM

I filled in the basic information, my address, phone number, and e-mail here, as well.

I decide I do not really like the bright green headers of the words “Summary, Experience, Education, and Skills” so I am going to change the colors of these headers. This is really simple! 

The top of Word Document, under “Font” there are many “A”‘s to choose from. The “A” we want has a colored box underneath of it. This button lets you choose what color you want your words to be. I highlighted the Headers that I wanted to change. I clicked this button and the Automatic color is Black. Hit this. Now the color has changed!

Screen Shot 2015-12-02 at 3.32.13 PM

Of course, if the color scheme you chose is perfect to you, you can leave it as is.

I also want to make the headers Italicized. I use the I under “Font“, beside the B and the U. Again, I highlighted the text Experience, and pressed the I. Now, it is Italicized. This enhances the headers more, in my opinion. You may choose to bold or even underline the headers instead.

Now, I need to change the filled in text that was already there (not sure what language this is?!) and replace it with my information to make my resume!

I complete my Objective, which is what you want to get from the job you are applying for.

Then, I decided to use bullets in order to easily list Katniss’s Experience, Education, and Skills. Sometimes, bullets make things easier to read and look at.

Screen Shot 2015-12-02 at 3.53.15 PM

I clicked the button under “Paragraph” that has dots and then lines next to it. This symbolizes the bullets. As you can see there are multiple styles, I just stuck with the plain black. Now, I have bullets and I can list Katniss’s information using them.

Be sure to fill in all your awesome skills, past experiences, and previous jobs. Do not be humble. This is your time to shine!

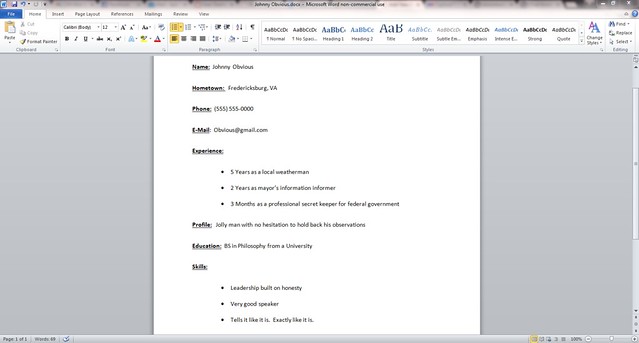
Here is my finished product on Word. Very easy and it looks professional.

Screen Shot 2015-12-02 at 3.01.02 PM

And here is my finished Katniss Everdeen resume all clean and dandy!

Screen Shot 2015-12-02 at 3.02.55 PM

Now, you are done with your resume! Congrats! You probably want to e-mail it to someone, or print it out, OR at least, save it!

Screen Shot 2015-12-02 at 4.01.40 PM

From the button File, this selection pops up. Here, you can choose to Save, Print, and Share. This way, you will have your resume where you want it and can share it to your employer.

I hope this Web tutorial on making a resume using Word helps you create a wonderful resume!

—SALTY SKINN

Vacation of a Lifetime

I had to think of a dream vacation and create a pinterest board of it for the My Dream Vacation assignment.  Here it is:

Capture9

Couldn’t get the widget to work properly, unfortunately.

So my dream vacation would involve going to a very remote place with lots to see in the natural world like Norway.  I don’t mind the cold and some of the sights you see in pictures are truly breathtaking.  I don’t know what kind of food they eat there, but I imagine anything would be worth bearing to take a visit there.

Next I think I would like to visit Japan to get a look at some of the technological marvels they have there, like the robot cafe you can see on the pinterest page.  Tokyo is a big city in particular and has loads to see and explore, especially for tech heads.

One thing I’d like to do anywhere is skiing.  I’ve never done it, but it’s always been something I think I’d like to learn someday.  Something about whisking down a mountain at a fast speed just seems incredibly thrilling.  And the sights are beautiful, of course.

To make this project, all I had to do was go to pinterest, create an account, create a vacation board, and find various pins on places I would like to visit.  I don’t think about this kind of thing very often, so it took me some time to think of places I would like to go.  The keywords I came up with were Norway, Japan, and skiing.

Johnny Obvious Resume

Johnny Obvious

This is for the Character Resume assignment.

Nobody else in the world can tell you the exact situation like Johnny Obvious can.  His unique skill set can benefit… somebody.  Maybe.  Probably.  More than likely he’ll just annoy people.  But you won’t find that in his resume.

So for this assignment I made up the humorous character Johnny Obvious as a caricature of people who tend to point things out that simply don’t need to be.  The points in the resume are intentionally left mostly ambiguous to add to the humor.

I just used Microsoft Word for this assignment.  I set it to 12 point font and double space because I think that makes it more readable.  There’s no set order to the various parts of the resume, since the point is obvious.

Capture8

Jack Brooks: Not Monster Slayer 2015-10-26 18:08:55

Slayer Cat Shirt

For the Storytelling Within the Web assignment, I decided to juxtapose two things that you normally wouldn’t think about together.

Capture7

Slayer is known as one of the most brutal thrash metal bands of all time.  I thought them releasing a shirt for cats would be pretty hilarious.  I decided to find an article on them on the rock and metal news site loudwire.com.  It was easy to find an article on Slayer to edit and their web pages were simple enough to not need to restructure the entire page.

To make this webpage the first thing I did was download the Mozilla X-Ray Goggles.  Then I spent a while thinking about what could be a funny story.  Then I had to find a website that was simple enough to not take hours of time to edit to fit the story.

When I found one, I just google searched “slayer cat” and the first image that popped up was the one of the cat in the Slayer shirt, which was the inspiration for the story.

I figured out how to embed the new image and replace the one currently there by looking at others who had finished the assignment.  They suggested copying the X-Ray code from the image in google and just pasting it over the text used in the webpage.

I did minimal editing to the text already there, since I thought it would be funnier to see the new text over the actual, serious lines.

Here’s the original page for reference.

NPR or Ds106?

Storytelling Within the Web

From the Spring 2011 ds106 class came the idea of changing up an existing web page to tell a new story ” you will be intervening in the code and design of a website of your choice to tell a story. You are not to photoshop the design of the site, but rather intervene in the actual html and CSS of the site—though you can photoshop particular images on the site. Essentially you alter the content of a web page (content, images) to make it tell a new story.

The Work Itself

http://properousdaisy.makes.org/goggles/properousdaisys-remix-of-properousdaisys-remix-of-properousdaisys-remix-of-properousdaisys-remix-of-properousdaisys-remix-of-properousdaisys-remix-of-properousdaisys-remix-of-properousdaisys-remix-of-properousdaisys-remix-of-properousdaisys-remix-of-properousdaisys-remix-of-properousdaisys-remix-of-properousdaisys-remix-of-properousdaisys-remix-of-properousdaisys-remix-of-npr-national-public-radio-news-amp-analysis-world-us-music-amp-arts-npr

The Story Behind the Story

So I am on the NPR website all of the time and thought it would be neat to change up the site myself with some crazy and wacky stories.

Narrating the Process

In order to begin with this project I looked at a ds106 student’s tutorial on it. Then I proceeded to add the titles and pictures necessary to change the website as you can see below.

Original Website

Screenshot (41)

Site in the Middle of EditingScreenshot (42)

Here’s a logo I made to replace the NPR one on the newly renovated site, however, it would not upload. I tried as many different ways as possible and for whatever reason, it would not work. But I still wanted to let people see it.

UMWlogo

How they Came Together

How it all Began- 4 Stars

Create a page on your website that goes into detail how a group came together. Talk about the motives behind joining forces, real or fictional. This can be serious or comedic, have fun!

This looked like a fun assignment to make up a story of a group people that became friends.

The Work Itself

It was 2011, junior year, in IB Biology class when Mrs. Durkes was assigning lab groups. She made the fatal mistake of putting Roberta, Samantha, Chrissy, and Teeny into a group together. Each girl knew each other from middle school but had never really gotten the chance to actually get to know each other.

So the class went to their assigned lab stations and that’s when it all started. The fours girls had the absolute best time dissecting flowers and mushrooms for science. They were daring each other to eat the mushroom, Robert even ate a piece of the flower. There was no dare too big for her. After class was over, they all walked down to lunch together and made plans to hang out that weekend. The biology girls had no idea what they were getting into.

Roberta, Samantha, Chrissy, and Teeny decided to spend the night in Samantha’s tree house but they didn’t realize that the tree house was haunted. I mean, who had ever head of a haunted tree house? While the girls were lying in their sleeping bags gossiping,  they heard a knock at the door. No one wanted to get up. It was so unexpected and terrifying. Finally Roberta got up because she couldn’t take the suspense anymore and had the constant need to prove how tough she was.

She answered the door. No one was there. The girls had no idea what to do. So naturally, all of them started screaming except for Roberta. Chrissy led the pack into climbing down the tree house as fast as possible and everyone followed. The girls ran inside, closed the door, and locked it. Everyone was trying to make sense of what happened but none of them could. They were all certain that it was a knock at the tree house door and it was definitely not the wind.

They decided to look out the window at the tree house. When they looked, there was shadowy figure of someone standing by the tree house door, knocking. The girls decided to stay up all night because they were just too scared to sleep.

The next morning Samantha begged and pleaded with her mom to tear down the tree house. The girls went home and from then on they were inseparable. With an experience like that, anyone would come close together.

Story Behind the Story

So if you have ever seen the movie “Now and Then” you can tell that I got some of my inspiration from it. I was also inspired by own group of friends. We met in junior year biology but I didn’t use any of our names. I used the names from the movie because I thought they were cute and fun. Also, each character in the movie reminds me a little bit of each of my friends so it just worked out perfectly.

Incredible Discovery Leads to New Theories About the past of Mankind (YouTube It Your Way Assignment)

This is the second of two required web assignments this week. This assignment is worth three stars, bringing my total for the week to seven stars. The assignment page is here, but I’ll include the instructions below as well.

For this assignment go on Youtube and pick either your favorite video or a totally random one. Alter the web page so that it in no way goes along with what the Youtube video is about. Have fun and be very creative! Remember you want to confuse your viewers!


The video I chose to work with was the classic “Monkey Smells Finger”

Since the instructions asked me to confuse my viewers, I decided to change the YouTube page to make it sound like a video leading to some important sociological or anthropological discovery that changed everything that mankind thought about its origins. Then, when people are expecting something on par with the discovery of extraterrestrial life, BOOM, monkey smells finger.

Monkey’s Incredible Discovery!

1 2 3

I used Mozilla X-ray Goggles to edit the YouTube page. I started with the title, changing it to “Monkey’s Incredible Discovery.” From there, I worked on the comments. I left anything along the lines of OMG, since those could easily apply to my fake video, as well as anything in a foreign language. I changed anything else to something describing just how incredible and life-changing the video was, with at least one person remarking that it made them question everything they’ve ever known. Once I had gotten through the comments, I started to work on the ridiculous related videos. I was able to edit the name of the top video to change it to “Monkey Solves Difficult Problem.” That was all I could think of for a video of a monkey peeing in its own mouth. I really tried to delete a lot of those videos, but I wasn’t able to. The titles of any other videos could not be edited using X-ray Goggles, for some reason. I could view the html, but as soon as I clicked in the box to try to edit it, the title disappeared. So, with the thought that any video of a monkey on YouTube would of course bring up several ridiculous and disgusting videos, I let them be. I thought I was all finished, so I clicked publish and followed the provided link to see how my new YouTube video looked. Everything was exactly as I had intended…except that the video couldn’t actually be viewed. A Google search turned up nothing, nor did checking through previous submissions to this assignment. I couldn’t find any way to get the video to work on my page, so I just included it at the top.

Scrolling through the web assignments, I wasn’t super happy because they all looked very involved without being very fun, but this assignment actually turned out to be very entertaining. I just wish I could get the video to work to complete the effect!