Bad Guy Business Card-”The Situation”

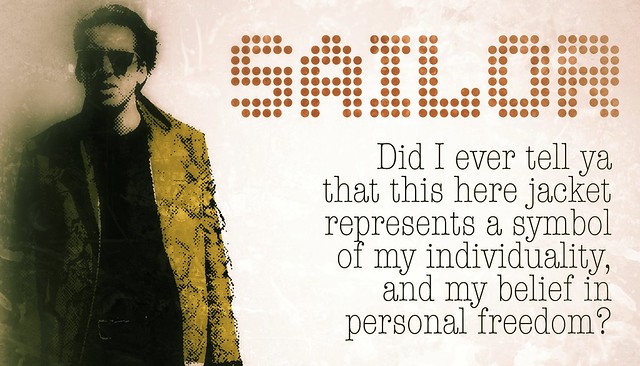
Bad Guy Cards Assignment is pretty simple, make a business card for a bad guy. I choose “The Situation” because I thought it will be fun to create.


First…find a great picture of Mike and crop him out using the Magnetic Lasso Tool then I used the “Film Grain” filter. Then…I did the same with this photo expect I didn’t use any filters.

After I found the background picture and used the Hue/Saturation to change the color..


I added the two layers and a couple of text, changed the blending options and Boyah!!

Stereogranimator

Steriobear

NYPL Labs : Stereogranimator

Create and share animated GIFs and 3D anaglyphs using more than 40,000 stereographs from The New York Public Library.

Since I’ve spent a fair bit of time animating gifs for DS106 of late this was interesting.

Stereoscopic photography recreates the illusion of depth by utilizing the binocularity of human vision. Because our two eyes are set apart, each eye sees the world from a slightly different angle. Our brains combine these two different eye-images into one, a phenomenon that enables us to “see,” ever so slightly, around the sides of objects, providing spatial depth and dimension. Stereoscopic views, or stereographs, consist of two nearly twin photographs — one for the left eye, one for the right. Viewing the side-by-side images though a special lens arrangement called a stereoscope helps our brains combine the two flat images and “see” the illusion of objects in spatial depth.

and

The Stereogranimator joins these latter-day adventures of the venerable GIF, mashing up an important early genre of internet folk art with a nearly forgotten species of folk photography.

You get to play with the creation of the gif, this creates a 2 frame animated gif and alternates between them.

Bonus link:Create 3D anaglyph images with 3 lines of Ruby code « saush

Update Colin maxwell tweeted Start 3D photos: 3D photo sharing and printing made easy

Cartoon Me

Cartoon Me

What I did for the Assignment Cartoon You, was I took a previous picture of myself and opened it in Photoshop. In Photoshop I used a filter called “Stamp”. This filter created a sketch of myself almost as if I drew it myself!

Super Villiain Your Friend

In this assignment “SuperHero-SuperVillain Your Friends”  we had to turn our friend into a super hero or villiain. I think Kick Ass is by far one of the best movies I’ve seen so I had to use Red Mist.

First I cropped out my “friend” (acutally my cousin’s face) which was easy because it was just a oval to select, rather than his whole body or some crazy shape. Then I simply duplicated it to the Red Mist poster and used the erase tool over the top of his head so he can have some of Red Mist’s cool red hair.


Who Got Served?

This is the Wait, where’d that guy come from? assignment; simply just putting someone random in a place they shouldn’t be. I was watching Fresh Prince (one of my favorite shows) and decided to use it for this assignment.

First and for most cropping the Sun Drop was a pain! But  I used the magnetic lasso tool, usually I use the magic wand tool but the background was way too busy. After selected the body I went to “Refine” under the main PS tool bar, and played with the options I had. I ended up repeating this process twice and it didn’t come out perfect but it was good enough. In total it took me about 10 mins to do this photo.

My inspiration: Fresh Prince and Sun Drop

Photobucket

Cartoon The Head !


I took the body of a raw chicken and I used Jimmy Neutron’s head and wala!, this is the result. :)

Tagged: DesignAssignments, DesignAssignments385

Bad Guy Business Cards – David Lynch Edition

Frank Booth Business Card

So what’s really surprised me recently is how my phone could suddenly be such a big part of my design process. I’ve used Photoshop and Illustrator for years, to touch up photos, create logos, set typography, etc. But in the past few weeks I’ve been bouncing images back and forth between my mac and my phone just so I could use these amazing photo image adjustment tools that I don’t have on my computer. In particular I’ve been using Snapseed an iPhone app that maintains the original image’s resolution and allows for multiple passes with filters unlike apps like Instagram.

I created this Frank Book Business card based on the frame below from the film Blue Velvet.

After deleting the background, I converted the image to grayscale and applied a Halftone Pattern filter, which emulates old printing processes to emulate grays with lots of tiny black dots.

Next I imported this image into Illustrator and used one of my favorite techniques which is to convert bitmap images into vectors using the Livetrace tool. After that I did some additional vector work, type setting, and the placement of the Pabst Blue Ribbon logo. To bring me to this point in the design:

Here is where I would have normally stopped and been fairly satisfied with the work. But lately I’ve been importing this work next to my phone and doing additional filter work to produce the final result above.

Right now it feels like a new process, that leads to some interesting rich results. I worry that I might lean too much on some canned computer filters to create a particular ‘look,’ but for now I’m sticking with it.

Below are the before and after phone edited versions of a business card for Sailor from the Lynch film Wild at Heart. And thanks to Paul Bond for the inspiration for the bad guys business card assignment.

Sailor Business Card

“1 STAR DESIGN ASSIGNMENT# 5? “Superhero Banner”

For this assignment I had to create a banner of my favorite superhero….(When I was younger of course..lol!)  So I chose the Power Puff Girls because they were my favorite super-heroes when I was a child and my mother even threw me a Power Puff Girl birthday party when I turned 12…..that is one party I will never forget!! I had so much fun with my friends and family! This design assignment was the easiest of all design assignments, all I had to do was upload my picture of the Power Puff girls to Picnik.com and then I created the banner with borders from Picnik, and then I also used the mirror-border effect on Picnik which created triple border and then I added colors inside each border and I had the ability to adjust the inner thickness, and the outer lines thickness. Then I used the text tool to create “The Power Puff Girls” text and  the “Always At Your Rescue” text at the bottom which I used the creative fonts tools from Picnik as well. Next I went to the stickers tab where I got to choose from plenty stickers and themes to paste on my banner so i choose to paste 3 hearts in the color of each Power Puff Girl and then I added the starts on the corner of the bottom text to make it look more girly, just like the Power Puff Girls. I had  so much fun playing around with the tools and getting much more creative with them! Hope you Like:)

“2 STAR DESIGN ASSIGNMENT # 4? “CARTOON YOU”

The “Cartoon You”  assignment was the most fun for me then the others in my perspective !! I had a very great experience trying to figure out how to turn myself into a cartoon character or animated version. So I basically just surfed the web and found websites that could turn my real life photo into a animation. So I used Picnik.com and from there I uploaded my photo, went to effects and used the effect called “sketch tool” which is located all the way on the bottom of the effects tab once you scroll down. Their are plenty of other effects you could use as well on your images which is so much fun! The sketching effect was my favorite of course!! Here is my original picture, and the animated version ^_^ !!!

“2 STAR DESIGN ASSIGNMENT # 3?‘ “THE LITTLE CAPTION”

For this assignment I had to choose any picture from Flickr Creative Commons (http://www.flickr.com/creativecommons/) or one from the DS 106 Flickr group (http://www.flickr.com/groups/ds-106/) and caption it. So, I chose this adorable picture from (http://www.flickr.com/groups/-106/)  and I thought of a catchy title that went with the theme of the picture. It was very easy for me to come up with a caption just by looking at the birthday boy’s facial expression on his face while getting ready to blow out his candles from his dessert, and the facial expressions on his friends faces who look like their urging and can’t wait to get their lips on it! I thought it would be funny to make a caption relative to that and plus it would catch my audiences attention whenever they see the picture. The process was very easy, I just used Picnik.com to upload the picture then I used the text tool and the fonts to create my captions. I chose to use the splash the color effect on this picture just because I thought it would be more funny and go with the flow of my caption which is the reason why I chose to only have the birthday boy in bright colors to show that he is the center of attention, and that he is the only one important on that day…. sort of like a king. I put everyone else in black&white to show that they were beneath him and weren’t getting any of his birthday dessert LOL! I wanted to be a little more creative with this one! Hope you guys like!!