Tutorial – Recreate Your Optical Illusions

This a simple tutorial on how to create the wavy effect seen here:

Optical Illusions

For this assignment. After you have watched the video that the assignment directs you to watch you will probably see something with the wavy effect above. This tutorial will focus on creating that effect, if you see something else, this tutorial will not really help you. This tutorial is also geared for Photoshop users, if you do not have a copy of Photoshop, this tutorial will again not be of any use to you. Let’s begin!

1. Open your photo in Photoshop:

Screen Shot 2015-07-19 at 1.53.48 PM      You will then see something like this:

Screen Shot 2015-07-19 at 1.53.56 PM

Now we want to start adding the effect, so we will open up the liquefy tool:

Screen Shot 2015-07-19 at 1.54.12 PM

This will bring us to this screen:

Screen Shot 2015-07-19 at 1.54.21 PM

Notice on the left of the screen the Pucker tool is selected, that will be one of the tools we use a lot. It kind of sucks in the image at the point you select, like follows:

Screen Shot 2015-07-19 at 1.58.48 PM

The next tool we will use a lot is the Bulge tool, it causes the opposite effect of the Pucker tool.

Screen Shot 2015-07-19 at 1.59.22 PM

For example:

Screen Shot 2015-07-19 at 2.01.10 PM

Using these tools all over the image you will produce the desired effect! Some tips, change the size of the brush often to make the effect more subtle! That’s really all there is to it! Good luck!

[contact-form]


Are You Feeling Artsy, Punk?

A Jim Groom Art Tutorial Jim Groom art is hilarious, and it’s one of my favorite assignments in the DS106 assignment bank. It’s an extremely open-ended visual assignment that lets you freely home your design skills, allowing you to familiarize…
Read more

The post Are You Feeling Artsy, Punk? appeared first on Coding Spencer.

Inklewriter Tutorial

Inklewriter is tremendously easy to use, and there are excellent tutorials on the site that answer most questions, but I thought I would do a quick run through of some of the basics in case anyone is completely unfamiliar with this sort of thing.

The first thing you want to do, of course, is create an account on Inklewriter. This is free and easy. Then click on the create new story button and off we go. You’ll be presented with a screen that looks like this:

inkle

Inklewriter is all about choices. That’s what the “add option” tab is for. In the first text box, where the preset “once upon a time” is, you want to start your story. I’ll start mine, “Steve left his house, climbed into his car, and shut the door behind him. As the car started, Steve wondered to himself, ‘Where should I get food?’”

This leaves me with a choice to make. Keep in mind, your story doesn’t need to have a choice right away. You can write as much as you want until you decide to start splitting things up.

So click on the add option tab and try inserting some choices. You can make as many story threads as you wish, but keep in mind the more threads you make, the quicker your story can become massive and unfinishable.

inkle 1


So as you can see, I made three possible options about where I’m going to get food. Clicking on any option opens up an entire new story thread.

inkle 2


I clicked on the McDonald’s option which leads me to another choice entirely unique to that first choice: what will I eat at McDonald’s?

Kumu Tutorial

Whatever project you decide to make using Kumu, there are a number of basic functions that are important to understand. Kumu is a fairly intuitive program. It comes pretty naturally once you get things moving.

The first thing to do, of course, is to make an account on Kumu. This is free and simple. Once you’ve done this, you want to head over to your dashboard. Click on the “New Project” tab in the bottom left to get things going. Name your project and provide a description .

Kumu 1


You’ll then be prompted to choose a base template for your map from four choices: Kumu options


Each option starts you off with a different visual setup that can be useful if you know exactly what it is you want to do. If you want to make the visual decisions yourself, then choose the custom option on the far right. This gives you the most bare bones template to begin with. It will tell you that the custom template is only for advanced users, but don’t be daunted. It’s really not that complicated and gives you much more freedom.

Once your map launches you’ll be met with this screen:

kumu 3

To begin understanding how Kumu works, press the blue “Add Element” tab on the upper left of your map. It will prompt you to label the element, so type in a name. Once you do, a blue dot will pop on the map with the given name underneath. Go head and make two more dots with different names. The points on the map are free to be picked up and maneuvered with. Once you have three points, your map should look like this:

kumu 4

Now there are many different things we can do with these points. For now, lets connect point 1 to point 2, point 2 to 3, and point 3 back to 1, creating a loop. To do this, click on your starting point and then click the add connection tab below the add element tab. Then type in the name of the point you wish to connect to. Do this same process for each one.kumu 5


Now we have a very basic Kumu map of three connections. Clicking on the line connecting each element allows for a description of each connection. Pictures can be uploaded to each point and can be visible on the map. If you click the settings tab on the toolbar in the upper right, you’ll find a host of options dealing with your map’s visual look. You can change the colors of elements, connection lines, backgrounds, and much more.

Even a very simple map can quickly get complex:

kumu 6


Or completely outrageous:

kumu 7


Create your own collage

1.

For my assignment that I create I am doing a tutorial for a collage. My collage was made for The Blue & Gray press. This is a collage or list of different things that you can get someone for Christmas.

It was supposed to be used as a guide for people. Collages are often seen in magazines as a list of best products to buy or gift guides like the one above.

It helps you determine what you want. Most collages like this one have a section below in italics that state the prices of items and where you can get them.

For your collage chose what kinds of things you want to list. This can be gifts or products that you love.

Take images from online and use GIMP or Photoshop to cut them out and place them in a collage like format. Then tell us where the images are from and how much they cost. Do not forget to tell why you chose them and where you place this collage.

I used Photoshop but you can use GIMP. If you have any problems making cut-outs refer back to my tutorial on how to create them.

I made this assignment worth 4 stars.

No, I do not play D&D.

For my second tutorial, I’m going to try something a bit out-of-the-ordinary. While most DS106-ers stick to working on technical aspects during their tutorials (bless Hope for this Mozilla Popcorn tutorial), I’m going to get a bit more creative and open-ended.

Intrigued–and also filled with mild trepidation–by the section titled “Fanfic Assignments” in the Assignment Bank, I was quite pleased to see a creative writing exercise that I often use myself listed in the project suggestions.

I love writing. I’ve had a poem published and attended workshops at the University of Virginia to hone my craft, and I recently finished and am sending around my novel to writing agents. To help myself flesh out characters and build worlds, I will often create a character profile.

Since I usually have the general plot of my story planned when I begin to scribble, my characters are created as ways to forward said plot. They’re tools, but, as any book-lover knows, tools aren’t fun to read about! To make the characters deeper, layered like actual human beings, I’ll go through and create back stories, fears, loves, interests, flaws, etc.

This is actually one of the most challenging parts of writing for me, because I prefer to let the words and ideas flow rather than spend a lot of time painstakingly thinking out details. Sometimes, though, working through details such as full names, dates, etc. for continuity is essential, and every writer should learn how to do this!

Therefore, my second tutorial will be giving everyone tips on how to create their own character and creatively write in general!

First things first…

(1) OKAY, WE GET IT. SOME PEOPLE DON’T LIKE WRITING.

If I had a dollar for every time I heard a peer or older adult say that they hate writing, English class, poems, [insert literary task here], I would probably have enough money to fund Alan’s vacation to Kansas.

Guess what? The world is amazing with all its differences. There are people who love writing, who win Nobel Prizes and move millions with their words, and then there are people who develop amazing math theorems that change science or learn ten languages and contribute to diplomatic cooperation. Point is: people have their likes and dislikes. Don’t shut out something before you’ve really tried it just because you had a bad first experience–like AP English.

(2) THERE ARE DIFFERENT TYPES OF WRITING.

The thing is, creative writing and literature studies such as those in AP English are quite different. I’m not the biggest fan of penning analytical essays about the motif of poison in Hamlet, but assign me a poem, and I’ll have a blast.

Creative writing AKA this ds106 assignment is meant to be fun. It isn’t timed. It isn’t graded. It’s a stretch of the imagination, and the only limits are the limits you place on yourself and your mind, so…

(3) RELAX.

Unlike science, history, or other intensely academic subjects, there are a lot of different writing styles (see: Faulkner and Hemingway), and not one of them is more correct than another. This leads to my next point…
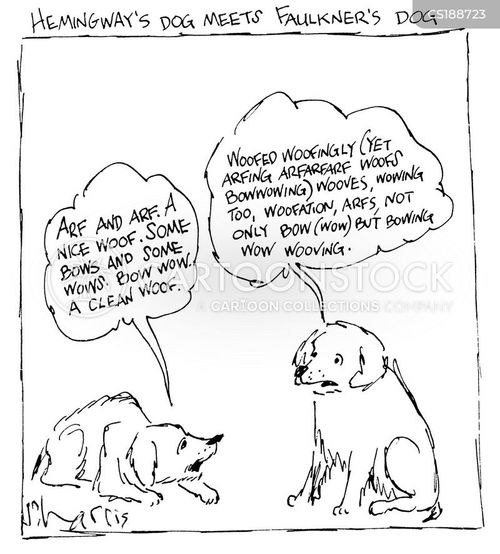
Hemingway & Faulkner’s dogs.


(4) DON’T COMPARE.

Again, creative writing is for your own enjoyment as a creator, as an artist, as a human being with a soul and a brain and ideas! Don’t compare your prose or poetry or scripts or whatever with your favorite author, because no matter how much you try to hone your craft or copy their style, no two writers will be exactly alike, and guess what? That’s awesome–the more diversity, the better! Everyone has something to bring to the world with their words no matter the form, style, or skill level of the piece. Stand strong in that knowledge and let yourself be empowered rather than discouraged as you explore and sample all different kinds of writers, some of which you’ll enjoy more than others!

(5) FREE-WRITE AND DON’T SECOND GUESS.

Don’t make creative writing more difficult than it needs to be; don’t over think it! Just write! Write words, connections, descriptions, ideas, questions…see a particularly pretty butterfly one afternoon? Describe it! Hate the assignment you have for a different class? Complain about it. Just get into the practice of transcribing your thoughts and mental images into words on the page. Again, look to number 4: the words don’t have to be beautiful, excellent, perfect…they just have to be your words. You’ll be amazed how easy the practice of writing will become after you’ve practiced it once or twice.

Also, as you’re writing, don’t go back and edit! This will just distract you from the creative moment and flow. It will also discourage you. Don’t discard ideas; don’t judge ideas. Just let them come and write them down. Leave editing for later and live second-to-second as your hand moves across the page or keyboard.

(6) SET GOALS.

Try to write maybe 200 words a day. Then, up that limit to 500, 1000, etc. The words don’t have to be brilliant or short stories. They’re more like journal entries–again, practicing putting your thoughts into sentences and fragments.

(7) ONLY SHARE IF YOU’RE READY.

Don’t share if you don’t feel comfortable. This can really intimidate a writer. Realize that writing can just be an enjoyment and stress relief for you and you alone if that’s what you want it to be. You don’t have to submit your pieces to critics or even your best friend if you don’t want to!

(8) CONGRATULATE YOURSELF!

Any amount or type of writing takes bravery and dedication! If you complete a piece, no matter how short, that’s an artistic feat that some people rarely–or never–accomplish. Pat yourself on the back and re-read your words with pride.

QUESTIONS FOR CREATING CHARACTERS: SEE WHAT CHARACTERS THESE ANSWERS HELP YOU DEVELOP!

Are they similar to you in personality? Looks? Or are they completely opposite of you?

Are they extroverted or introverted?

What color is their hair? Their eyes?

What world do they live in? Is it our world, or is it a completely new, fantasy world?

Did they grow up with parents? With siblings?

Have they ever been in love?

Are they gifted in any way (this can be an everyday gift like intelligence or more magical like manipulation of the elements)?

Do they like animals? Are they more of a dog or cat person?

What’s their favorite food?

What’s their favorite school subject/thing to study?

What do they want to do as a career?


All right, now that I’ve given you my version of a basic writing tutorial/some basic writing tips, let’s start on this assignment. The original poster gave us very simple parameters, which is awesome. These are character basics and not super intimidating, so remember, HAVE FUN! Write down whatever ideas you have, however odd they may seem at first, and then edit them later before posting your final character description. Take as much time, reflection, and privacy as you need, and plan your writing accordingly (you don’t want to post the assignment late and lose points, for example).


MY CHARACTER: FINN

paragraph of back story & personality & place in their world:

At age 19, Finn is the younger of a set of fraternal twins. Due to his age and the ever present, oh-so-judgmental gaze of his twin sister, he consciously–and subconsciously!–embodies the little brother trope. He’s a bit obnoxious, over-eager, and immature, but he’s got the biggest, sweetest heart and will do anything for those he loves. Sacrifice isn’t an issue if the sacrifice helps someone he cares about, and his generosity knows no bounds. Despite his wild and at times careless demeanor,  he is also highly intelligent; this surprises those he meets, and Finn is constantly squashing expectations. He his sister are very close, and both are studying to work with their father and mother in the city university’s robotics lab and department.

appearance:

Finn’s looks match his crazy personality. He sports a dark green mohawk with equally green eyes and a big, sparkling smile.

likes:

sleeping in, cookies, comedies, puppies, old record stores, tinkering with machinery, computer coding, sudoku, swimming, cargo pants

dislikes:

hipsters/generally pretentious people, high fashion/haute coture, smelly perfume, people teasing his sister, gerbils, scooters, slasher flicks


See–that wasn’t so bad! Make sure to go into any writing assignment with a positive outlook; this is supposed to be fun. Writing is an act of creation, and as humans, we are born to create. Whether it’s a science experiment or a novel, our brains are wired for invention.

Now, I leave you with one of my favorite quotes and wish you well on your writing journey!

Dead Poet’s Society


Create Your Own Assignment #2 Tutorial: How to Make Your Own DS106 Wallpaper

The second part of the Create Your Own Assignment task this week was to create a tutorial for our assignment.  My tutorial features step-by-step instructions on how to create a basic computer wallpaper.


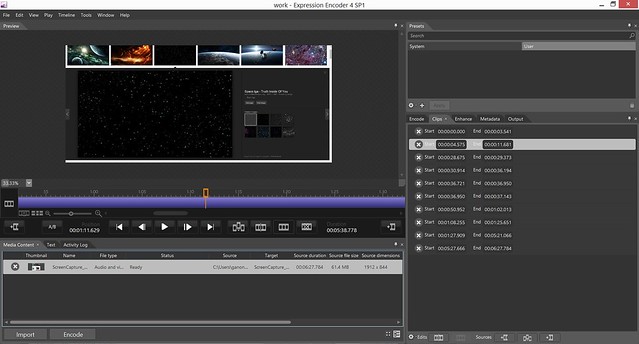
I created my tutorial using Expression Encoder 4, which is a screen capture program.  My work space in the program looked like this:

how i made tutorial

The purple-blue bar on the left side of the screen represents the timeline of the video.  I had to make several edits throughout to remove awkward pauses or unnecessary rambling (which I seem to have a lot of!).  With the editing complete, I exported the file and uploaded it to Youtube.

The tutorial also functions as a mini GIMP tutorial, as I go over a few tricks that a novice GIMP user might not know.  If you want to see a full resolution image of the final product, click here.

A little How-to on switching up the mood

Here is how to switch up the mood…

Here is a quick and easy way to complete the Switch Up The Mood visual assignment! I used an existing photo I had saved onto my computer just to use as an example, but use any picture you already have or take a new picture of anything to use for this assignment!

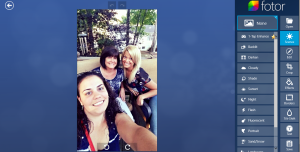
I opened up the photo editor Fotor which actually does a variety of things, not only edits photos but you can create collages and slideshows with this editor as well! Anywho, I opened up the editor and chose the picture I wanted to edit and it takes you to this screen:

Av1

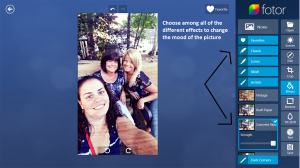
Once you arrive at this screen, towards the right hand side of the screen, as you can see there are tons of options on how to edit this photo. I went into the effects section of the editor


Av2

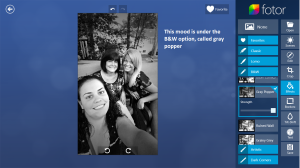
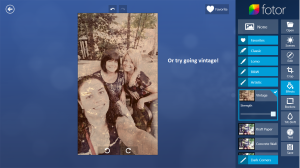
And started tooling around with all of the different options, from artistic, to black and white, to lomo, or even the good ole’ classic option, Within each of those options, there are even further in depth options within that category. Below are two example of changing the original photo to an option under black and white and a vintage option.

Av3 Av4

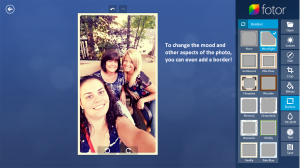
You also can change your photo into a little more artsy photo and add a border if you’d like!

Av5

I wouldn’t limit yourself to only what you are comfortable with, but absolutely have fun with this one! Be creative, this is only one option of how to create this assignment, but again don’t limit yourself, I would even experiment with one or two other photo editors to see what final mood changing photos you can come up with! Good luck!

The Book of Life Silent Film!

Hi there! I thought this assignment Return to the Silent Era (4 1/2 Stars) would be a good one to tackle! Last week in the DKC (Digital Knowledge Center) We focused on video editing. So as part of our training we get to work with different assignments in the ds106 assignment bank. Because of this, I was definitely ready for this week!

As part of this assignment I was to take a trailer and render it so that it would look like it came from the silent film era. Meaning, I added a black and white filter, and took all of the audio out, replacing it with a silent film soundtrack. I also added different slides to add dialogue like a silent film would do. So while I was looking at different trailers to use, I went to this YouTube Channel MOVIECLIPS Trailers. This channel is chock full of different trailers, of new movies that are just coming out this week to older movies that have come out this year. I stumbled upon this trailer and I thought I would give it a shot:

So once I had my trailer picked out, I converted the video so that I could download it to import it to iMovie. I used ClipConverter to do this. I then imported the video file into iMovie. I first turned the entire clip into black and white so it would look like a silent film. Then I went through and split the clip, within the film strip, into smaller pieces where there was some dialogue. This way it organized the trailer so that I could add the text slides. Here’s a shot of it in iMovie:

This also helped when it was time to move around a small clip. The title of the movie was moved from just before the end to the end of the trailer. Once I had the clip split up, I went to create the text slides I added to show the dialogue. I found this border on google that I thought was great to use. The original was white so when I added it to photoshop, so I changed it to black to match the traditional silent film text slides.

certificate-border-9

Here are the finished slides!

After adding all of the text, I went through and muted all of the sound so I could add the music. Then I went to find some music. I wanted it to sound like it would be used in a silent film but I also wanted it to work with the mood of the trailer. I tried different YouTube videos until I found this one. I found this video with a compilation of silent film music.   After I found the music I wanted I downloaded it and added it to the video. I ended up using the first song that was in the video because I thought that one fit the best with the trailer.


This is the final product, and I have to say I really like how it turned out. But anyway I hope you enjoy it!

Also here is probably my favorite part of the entire trailer:

Tutorial: Storytelling Within The Web!

This week every DS106 student was required to create a tutorial for an assignment in the DS106 Assignment Bank.  The assignment that I decided to create a tutorial for was the Storytelling Within the Web assignment that was required for this week.  I had trouble with this assignment at first, so I created this video tutorial to help anyone who has yet to do the assignment, as well as any students who take DS106 in the future!