Have a Rockin’ Birthday

I wanted to give my my son-in-law a special birthday card this week.  AnimatedGIFAssignments1086 was just the thing.

Make someone a special birthday card, but make it extra special by including a GIF!!  Try to make the design unique to them (it’s THEIR birthday, after all!).

Animated Birthday Card

‘Shakin’ It Up’ for a special birthday card

I’m starting to get good at this now with all the practicing I’m doing with my new GIFing skills.  I use Photoshop Elements 11 for the Mac as my image editing tool, and here’s my tutorial on the making of this GIF.

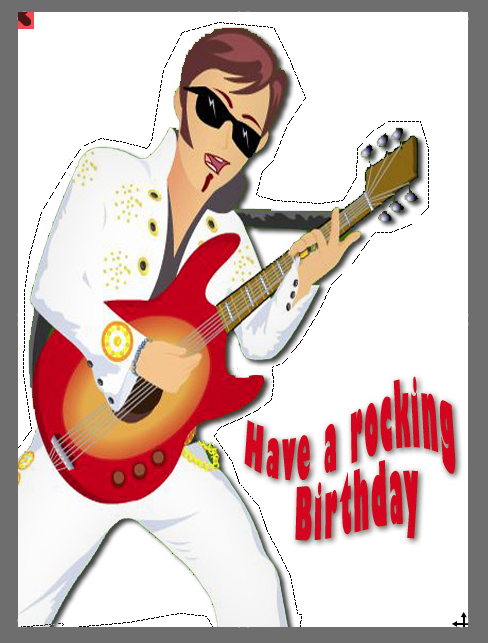
Original Birthday Card Image

Original Card

Step 1: For this project I started with an image I found on-line from a free create-your-own birthday card site.  I chose this image because it had a solid white background which makes it much easier when you get to the point of merging the layers.  And that was important because on this card I wanted to make the guy dance, but keep the text still.  I also wanted to add a little something extra to personalize it.

Lasso Tool Selection

Selecting Image with the Lasso Tool


Step 2: Use the lasso tool to capture only the guitar player as illustrated above.  Copy and paste it into a new layer with a transparent background.  Then grab the image of the “Have a rocking Birthday” text and do the same thing.  Then you’ll end up with two pieces of the image on two different layers, with transparent backgrounds.

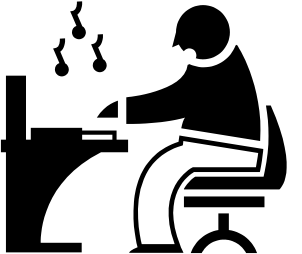
Making Music on the Computer

Step 3: To personalize the card create another layer with your text or a special image.  I used this free clipart icon of a man sitting at a computer making music as my son-in-law, Michael, has just taken up a new hobby learning how to create music on the computer.  I think he might be using Audacity even.

Guitar Player Images

Step 4: Create Guitar Player Image Layers

Step 4: Duplicate the guitar player to create three identical layers.  Rotate two of the images +5deg and -5deg.  You now have 3 guitar players, one leaning forward, one leaning back and one in the middle.

Step 5: For the border I made a rectangle with a transparent fill in PowerPoint (I know my way around the program very well, and it was just easier to do it there.) and saved it as a picture in the .PNG format.  This allows you to maintain the transparency of the images.  We’ll also need a solid white layer. You should end up with 7 unique layers at this point. But we’ll need to make duplicates of layers 4-7 below to be used during the layer merging process.

1. Guitar Player tilted backward (1)

2. Guitar Player in the center (1)

3. Guitar Player leaning forward (1)

4. “Have a Rockin’ Birthday” text (x3)

5. The computer guy icon (x3)

6. The border with a transparent middle (x3)

7. A solid white layer (x3)

Step 6:If you haven’t already, duplicate layers 4-7 so that you have 3 of each as noted above.

Step 7: Now it’s time to start merging the layers together so that you end up with only the guitar player moving and everything else remaining still.  These new merged layers are what will be used to create the actually GIF. Make sure you save your work often and I’d highly recommend saving the work you’ve done creating the individual image layers as its own file at this point – just in case you make an error during the merge process, you have something to go back to.  You really don’t want to start all over again do you?

Note: The white layer should go at the bottom of your stack.  It is supposed to be the background.  Otherwise when you merge the layers you’ll end up with only a white image.
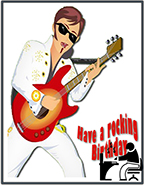
Rockin B-day Final Image

Final merged image

Merged Layer 1: Guitar player tilted back =  1 + 4 + 5 + 6 + 7

Merged Layer 2: Guitar player in center =  2 + 4 + 5 + 6 + 7

Merged Layer 3: Guitar player leaning forward =  3 + 4 + 5 + 6 + 7

Duplicate merged layer 2 (the guitar player in the center) so he’ll rock forward and backward evenly. Ta Da!  You now have the four layers you’ll need to create your GIF.  Center => Forward => Center => Backward. If you’ve done it right you’ll only see the guitar player rockin’.

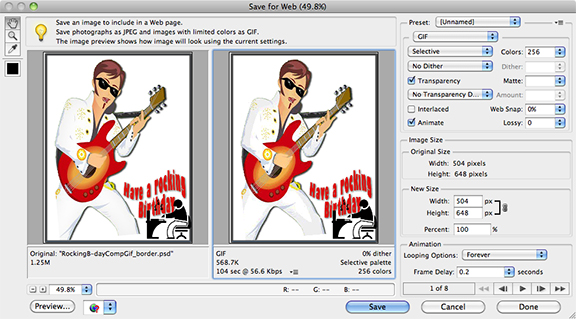
Step 8: In PhotoShop Elements 11 you select “Save For Web” to preview your GIF. On the right hand side menu, select GIF, Transparency, Animate, and set your speed in the “Frame Delay” box at the bottom. The default delay of 0.2 seconds works for most projects. Click on preview over at the bottom left and you can watch your masterpiece in action.

SaveForWebWindow_8in

Step 9:  If you like what you’ve done, save it as a GIF.  To view the file once it’s on your computer you’ll need to open it with your browser.  On my Mac I right click the file, select ‘Open With’ Google Chrome.

Obruni Arrives in Africa – Sound Effect Story (Slight Variation)

Amber arrives in Ghana, Africa. The new “Obruni”, or white person, both delights and scares the young children of Takoradi, and she soon discovers the way music can transcend cultural divides. Listen to the original full length podcast episode the sound effects were taken from at www.rockylouproductions.com/Obruni.html

Audio editing is not for the faint of heart.  Especially if you can be a perfectionist or have a tendency towards OCD. [Guilty as charged...]  You can fiddle around and fine-tune forever.  (Note: The audio clip attached happens to be an updated version from what I posted earlier this morning.  I didn’t like that the car racing by in the beginning was inaudible on my iPhone. So I fixed it!)  But it can really be worth it when you come back months later to a piece you created and go, “Wow, I did that?”  

Inspired by LoDown episode 8, I jumped in to create my own sound effect story - Audio Assignment 70 with a slight variation of having a bit of spoken and sung text.  The assignment asks us to create a 90sec or less story with at least 5 sound effects.  I decided to use sound effects I had from a podcast I had created with my daughter, Amber, in the fall of 2010.  We really didn’t know what we were doing back then at moving her stories off the written page and making them audible.  I didn’t have any experience with sound editing software, and I didn’t even know what a Podcast was.  Amber had to suggest listening to StoryCorps and WYNC’s RadioLab to help me become familiar with the genre we were embarking upon. 

I’m a big Apple fan and went with GarageBand as my sound editing tool.  I wasn’t up to the VERY steep learning curve for the more professional stuff. (And I hadn’t heard about Audacity. I’ll have to check it out at some point during the course.)  I have plans for a future blog post (possibly a series or a LoDown co-hosting gig) that will go through the creation process for the entire podcast episode, but for this post I’m going to stick to the sound effect story.

A story needs to have a beginning, middle and end- now doing that in 90 seconds can be a challenge.  Finding the right sounds, keeping in mind copyright issues, [link to my YouTube playlist on copyright and creative commons] is also a big challenge.  We used freesound.org, pulled sounds off of creative commons YouTube videos, and even created some of our own sound effects if we couldn’t find what we wanted. But again… that’s a story for another blog post.  My storyline for my sound effect story could be an audio trailer for the larger podcast.  The over arching story is about how the people of Takaradi, Ghana reacted to this new white person in their midst and how she responded.

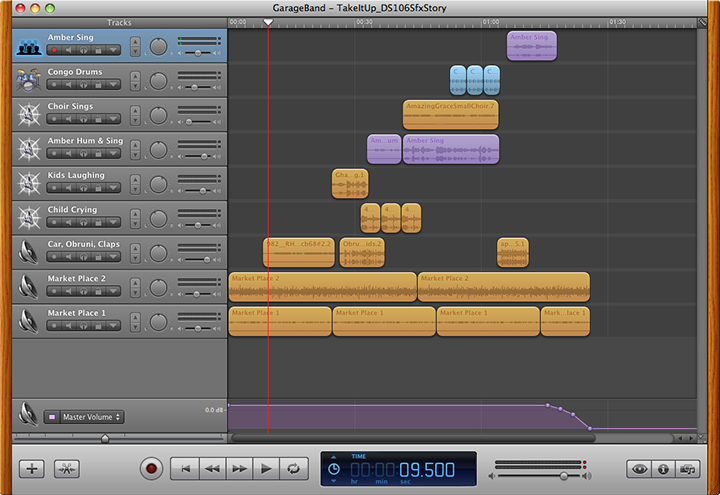
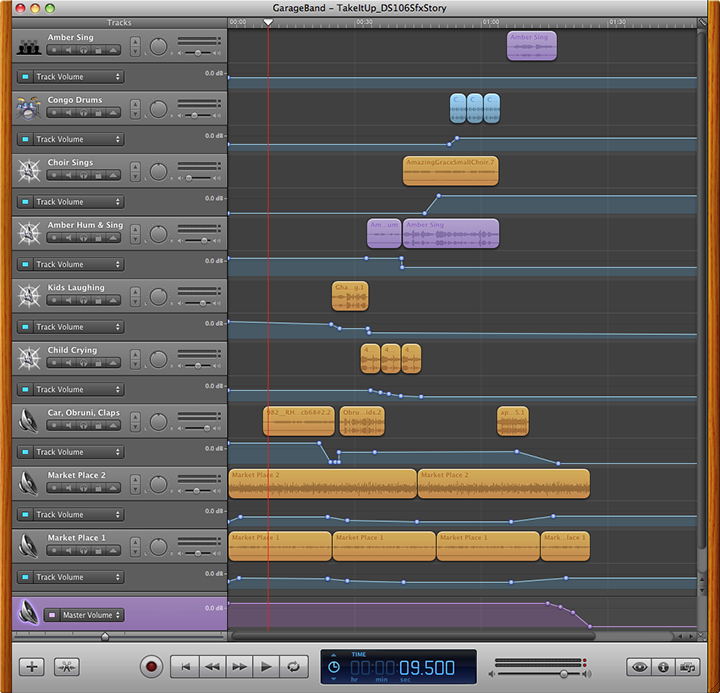
Let me take you through at least a portion of my process. Below is a screen shot of the final GarageBand file. I like to build my layers from bottom to top when possible. That way I know where I’m at, and it makes sense to me as I layer on my sounds. So that’s how I’ll be referring to them as I move along.

Master Garageband Screen Shot

GarageBand screen shot of layered sound effects

Setting the Scene (Layer 1 & 2) To set the scene we used a lively chaotic market place sound effect that is actually a combination of two different sound effects grabbed from freesound.org.  (Called Market Place 1 and Market Place 2 above.) Neither of them sounded right alone, but the combination was just what we wanted.  Experimenting with different combinations is a great way to find just the right sound you are looking for.

The first “event” in the story was the addition of a car racing by on layer 3. Remember I’m counting from the bottom up. If you listen with headphones or good speakers you’ll be able to hear the stereo effect as the car goes whooshing by.  There are things happening in and around the market place.

Our story gets more personal when Layer 5 brings in the children laughing, while layer 3 changes over to shouting out “Obruni”.  Both of these effects were pulled from YouTube videos. So… why you might ask don’t I put each sound effect on its own separate track? (Track 3 has 3 different effects.) Because it’s a visual nightmare when you have to keep scrolling the screen to see where you are at. I try to limit the number of tracks I need to what can fit on my computer screen.  For our big podcasts that almost never happens -but we try. And labeling your larger tracks with something you understand, as well as the individual clips, is a good practice.  All things we learned the hard way!

With Layer 4 we hear a child crying and Amber fading in, softly humming “Amazing Grace”, to soothe the little one on Layer 6. Layer 6 continues and morphs into Amber actually singing. With layer 7 the choir joins in. Amazingly we found this little, slightly off key (just what we wanted) choir with a YouTube search. A set of congo drums joins the party on layer 8.  Then it’s back down to layer 3 with the audience applause.  Our final layer 9 brings the story toward a close with Amber singing alone again and the market place sounds coming back into auditory focus to take front and center stage.  Life continues on with one final master fade out.

Fine Tuning: But least you think we are finished… Oh No… you would be wrong.  You can consider this version of the audio file a rough draft.  But at least these aren’t just end-to-end clips. I’ve talked about some layering here. How these sounds are in relationship to one another is a big deal.  Blending one sound effect into another and adjusting the volume balance between clips can add a lot to your story.  Panning the sound effect into one ear or the other or the stereo effect like the car racing by are nice details to add.  You have to be careful with this though.  You don’t want to end up making your listener dizzy because what they are listening to doesn’t make sense. With the screen shot below I’ve opened up the track volume areas so you can actually see what I’m talking about.

Volume tracks visible

GarageBand file with volume tracks visible

Layer 1 & 2 market sounds fade in At the very beginning we don’t want to startle our listeners with an abrupt beginning.

The layer 3 car sound effect needed to fade out, and the clip we used for the kids laughing on layer 5 was too soft at the beginning, so I bumped it up and brought it back down when needed.

When the child is upset and crying (layer 4) at seeing this person with a different color of skin than her own, she cries full on.  Then her effect begins to trail off as Amber’s humming effect crosses over.  At this same time I reduce the background market audio (layers 1 & 2) so that the listener is able to focus on the next event in the story.  But since my story takes place in a market place, I don’t want to mute it completely.

As Amber is singing (layer 6) the people in the market place gradually join in (layer 7) and then someone fades in with a beat on drums (layer 7).  We linger just a bit on this climactic moment of the story then the audience claps. (Back down to layer 3.)

The clapping trails off.  Amber returns alone,(layer 9) but this time with a more ethereal sounding tone. That’s why this clip was moved to layer 9 instead of remaining on layer 6 with the other Amber clips.  I wanted to modify the basic sound effect to give the feeling of a dream or fade away into the distance.

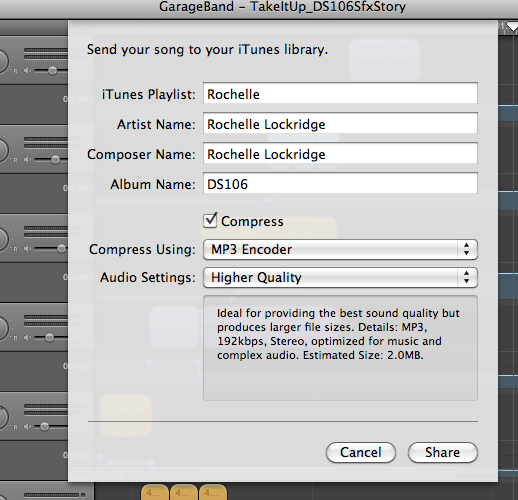
There is more mixing or “Mastering” of the final audio that happens to give your audio file more life, but I’ll save that for another post. As well as, how to export your file so that you aren’t shocked at the low sound quality of what you post.  Scott Lo and I are contemplating a LoDown episode for audio week 3 entitled, ”How come what I posted doesn’t sound like what I made?” Any interest in that topic? In short it has to do with the audio file compression you need to do so people can download and listen to them on your mobile device.  This 90 sec story uncompressed (AIF) is 23 MB, while the compressed MP3 that you listened to above is only 2.9 MB.  And it could be even lower if I used the standard bit rate compression of 192 KB rather than 256KB which I prefer.

192KB MP3 Compression Settings

Typical “High” quality compression rate settings for GarageBand.

Okay… That’s going to wrap up this post.  It’s time for bed.  Let me know if you have any questions or would like me to explain in more detail how I did something.  Hopefully I’ll have the time to write up more posts on the subject.

Splish Splash

Musician at Work

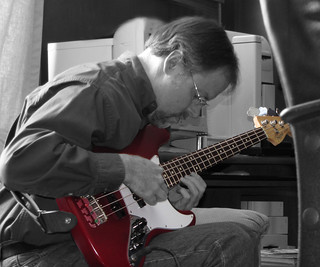
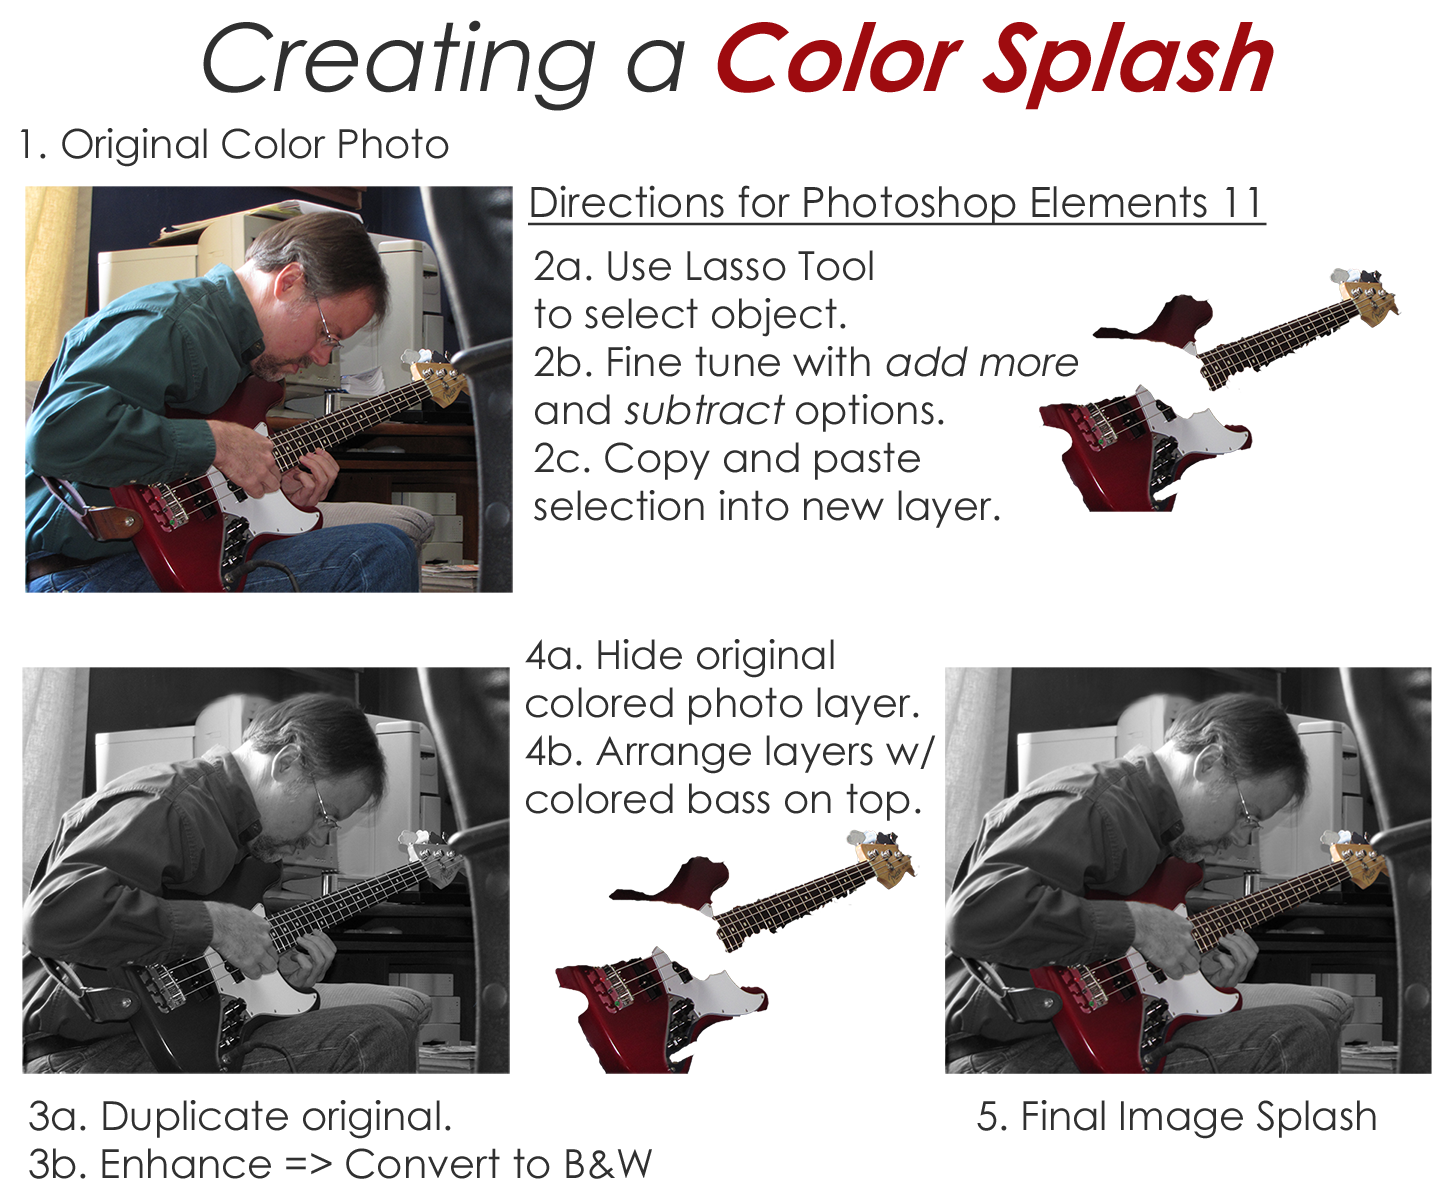
DS106 Visual Assignment 340 asked me to emphasize details- remove all color from a photo, and then restore the original color to a single object. Here’s one of my favorite examples from a project I did a few years back along with a printable 1-page directions handout.

My partner is a singer/songwriter who also plays bass and guitar. He’s been a great sport letting me experiment with new digital story telling tools over the last couple of years.  One day while in the recording studio laying down new tracks for his latest CD, he agreed to let me take photos of him in action. The original color image I use in this example is nice enough. It tells a story of a musician hard at work in the studio. But I wanted something that would really grab your attention.  I decided to highlight the bass by leaving it in living color and tone done the rest of the photo by making it black & white.  This was especially powerful when you see his black & white hands holding the colored bass. Talk about a SPLASH.

The trickiest part to accomplishing this effect using Photoshop Elements 11 is the use of the Lasso Tool.  You can pretty easily select the bulk of the object you want to leave in color- or make it a B&W object for another perspective. The hard part to making this look nice is the fine tuning you need to do while using the Lasso Tool.  I had to zoom in very close and use the add more and subtract options alternately to select only what I wanted. You then copy and paste the selection into a new layer.  As long as you don’t move any of the images in the individual layers themselves they will all align properly.

ColorSplashDemo_8X11


Technicolor Life: A Six Word Memoir

6 Word Memoir
I went to bed last night and everything was ok. The world was at peace, the twins were happy and sleeping well and David was at my side. This morning I woke up to gray…


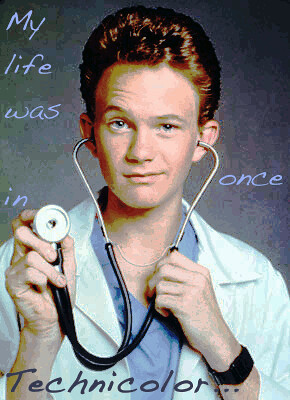
The first part of NPH and the Search for Color is a Six Word Memoir, stating “My life was once in Technicolor”

I made this in GIMP, using this image of Neil Patrick Harris from his days doing Doogie Howser MD as the base.


Equalize

I chose the Equalize color function, feeling that it gave me the most Technicolor look stylistically, before going on to add text.


Fonts

I used the Handwriting- Dakota font since I thought it looked most like a Doctor’s handwriting and chose to move the word “once” to the right side of the image to emphasize the fact that Neil woke up to an awful surprise.

I saved the image as a gif in Gimp as I find that it leads to the least skewing of the graphics and uploaded it to Flickr.

Selena is that you?

For my second star assignment I choose Actor Transformation. This assignment was to pick an actor and put to together different clips from through out their career to show how much they have changed over the years.

I immediately knew that I wanted to do a child actor.  They seem to be the ones who have the most dramatic changes through out their career. I ended up googling Disney child actors to help me decide who I wanted to do.  I ended up choosing Selena Gomez.  For those of you they didn’t know Selena (and Demi Lovato) got started in acting from Barney.  Since her Barney days she has been on just about every Disney Channel show and is now starting to break off into movies.  She has also managed to work pretty consistently since she started so I wouldn’t have to worry about having too much dead time in her timeline.

To show this progression I used Mozilla Popcorn.  While I found some issues using popcorn the first time, I decided that I would try to use it again. (I think the fact that I use Firefox helped since Firefox and Popcorn are both made by Mozilla).  To start making this video I first went to Selena’s IMDB page and pulled out some significant shows or movies that she had done.  I then went to YouTube and started looking for good clips from each of the ones I picked.  It took me a bit of playing around to decide exactly which clips that I wanted to use for each.

After deciding which clips I wanted to use, I open Popcorn.  When you first start up popcorn it looks something like this:

opening page

To get started you simply clip Start a Project.  After beginning my project I went ahead and entered all of my clips into my file.  To do this you clip on the Media tab and then enter each YouTube link and then click create clip:

create clip

After you enter the clip it will appear in the media gallery section listed just below.  Here is a picture of what mine looked like after I had entered all of my videos:

media guide

I then entered in each clip one at at time.  I started off with the earliest clip I had of Selena.  I then edited the time of the clip.  This can be done by pulling on the arrow circled in the picture below.

clip 1

After getting the first clip entered how I wanted it, I added the rest of the clips in one at a time each in a separate layer doing the same thing.  Do not forget to line up each of the clips so that they are touching like in the example below (I accidentally put one in out of order which is which is why they do not go down in a even diagonal line).order

After getting all of my clips in and in the correct order I added in a popup to say what the show or movie was that she was in and what year it was released.  You can add in pop ups by clicking the events tab and then the popup tab. (If you have video paused exactly where you would like the pop up to appear you will not have to move it at all which was quite helpful).  You then add edit the pop up to say whatever you would like it to say.

Finally I added in a title.  I did this simply by adding in a picture (I just used a simple blue background that I got off of google).  To enter your picture you select events and then image.  After you have the image tag open you simply drag in the picture that you want.  I then added words on top of the picture for my title.  You can add words by going to events and then text.  Here is a picture of what my popcorn looked like with the title placed in:title

After adding your clips, popups, and title you are good to go.  Just press the save button at the top and you are done!

Here is my final video! Hope you like it:


6 stars down and 0 to go!!

A Capella With Yourself Tutorial

Here’s a bit of a Garageband tutorial for the “A Capella With Yourself” audio assignment (if you’re still interested in audio that is!)

Step 1: Write a song, OR pick a song that you like.
Tip: When you’re picking your song, make sure it’s within your vocal range so you dont sound like a shrieking cat or a deep throated whale.

Step 2. Listen to the song over and over again
Each time you listen to the song, you should be listening for the beat, the lead singer, the background singer(s), and if possible, the music key. This can be very tricky if you don’t have a musical ear….but here’s a page that could possibly help you called Song Key Finder which tells you what key the song is in and what scale it is (you might find your song on this site under “Popular Songs”.) Once you have the song key, you can sing ANY note within that scale in your a capella and it would sound good.

Step 3. Open Garageband and Create Tracks

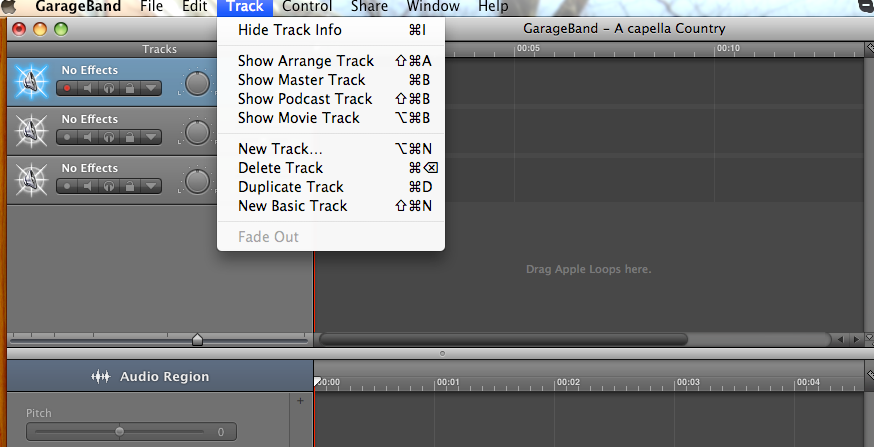
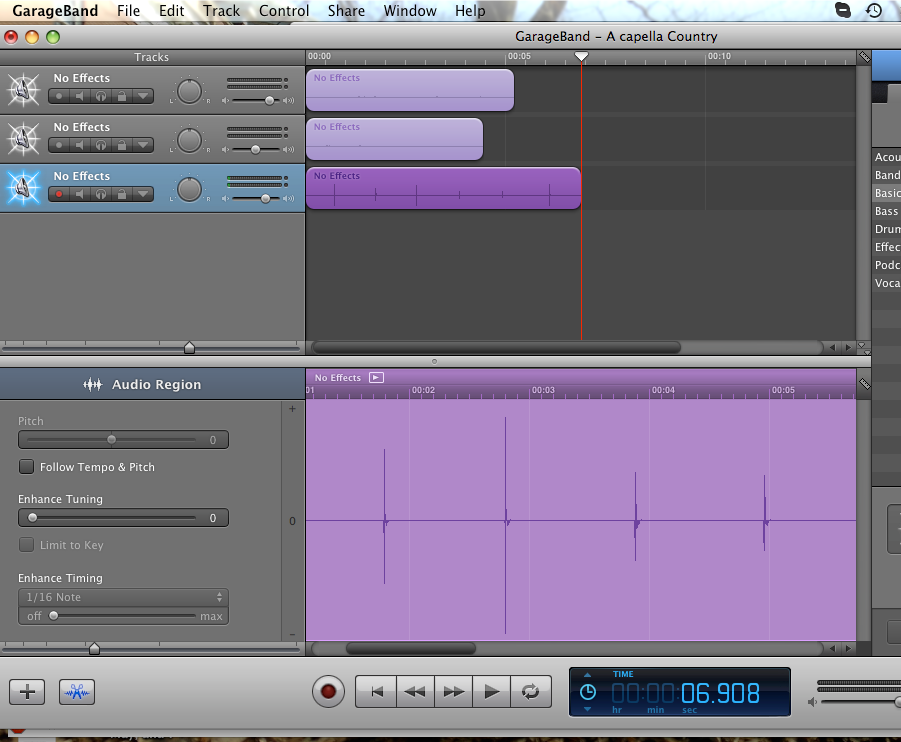
When you open Garageband, create 3 tracks (or however many “people” you’re singing with) by going to Track–>New Track. What this does is give you the chance to overlay each voice’s part.

Create Track photo Picture5_zps765f4acc.png

Step 4. Start Recording in Parts

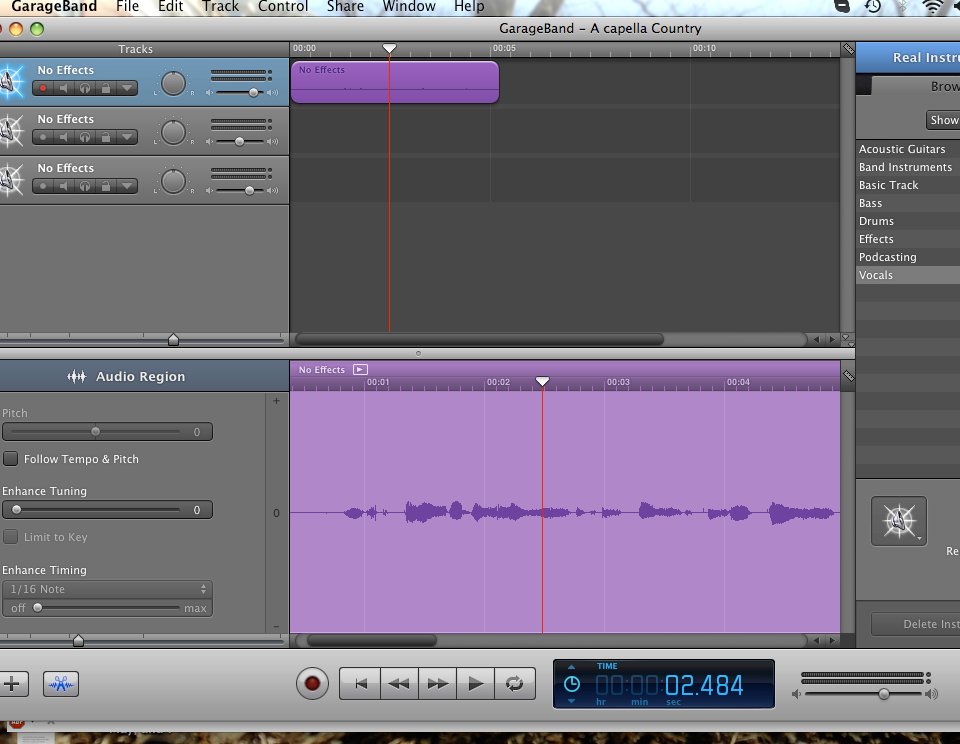
On one of the tracks, click the red circle button at the bottom of the screen to start recording. The first track should be the lead singer’s part, singing the main theme of the song (this is the part of the song you’re used to and probably sing in the shower.) When you’re done, press the spacebar to stop recording. It should now look like this:

Vocal Track photo Picture6_zpsc724749e.png

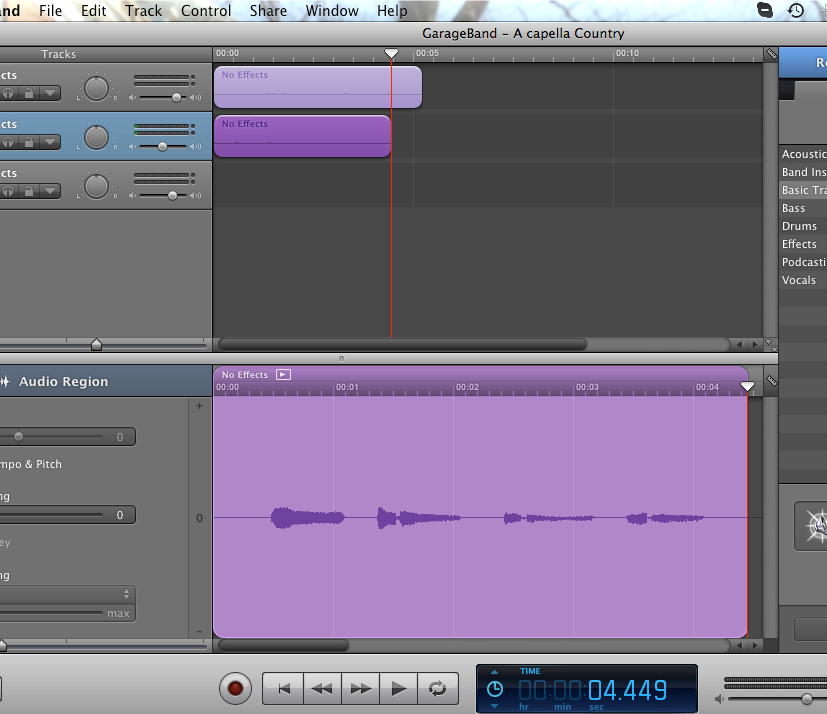
The next track should either be the backup vocals or the beat. In the image, I started with the backup vocals since I wanted to get all of the vocals out of the way. I dont really know how to explain singing a backup chorus other than taking a guess with the notes and hoping they sound good. After a few recordings, they’ll eventually sound nice. (or that’s just my luck.)

Background Vocal photo Picture7_zps43421baf.png

Lastly you should make the beat of the song. This can be done by snapping, clapping, or beatboxing (making “tss-tss-tss-tss” sounds). The point is to sound like some sort of percussion instrument to keep the song on track. If you cant find the beat of the song, try counting 1-2-3-4 OR 1-2-3 and see which one fits. (Most songs are in 4/4 so its 1-2-3-4)

Beats photo Picture8_zpsb3fe83d3.png

Step 4.5: Put some attitude and emotion into it!
No one likes a flat sounding song! Add some color to it to keep it interesting!

Step 5: Make Sure all the Sounds Align

Now that the hard part is over, all you have to do is make sure all of the beats and vocals line up to form the song. You can move each recording to fix it up if something sounds off.

Step 6 (optional): Add Effects

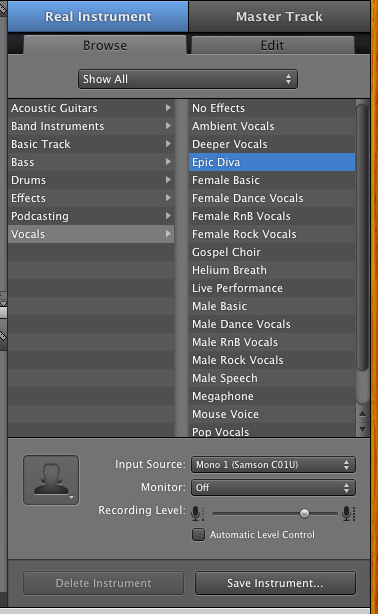
How would you like your singing group to be on stage in a concert hall? To make this sound effect, look to the right side of the screen and look under vocals to find the “Epic Diva” effect. This effect produces an echo and something called a reverb (not the repitition of an echo, but an open sound.)

Effect photo Picture9_zpsb85352d6.png

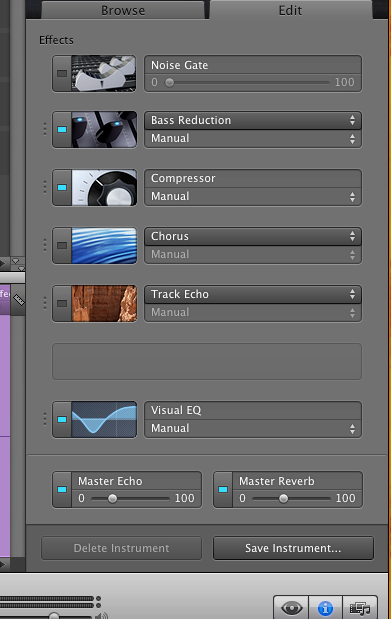
After clicking this for each track, under the Epic Diva options turn off the Chorus and Track echo buttons by clicking the blue light. Also go to the bottom and turn the scroller on the Master Reverb to about 44%. This is the concert hall effect.

Moar effects photo Picture10_zps509b4353.png

Step 7: Save it

To save the project, head up to the Garageband toolbar and select Share–>Export Song to Disk. This turns your glorious song into an mp3 able to be shared with everyone.

Aaaand you’re DONE!! Listen to yourself, yourself, and yourself now! You all are ready to have your own world tours!

How to: Call a Celeb

This tutorial is for the assignment Character Bird Calls. You can read my blog post about what I did for this assignment here.

1. The first step is to plan. You need to decide who you are going to call. Why this person? What sounds could you use to call or attract this person?

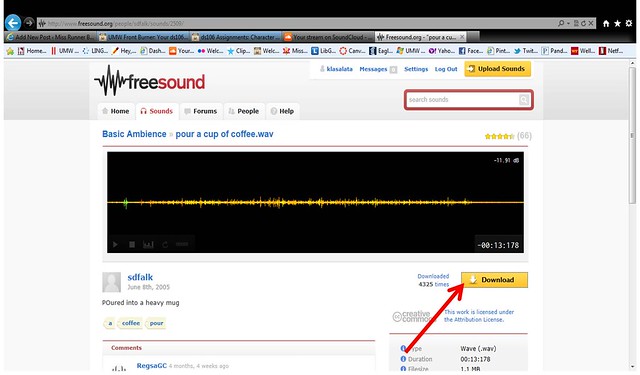
2. Once you have all of that down, you are ready to roll! I found Freesound.org the most helpful for downloading my sounds. {But if you have another website you favor, you can use that one too} Search for your sounds and click the download button to download them onto your computer/flashdrive.

freesound

3. After downloading the sounds, import them into Audacity. You can import your songs by clicking Project > Import Audio.

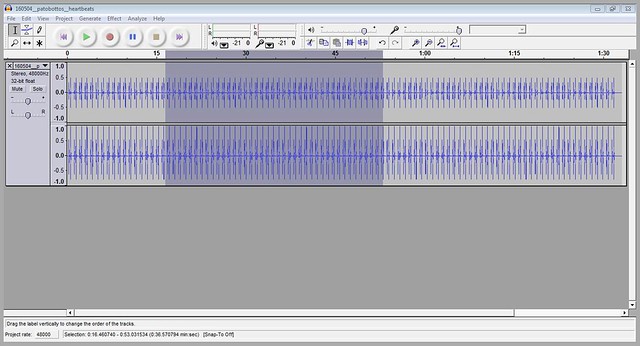
4. Now that you have a sound clip in there, you can cut it to make it shorter. In order to do this, you need highlight the section that you do NOT want and click the backspace key.

highlight

5. To import another sound, repeat step 3. Each sound will appear on it’s on track line.

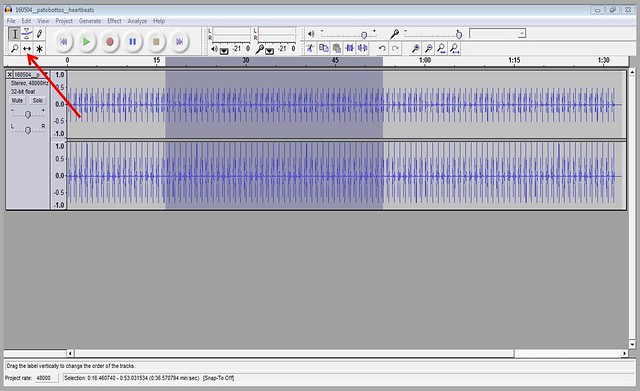
6. If you do not want your sounds overlapping, you can use the time tool found at the top and move each track in the order you want it to sound.

time tool

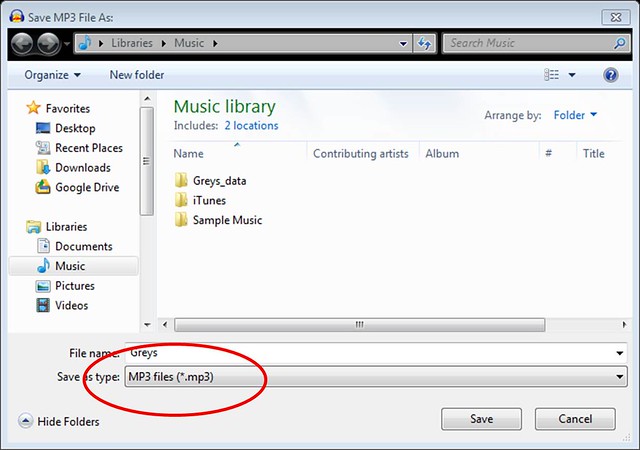
7. Once you are done, save it as an MP3 file!! This is very important! Click File > Export as MP3

mp3

{By saving it as MP3, you can upload it to SoundCloud easily}

TIPS:

  • Make sure that after uploading it to SoundCloud you embed it into your blog post!
  • DON’T forget to add the assignment tags. If you forget these, you will not get any credit for all of your hard work!!!
  • Write about why you chose these specific sounds and why they form a story!

How to: Makeup Your Pet

This tutorial is not really going to tell you how to put makeup on your pet. This is digital storytelling, you should have known that you are going to be creating things, silly goose!! You will need a camera, and a program like Paint, which usually comes on standard computers.

1st Step: Take a picture of your pet. For the best results, he/she should be looking at the camera, if at all possible!

Makeup your pet

2nd Step: Upload your picture to your computer.

3rd Step: Open up Paint and get creative!

tutorial makeup your pet

4th Step: Now that you’re all done, upload your picture to your blog. Make sure you have the correct Assignment tags!!!!

Makeup your pet2