What’s Inside You? (Tutorial)

the WIRED Feature – What’s Inside You?Ā assignment is actually quite simple despite the 4 star rating. The most difficult part was figuring out What’s Inside Me? Even this can be quite simple if you ask yourself the right questions.

I used this assignment to create character profiles for my final project.

Getting Started

  1. First thing I suggest doing is open up your favorite word processor program and type “What’s in Me?” This is the fundamental question for this assignment
  2. Now we need to come up with 5+ words whichĀ representĀ us, these will usually be nouns orĀ adjectives. Think aboutĀ extracurricularĀ activities you are involved in (Music, Sports, Art), Courses you Enjoy (Math, Science, History), Anything you are passionate about (Games, Coffee, Hiking), and especially anything words which positivelyĀ describe your personality (Think “I am…”).
  3. Now you Should have a bulleted list of your words. Next we need to give each word a description. This can be something serious or something funny, or a mix of both.

For one of my characters I used “Noble Blood- from a family of noble baring he was born with a silver spoon in his mouth and trained in most every skill he could think of however, he found this lifestyle to constricting so left home. He took the spoon with him.” Ā It explains something about the person in question but adds a bit of humor to the end.

Design

Now that we have the words it’s time to start theĀ designĀ portion of this assignment. The design should also reflect your personal sense of style and design, I like the clean minimalist look so the ones I completed are fairly simple

  1. Open whateverĀ photo editing/design program you want. You need something that can work with both Text and Photos which I’m sure most can.
  2. [Optional] Start with a picture of yourself, or one that represents you. (I’m sure if Alan where to be doing this assignment he would use his trademarked dog photo over one of himself).
  3. Create the Background. Depending on your picture (size, free space to put text over, and the style you want toĀ convey) your background will differĀ accordinglyĀ just make sure you use a background which is easy to read text placed over it.
  4. Once you have your picture and background figured out and oriented it’s time to add the text. Start with your name, be sure to choose a font and color which compliment yourĀ personalityĀ as well as theĀ background. The key to every element of this assignment is to be an extension of yourself.
  5. Now it’s time for your words. you can orient these in any way you want just be sure to use a font and color which is easily legible on your background as this will likely be smaller then your name it’s better to use simple fonts like Time’s New Roman or Ariel.
  6. Now that we have everything on your picture you need to reorganize each element. Remember this should be an Extension of yourself so if you put that you are “organized” don’t have each wordĀ hazardouslyĀ placed on yourĀ background.

Now you are done, it’s not that hard to do as long as you ask yourself the right questions. Be sure to be creative with this, as I reiterated throughout the guide is that the entire thing needs to reflect you so make sure that every element is coherent andĀ emphasizesĀ yourĀ personality. If you put that you were funny but every description was dry and cold, I’m not going to believe you. If you said you liked hiking use a picture of mountain trails as your background.

Inanimate Motion Tutorial

For this assignment, it helps to begin with an overarching story in mind.Ā  I chose to do this assignment in a way that it would contribute to the story I’m telling in my Final Project for ds106 – Spongebob’s Best Day Ever.

So, I went digging through my kids’ toys for inspiration.Ā  :) Ā  What kind of inanimate thing can I bring to life with a bunch of pictures? What kind of story could I tell?

Somehow, I found inspiration in the Queen Rubber Duckie in my daughter’s room, and the McDonald’s Happy Meal Spongebob toys in my son’s room – the happy dancer and the karate master.Ā  I won’t try to explain how those things inspired me.Ā  This is not a tutorial for finding inspiration.Ā  It’s a tutorial for making this assignment.Ā  I don’t have time nor space to try to teach inspiration (it’s a monster I don’t even really understand myself, anyway).Ā  So sorry.Ā  Moving on now.

So, I grabbed the rubber duckie queen, the Spongebob toys, and my daughter’s mermaid/ocean beach towel and laid them out on a card table.Ā  I quickly noticed, in positioning my iPhone to take pictures, that I could create the appearance of different scenes, or camera angles, based on the positioning of my phone.

IMG_4346IMG_4347

I learned simultaneously that this meant that for each scene, I would have to keep the camera rather still.Ā  My husband came over to help me reposition the toys for each camera shot so that I could move the camera less between shots.Ā  I purposefully included some shots showing the hands involved in the process to add to the corniness, and the obviousness that we’re propelling this inanimate thing ourselves.Ā  I’m going for cheesy here.

So, I took several successive shots for each progressive scene.Ā  I kept the pictures in order of what I wanted.Ā  This made it super easy when it came time to upload.Ā  I went into Windows Movie Maker, and clicked the gigantic box that says ā€˜Click here to browse for photos and videos.’

Spongebob Click for Photo Upload

You can also click and drag photos into this window, but this was the easiest method for what I was trying to accomplish.Ā  I went into the location of my photos (after importing them to my laptop from my phone using an iPhone cord), and used shift to select all of the photos for the project.Ā  They uploaded in perfect order for the project.

In a few places, I wanted to copy photos to duplicate an action, such as Spongebob chopping the Queen Rubber Duckie, or the up and down positions of his bouncey victory dance.Ā  For these, I right-clicked on the appropriate frame and selected copy, then left-clicked in the spot I wanted the copied photo and right clicked again and selected paste.


Spongebob Copy


Then I clicked on the Edit tab under Video Tools.Ā  Once there, I used Ctrl + Shift to select each of the frames that I wanted to change and went up to the Duration window.Ā  I edited the majority of the scenes to 0.50 seconds.Ā  I allowed for longer for the dramatic scene of the initial encounter with the Queen, as well as the transition to karate master Spongebob and the final dancing Spongebob scene to help draw out the fade-out.


Spongebob Duration Change


Next, I went into the Visual Effects tab under Video Tools.Ā  I selected the single frame where Karate Master Spongebob appears, and selected the Fade in from White feature for it.Ā  You know.Ā  To help make it extra dramatic.


Spongebob Fade in from White


I also went to the final scene and selected the Spin 360 degrees Visual Effect to help make a definitive end to the scene.


Spongebob Spin


I then recorded a few clips of some songs on YouTube using the Voice Memo Recorder on my phone.Ā  I emailed those to myself (because iTunes wouldn’t work right for me at the moment) and then uploaded them into Audacity and trimmed them down to the selections I wanted and for the correct lengths.Ā  Then, I uploaded them into the Movie Maker project in order by selecting Add Music under the Home tab in Video Tools, and selecting ā€˜Add Music from PC’.Ā  It matched just fine when done this way, since the appropriate editing of the audio was done in Audacity.

I saved my work in a number of ways.Ā  I saved the project using the floppy disk button on the top left of the screen.Ā  Once all of the editing was completed, I clicked Save Movie, and For Computer.


Spongebob Save


Once finished, I uploaded the completed video to YouTube for easy posting, and Voila!Ā  Spongebob’s Epic Battle via Inanimate Motion is completed!

When Unicorns Explode Tutorial

Our Masterpieces

In order to complete this assignment and earn the star it says it’s worth, there are three options.

1)Ā  Make or take a picture that is a part of a story of something meaningful to you.Ā  Write up the full story, in the manner that I have done on this post, and include your photo as a supporting piece to your story to help put us there. :) Ā  Of course, the photo should be as COLORFUL as possible, whatever that means to you.

2)Ā  In lieu of a story of words, embellish your photo in another way that takes the color to the extreme and brings smiles to your audience, so that it tells a kind of story all on its own.Ā  This can be through any of your favorite editing programs such as Aviary, Photoshop, Cornify (thanks, Michael, for finding this awesome gem), Instagram, GIMP, Paint, or paint.net.Ā  Abbey‘s submission is an awesome example of this option.

3)Ā  This assignment can also be satisfied through creative presentation of your photo, in such a way that it creates a story in and of itself through its presentation alone, such as in this epic submission.

So, use the picture to tell a story, one way or another, either by giving the background of the picture with words, in great detail, or with fantastic editing, or by creative incorporation into your blog through a clever concept or perspective on the assignment.

It’s that simple!Ā  The work behind this assignment is in the brainstorming of the story behind the photo and how to incorporate it.Ā  Have fun!


Product Evolution Tutorial (Windows Movie Maker)

Alright I am going to show you how to complete the Product Evolution Video Assignment. For this assignment we will take a piece of technology and make a short video showing the progression of the product through time.

Getting Set Up

  1. We need to pickĀ somethingĀ to show it’s evolution, this can really be anything but easy ideas would be things like; cell phones, computers, TV’s, or gaming devices. For my video I choose the Calculator.
  2. Gather your time line, this is easy enough to do with aĀ GoogleĀ search of “timeline history” for whatever product you chose. My search of “Calculator Timeline History” brought me to this timeline.
  3. Now that we have the names of theseĀ differentĀ types of calculators, found on the timeline, we need Pictures to go with the video. Doing anotherĀ GoogleĀ search under images usually produces good results. These are the pictures I will be using.
  4. Now that we have the pictures its time to get them into the type of program you will be using, I will be using Windows Live Movie Maker. First thing once it opens is to import all the pictures we areĀ using by clicking on where it says to “Add Photos” you should also find some music to go along with the video (otherwise it will be a very lame video).
    Movie Maker
  5. Now that all the pictures and music are added in the next thing we need to do is ensure the pictures are in the right order.
Now everything is ready to go to start making the movie.

Make the Movie

  1. First Thing to do is add the title. something to start off the movie saying what it’s called and the “ProductionĀ Company.” This can be done by clicking the Title and the Caption button on the Home Screen.
    Titles and Captions
  2. Now while we are doing this we should also add Captions to all the photos, just add the Name of the product and the year it was around. This can be a little tricky to find a color and location that makes it asĀ visibleĀ as possible but just play around with it.
  3. After all the captions are placed you have a basic movie, now it’s time to add the desired animations and upload toĀ YouTube.
    Animations


Tutorials galore!

The following are my tutorials for the Movie Music Comparison assignment and the Movie Scenes That Changed Our Lives assignment, respectively. I’m trying out Vimeo because at this point YouTube can kiss my frustrated not-read-only downtime-hating tush, and you can quote me on that. I used the 30-day free trial of Camtasia to create both tutorials, which I would highly recommend for anyone creating screencast tutorials. That does come with a small caveat: it’s a hefty program, and it’ll run slowly if your computer isn’t especially powerful. I also couldn’t get the “Upload to YouTube” function to work, but I figure that’s a combination of my craptop’s age and my own incompetence. Anyway, on to the tutorials!’


The first tutorial isn’t perfect, but my intention there wasn’t really to showcase how to complete the assignment, and rather to familiarize viewers with a program I’ve found incredibly useful all semester. While YTD Video Downloader is quite user-friendly, it can be helpful to have a tutorial showing exactly how the program works to get new users comfortable enough to try it out. One thing I probably should have realized earlier (and did change for the second video) was that my wallpaper, while clever, isn’t exactly safe for work. Oops! At least it’s clever. : )

The second tutorial is more traditional and perhaps more detailed, but that is in part because I’m only doing a walkthrough involving one program. Because of that it was a little easier to include more details about how to complete the project as a whole, rather than just talking about the “Add Narration” function, which was my initial goal.

I’m pretty pleased with how both of these tutorials came out, little errors and all, mostly because of the way Camtasia allows you to zoom in on different parts of your screen during post-production. That one tiny detailĀ  is extremely important to me when viewing screencasts, because when watching screencast tutorials I most often get lost when I can’t find the specific menu or tool that I’m supposed to be using. By zooming in to the exact spot on the screen where the icons are located, it’s much easier to direct your viewer’s attention to what they’re supposed to be doing, and I hope that at the very least I achieved that with my tutorials.

Tutorial for my Mother

My mother still has no clue how to work anything Apple related. I’m not sure why, to me it is very intuitive. None the less, I’ve gotten many a call from her trying to figure out iTunes. Here is my tutorial for her on how to make a “Smart Playlist” within iTunes:

I used Screenr to record the video. It is very simple to use, just watch out for the issue wiht clicking “done” (It will hide in the toolbar area).

I watched two examples to make sure I knew how to explain things. One was a tutorial on how to download Skype. She was very consise in explaining what to do. It was cute on how she said “mom” instead of you. I should have done that, too. Another one was how to Google! I thought this was cute because its true: mothers don’t know how to google anything. Both were very cute and informative on how to explain things to someone who has no clue.


I’m not sure what else I need to describe for this assignment!


This was worth 5 stars so I now have [10/16] stars.

Danger! Danger! Will Robinson!

Take a famous character’s catchphrase and illustrate it into an image.

I loved this assignment and had too many ideas, so I decided to make a tutorial. My sister and I love Lost in Space. We were introduced to the show when we didn’t understand why our mother went around saying, “Danger, Danger Will Robinson!” She promptly sat us down with the entire show on DVD.

Step One: Use photoshop and open the two pictures you will use.

Ā Ā 

Step Two: Use the Lasso Tool and carefullyĀ trace around Will Robinson’s face.

Step Three: Copy what you just traced and paste onto the other picture.

Step Four: Use Free Transform to resize the face.

Step Five: Group the Layers together. Then Duplicate the image.

Step Six: Select the duplication. Copy Merged and Paste into first group.

Step Seven: Move the layers so that one of them is partially hidden beneath the other.

Save your image and your finished! You successfully created an image for a catchphrase form Lost in Space.


Tutorials oh my!

Warning, all of these tutorials are made FOR 3-4 different programs. I tend to cross the gaps when using them. The programs are as follows: Audacity, Windows Movie Maker 2.6, GIMP, Paint.
General Tutorials;

Intuitive design:
This is what I am going to call being creative. Calling inspiration from a number of resources. You have basically two general fields that you may travel down with intuitive design. First being recycle and the second being generation. The majority of everything anyone does is going to be recycling. Looking at other things, mixing and matching ideas to push our entire thought basis into a slight variation that can be radically different then we may have expected. An excellent set of examples would be video games. The first, FPS (First person shooters) had an adventure more or less running through mazes or on pre-determined paths where events occurred that the player had a bunch of flashes and eventually something lay on the ground dead, either you or the enemy. Other games, such as RPGs (role playing games) attempted to have intricate stories that allowed for multiple different paths for the adventure and the game panned out as much an interactive novel. More recently these concepts are being combined. Look at any FPS today, and there is at least a forward explaining the premise of the game, and 99% of the time there is people that you interact with that either join or fight you based on their affiliations. On the other side of the sword, the top down view has almost been completely abandoned with RPGs, and you are either placed in a first person view of the world you interact with (see Elder Scrolls series, most recently Skyrim!) or is placed with opportune locations for cameras (see Final Fantasy) which is a slight modification of 3rd person shooters, which you can even do in games like Skyrim. All of video games concepts came from much earlier, either 1st person perspective, hell you can go hunting or to war today, or board games, remember the game of LIFE? Monopoly? Top down less interactive varieties of video games.

Now that we have given a general exploration of recycling content, what of generation. This is MUCH trickier, because if you think about it, everything you are going to do or have a concept of has a basis from before. This isn’t a problem, but on a slightly different note, this is where you can be hailed as a genius. In this time of great communication and allowed development, there is something that takes everything in a different direction, for example discovery of a new material or form of generating power (see Nuclear Power coming about in the ’50s, internet, transistors, etc) I suggest stumbling into new generation of concepts versus seeking them out. Doing things differently every time, not staying in your comfort zone is the best way to do so.

Good Luck!

Time management (This one is more for me than anything else.);
If this is taking more than 15 minutes, do not be as exact, unless you are working with multiple people or your final goal is a ‘flawless’ product. (a flawless product is not necessarily possible, so don’t get focused on that point, but on making a complete item, on which you shall improve)

This is if more for if you have due dates, want to keep a schedule, or just wish to not get ‘to deep’ into a project.

The initial action for time management is the planning stage. Before you do anything, you must figure out how much time you have available to spend on whatever project you are going to be working on. After determining the amount of time that is possible for your project to consume, set out a general outline of limitations for each step. (Generally steps are plan phase [you are in that right now], base, general build, analyzing, corrections, clean up, fill-in, analyzing, corrections, and finalization)

The planning phase is extremely important, but it can be as short as thinking of your planned final product followed by putting ‘pen to paper’ or it can be as deep (and long) as mixing the base build of what you are doing with the decision making of the planned final product. Depending on the amount of time and the size of the product I would generally suggest 15% of your available time be placed into this category (Other projects such as movies or video require longer planning phases will picture taking requires less). The base should be a quick generalization hammering out loose details and having a general direction; a couple of examples of this would be story boarding (for movies) or outline for a paper.

The general build is that of putting pen to paper, taking a ‘preemptive’ photo (hurray for instant review!), word vomiting facts, etc. This is where all of the unfocused undetermined work comes in. Using a video for example this would be where gathering a large amount of raw footage (shoots 1-5 persay) This is your first ‘real’ amount of work. This should take roughly 20% of your overall amount of time allotted.

Analyzing 1 better known as reviewing your work. This is where you re-read what you wrote, watch your first set of takes, go take a bath room break and reorganize your thoughts of what you planned. This can be roughly 5% of your time allotted.

Corrections 1, this is the time where you go to those things that had issues and correct them as best you can. Labeling or moving around what you have written in your paper, deciding what shots need to be re-shot, etc. I suggest about 10% of allotted time.

Cleaning up, better known as making sure that the corrections you have made don’t fit awkwardly. Making sure the lines in your drawing match up correctly. This should take at most the same amount of time to do as the corrections, but I suggest 5% of allotted time.

Fill-in is the next step for your general build. If you are doing a picture, this is where you put in all of your coloring, video is where you fill the gaps of the film, and for a paper putting in all your transition material. ~15% of allotted time.

Analyzing 2, rinse repeat of Analyzing 1, 7% on the time allotted as before.
77%

Corrections 2, gotta be precise, Cleaning up should be rolled into this and bridge the gap between this and going into finalization. 13%

Finalization, much like fill in, but this is where you Analyze your corrections, make sure the finishing touches are there, and everything is smooth with few if any problems. This is the best time to show people, and see if they see any errors. Varying opinions should be generally ignored, this is your product. 5%.

The last 5% should be used either in transition, set-up, or finalization. It is a buffer if per say you find a bug or a problem that you can quickly patch up. (Allowing you to be worry free until the finalization time)

Cutting;
I have already have done the cut for the following photos.

Frame Change

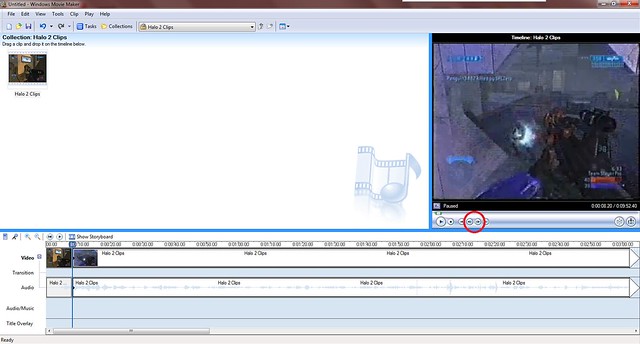
The red circles show what you click on to go either 1 frame forward or 1 frame backwards. So after you have selected or figured out where you want to cut clips. Once you have found the spot you are going to cut.

Split

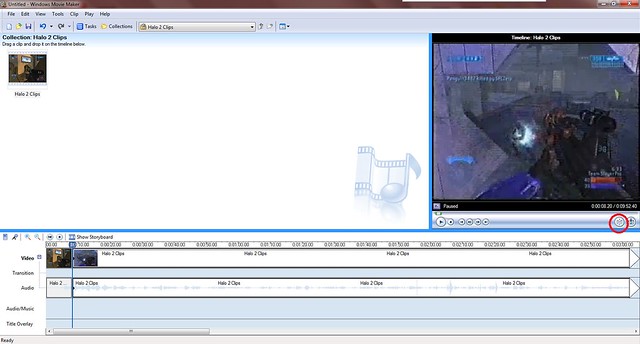
You click the button that is circled. Make sure that the video (or music) that you are going to cut is selected.

Split2

What should occur is that the new file name and a preview image should also show up. and appear like the red circled area.

Music/Sound Syncing;
After importing the media. Drag and drop into the ‘music portion’ (as seen below)

Tutorial-Sound

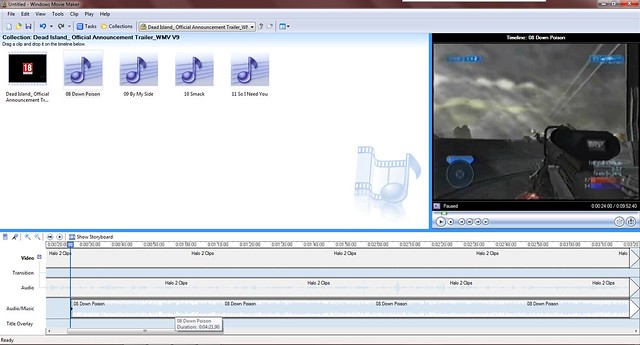
Syncing is a difficult thing to do. It requires you to line up sounds and visual effects. There are two ways to do so. The first is if you have continuous footage (aka not easy to cut, adjust play speeds, or anything of that nature), you will need to find the part in the song that you are going to line up with the most important event that occurs. Look on the music tab and inside of the music section there are larger variations in the stream, these are the noisiest. An great example would be to line up that portion with an explosion or something of that nature. You can also go into audicity and do remixes multi-layer and create fade-in/fade-out effects so that the music/background noise all lines up as you want. The other side is where it is a montage. In this since your mixing a bunch of different clips to create a thrilling showing of something. You can cut, modify clips (change speed, overlap, etc) and break it into single images so that the highest point and even more finely all of the actions that occur within each clip to the music. This is more labor intensive, but can give amazing results.

Specific Tutorials:
Make a Pokemon Card:
2 Different ways that this can be executed. The first is from scratch, look at a pokemon card or google one, look at it, create each box, all of the coloring etc. This way is much more difficult and I suggest going the other direction, which is taking a googled pokemon card (or going to a website that has blank ones available). If you grabbed one from the web, you need to delete all of the text, the best way to do this is using one of the Select tools (Fuzzy Select Tool is awesome, just change the threshold) delete delete delete. Follow this with creating a new layer below the card, so there is empty space, and go to
Filters-> Renders -> Clouds. Play with these, till you get what you are looking for (you can select the colors via the normal color swashes) Drag and drop + resize an image that you shall be turning into a card. This should be on or near the top layer. Follow this with using the Text tool and fill in all of the fields that you deleted the text from. Then google the color that you made for the card (so Fire, google Charmander Pokemon Card etc.) use the Ellipse Select Tool to select just the fire circles for amounts of use, copy and paste on the project you are working on.

Look over your finished work and compare to the Pokemon Card that you downloaded, fill in any fields that you see which is filled out just as they have. Congrats you are done with this one!

Terminate It;

Start by googling ‘terminator’, look at the images, and by the fourth page there should be either a skull only or a full body piece that should be a high enough quality to use (or use Terminator ‘the specific part you are looking for’) Create a new layer for your terminator piece and another layer (on top) for your main image/picture. Be sure to turn on/off the visibility of a layer and move the terminator image portion around so it lines up as if it is directly below, and of course scale it as necessary to fit properly.

Once you have completed this, select the Eraser Tool, clean our everything that is going to be shown as if it is part terminator. If you want use the Dodge/Burn Tool around the edge, to make it appear as if it was burned off OR use the Smudge tool and drag the edges around so that it appears to be ripped or torn. (these effects can be either make the image look outstanding or ruin it, so be careful and remember to take a step back every 15 minutes or so)

Wonderful, you have created a terminator thing mix. Go spread the word and be happy!

Make a Montage;
Make a montage, is rather easy to do for a simple project, but for the example that I gave when creating the assignment it is far more intense and even requires generation of entire footage using programs as complex as 3DS Max and adobe premier. I am going to explain how to do so on a less rigorous but effect manner. First become familiar with how to cut clips and syncing above. Follow the 2nd method I described for syncing. Collect them all in your editing software (Collections for Windows Movie Maker 2.6) and place your choice of music in the ‘audio/music’ section. Create an intro, via the tools -> titles and credits -> title at the beginning. Fill in as need be, stretch the time line out for a few seconds. (You don’t want to stare at it for 15s, and you don’t want to make it a single frame. So fine a comfortable spot with the duration) Once you have done this, make sure you have imported all of your clips, and start to sync them up with the music you have already brought down. Once you have completed this, create a ‘credit’ or ending title the same way you had generated the intro. Good job, you are done. You can finalize your movie by going into the file->save movie file button. Follow the directions, adjust settings as you see fit (or just hit next till finished)

Be a Commentator;
This is far easier then generating a montage. First find something you want to record your voice in, import and drop into your Movie timeline section, right click the audio section (assuming you have expanded it) and click on Volume, turn it down to about 50%. Press play, record yourself commentating the film. Use the ‘Narrate Timeline’ button. It is the 2nd button on your toolbar above the timeline. Once satisfied, using the cutting method to delete mistakes and re-recording publish your movie via File -> Save movie file; follow directions to publish. Congratulations you are done.

Tutorial: DS106 Bumper Stickers

This is a tutorial for the DS106 Bumper Stickers design assignment worth two stars. This assignment required you to create a bumper sticker which promotes the causes or effects of taking the DS106 class. I chose to create a dumper sticker that says “CAUTION DRIVER UNDER THE INFLUENCE OF DS106″, I chose to base my bumper sticker off of this because DS106 requires a lot of long nights in order to finish the required assignments. Thus, we get little sleep and get up early to drive to our classes in the morning. Here’s my bumper sticker assignment.

In order to create a bumper sticker for this assignment you need photo editing software such as gimp which is what I used. I highly recommend using gimp because it’s easy to use, and can be downloaded for free off of the internet. Once you have downloaded gimp, the first step is to search google for a image that you would like to edit, if you don’t want to edit a image then simply skip this step. I searched google for caution signs, I chose the third caution sign on on the top because it was clean, simple, and I knew I could easily edit it.

The next step is to open up gimp. If your choosing to edit a image saved on the computer then you first have to import it into the gimp photo editing program. In order to do this, click file, open, choose the file containing the picture you would like to use, then click assign. By clicking assign gimp will import your picture into the window which will allow you to edit it. The canvas will automatically adjust to your image, if you would like to change the size of your image simply go to image, scale image.

Once you see your image in the canvas, the next step is to put text into your image. In order to do this click the text image (A)in your toolbox.

After clicking the text tool function simply drag and drop it in the position that you would like the text to appear in your image. Then type in your text that you would like to be shown in the gimp text box.

Now that you image has your text you can either stop here or add something extra. I decided to add police sirens on the bottom of the sticker to represent caution without actually saying caution. This was very easy to do, simply click the ellipse tool shown below. This will allow you to create circle and oval shapes perfectly.


Once again, simply just click and drag it to where you would like it to be shown. You can also alter the size of the circle. The next step is to fill in the circle with color, I chose red and blue to make it look like sirens. In order to do this just block the bucket in the tool box, select your color, and click inside the circle. Repeat these steps as many times as you like depending on how many lights you would like to be shown.

Your bumper sticker would now be complete. Next you have to save your image as a .jpg, and export it. Go to file, save as, type what your would like your bumper stick to be saved as, then click save.

Since you want you image to be a .jpg, you will have to export it. Gimp will automatically pop up a box asking you if you would like to export it. Click export.


Learning how to make ds106 Propaganda

I made this tutorial for the ds106 Propaganda Poster project, which is a design assignment. I used the screen filming tool in QuickTime to film this; that’s a really useful thing that I’m glad I discovered. The background music is from the soundtrack of the TV show Lost. The song is called “Shambala” and it is actually kind of a slowed-down version of the song by the same name by Three Dog Night, who has been featured on my blog before.