Oh Stephanie Tanner

For my second assignment that I created I made a remix assignment.  While going though the assignments for remix I found myself wishing that there were more.  I made a note to myself that I needed to create one for this category.  There were some ideas that were similar to what I came up with but nothing exactly that same so I ran with it.

For my assignment I decided that I would have participants create a remix of a character over a course of time.  They could pick any character (however TV characters from a show that has been on air for a while will probably be the easiest) and use clips of videos to show how they have grown up over a certain about of time.  This can be done in any video editing program as long as they are able to show the character growing up.

For my character I picked Stephanie Tanner from Full House.  I picked her because she is great and because Full House was on long enough that you’d be able to see plenty of change in her character.  I started doing this assignment by looking up clips of Stephanie at all different ages.

After finding my clips I used Mozilla Popcorn to make my mash up.  I entered in each clip one at a time and cut them to the size I wanted them.  I then layered in the next clip doing the same thing until I had them all lined up. After all the clips were in I added a title and saved my video.

Here’s what I came up with.  Enjoy Stephanie over the years:

FTW: FTR

The most challenging assignment of the week: For the Remix!

I don’t like physical/3D art. Let me just put that out there. I don’t get it. My roommate is in a Studio Art course, and I don’t get anything she does.

So, that was off the table. I downloaded the photos from the wordpress site and opened them up in Corel PaintShop Pro X5. I wasn’t sure what to do yet, but I wanted to see them all laid out.

I work better when it’s off-the-cuff. I opened the photos I liked best and started to mess around. I used to do this pixelated, grid-like thing to photos in middle school. Under Texture Effects, there is Mosaic - Antique. I duplicated the photo layer then used the effect. I erased the parts I wanted to be visible and clear–his face, etc. That’s it! I put the pictures all together on one and created a black square in the middle so they weren’t overlapping.

I wasn’t originally sure I was going to keep this “remix.” After staring at it for a good while, though, I realized it had a computer-pixelated effect that went well with the topic of Cory’s books.

I hope this was appropriate, though!

FTR: For the Remix

 
Creative Commons License
This work is licensed under a Creative Commons Attribution 3.0 Unported License.

Don’t Even Breathe On It

For this assignment, we had to redub over some voices from a show, movie scene, etc. and I chose Spongebob.  I don’t know why, I hated Spongebob as a kid and still don’t like him.  I guess I just thought it would be easy.  I played the part of Mr Crabs or just the voice.

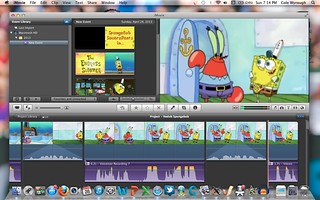
As for putting everything together, I found the video on YouTube and downloaded it using iLivid.  I worked on everything in iMovie and separated the clips of spongebob and Mr Krabs talking using the clip cutter.  I found that was the most useful tool and then lowered the volume on each section of Mr Krabs speaking.  Then I listened to each side of SPongebob and filled in the blanks on the area in between.  Here’s a screenshot of my workspace.

Screen Shot 2013-04-28 at 7.14.19 PM

And the Original Video

And the Final Video

The scene really just talks about another one of Mr Krabs’ crazy schemes but this time it’s not to make money, it is to create the ultimate punishment for Spongebob breathing on Mr Krabs’ car.

Pinteresting Character

I got this idea from Alan’s example for our final projects. I couldn’t find an assignment for it… so I made my own!

The task: Build a Pinterest page of at least 20 pins for a character of your choice. Search for pins that relate to your character and things that he or she would want to pin for themselves. Use X-Ray Goggles from Hackasaurus to modify the board further to personalize it for your character. Bonus points if you build a page and have visitors to your blog guess which character you picked!

The product:

Since I’m the first person to complete this assignment, I should just tell you which character I chose. If it isn’t already obvious, I chose Dexter Morgan.

Not that he’d ever have a Pinterest page, but I imagine his would look much like this. Interest in knives, removing blood stains, understanding his teenage daughter, etc.

Probably one of the more interesting assignments for web, I think! You get to build on a story of your favorite character.

Alas, those pesky stars! (part two)

 Mashup 2 (four star’s!):

The final finale of stars, and all the glory they hold! For my final star assignment, I did as I usually do and i had fun with it! I decided to the Actors Transformation assignment, which involves picking an actor and making a video that shows their careers as they grow older. I decided to do Dakota Fanning, who I’ve always been a fan of, even though we’re only six months apart. She’s one of the few child stars that have been in the spotlight but never steered off the right path. While I understand that all stars are human too, it’s also important that as a star, they have a significant influence on younger generation with what they say or do. Therefore, I chose Dakota because she has always been a strong actress, an amazing one at that too, that remains a strong inspiration. She doesn’t give us a reason to wince when she shows up on OK! magazine, and I think that’s very admirable! So I was proud to take four clips (here, here, here, and here!) of Dakota’s work over the years to stress her career as an actress! As usual, I used Keepvid to convert them then iMovie to do the rest of the nitty gritty work (tutorial here!). Here’s what I got!:

Alas, those pesky stars!

It’s the last time we will ever do stars, fellow DS106ers. How bittersweet. For my two mashup assignments, I decided to have as much fun as possible with them BUT to also make sure I really get my points across while making some sort of impression on DS106 as a whole.

 Mashup #1(four star’s!):

For my first mash-up this week, I decided to do a Movie Trailer Mashup, which is where you take two movies (either their trailers, or scenes from them) and you switch’em up. By switching I mean, I used the movie Insidious and The Ring. I decided to go with the trailer from The Ring but use the audio from Insidious. I was worried at first because I was afraid that the voices would be heard with the lack of mouths moving. However, when I looked at other examples, I found comfort in that no one actually cared too much about that. It was more about how well you could get them to fit (or not fit..!). There was a small portion of editing but overall, it was easy and quick! I used Keepvid to download both of the videos, then iMovie to do anything editing that i needed. For my details, check out my tutorial here! Otherwise, I used the two following trailers:

And i put them together to form my own:


POPCORN!

 Ahh..

…nothing can my true enthusiasm for being done with this assignment which involved Sending Alan on a Trip.  Sorry Alan, but this was probably the most frustrating part of DS106, for the following reasons.

  1. There was no way to shorten durations of clips. While you could make it longer, mine didn’t give the chance to shorten it less than five seconds.
  2. Mozilla Firefox=death. It is the slowest browser out there, and such a pain in the ass.
  3. There was no ‘undo’ button, so if you erased something, you were pretty SOL.
  4. Constantly.Freezing.AGH.
  5. My biggest worry was that I wouldn’t be able to make it run smoothly, and unfortunately, that’s how I felt at the end: it’s not running smoothly enough.

Those are some of my complaints about using Popcorn, but I did give it a very fair try. I actually tried three times for over an hour, and I guess third time’s a charm because I finally made it through without totally giving up. Some parts still seem to be off to me but when I tried to go in and fix it, it seemed as if i made something worse so i had to settle for the lesser of two evils: have one clip be off versus the rest of the video. I used to following images/audio/video in my assignments!

8260159578_9a172c2232_z

^One of the Bizarre things Alan sees on his computer.

^Alan’s record.

Screen Shot 2013-04-28 at 6.25.20 PM
^The Wikipedia and Google Maps Alan looks up!

Screen Shot 2013-04-28 at 6.26.34 PM

^Alan’s twitter search! (Hawaii!)

p-530010-babe-ruth-baseball-card-1985-big-league-chew-2-new-york-yankees-67-aw-44425


^Something valuable to fund the trip!


flower lei necklace


^Unexpectedly expected!

^Where Alan will be visting! (rhymes with Dawaii  ;) )

I ended up sticking with Popcorn rather than using my usual movie editor because I didn’t want to just give up and I’d rather fail at it than not try at all. It was a true struggle. Other than the above reasons, it felt like the bane of my existence and I just wanted to choke someone before I was done. It was just extremely frustrating because while with iMovie, there are plenty of tutorials, I just felt like the Popcorn tutorial they provided wasn’t helpful at all. The idea of Popcorn and what it stands for is awesome but the execution is a disappointment. The website, or maybe the browser that it is supposedly best supported by needs some work. however, without further adieu, go here to see my Mozilla Popcorn creation!


Never Grow Up

One of our final ds106 assignments was to make up two of our own assignments.  For my first one I actually decided to use an assignment that I had already kind of made up previously.  Back in design week I started doing an assignment and kind of got carried away making it my own (you can see the original post here).  I got way off the original assignment and decided to start over and do the assignment how it was originally intended.  At the time I was quite annoyed at myself because it meant I had twice as much work to do, now I am quite thrilled because I get to recycle my mistake into something new.  I really loved what I had made previously so I am excited I get to bring it back.

So this assignment is called my favorite lyric. In this assignment you are to pick your favorite lyric from a song and make it into something visual. You can do this by picking a background image that gives off the same feeling that the song does and layer the lyrics over it.  Since this came from a pretty creative and free place for me, I wanted people who did this assignment to feel the same way.  The main goal is to make the final product evoke the same feeling as the lyric of the song.

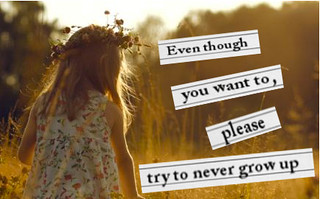
For mine I decided to do the song Never Grow Up by Taylor Swift.  This song is super pretty and always evokes some kind of emotion in me when I listen to it (especially right now when I am only a few weeks away from graduating).  I choose the lyric “even though you want to, please try to never grow up” as the specific lyric in the song to make my visual for.

While I was playing around I ended up putting this simple picture of a little girl as my background.  I felt like this little girl displayed happiness and innocence that I relate to childhood.   I then started to add in the words.  At first I just was trying to lay them on the picture, but I then decided I wanted to mount them on something first.  I decided to use notebook paper as that mount. I opened the notebook paper into a new page and cropped it to be the size and shape that I wanted and then just copied it in over by background. I did this for each set of words that I had on my background.  I then added my words using the text tool.  I played around a lot with the angles, fonts and size of everything before finding something that I really liked.  I am pretty thrilled with how this came out.

Here is my final product.  I hope you enjoy and have fun with this assignment!!

nevergrowup

10-Step Challenge

For one of the assignments that I submitted for the assignment bank was the 10-Step Photo Challenge.

I saw this on a site once and thought it was a great idea for an assignment.

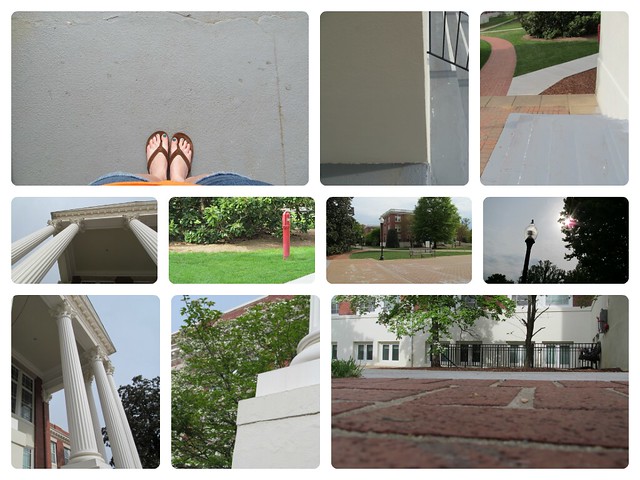
The task:  Take ten steps in any direction and with each step take one photo. Think about angles and lighting to create interesting photographs. Don’t forget the Rule of Thirds! Create a collage in a photo editor.

This is my product:

10-Step Challenge

I went to Monroe Hall and stood on the steps. From there, I took ten steps and with each step I took a photo at a different angle.

My goal was not to create 10 distinct photos but to create a vision of what I see when I step out on those steps every Tuesday/Thursday. I’m feeling sentimental…

I hope students enjoy this assignment like I did!


Post Photographic Portrait

For this assignment we had to take a photo from a series of photographs taken by Jonathan Worth of author Cory Doctorow and remix them.   The photos were found here and we were encouraged to draw ideas from the themes and topics of Cory’s books for this remix.

I found this assignment that hardest of the week.  It wasn’t the assignment itself that I had trouble doing, it was coming up with a good idea.  I literally sat in front of my computer for a good forty-five minutes before I came up with anything that I liked at all.

I ended up spending a little bit of time on his website and came across one of his books called “The Great Big Beautiful Tomorrow” and got my first idea that I really liked (and immediately thought of the really stinking annoying song they play over and over on the carousel of progress in Disney).  Here is a clip to a trailer for the book:

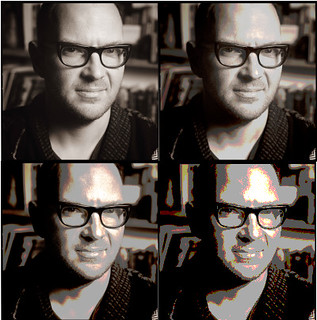
This preview talks a lot how our society is constantly changing and evolving and that is what it makes our future great.  I starting thinking about how I could show that in one of the pictures.  I decided that I wanted to take one picture and show it in different stages of evolution.  I was going to take the picture and make it look “older”.  I was then going to combine the four pictures next to one another so that the changes would appear more drastic.

To do this I uploaded the picture into gimp. I then reduced the size of the picture so that each would be about 200×200.  I then used the posterize tool to make my pictures look older.  I played around with this tool for a bit until I made the pictures look how I wanted them too.  After getting all four pictures to a setting that I was comfortable with I placed them side by side so that you could see the difference in effect.

Here is what I came up with:

four