Oh, Chicago

For my next assignment I did grettings from ds106.  This assignment is to tell us where you are, where you’re from, or simply where you’d rather be and build a greeting card.

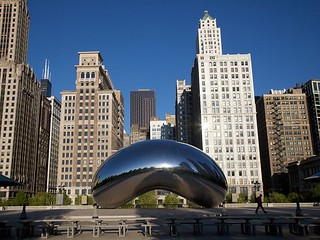
To make this greeting card I started off by finding my pictures.  I’m not going to tell you why (if you really wanna know you have to read my final story post when it comes out) but I am doing this greeting card for Chicago.  I decided that I wanted to use a picture of the skyline and the Chicago bean for my picture.  Knowing what I was looking for made it pretty easy to find these two pictures:

Chicago Skyline

bean4

I then imported them into gimp one and a time and rotated them so that they were are about a forty-five degree angle.  I imported the sky line one on the bottom and the bean one on the top.

I then imported a plain cream background to go over the middle of the two pictures where they overlap.

1CreamBackground

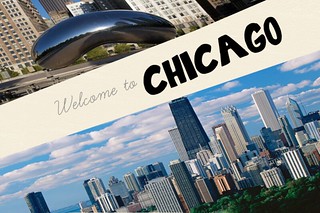
I then cut away the cream until it was just overlapping the middle of the two pictures.  I then added in the words “Welcome to Chicago.”

Here is my final product.  I hope you enjoy!!

Chicago

Fans React!

For my fourth assignment for my final project I did storytelling within the web.  This assignment is to take a website and edit it completely so that it tells a totally different story than it once did.

I’m going to warn you now IF YOU WANT TO BE SURPRISED BY MY FINAL PROJECT STORY YOU SHOULD STOP READING NOW! So far none of my assignments have given too much away but this one will!! Turn back now if you don’t want to be surprised!

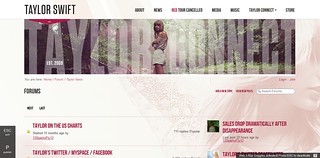
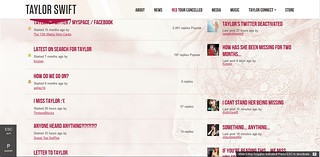
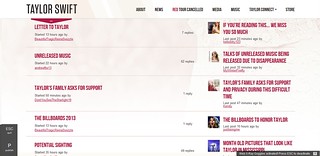
So to do this assignment I first had to decide which website I wanted to modify.  I decided to use Taylor’s official fan form. I really wanted to get Taylor’s fans reaction to the situation that I have created (which I still don’t want to spoil for you).  To do this assignment I used Hackasaurus.  This is an awesome program where once  you install it, all you have to do is point and click at the website you want to edit.  It’s seriously that easy!  The hard part was actually editing the website.  Coming up with ideas was much harder than I thought.  For the first six or seven I was rolling but when I got to like fifteen I was having a hard time.

After some creative ideas and a lot of editing here is what I came up with…

1

2

3

You can also look at the final website here!


Where is the World is Taylor?

For my third assignment for my final project (look at me go!) I did google map trip. This assignment is to use Google Maps to tell a story! It can be the story of a trip you took, a trip you would like to take, a strange occurrence, a war, anything you like!

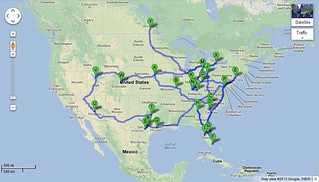
Since my whole project is on Taylor Swift I had to decided what I wanted to map out related to her.  After thinking for a few minutes I decided to map out her current tour.  I personally went to her tour a about a month ago and it was freaking awesome.  Here is a video of the opening of her tour at my concert (not my video, sadly my seats were not this good).

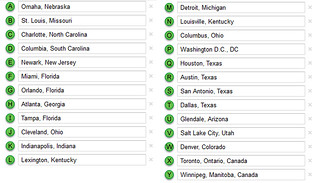
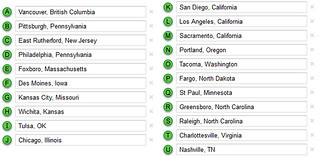
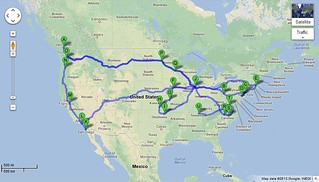
So what I decided to do was to pull up her tour dates.  Luckily I was able to easily find these dates on her website. I was planning on putting all these dates on one google map but her tour was too long to fit onto one.  For this tour she is out across the United States and Canada for nine months! (and she is about to release worldwide tour dates).

To make my map I used google maps.  All I had to do was transfer each city from her website into the next destination slot.  This would have been a relatively easy process if she wasn’t going to forty-seven different cities.

Here are my final maps that I made.  Please note that there are too because there were so many different cities that google maps made me start a new one half way though.

City List part 1

Map part 1

City List part 2

Map part 2

Look at Me Now

For my second assignment for our final project I did Not Quite Norma Jeane. This assignment is to remake this classic Marilyn Monroe “expressions sheet” with self-portraits or with the aid of a friend.  Were going to call Taylor my friend for this one.

To do this assignment I used the collage section of picmonkey. It is a quite simple program to use and you can just drag and place the pictures that you want in the spot that you’d like them.

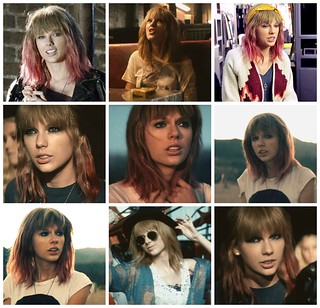
To get my pictures for this assignment I started off on google images.  I was trying to find pictures of Taylor not looking like herself.  After I few minutes of searching I remembered her I Knew You Were Trouble music video that she recently released.  In this video Taylor is dressed much more emo/goth than usual and she has short hair with pink streaks which you can see right below

I then started doing a google image search to try to find pictures of her in this music video.  After having a hard time finding a good variety, I ended up just watching the video on a high definition setting and taking screen shots of it.  This proved to be much easier and gave me the freedom that I was looking for.

Here is my final collage.  Not exactly the Taylor you’d expect right?  Any ideas where my project could be going??

Taylor

Welcome to Nashville!

How on earth can it already be time for final projects? I’m having a hard time believing that the semester is almost over!!

About a week ago we came up with ideas for our final projects.  You can find my original idea here.  Just to give you a heads up this is not exactly what I am doing for my final project any longer.  The more I got to playing around the more elaborate my story became.  I do not want to give too much away right now about all the little changes because I still want to make my final reveal exciting.  You’re going to just have to wait to see my final outcome.

For our final project besides coming up with an elaborate story, we also had to plan out and do around 15-20 stars of assignments.  These assignments could we any of the different types of media as long as we used three of them. Here is my first assignment:

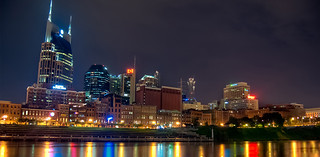
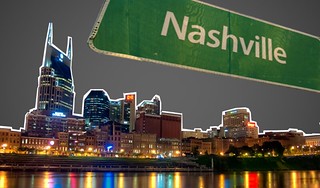
For my first assignment I did A Place I’ve Never Been.  For this assignment  you were to create a photo collage or illustration of a place you’ve never been to.  I decided to use Nashville, Tennessee as my place for this assignment.

I completed this assignment using gimp.  I started off with this picture of Nashville

Picture of Nashville

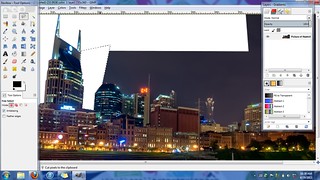
and cut it out using the free select tool until all of the sky was out of the picture.

1

This process was a bit tedious but I was pleased with how it came out. I then inserted my picture over the Tennessee flag and cut the white away again to make it look like this.

cutout and flag

I ended up getting stuck here for a little while.  I quickly decided that I was not a fan of the flag in the background but I wasn’t sure what else to add.   After a lot of google searching an some trial and error I ended up finding a plan grey background that I thought really showed off the buildings instead of taking away from them.

I then found this picture of a Nashville sign and I cut the sign away from the background just like I did with my original picture.  I then pasted that on the top part of my design and played with the sizing until it looked how I wanted it to.

Here is my final product.  I’m pretty happy with how it turned out.  Hope you enjoy!

final


Portraiture

For FTR!,  I decided to take the office photo with the picture frames on the wall and put a portrait of  Cory Doctorow into the frames.  Both the picture of Doctorow and the photo of the office were taken by Jonathan Worth.  In order to do this, I had to measure the dimensions of each frame by recording the coordinates of each corner and finding the width and length.  After recording them, I scaled and pasted as a new layer the picture of Cory and moved them to their appropriate frame.

mashup process

This was more tasking than I was previously aware.  For some reason I couldn’t figure out how to make the first image I placed (the one you can see in the screenshot above) to fit the frame, but I think I did a decent job with the rest of them.

Here’s the final product:

officespace

Always Sometimes Never

Those three words pretty much haunt every geometry student at some point in their life. A square is always a rectangle, but a rectangle is sometimes a square? How can that be? It’s all about the properties. Quadrilaterals share a lot of different properties, but there also are a lot of differences between them. We could even say that they are remixes of each other (do you see what I did there?). This is leading me to the assignment of For the Remix in which us ds106 students have the opportunity to adjust a photo in whatever way we see. It’s really a cool idea, and I am excited to see how far it can go. Want to take part in it? Click here!

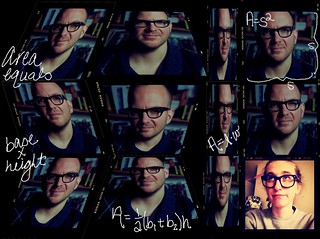
So looking at all of the different pictures, I decided to go with the one of Cory’s face in 12 different squares. It’s simple, yet together it makes art. You see very subtle differences in his movement which really helps to express his emotion, which seems calm and serene. When I think of being calm and serene, call me crazy but I think of math. Currently I am in no math classes and that makes me so sad. There is just something very soothing about being in a math class, so I usually find myself doing the homework for the class that I am a PASS leader in as a way to calm my nerves.

Looking at this picture just for some reason made me think of math. Yeah sure, call the nerd alert, but it’s true. So I decided to do a play on mathematics, for this artistic interpretation. For starters I wanted to have the squares now be different quadrilaterals, and I also wanted to be in a picture (because I have glasses similar to his anyway and mine have math symbols on them so it’s better).

So I did what they told me not to do, and I opened the picture in Paint (I know I am such a bad ass). I did this in order to cut and paste each individual square into GIMP where I did the editing. However, GIMP and I do not get along in the cropping front, so I figured I would just save a bit of time and have a few (or 11) layers.

The main tool that I was using was the Perspective tool in which I changed the shape of the square, thus changing the perspective of the photo. I was actually really surprised to see what I was going to get. So I decided to make the whole first column be parallelograms. Deciding that just simply tilting each square a bit to the right or left wouldn’t do much, I decided to make the second column trapezoids. The third, rectangles and the 4th is the perfect square.

I then took a picture of myself on my iPhone and used an Intragram filter in order to the framing as well as the tinted color (which looks nothing like the coloring of his photos, but I enjoy to stand out a bit).

So now I bet you are trying to visualize what I came up with?

Well here it is!
Always Sometimes Never

I was actually really happy with how it came out, but I wanted to add a bit more. I decided to go for writing the different equations in different ways to show how math can be different, even if a rectangle is always a parallelogram.

Thanks for reading!

Princess Karissa

Flickr/Craigslist Morph

This next assignment, which I chose to title ‘twittr’, asks the user to combine two popular websites to create a new page. I completed the assignment using the sites Craigslist and Flickr.

I used Firebug to edit the two pages, and used simple cut and paste to take section headers from Flickr and transfer them to the newly edited Craigslist page. The assignment was a bit frustrating at times, because, as was mentioned earlier in the semester, any accidental click when using firebug and all your progress is lost. Unfortunately, I faced this reality twice, and lost all the progress I had me. Ultimately, I made a simple page because the more complex ones kept getting lost. Here it is!

Screen Shot 2013-04-28 at 11.28.46 PM

Creative Commons Joke

For this assignment I was tasked with remixing photographs by Jonathan Worth. While I’m not quite sure if a video was meant for this assignment, I went for it anyway. I was at a complete blank as to what I should do, so I went with what I feel most comfortable with, iMovie.

I downloaded the three pictures I felt I could make the most out of, and developed a dialogue between the same person at two different angles. Here is a screenshot of my workspace.

Screen Shot 2013-04-28 at 9.38.21 PM

And here is the final product.

I’ll See You Past the Horizon

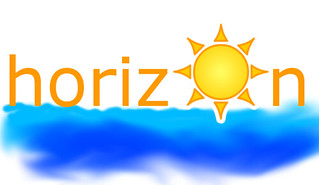
Gosh it seems like all that I want is to go to the beach. Probably because I am a total Jersey girl, and I am constantly craving the beach at all seasons. But that is besides the point. This assignment that I created is all about improving vocabulary. As a future teacher I wanted to show students that they can associate different words with pictures by drawing the words.

So, I decided to draw the word “horizon” in which I think of the sun rising over the horizon, so I decided to draw a sun setting as part of the word. This way, I remember that horizon is the line that goes left and right, which is the opposite of a vertical line (if we are bringing this back to the math classroom which everyone should always be doing anyway).

I used this in GIMP and found the clip art of the sun and then added another layer for the text and the painting in the background tool was using the smudge feature.

Here is the final product

Horizon

Thanks for reading!
Princess Karissa