Take a trip to Eurasia!

Where Do You Want To Go? – “Where is somewhere that you have always dreamed of going? I really like traveling, and I often think about where I would go if I had all the money in the world. Do a video montage of images and/or video of the places that you would like to go, and add music that is native to the that area or just something fun.”

Tutorial:

  1. Find pictures of places to see and things to eat!
  2. Upload and put pictures in an order that makes sense on Youtube
  3. Add some audio that sounds fun and cheery
  4. Upload and save slideshow
  5. Upload show to Movie Maker (if you have Windows)
  6. Make a title and short ending credits (because it was probably only you making the video)
  7. SAVE and upload to Youtube
  8. Upload from Youtube onto your website!

So I have fairly recently already been to Europe, but I hope to return in the future! Italy and Japan are two places I would love to go to! I won’t exactly be descriptive in my story because I am not familiar with the cultures because I (obviously by the name of the assignment) have not been to either country. I apologize. Also, the first things I went over before my Europe trip were things to do, things to eat, and souvenirs. SO I will go over the first two, because the third one is just a bit excessive for this movie!

Let’s take a trip to Eurasia! First, we of course have to make the flight over, take a taxi to the hotel, and get acquainted with the new time zone. By now you hopefully have your whole stay mapped out, but most importantly, what to do and what to eat!

First we will go to Italy. So in the morning we will grab coffee and hike up to Mount Vesuvius where there is not only history but an amazing view. Then we will make the trek to Sistine Chapel to see all the beautiful artwork on the ceilings. When we leave we will be super hungry so we better find a place with some awesome pizza! On the way to the Leaning Tower of Pisa we will probably come across a gelato vendor and won’t be able to escape unscathed. Then that evening we will take a boat tour of the Grand Canal and all it’s beauty. Then for dinner we will get some great pasta and tiramisu for dessert! Then at night, when the stars are shining, we will head over to the Colosseum!

Next up we will go to Japan! Early in the morning we will go to a nearby Japanese tea room that smells of herbs and honey. Then we will go out to see the famous Itsukushima Shrine in all its glory. Then we will stumble upon a beautiful Japanese Zen garden that is 100 times the size of the small one you own at home! Then while souvenir shopping we will probably smell some delicious ramen and have to grab a bowl (or two). After shopping we will visit the sacred Rokuon- ji templ and bask in the glory of it. And I am sure there will be cute vendors around there selling rice balls or adorable bento boxes and we will just have to experience them! Next up we will buy some tickets to go see the Okinawa Churaumi Aquarium and all the fish they have. (We will of course try to take some selfies in front of the whales.) Then we will hike up Mount Fuji and look down at the country side around it and just wait for the stars to come out. Afterwards, we will grab some sushi and japanese strawberry cake for dinner and dessert. Maybe if there is enough time in the day we can soak in some hot springs! But hey, this is all part of my dream, to travel to Italy and Japan.

Will you join me?


Sick Beat

Just trying to have fun with this project Audio Assignments Create A Ds106 Radio Bumper (4 stars) trying to challenge my self while having fun.

* My main objective for this project whether I finish or fail to finish this project is to learn more about using Audacity, learn how to manipulate sound and challenge myself.

I am not even sure I did this one right but is there any “Right” way have to have an introduction:

But this is how I did it:

  1.  Open Audacity (by clicking the short cut, it will end up looking like this when you open it up)

2 . To Add a sound  go to the bar very top of the “Green” bar where their of options such as File, View ect. Select  “File” then “open” for the first sound.

3. To add a second sound go to the very top menu bar and select  File >Import> Audio (this I repeated several times)

The result: Fantastic (of course)

I am really disappointed that I did’t really get to use this but I think that is is worthy to be noted:


I like this because there is a lot of little sounds making up a big group of sounds. No one sound is perfect but together they make up one good sound.

In this assignment I wish I would have been able to successfully been able to fad the sound in and out. From the looks of the sound wave I did’t get it quite right. I think the main problem was when I selected the section that I wanted to fade in on it selected such a big chunk of it. When I went to do the fade out it would not preform the action. I just want the reader to know every time that I write about something that was holding me back from the projects true potential  that I did try several times before calling it quits. This project to me about 2 to 3 hours, I think I spent most of the time looking for sounds that would work together well. How do people find the perfect sound to mesh together anyway? I guess you would have to have some kind of musical genius. For this project as a side story I almost used the Media Editing lab and Vocal booth at the University of MaryWashington but when I got to the room someone was already using it. If we continue with the subject of Audio I would like to discover if there is any useful equipment that can be used.


llanfairpwllgwyngyllgogerychwyrndrobwllllantysiliogogogoch is a real place

For this GIF assignment I was supposed to make a GIF of either weather or a weatherman. I always have found the clip I used hilarious that this weatherman can pronounce llanfairpwllgwyngyllgogerychwyrndrobwllllantysiliogogogoch with no problems whatsoever.

My gif can be found here

The assignment link can be found here

And here’s a video on how to pronounce the town name:

Trampled by Turtles

For this GIF assignment I was to make a GIF with one of my favorite musicians. I have no idea how to embed that onto here, so you can find the GIF I made here.

The assignment link is here

Steps:

  1. Google how to make a GIF because the link on the week 2 page doesn’t work.
  2. Find Makeagif.com here.
  3. Insert the link of the Youtube video you want to use
  4. Edit to your liking
  5. Post

period piece mashup tutorial

For this assignment, first download the videos you want to use from YouTube. I installed the SaveFrom plugin for Chrome, which makes this super easy. When you go to YouTube, there will be a little download button below the video:

Screen Shot 2016-06-16 at 8.30.58 PM

Open iMovie, and import your videos. Now, select the sections of the videos you want to use, and start dragging them onto your timeline.

Screen Shot 2016-06-16 at 5.35.20 PM

Alternate between the videos.

Screen Shot 2016-06-16 at 5.35.51 PM

I chose 10 second clips at first, then 8, 6, and 4. This effect will help build the drama as the clips begin to change more rapidly by the end of the video.

Go to Titles, and select the intro and outro slides you want to use. Type in the text you want, and drag the slides onto the timeline the same way you added the video segments in.

Screen Shot 2016-06-16 at 5.45.02 PM

You’re done! Click the Share icon at the top and select the platform you wish to publish your video on.

Screen Shot 2016-06-16 at 5.45.47 PM

Product Review: XL Croakies

Original Assignment

I may have spent just as much time debating what to do a review on then working on itself. I chose my pair of Croakies. They’re made to hold your glasses around your neck. Made popular by fraternity members, Croakies are more of a fashion look than a practical use. This is my personal opinion. I’m more likely to take off my glasses and fold them, allowing them to be hung on the collar of my shirt. I was only limited in this review by the simplicity of the product.

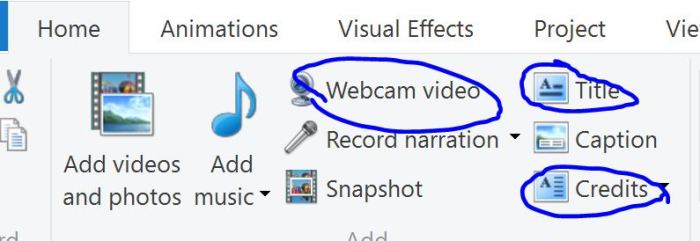
I made this whole movie (review) without ever leaving Movie Maker. Upon opening Movie Maker, the program I clicked on the Home tab and selected Webcam Video. Once it was selected it was ready for recording. I clicked on the big red dot signify record and I spent the next four minutes talking about my Croakies. When I finished I went back to the Home tab. I was able to add both a title and credits sequence from here. I was finished after exporting the file and then uploading the file to YouTube.

VideoAssignmentCapture2
Circled are the tools mentioned above and used during the review.


Scenes of Lasting Memory

Original Assignment

This assignment is my favorite since I created my first GIF files. I enjoyed using Movie Maker, which I thought was surprising. It was too difficult to choose my three favorite movie scenes of all time. After ten or so minutes I decided on my three scenes.

The first is from Saving Private Ryan. It is my favorite war film. the classic D-Day invasion directed by Steven Spielberg will forever be remembered. Tom Hanks acting when stunned and in shock is admirable.

The second scene is from the movie The Shawshank Redemption. I first saw this film when I took a film study class in high school. I would have to say it is my favorite movie of all time and I happened to choose it among many great scenes in that movie.

The last scene features what I like to think as the creation of Wolverine. Wolverine had already existed (actually for almost a century) previous to the operation. This form of Wolverine is what people remember in what I think is a thriller.

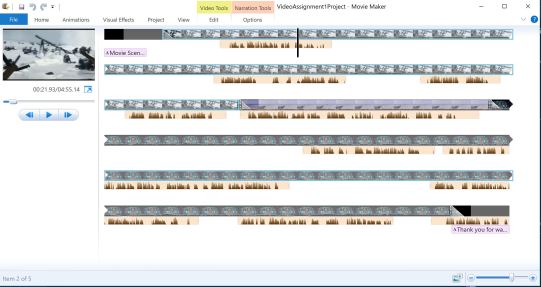
So how did I create this assignment? It was not that difficult. I used the website SaveFrom.net to record the three scenes. I downloaded Movie Maker for Windows 10 to my laptop. Once I uploaded the scenes I used the Trim Tool to set the beginning and ending of each scene. You’ll notice you can move the scenes around. This is helpful if you did not upload in the order you wanted the scenes to show. Under the Home tab you may give the movie a title and an ending credit scene. Also under the Home tab is how I recorded my voice. Upon clicking annotation record you will be able to play the movie and talk as it plays. Under Options (Narration Tools) I was able to make my voice louder than the film so I could be heard. I exported the finished product and then uploaded it to YouTube.

VideoAssignmentCapture1
A finished look at the post edit in Movie Maker.

A video letter to my sixteen year old self

Have you ever thought about what you would do differently in life if you had the chance to go back? I know I have… I luckily came across this video assignment which allowed me the opportunity to do just that. The assignment required that I do a video letter to my sixteen year old self talking about anything that I would’ve wanted the sixteen year old me to know. I thought giving advice to the teenage me wold be easy, turns out it wasn’t. I spent more time just thinking about what I would say than I did actually recording it. Since this is going up on the internet I didn’t want to get too personal…anyhow here’s the best I could come up with.

You can follow these steps to make a video letter to your sixteen year old self.

downton ab(beyonce)

Mashups? Ummm, yes, please. As a hungry hungry pop culture consumer, I love seeing my favorites all smooshed up together. For this video assignment, I put together the Downton Abbey theme and Beyonce’s music video for 711.

I loved Downton Abbey when it was on, and I have to admit that just hearing the theme that plays during the opening credits pulls at my heartstrings. However, I think it’s important to remember that Downton was not without some serious flaws. Namely its lack of diversity. Sure, one could argue that the setting of the period piece saga necessitated an entirely white cast (Ok, so they had one black character. One time. Just the one). Still, in a whole seven seasons, the show never had the courage to even address the classism and racism that laid the foundation for the core characters to go about enjoying their oh-so-privileged lives. I’m not trying to dismiss the entertainment value of the show, but I do think it’s important to always keep these things in mind.

Anyways, what better excuse to watch more Beyonce videos than to overlay the Downton theme with the most prominent black female entertainer of our day? Lady Crawley would be turning in her grave.


Here’s the original Beyonce video:


In part, I selected the Downton theme because its tempo is relatively quick for the classical music that I’m familiar with. I thought that this would make it fit more seamlessly with a pop music video, and for the most part I was correct. 711 has a lot of tempo changes so it’s not a perfect fit, but there are moments where the two seem in sync. I’m happy with the result, and I hope you enjoy watching it!


The Process: 

If you have iMovie, then this assignment should be fairly straightforward. First, download the audio you want to use. I used a youtube to mp3 converter online. Enter in the URL for the video you’re using, and click ‘Convert.’ Then click ‘Download.’

Screen Shot 2016-06-12 at 1.04.46 PM

Next, download the video you’re overlaying the audio with. I used QuickTime for this. Go to ‘File,’ and select ‘New Screen Recording.’ Drag the box to the section of the screen you want to record (around the video presumably) and begin. Turn off the annotations so you don’t get annoying pop-ups in your recording!

Screen Shot 2016-06-12 at 1.05.44 PM

After you’ve finished recording, save the clip to your computer. Open iMovie, and select ‘Create’ from the top bar. Choose ‘No Theme.’

Screen Shot 2016-06-12 at 1.18.31 PM

Next, select ‘Import’ from the same top menu bar. Find your video, select it, and click ‘Import Selected.’

Screen Shot 2016-06-12 at 1.19.41 PM

Drag the orange sliders to the section of your video you want to use for the final project.


Screen Shot 2016-06-12 at 1.21.37 PM

Click inside the orange box you just created, and drag it to your timeline.

Screen Shot 2016-06-12 at 1.21.43 PM

Now, go back to ‘Import,’ and import your audio clip the same way as before. Mine was longer than the video, so I used the orange sliders to only add that amount of time to the video.

Screen Shot 2016-06-12 at 1.22.54 PM

Just like before, drag down your audio to the timeline, on top of your video clip so that it starts at the same time. If you cut off your audio in the above step, you’re going to want to fade it out so that it sounds ok. See the tiny gray circle at the far right of the audio track? Slide over the icon in a few seconds, and it will fade out:

Screen Shot 2016-06-12 at 2.40.47 PM

If you’re happy with your video and the sound, click ‘Share’ from the top menu and choose the platform you wish to share it with. I selected ‘YouTube,’ and followed the pop-up windows to log in to my YouTube account and upload.

Screen Shot 2016-06-12 at 1.25.15 PM

This will take a while. Check its progress by clicking the clock icon in the top right:

Screen Shot 2016-06-12 at 1.53.47 PM

Once you’re done, check out your video on YouTube!

Dancing Queen Lyric Video Snippet

The task: Take a short section of one of your favorite songs, and turn the song into a video using only lyrics.

The Video:


I chose to use the song Dancing Queen for this assignment for a couple of reasons

  1. I LOVE the movie Mamma Mia (and most other musicals…). I know basically every word to every song.
  2. I went to my cousin’s dance recital last night, and one of the songs in the performance was Dancing Queen. In case you were wondering, it has been stuck in my head ever since. (We’re going on 24 hours now.)

Too bad large groups of people don’t appear out of nowhere and burst into song with me when I sing it. Sad face.

How it was made:

I started off by selecting a song. I went with Dancing Queen by ABBA, and I found a YouTube video of the song.

Screen Shot 2016-06-12 at 4.34.49 PM

I used a converter to download an mp3 version of the song.

Screen Shot 2016-06-12 at 4.34.58 PM

I copied the YouTube link into the conversion website and then clicked download to save the file to my computer.

I used the Superstring program to create my Lyric video. Once the program is installed on your computer (it is free!), it is pretty easy to use.

Screen Shot 2016-06-12 at 4.32.13 PM

When the program opens the first time, it will take you through a tutorial. Once the tutorial is completed, choose the add to library button in the middle of your screen. When the menu pops up, select choose songs, and select the mp3 file that you just downloaded.

Screen Shot 2016-06-12 at 4.32.20 PM

Once the audio file has uploaded, you will be able to type in your lyrics. Each box will appear individually in the final product, so break them down as you want them to appear. Double click in each box and begin typing. (tip: you can tab from box to box)

Screen Shot 2016-06-12 at 5.07.42 PM

Now, you can click on the top and bottom of the boxes and click and drag them. Dragging will change the size of the box (which is the amount of time the lyrics within will show in the video). The larger the box, the longer the lyrics will show. The times to the left represent the total time the song has been playing to that point.

Screen Shot 2016-06-12 at 5.08.05 PM

Now, you can adjust the formatting using the tools to the right. (tip: highlight all of the lyric boxes before making any changes, unless you want each box to be different).

Screen Shot 2016-06-12 at 5.07.28 PM

Once you are done with the formatting of the video, you can export the final product by going to Control?Export and saving the file to your computer.