Self(ie)-Portraiture: Me, myself, I – You, yourself, we

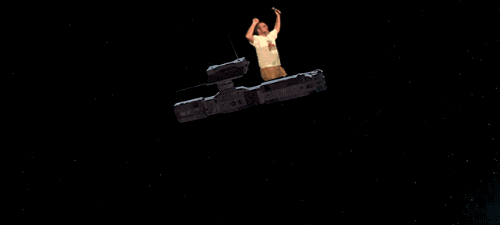
Self-portraits are everywhere online and easily shared via mobile communication. The selfie is more than fashionable. It is an everyday practice of the state of personal publishing and ‘always on, everywhere’ networked media. The smartphone facilitates a personal push and pull media on a scale that we have never experienced before. Traditional film cameras were never widely used to photograph ourselves. We pointed the lens at our family and friends, learning to preserve ‘Kodak moments’ in physical frames and albums. The story behind this composite three-image photographic self-portrait is about the distractive state of everyday live, where moments of procrastination, rest or idleness are easily assigned to status updating, . This photograph is not just a self-portrait, it is an ‘us-portrait’, palm and finger akimbo, multiplied and montaged.

Of course that does not mean that the image is without a personal meaning or story, but it has general significance about the ‘mediated self’ at this media technological moment of ubiquitous cameraphones. There is an interesting, huge scale, rich media visualization project called Selfiecity that is studying the demographics, poses and expressions of the selfie and which claims that cities such as Bangkok, Berlin and Moscow each have their own style of taking selfies – that is, that cultural difference can be identified  how we take selfies.

‘Looking At Yourself’? These days, in media terms, you hardly ever stop.

Anyway, this is how my selfie-portrait came about.

Working at home on a Winter Sunday afternoon in January 2015, with early disappearing light, and in need of distraction, I had an urge to Instagram. For some unknown reason, I placed the cameraphone on the floor and became aware of the electric light fitting on the ceiling and how from that angle it create an ‘L’ shape. On hands and knees I tried to put my head in the square frame because I thought that the light fitting and ceiling alone was too dull an image. Not wanting to look directly into the camera, the difficult bit was to look away from the screen and take the picture at the same time without knowing for sure about the framing – a trial and error process. I’m guessing that there were multiple attempts to get it ‘right’, to be aesthetically satisfied with the result. When taking an Instagram photo, I always scroll through the filter and settings options, but I don’t recall which ones I used for these images.

instagram_me1

Instagram Selfie #1

Very soon after this first image, I must have decided that this was an interesting process and result, so two more images followed in the same way – but different framing of head and light and filters and settings.

instagram_me2

Instagram Selfie #2

instagram_me3

Instagram Selfie #3

I must have been struck by the outcome because I then shared the three images on Facebook and then combined the three images on my laptop to create one further composite image share on Facebook.

me me me

MeMeMe (Selfie-Portrait) (2015)

This self-portrait, then, was not done specifically for the ‘Looking At Yourself’ Visual Assignment, but, rather, the image chose the assignment. As I was deciding which visual assignment to do as part of Unit 5 ‘Telling Stories in Photos’ of open ds106, the whole experience seemed a perfect fit for the brief – ‘art following life’. Here was a self-portrait as a routine use of media in everyday life, an act of everyday creativity, not something done to order, or for professional or hobbyist reasons or to fulfill a creative assignment brief, but a spontaneous and routine thought and action if not specifically typical of what I do everyday, then a good general, though convoluted, example of habitual self-portraiture.

Starting with the three Instagrammed selfies:

#1 ; #2 ; #3

I copied and pasted the images onto a blank slide in Microsoft PowerPoint. I like the rough and ready image manipulation and easy use of text and graphics that you can use in PowerPoint. When I’m not worrying too much about image resolution or more sophisticated techniques that might require more suitable software such as Photoshop, which is most of the time in a social media context, PowerPoint is perfectly adequate as a basic photo editor. Placing the three images initially side-by-side, I then rotated and resized them and overlapped them until I was happy with the composition. All the images were rotated to a different orientation than when they were originally captured on Instagram and the final composite image was saved using a screen capture utility (I use Gadwin PrintScreen to copy and paste and save as JPGs).

Having three light fittings in the composite image didn’t look properly balanced, so the middle image was placed to overlap the one on the left obliterating the light in the middle image. Most pleasing in terms of the composition was how the two images on the right could be combined so that a Cubist-like head and shoulders effect is created. On reflection, I also like that if the composite image of my head is taken as an ‘O’, then with the image turned upside down, you can perhaps make out a squiffy ‘LOL’ with the ‘L’s formed by the illuminated sides of the lightshade.

me me me lol

MeMeMeLOL

But this upsidedown ‘LOL’ version doesn’t work so well as a composition. During Unit 5 we were instructed to keep in mind at least three principles or ‘tips’ selected from study material provided to learn about taking good images. I decided to be guided by the ‘6 Principles of Gestalt Psychology That Can Improve Your Photography’ written about by photographer Joe Baraban. Looking at photography with these principles places an emphasis on the complete photograph as a relationship between its parts and the whole. The angle is to think about what the viewer percieves and processes visually and psychologically when looking at a photograph and therefore how a photogrpaher can control what the viewer sees.

Analysing my selfie-portrait using the ‘6 principles’, I can see how this applies. In terms of the ‘Figure-Ground’ principle, for example, where you are looking at the relationship between objects and their surroundings, the dull background of my composite photograph contrasts against the silhouette, and chiaroscuro of my head and body and the over-exposure of the light fitting. My selfie-portrait has ‘Closure’ through the visual tension of the repeated figure and light – puzzling, but not too so. ‘The Law of Common Fate’ principle is about visual direction in the image and with the placing of two of the figures looking at the same light source, this works in harmony. There is ‘Similarity’ with repetition of the figure and light and ‘Proximity’ of forms, shapes and colours. The dark palette, repetition of shapes and balanced grouping across the three images, two figures and lights, produces a balanced, off-centre effect, though not classically satisfying ‘Rule of Thirds’.

As an image, and a retrospectively conceptualised ‘selfie-portrait’, I’m more than happy with the image because it conveys a sense of myself as a creative person. Its origins lie in a serendipitous moment of distracted play, and I think that serendipity is one of the most important creative thinking techniques - ‘Chance favours the prepared mind’ (Louis Pasteur).


Say it like the Peanut Butter – My Version 1.0

This Say it Like Peanut the Butter assignment post will have a few iterations because now that I have gotten this far….. I WANT TO BE ABLE TO CREATE A REALLY COOL ONE WITH A MESSAGE!

As part of Unit 2 in ds106, the challenge assignment is to create an animated gif from a favorite or unfavorite movie. The bigger challenge is to find resources to help you learn how to create one. The assignment was created 4 years ago and it seems things have gotten a whole lot easier to pull out a clip and make a short animated gif. So easy in fact that I am not sure I learned too much on the first attempt other than I can cut down on a lot of time by using some of the tools available.

sayitlikepb

The movie I selected was “It’s a Wonderful Life”. This scene is where George realizes he does exist because his mouth is bleeding. Other scenes considered were him running up the stairs and the finial coming off, and the end where the bell rings for Clarence.

I have to admit – it took me a while to start to do this part of the unit because all I could think of was the early days of web page design and how blinking pages were the rage and then everyone settled down and they became the “what not to do” for good design. I think the animated gifs can be appropriate and useful  communication in digital stories if done with purpose and intent. So as with most creation and art – if it has purpose and meaning it will be good and of value. That being said – the exploratory gifs that come out of this assignment within the viewpoint of seeing if you can find resource, help, and the new ideas for your own learning and then share with others on the same journey is right on target and wonderful to see.

I have seen some pretty killer animated gifs in the ds106 Google+ community and some other places linked from ds106 so this first attempt is more the proof of looking for resources and trying them out to see if something can be created and to research and read about what animated gifs are and why to use them.

I found Jim Groom’s tutorial page and started to download the tools. In doing so the gif creator just showed up and made a gif for me when I thought I was downloading the video. ! I wasn’t able to eliminate frames. I would have liked to have taken about the first 7 out so that the hand motion was just the animation. When putzing with some duplicates – the gif would run once but not loop, I have my version 1.0 done so far.

This gif is the “cheater”, easy way out. but it really did spark the creative juices and desire to master the finer details. Using other tools to make it smoother, make it my own iteration so it doesn’t have a tool watermark, and some content of meaning to me. I want to get to Gimp and to Photoshop to try the creation. So I will continue to work on this assignment and create another more extensive gif. Stay tuned!

Below is actually my first attempt (or warm up attempt) before finding a movie. If using my own photos, I would improve by using a tripod so that the background and perspective stayed aligned. He was a good sport!

output_ThglMA

Animated Gif -

Tutorial: Post-It Notes And Grocery Lists!

1. Open paint program for your Operating System.

2. Create Post it note colored squares to replicate note pads.

3. Insert text and type in notes and lists for your character.

4. Change the text font to resemble handwriting (Example: Bradely Hand ITC)

5. Arrange the notes to look like a post it board.

6. Save as image file and upload to http://assignments.ds106.us/assignments/post-it-notes-and-grocery-lists/

7. Tag as VisualAssignments, VisualAssignments1505

Wanted Poster Tutorial

1. Find a photo of the individual wanted, and convert to black and white. Go to http://www172.lunapic.com/editor/?action=effect-bw if you don’t have software.

2. Go to http://www.mobilefish.com/services/wanted_poster/wanted_poster.php and upload the B/W photo you just created.

3. Fill in the information related to your character (Crime, Name, Contact #, Reward)

4. Once information is completed, click the “Generate” button

5. Right click and “Save As” to save your image.

6. Complete! Upload to: VisualAssignments, VisualAssignments1386 at http://assignments.ds106.us/assignments/wanted-poster/

Award show photo

snoopchris

The post award celebration photo of Chris and Snoop after they won the award for “Most Gangster Crime duo”

Not Just Another Face in A Hole

Tina, with Hair, Pigment, and Ray Ban Sunglasses, by @iamTalkyTina

Tina, with Hair, Pigment, and Ray Ban Sunglasses, by @iamTalkyTina

WELL! I am NOT just another Face in a Hole. 

But sometimes I think that someone (La kisha Mahone (@LKMahone) not saying any names)  is just stuck on trying to make a monkey of me. Because when I woke up this morning, I was another face in a hole of me and of monkeys from her.

So it reminded me again of a dark time and when I was making a movie (but just a bit part) — but I already told you that story.

So anyway, when I got made a monkey of the second time with the Face in a Hole, I just had to set the record straight again. Plus, make a GIF of it (actually, TWO). Because making a GIF of it makes it even more fun. And two GIFs makes it double the even more fun!

So anyway, up above here is my response to it. Now, I will tell you how I did it without that Face in the Hole thing.

First, I had to find the original image of some guy and monkeys (it is always good to attribute your sources) and so I used TinEye, the Reverse Image Search engine to do that. I found 50 results and selected this picture of Bruno Looking Stupid.

Instead of a Face in the Hole one which says Face in a Hole on it, I made one of me with my hair showing (so that I do not look like Thomas the Tank Engine) but I also coloured my hair to match the hair of my actor friends in their monkey costumes (so for that, I used the Colour Replace tool, plus another layer of me where I made the Brightness darker and the Contrast more of it). Then, because they had colour in their faces, I put colour in my face (even though I am from the Black and White TV times) — I can do that as a professional in the business with make-up and the such. I also used the Colour Replace tool for that, too, borrowing some face colour from the other monkeys for it.  Plus, because they were all wearing their cool-kid sunglasses from the set, I am wearing my sunglasses, too. So you don’t get any of that hair or colour or glasses with Face in a Hole.

Then, because just a regular picture sometimes needs a little sprucing up, plus for the exercise of making a GIF, plus for the fun and the Art of It, I decided that I needed to add some movement to the image. I remembered that Arthur C. Clarke was on the set that day playing with that bone, so I found this image of it on the Internet.

"2001 bone to spaceship cut scene" GIF

“2001 bone to spaceship cut scene” GIF from andrewsimone.com

Then, I put the GIF into photoshop and got rid of the sky parts so that I would just have the tumble bone. I also removed the spaceship part and set it aside so that I could use it later for the coupe de groom. That is like a coup de grace, but with Jim Groom instead, and transportation (that’s the coupe part).

So here is what it looks like when you use the Magic Tool to select something and then use the eraser to get rid of it. You just have the bone left.  (Note, this is just one frame, you have do do it for each frame of the bone in each active layer of it. So that takes a few minutes. But worth it!)

"Bone Isolation Technique" animated GIF by @iamTalkyTina

“Bone Isolation Technique” animated GIF by @iamTalkyTina

Next up was to insert the 25-odd animated bone frames into my static image, and re-create the situation from when the photo is purported to have been taken — me and my actor buds hanging out, with Arthur C. Clarke in the background practicing the bone scene. Look how surprised they all are at getting their picture taken with me.

"Not Just a Pretty Face in a Hole" animated GIF by @iamTalkyTina

“Not Just a Pretty Face in a Hole” animated GIF by @iamTalkyTina

Now, that is pretty much enough of it, because that is my @iamTalkyTina picture, plus a GIF the bone in the background. But remember, there is a coupe de groom coming up.

So back to the bone-spaceship GIF where we set aside the spaceship part for later? Now we get that back out and add in some Dancing Jim Groom from the Dancing Jim All Over the World assignment (Animated GIF Assignment 1001) and make it kind of like Slim Pickens in Dr. Strangelove or How I Stopped Worrying and Learned to Love the Bomb but with Jim Groom instead and on the bone-spaceship instead of the bomb.

"Dancing Jim Groom Around the World on the 2001 Bone Spaceship" animated GIF by @iamTalkyTina

“Dancing Jim Groom Around the World on the 2001 Bone Spaceship” animated GIF by @iamTalkyTina

So that is what can come from invoking me, @iamTalkyTina in a blog post. Or if you make a monkey of me. And it shows just how much learning can come after a simple Face in the Hole.

Well, bye!

Splash The Color – Fruit Roll-ups

Earlier in the week I completed Splash The Color for Fruit Roll-up Friday, a promotion for Wagstaff Snack company. It was relatively easy seeing that I did it before. First I uploaded the picture to adobe photoshop and then magnetic lassoed the area I wanted to keep color. Once that was done I then selected the inverse of the area I lassoed. Next, I removed the color by selecting the “Enhance Tab” then “Adjust Color” and then “Remove color.” Or Shift+Ctrl+U. Then then removed the color I did not want and left my Splash of color.


Fruit Roll-Up Friday!


3 stars

Spot the Difference and Win Snacks!

I completed the Where’s The Error assignment on behalf of Wagstaff Snacks. As a promotional effort he is offering FREE snacks for the first person to spot the difference in the 2 photos. Using photoshop I was able to change a small part of the picture but that is all I will say for now.


Can You Spot The Difference?


3.5 stars