Tutorial 2: Post-it Notes and Grocery Lists

This was a pretty easy assignment, but it was also pretty fun because you get to pretend to be someone else. For my character from the Wire I tried to make his notes as tuned into his life as possible and what I knew about him or could imagine him to be. To do this project I used the “stickies” application on my Mac, but websites such as canva.com, or even Photoshop could work as well with squares or even photos of the post-its. Then I just thought like my character and typed away! Each set will look different which is pretty cool!

Screen Shot 2014-12-03 at 12.30.46 AM

WANTED

This assignment was perfect for Herc. Marlo stole Herc’s video camera, which Herc is risking his job over.

Wanted!

Process:

I used this website to create this poster. I downloaded the image of an old fashioned camera and the just uploaded it.

Cutty’s World

For 3.5 stars I did color isolation from the visual assignment “Focus on One Color”. After attempting to do this first in GIMP I ran into time constraints so I settled with Pixlr after watching this tutorial. I captured all the brown(with the exception of the color of my skin) a key color in my world the end result is below:

Cuttys World

All kinds of courage

When I think of Bunny Colvin, I don’t really picture an artistic person. It’s challenging to think of assignments that relate to his role on The Wire. But a certain scene from Season 4 episode 11 inspired me.

Word clouds seem to be a pretty big thing today. And so I was surprised to not see an assignnment for it on the database. So naturally, I decided to add it myself. I used the words from the examples the corner kids gave for “courage” as the basis for Colvin’s very own word cloud. I sued the wordle site to generate the cloud from the words, and I chose a color scheme and font I felt matched the emotion of the corner kids and the professionalism of Bunny Colvin.


Difficulty: 3 stars

Moving On

The Visual Assignment “Before and After” is about combining the past and present into a single image.  I chose to do that with an image in a rear view mirror (that I placed there with the help of Photoshop).  Here we have someone looking forward to what is down the road in the future of […]

Wanted: Stringer Bell

For my final assignment this week for my final project, i decided to do “WANTED Poster” assignment worth 2 stars. I attempted to do this assignment earlier in the semester but i found it to be a little too difficult. Now that i’m super awesome with GIMP, i figured i could try it out again and maybe finish it! Instead of using a website to create this poster, i did it myself through GIMP. It wouldn’t have been as fun if i just did it with a generator. Similar to all my other visual assignments, i was forced to cut out a picture of Stringer. Now, the assignment said to choose a photo where just the head is showing. I wanted to capture a picture where you could see Stringer’s intelligence and his overall macho body. I googled some photos and found this one. I thought it was the perfect fit because he was wearing his glasses and he just looked like he was in control.

Stringer

Now the next steps weren’t so hard. I cut out his body, well, the parts that i wanted, and exported it as a PNG. For more details, check out my past post that goes step by step for cutting and cropping! Otherwise, let me tell you how i added his face to the WANTED poster. I had to google “WANTED posters” and chose a poster big enough for Stringer’s body. I ended up choosing this one because it was just a good fit (you’ll see in the final piece). Now, what makes wanted posters so famous is obviously the font. I went to dafont.com and chose “Rio Grande” bold and went with just a simple black color because it just fit well. I opened up both pictures in layers and added Stringer to the picture then added the words. It was actually hard for me to decide what to write. I mean, they always wanted to catch Stringer but never really could. That’s what made it so disappointing. I ended up going with something smart because that’s just what Stringer is. Smart. Now, take a look at my final piece!

Wanted: Stringer Bell

Stars: 2

Stringer and McNulty: BFFLs

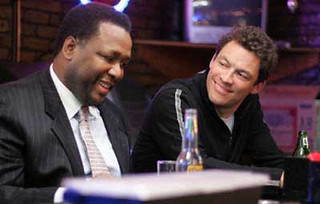
Strange, right? McNulty and Stringers becoming best friends. I remember the first time in The Wire where they talked and Stringer drew that mean picture. Anyways, maybe they were best friends at one point. Like Professor Xavier and Magneto, yeah? Who knows. For my first assignment with my Final Project, i chose the “Opposites Attract Meme”. GIMP is by far my favorite application to use for photo editing so i’ve kind of gotten the hang of it. Just because i’m good with GIMP doesn’t mean this assignment was easy! I already knew how to do the whole crop head thing. I did a tutorial on it in the beginning of the semester, here! My biggest issue was trying to choose the right photo. There are few scenes with McNulty and Stringer, yet alone one where they are both having a good time. I ended up choosing a photo of McNulty and Bunk hanging out at the bar, as usual.

Original Bar Scene

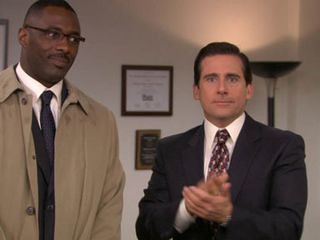
Now, Bunk’s facial structure is way different from Stringer’s. Let’s just say Bunk’s face is a bit more round. So i had to morph stringers face a little bit and smudge some of his face to make it look KIND of normal. I’m not a fantastic photo editor so you can see where there are some mess ups. My next step was to choose a picture of Stringer that was from a similar angle and looked good for this bar scene. I went through a couple of google images pages until i found this gem. It’s not from The Wire but from The Office instead. There wasn’t too much of a difference. I think this Stringer may have more grey hair but that’s all. After i cut out his head, i saved it and added it to the bar scene. I’ll repost some directions below. Here’s the original picture of Stringer!

stringer bell smiling

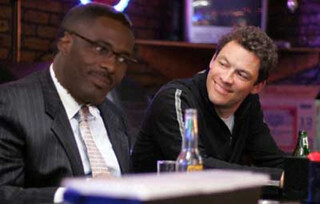
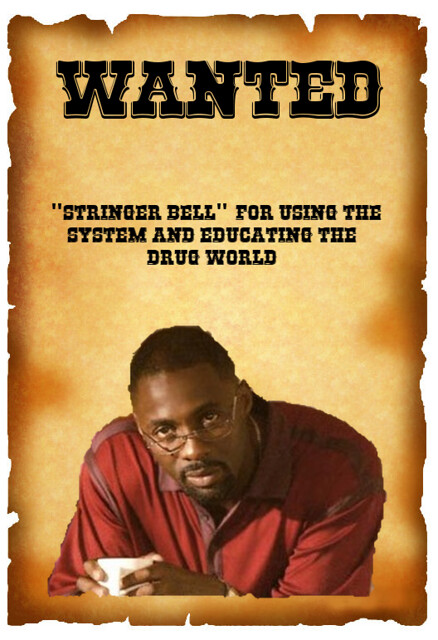
Now after a couple of hours of work, here’s the final piece! Opposites do attract!

A New Friendship

Instructions:

Death (Process)

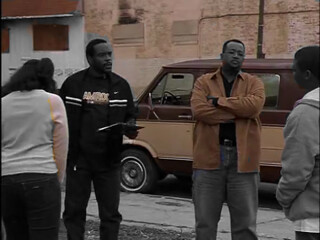
Like I said, this thing was the hardest to make considering i’ve never used GIMP before, except for the GIfs and we all know how those turned out
 My first step was to find the right picture of Will Smith and Jada. Just look at their bodies. They look so happy and Jada is enjoying a snow cone of some sort. What else could you ask for? Then came Avon and Stringer. Avon was the easiest head to crop because it worked the first time. Here are the steps for cropping:

Cut Head:

What I did here was open GIMP and chose the scissor icon thinking it would cut, and yes, it did! I cut around Avon and Stringer’s heads. After not knowing what to do next, I watched this tutorial which helped me a lot.

Layers: As the tutorial says, you go under the “Layer” menu and choose transparency then choose “Add Alpha” which I did.

Select: Now you go under the “Select” menu and choose “Invert”. After invert you now have the background selected. Now go under “Edit” and press clear.

DON’T FORGET PNG LIKE ME!: Now, Please
 Please
 don’t forget to save the image as a PNG so the background is not white. I was stuck on this for almost 2 hours wondering why my background wasn’t transparent. Then after emailin/tweeting/bothering Groom, he gave me his words of wisdom. Keep in mind, this whole process is just for cutting the heads out
. There’s more.

Open As Layers: Yes, open the pictures as layers. From here, you select the tool that is for moving layers and you shift the floating heads over the bodies of the soon to be headless. That’s really all it takes. I wish i could say that with more sincerity but this process was frustrating for me. Hopefully you will avoid frustration.

Stars: 4

Architecture/Landscape Then And Now

I created the Architecture/Landscape Then And Now Visual Assignment. I wanted to do this because I enjoyed blending then and now pictures of UMW last year for my senior history seminar called Adventures in Digital History.

Here’s the description of the assignment:

“Much like other then and now assignments, this assignment requires an old photo and a current photo. The difference is that the blended photo must be a landscape or include architecture, so a building, house, etc. People aren’t the only things that change over time! If you don’t have old photos, find one through Creative Commons! ”

Example: http://thenandnow.umwhistory.org/all/blended-ball-hall/

thenandnowds106

twitterredditpinterestlinkedinmail

A Day in the Life of Frank


In the perfect day, I would wake up early.

alarm clock


I would wake up my son, Ziggy.

wake up son

I’d get him ready for school and take him to the bus stop. That’s his best friend Sarah.


bus stop

Then I’d go to work. I love my job, but lately there have been issues with one of my workers. I can’t wait until Ziggy is old enough to work here so I can fire these idiots. Ziggy will be a great worker.

194867_1.1

After a long day of work, I’d pick up Ziggy from school.

Parent Pick Up Line

I’d take him to soccer practice. His team is very good and his coach is one of the best in the city of Baltimore!

soccer practice

After a hard soccer practice, Ziggy and I will come home and I’ll make him our favorite meal, chicken with a side of mac and cheese and some green beans.

dinner

Finally, I’d kiss him goodnight and know we get to do it all over again tomorrow!

put son to bed


Life as a Dog

I decided to create my own assignment, so I was thinking of something that would be fun to do. I thought about what it would be life if I spent a day as an animal. Of course, I did a day in the life of a Niepokoj dog.

I thought about what I would like to do as a dog. First, it would be to wake up my owner, and then cuddle in bed.  After that I would take a bath, then get dressed. Once that was done, I would like to go out and play in the snow since it is winter. Then I’d want to go take a car ride around town. After going for a drive, I’d be too excited I would need to play. Then I’d get nice and tired and it is time for bed.


Process:

This took a little bit longer. I went through all my pictures and videos to find the perfect ones to fit it. Once I picked the pictures or videos, I ordered them in the outline I talked about above in my thought process. This took a little while because I didn’t know how to drag the clips, it kept trimming them. I found this website extremely helpful.

Now, I picked the theme ‘filmstirp‘ in iMovie and had to add some music. I downloaded ‘Let’s Go’ for when the pictures were about going in the car. I used the other theme music from the preloaded sound effects on iMovie.